Enlarging images in Photoshop is a common task, whether for print or digital display. While Photoshop offers powerful resizing tools, understanding the process is crucial to maintain image quality. This guide provides a step-by-step approach on how to make photos bigger in Photoshop without significant quality loss.
 Opening the image size dialog box in Photoshop
Understanding Image Resizing in Photoshop
Before diving into the steps, it’s important to grasp the fundamentals of image resizing. Enlarging an image involves adding new pixels, which can lead to blurring or pixelation if not done correctly. Photoshop uses interpolation algorithms to create these new pixels, and choosing the right method is key. Additionally, cleaning up any dust, scratches, or noise before enlarging is recommended, as these imperfections will be magnified.
Step-by-Step Guide to Enlarging Images
-
Open Your Image: In Photoshop, go to
File > Openand select the image you want to enlarge. -
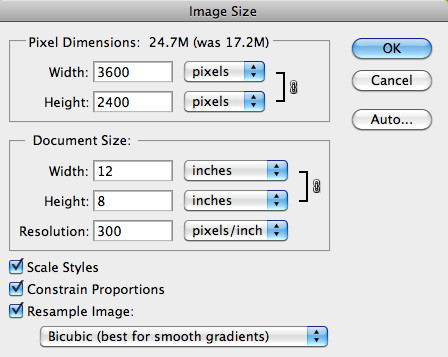
Access Image Size Dialog Box: Navigate to
Image > Image Size. This will open a dialog box containing all the essential resizing controls.
 Changing the image size in Photoshop
-
Adjust Dimensions: You can modify the image size by entering new values for:
- Pixel Dimensions: This changes the total number of pixels in the image, directly impacting its resolution.
- Document Size: This alters the physical dimensions (e.g., inches, centimeters) of the image for printing.
- Resolution: This determines the pixel density (pixels per inch or PPI). Higher resolution means more detail but a larger file size. Keep the resolution at 300 PPI for high-quality prints. For web use, 72 PPI is generally sufficient.
-
Choose the Right Resampling Method: This setting dictates how Photoshop generates new pixels when enlarging. The “Bicubic Smoother” method is generally recommended for enlargements as it produces smoother results, especially with images containing noise. “Bicubic” is ideal for images with smooth gradients. Experiment to see which method works best for your specific image.
-
Constrain Proportions: Ensure the “Constrain Proportions” link icon (chain) is active to maintain the original aspect ratio of your image. This prevents distortion when resizing.
-
Preview and Confirm: Before finalizing the changes, preview the resized image within the dialog box. If satisfied, click “OK” to apply the enlargement.
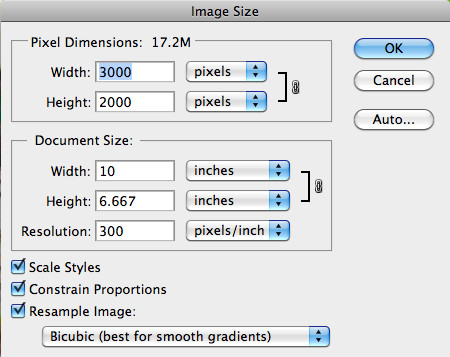 Comparing the original and enlarged image sizes in Photoshop
Best Practices for Enlarging Images
- Avoid Extreme Enlargements: While Photoshop can enlarge images significantly, excessive upscaling will inevitably lead to quality degradation. Start with the highest resolution image possible.
- Sharpen After Resizing: After enlarging, you might need to sharpen the image slightly using Photoshop’s sharpening tools to compensate for any softening caused by interpolation. Be subtle with sharpening to avoid introducing artifacts.
- Experiment and Save Iterations: Don’t be afraid to experiment with different resampling methods and settings. Save multiple versions of your resized image to compare results and choose the best option.
By following these steps and understanding the underlying principles, you can successfully enlarge your photos in Photoshop while minimizing quality loss and achieving the desired results for your project.