Creating personalized stickers from your photos is a fun way to enhance your messages, social media posts, and more. This guide provides a step-by-step approach on How To Make Photo Stickers directly on your iPhone using the built-in Photos app. You’ll learn how to create both static and animated stickers, add effects, and even delete them.
Creating Static Photo Stickers
Transforming a photo into a sticker is a simple process. Here’s how:
-
Open the Photos App: Launch the Photos application on your iPhone.
-
Select Your Photo: Choose the photo you want to use to create your sticker and tap it to view it in full-screen mode.
-
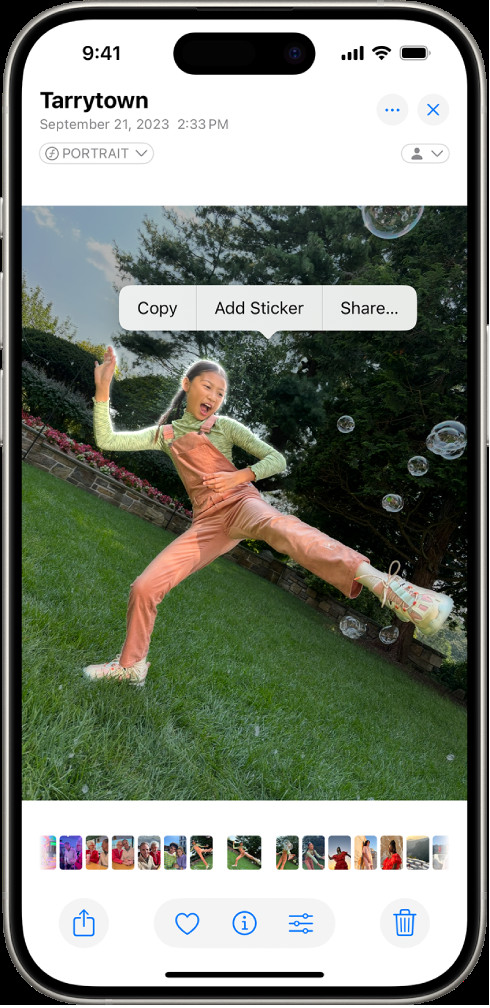
Isolate the Subject: Touch and hold your finger on the subject of the photo. You’ll see a shimmering effect around the subject indicating it’s been selected. Lift your finger.
-
Add the Sticker: Tap the “Add Sticker” option that appears. This action automatically saves the isolated subject as a sticker.
-
Access Your Sticker: Your new sticker will be available in the sticker menu accessible through your iPhone keyboard and Markup tools.
-
(Optional) Add Effects: Customize your sticker with visual effects like Outline, Comic, or Puffy by tapping “Add Effect.”
 A person is selected in the Photos app with the "Add Sticker" option highlighted.
Making Animated Stickers from Live Photos
If you have a Live Photo, you can create an animated sticker:
-
Open the Live Photo: In the Photos app, select and open the Live Photo you wish to use.
-
Select and Duplicate the Subject: Touch and hold the subject of the Live Photo. Slide your finger upwards until a duplicate of the subject appears, then release.
-
Add the Animated Sticker: Tap “Add Sticker.” The animated sticker is now saved.
-
Access and Use: Find your animated sticker in the sticker menu accessible via the keyboard and Markup.
-
(Optional) Apply Effects: Just like static stickers, you can add visual effects to animated stickers using the “Add Effect” option.
Removing Unwanted Stickers
Deleting a sticker you no longer need is straightforward:
-
Open a Photo for Editing: In the Photos app, open any photo and tap “Edit.”
-
Access the Stickers Menu: Tap the Markup button (the circle with a pen tip inside), then tap the Add button (the plus sign).
-
Delete the Sticker: Tap “Add Sticker,” then touch and hold the sticker you want to remove. Tap “Remove” to delete it.
Syncing Your Stickers
Your custom stickers are synced across your iCloud-connected devices – iPhone, iPad, Mac, and Apple Vision Pro – as long as you’re signed in with the same Apple ID. This ensures your personalized stickers are always available.

