Microsoft Excel’s “Picture in Cell” feature offers a dynamic way to embed images directly into worksheet cells. Unlike traditional floating pictures that sit above the grid, pictures in cells move and resize with the cell itself, maintaining perfect alignment and organization within your spreadsheets. This functionality is incredibly useful for creating visually engaging reports, inventories, employee directories, or any Excel sheet where visual context enhances data interpretation.
This guide will walk you through various methods to insert photos into Excel cells, ensuring you can leverage this feature effectively to improve your spreadsheet presentations and data handling. Excel supports a wide range of image formats for in-cell pictures, including JPG/JPEG, PNG, BMP, ICO, WEBP, TIF/TIFF, and GIF (static GIFs). Let’s explore how to use this feature to its full potential.
Inserting a Picture from the Excel Ribbon
The most straightforward way to insert a picture into an Excel cell is through the ribbon interface. Here’s how:
-
Navigate to the Insert Tab: Open your Excel workbook and go to the “Insert” tab located on the Excel ribbon.
-
Access the Illustrations Menu: In the “Insert” tab, find the “Illustrations” group and click on the “Pictures” dropdown menu.
-
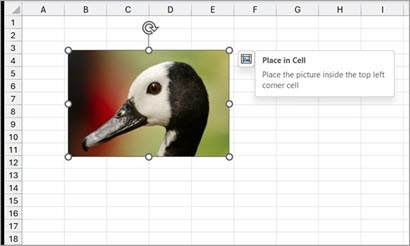
Choose “Place in Cell”: From the “Pictures” dropdown, select the “Place in Cell” option. This is crucial for embedding the image within the cell rather than as a floating object.
-
Select Picture Source: Excel provides three options for sourcing your image:
- This Device: Choose this option to insert a picture from your computer’s local storage. Navigate to the folder containing your image, select the file, and click “Insert”.
- Stock Images: Access Microsoft’s library of stock images. Browse or search for an image that suits your needs, select it, and click “Insert”.
- Online Pictures: Insert images directly from the web using Bing image search. Type keywords to find relevant images online, select one, and click “Insert”.
-
Image Insertion: After selecting your image and clicking “Insert,” the picture will be placed directly into the currently active cell. If you selected multiple images, they will be inserted into subsequent cells down the column, starting from the active cell.
 Insert Picture in-cell in Excel three version two.jpg
Inserting Multiple Pictures at Once
Excel streamlines the process of inserting multiple images into cells simultaneously. This is especially useful when you need to populate a list or directory with several images at once.
- Select Picture Source: Follow steps 1-3 from the “Inserting a Picture from the Excel Ribbon” method to reach the “Insert Picture From” dialog.
- Select Multiple Images: In the file explorer or image selection window, hold down the Ctrl key (or Command key on Mac) and click on each image you want to insert.
- Insert Images: Click the “Insert” button. Excel will insert each selected image into consecutive cells, starting from the active cell and moving downwards in the column. Note that this action will overwrite any existing data in the cells where images are inserted.
Pasting a Picture Directly into a Cell
If you have copied an image to your clipboard from any source (another document, website, or image editing software), you can directly paste it into an Excel cell as a “Picture in Cell”.
- Copy the Image: Copy the desired image to your clipboard (e.g., right-click on an image and select “Copy Image”).
- Select the Target Cell: In Excel, click on the cell where you want to insert the picture.
- Paste as Picture in Cell: Right-click within the selected cell to open the context menu. Under “Paste Options,” choose the “Paste Picture in Cell” icon (it typically looks like a picture frame within a cell).
Using the standard paste command (Ctrl+V or right-click “Paste” without choosing the “Paste Picture in Cell” option) will paste the image as a floating picture, positioned over the cells, not within the cell itself.
Converting a Floating Picture to a Picture in Cell
If you already have images in your spreadsheet that are floating over cells, you can easily convert them to “Pictures in Cells.”
- Select the Floating Picture: Click on the picture you want to convert. This will activate the “Picture Format” tab in the Excel ribbon.
- Choose “Place in Cell”: In the “Picture Format” tab, locate the “Place in Cell” button and click it. The floating picture will be repositioned and embedded into the cell it was originally overlapping, usually the top-left cell it covered.
Alternatively, you can right-click on the floating picture and select “Place in Cell” directly from the context menu.
Switching Back to a Floating Picture (Picture over Cells)
If you decide you want to revert a “Picture in Cell” back to a floating picture that sits over the grid, the process is just as simple.
- Select the Picture in Cell: Click on the cell containing the picture.
- Access Picture in Cell Options: Right-click on the cell to open the context menu. Hover over the “Picture in Cell” option in the menu.
- Choose “Place over Cells”: From the submenu that appears, select “Place over Cells.” The picture will now become a floating image, positioned above the cell grid, allowing you to move and resize it independently of the cell.
Enhancing Accessibility with Alt Text for Pictures in Cells
For accessibility and SEO best practices, it’s crucial to add alternative text (alt text) to your images. Alt text provides a textual description of an image for screen readers, assisting visually impaired users in understanding the image content. It also helps search engines understand the context of the image, which can be beneficial if your Excel sheets are shared online or converted to web pages.
- Select the Picture in Cell: Right-click on the cell containing the picture.
- Open Alt Text Pane: From the context menu, select “View Alt Text.” This will open the “Alt Text” pane on the right side of the Excel window.
- Write Descriptive Alt Text: In the “Alt Text” pane, type a concise and descriptive explanation of the picture. Focus on conveying the essential information and context of the image. For example, if the picture is a product image in an inventory list, the alt text could be “Image of Product Name – [Product Code]”.
By adding meaningful alt text, you make your Excel spreadsheets more accessible and improve their overall usability for everyone.
Incorporating pictures into Excel cells offers a powerful way to visualize data and enhance the clarity of your spreadsheets. Whether you’re creating a product catalog, an employee directory, or simply want to add visual cues to your data, mastering the “Picture in Cell” feature can significantly improve your Excel skills and the effectiveness of your documents.
