Live Photos on your iPhone bring your still images to life by capturing a few moments before and after you snap the picture. This feature not only adds motion and sound but also offers creative editing possibilities. You can easily adjust your Live Photos to select the perfect key frame, apply fun effects, and enhance your memories. This guide will walk you through everything you need to know about How To Edit Live Photos on your iPhone, making your dynamic photos even more engaging.
Understanding Live Photos
Before diving into editing, it’s helpful to understand what a Live Photo is. When you take a Live Photo, your iPhone records a short video clip – 1.5 seconds before and after the moment you press the shutter. This creates a moving image that you can interact with. Think of it as a very short video embedded within a photo. These dynamic images offer more depth and context than traditional still photos, capturing fleeting moments in a more immersive way.
How to Take a Live Photo
Taking a Live Photo is as straightforward as taking a regular photo. Here’s how to ensure you capture your moments in motion:
-
Open the Camera app: Launch the Camera app on your iPhone.
-
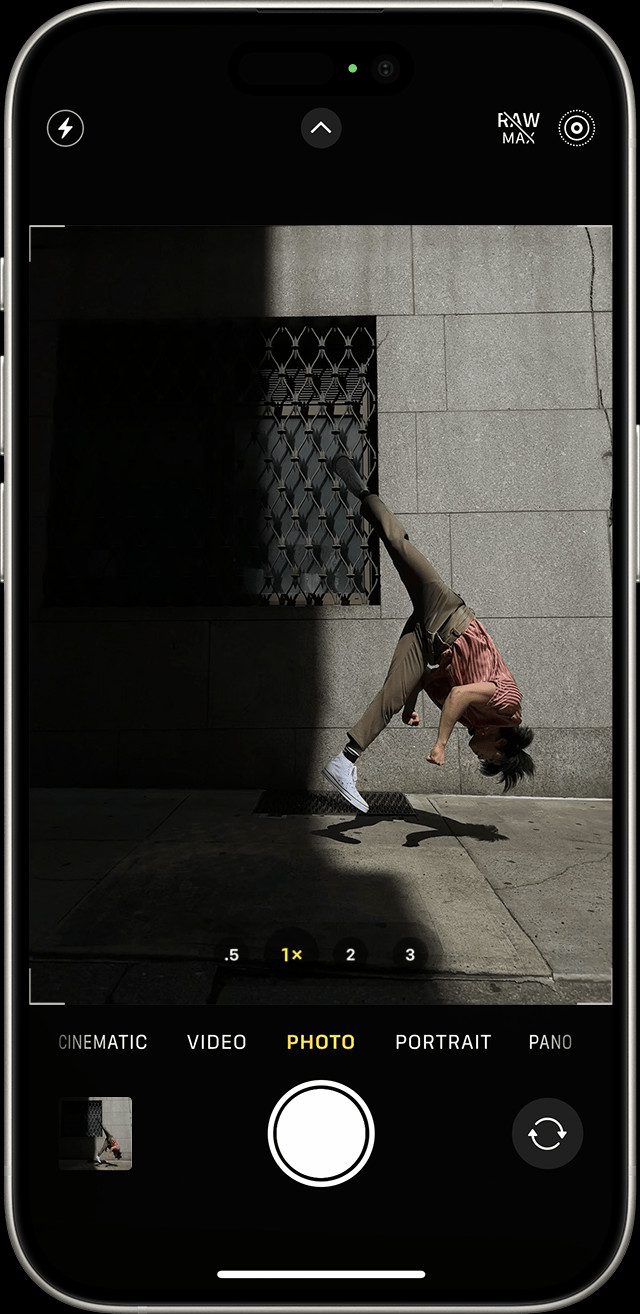
Verify Photo Mode and Live Photos are Active: Ensure your camera is set to Photo mode. Look for the Live Photos button at the top right of your screen. If the icon is yellow, Live Photos is on. If it’s white with a slash through it, tap the button to activate it.
 Enabling the Live Photo feature in the Camera app on iPhone.
 -
Hold Still: Keep your device steady as you’re about to take the photo.
-
Tap the Shutter Button: Press the shutter button to capture your Live Photo.
Live Photos is often enabled by default on iPhones, so you might already be capturing them without realizing it!
Finding and Playing Your Live Photos
Once you’ve taken some Live Photos, here’s how to find and view them in your Photos app:
-
Open the Photos App: Launch the Photos app from your iPhone’s home screen.
-
Navigate to Live Photos Album: Scroll down in the Albums view to the “Media Types” section and tap on “Live Photos”. This album automatically collects all your Live Photos.
 Navigating to the Live Photos album within the Photos app on iPhone.
 -
Open a Live Photo: Tap on a photo to open it. It will appear as a still image initially.
-
Play the Live Photo: Press and hold your finger on the screen. The photo will come to life, playing the short motion video and sound captured.
Editing Your Live Photo: Changing the Key Photo
One of the first edits you might want to make is changing the key photo. The key photo is the still image that represents your Live Photo when it’s not playing. You can choose a different frame from the Live Photo to be the key photo:
- Open and Edit: Open the Live Photo you want to edit and tap “Edit” in the top right corner.
- Access Live Photo Options: Tap the Live Photos button at the bottom of the screen.
- Select a New Frame: A slider will appear showing the frames of your Live Photo. Drag the slider to choose a new frame.
- Set as Key Photo: Release your finger from the slider and tap “Make Key Photo”. This selected frame is now the still image for your Live Photo.
- Finish Editing: Tap “Done” to save your changes.
You can also toggle the Live Photo effect on or off during editing. Tapping the “LIVE” button at the top of the screen will disable or re-enable the Live Photo motion effect.
Adding Fun Effects to Live Photos
Beyond changing the key photo, you can add creative effects to your Live Photos to make them even more dynamic and interesting:
-
Open the Live Photo: Select the Live Photo you wish to enhance.
-
Access Effects Menu: Tap the Live Photos button near the top left corner of the screen.
-
Choose an Effect: Select from three different effects:
- Loop: This effect turns your Live Photo into a repeating video loop, playing continuously. It’s great for capturing ongoing motion like waves or bustling city scenes.
- Bounce: Bounce makes your Live Photo play forward and then in reverse repeatedly, creating a back-and-forth animated effect. This can be fun for actions like jumping or a pet shaking its head.
- Long Exposure: This effect simulates a long exposure shot, blurring motion like water or light trails, similar to what you might achieve with a DSLR camera. It’s perfect for waterfalls, fireworks, or capturing light movement at night.
Experiment with each effect to see which best complements your Live Photo and the moment you captured.
Advanced Editing Adjustments
Like regular photos, Live Photos can also be adjusted for exposure, color, and more. However, remember that editing in third-party apps might remove Live Photo effects. Here’s how to make basic adjustments within the Photos app:
- Open the Live Photo: Choose the Live Photo you want to adjust.
- Tap Edit: Tap the “Edit” button at the top right corner.
- Make Adjustments: Use the editing tools to adjust aspects like brightness, contrast, color, and filters. These adjustments apply to the entire Live Photo, including the motion part.
- Save Changes: Tap “Done” to save your edited Live Photo.
Sharing Live Photos
Sharing your Live Photos allows others to experience the motion and sound you captured. Here’s how to share them:
- Select Photo and Share: Open the Live Photo you want to share and tap the “Share” button in the bottom left corner.
- Choose Share Option: Select how you want to share your photo, such as via Messages, AirDrop, social media, or email.
- Share as Still Image (Optional): If you only want to share the still photo and not the Live Photo effect, tap “Live” in the top left corner before sharing. This will convert it to a still image for sharing. Note that sharing via email will also send it as a still image.
When recipients receive your Live Photo via Messages on another iPhone or iPad, they can press and hold to play the Live Photo. On a Mac using Messages, double-clicking the Live Photo will play it once, and clicking the “LIVE” button replays it.
Turning Live Photos On and Off
While Live Photos is a fun feature, there might be times when you prefer to take still photos to save storage space or for specific photographic needs. You can easily turn Live Photos off:
- Temporary Turn Off: In the Camera app, tap the Live Photos button. When the button shows a slash through it, Live Photos is off for the current session. However, it usually turns back on automatically the next time you open the Camera app.
- Permanent Turn Off: To keep Live Photos off persistently:
- Go to “Settings” on your iPhone.
- Scroll down and tap “Camera”.
- Tap “Preserve Settings”.
- Toggle the switch next to “Live Photo” to the on position (green). This setting will preserve your last Live Photo setting, keeping it off if you turned it off last time.
By mastering these editing techniques, you can take full advantage of the Live Photos feature on your iPhone, transforming everyday snapshots into dynamic memories. Experiment with effects, adjust key photos, and share your lively creations with friends and family to bring your photos to life.