Deleting photos on your Mac can be done in a few simple steps, but it’s important to understand how your photo library is set up and where your photos are stored. This guide will walk you through different methods of deleting photos on a Mac, ensuring you only remove the images you intend to.
Understanding Your Mac Photo Library
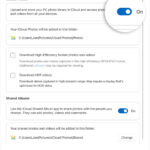
Before deleting photos, it’s crucial to know if you’re using iCloud Photos. iCloud Photos syncs your entire photo library across all your Apple devices signed in with the same Apple ID. Deleting a photo on your Mac will also delete it from your iPhone, iPad, and iCloud.com if you have iCloud Photos enabled. If you don’t use iCloud Photos, your Mac’s photo library is stored locally, and deleting photos will only affect your Mac.
Methods for Deleting Photos on Mac
1. Deleting Photos from the Photos App
- Open the Photos app: Locate and launch the Photos app on your Mac.
- Select the Photos to Delete: Click on the photo(s) you want to remove. To select multiple photos, hold down the Command key while clicking.
- Delete the Photos: Press the Delete key on your keyboard or right-click and select “Delete Photo.” You’ll be asked to confirm the deletion.
2. Deleting Photos from Finder
You can also delete photos directly from Finder, bypassing the Photos app:
- Locate Your Photo Library: Your photo library is typically found in the Pictures folder. It’s named “Photos Library.”
- Right-Click and Show Package Contents: Right-click on the “Photos Library” and select “Show Package Contents.”
- Navigate to Masters Folder: Inside the package contents, find and open the “Masters” folder. This folder contains the original, full-resolution images.
- Delete the Photos: Locate and delete the desired photos. Caution: Deleting files from here permanently removes them from your library.
Recovering Deleted Photos
If you’ve accidentally deleted a photo, check the “Recently Deleted” album in the Photos app. Photos remain in this album for 30 days before being permanently deleted. You can recover them from there. If you’ve deleted photos from Finder, you may be able to recover them from your Time Machine backup if you have one configured.
Tips for Managing Your Photo Library
- Regular Backups: Regularly back up your Mac to ensure you don’t lose precious photos. Use Time Machine or another backup solution.
- External Hard Drives: Consider storing your photos on an external hard drive to free up space on your Mac.
- iCloud Photos Storage: If using iCloud Photos, manage your iCloud storage to avoid running out of space.
Conclusion
Deleting photos on your Mac is a straightforward process, but understanding where your photos are stored and the implications of deleting them is essential. By following these steps and tips, you can effectively manage your photo library and ensure your memories are safe.