Shutterfly is a popular platform for creating personalized photo products like photobooks, prints, and gifts. Managing your photos within Shutterfly projects is crucial, and sometimes you need to remove photos you no longer want to use. If you’re finding it tricky to delete photos from your Shutterfly projects, you’re not alone. This guide will walk you through the simple steps to effectively delete photos and troubleshoot common issues.
Understanding the Basics of Photo Deletion in Shutterfly
Before diving into the steps, it’s important to understand how Shutterfly organizes photos within a project. When you upload photos for a project, they are typically stored in a photo tray or filmstrip at the bottom of your project interface. These are the photos you can drag and drop onto pages or delete if you decide not to use them.
Step-by-Step Guide to Delete Photos from Shutterfly
Deleting photos from Shutterfly projects is generally straightforward. Here’s how to do it:
-
Open Your Shutterfly Project: Navigate to your Shutterfly account and open the project you want to edit. This could be a photobook, photo album, or any other customizable project.
-
Navigate to Individual Page View: This is a crucial step. Many users encounter issues when trying to delete photos while in an “All Pages” view or a spread view. Ensure you are viewing a single page within your project. This usually involves double-clicking on a page to enlarge it to a single-page view.
-
Select the Photo: At the bottom of your screen, you’ll see the filmstrip of photos you’ve uploaded to your project. Scroll through these images and locate the photo you wish to delete. Click on the photo to select it. You should see a blue outline appear around the selected image, indicating it is active.
-
Press the Delete Key: Once the photo is selected (outlined in blue), simply press the “Delete” key on your keyboard. This key is usually located in the upper right area of your keyboard and might be labeled “Delete” or have an arrow symbol. Pressing this key will remove the selected photo from your project’s photo tray.
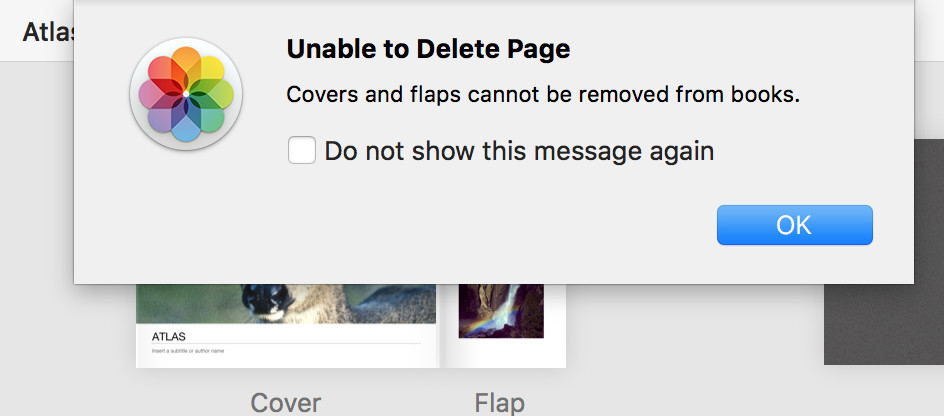 Shutterfly error message 'unable to delete page' when trying to delete a photo from the flap in All Pages view, highlighting the need to switch to individual page view for photo deletion.
Troubleshooting Common Issues When Deleting Photos
Sometimes, you might encounter problems when trying to delete photos. Here are a few common issues and how to resolve them:
-
“Unable to delete page: covers and flaps cannot be removed from books” Error: This error typically occurs when you are in the “All Pages” view and attempt to delete a photo, especially from the cover or flap of a photobook. As mentioned earlier, ensure you are in the individual page view before attempting to delete photos. Double-click on the page to enter this view.
-
No Delete Button in Menu: You might be looking for a “delete” button within a right-click menu or project interface. However, Shutterfly primarily uses the “Delete” key on your keyboard for photo deletion. There isn’t usually a visible “delete” button within the software interface for individual photos in the tray.
-
Photos Still Appearing in Project: If you’ve deleted a photo but it seems to reappear, double-check that you have actually selected the photo in the photo strip at the bottom and then pressed the “Delete” key. Also, ensure you are not trying to delete a photo that is actively placed on a page. You need to delete it from the photo tray first, then remove it from the page if it’s placed there.
Conclusion
Deleting photos from Shutterfly projects is generally a simple process using the “Delete” key once you’ve selected the image from the photo tray in the individual page view. By following these steps and understanding common issues, you can easily manage your photos and keep your Shutterfly projects organized and clutter-free. Remember to always work in the individual page view for smooth photo deletion.