Cropping a photo is a fundamental image editing skill that can dramatically improve your pictures. By removing unnecessary edges and focusing on the subject, you can create more impactful and visually appealing images. On a Mac, you don’t need to download any extra software to perform this task. Preview, macOS’s built-in image viewer and editor, offers a straightforward and efficient way to crop your photos. This guide will walk you through the simple steps to crop a photo using Preview on your Mac.
To begin, locate the image you wish to crop in Finder. Once you’ve found it, double-click the image file. This will open the image in Preview, the default image viewer for macOS.
Next, you’ll need to activate the Markup Toolbar to access the cropping tools. If you don’t see a toolbar with editing icons at the top of the Preview window, navigate to the View menu in the menu bar at the top of your screen and select Show Markup Toolbar. This will reveal a set of editing tools directly in Preview.
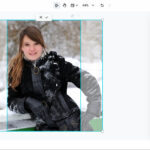
Once the Markup Toolbar is visible, look for the Selection tool. It’s typically the first icon on the left side of the toolbar and looks like a rectangle with a dotted outline. Click on this Selection tool to activate it.
With the Selection tool active, position your cursor at one corner of the area you want to keep in your photo. Click and drag your mouse to create a rectangular selection around the portion of the image you want to crop. As you drag, a dashed rectangle will appear, outlining your selected area. Adjust the selection by dragging the edges or corners of the rectangle until it precisely frames the part of the image you want to retain after cropping.
After you’ve made your selection, locate the Crop button in the Markup Toolbar. It’s usually positioned in the middle of the toolbar and is represented by a rectangle with overlapping corner brackets. Click the Crop button. Preview will immediately remove the areas outside of your selection, effectively cropping your photo to the selected area.
Finally, to save your cropped image, go to the File menu in the menu bar and select Save. This will save the cropped version of your photo, overwriting the original file unless you choose “Export” to save it as a new file. Now you have a perfectly cropped photo, ready to be used as needed.
In addition to cropping, Preview also allows you to easily resize images. If you need to reduce the file size of your image or adjust its dimensions for web use or sharing, you can find the Adjust Size option under the Tools menu in Preview. This feature lets you change the width and height of your image in pixels, ensuring your photos are perfectly sized for any purpose.