Resizing images in Photoshop is crucial for various tasks, from preparing photos for print to optimizing them for web use. This tutorial provides a step-by-step guide on how to change the size of a photo in Photoshop, covering essential techniques and best practices for maintaining image quality.
 Opening the image size dialog box in Photoshop
Photoshop offers powerful tools for resizing images while preserving detail. Whether you need to enlarge or reduce an image’s dimensions, understanding the different options and techniques is essential for achieving optimal results.
Accessing the Image Size Dialog Box
The first step in resizing your photo is to open the Image Size dialog box. This can be done by navigating to Image > Image Size in the Photoshop menu bar. This dialog box contains all the necessary controls for modifying the image’s dimensions and resolution.
Understanding Image Size and Resolution
Before adjusting the size, it’s important to grasp the relationship between image size and resolution. Image size refers to the physical dimensions of the image, usually measured in inches or centimeters. Resolution, on the other hand, determines the number of pixels per inch (PPI) or pixels per centimeter.
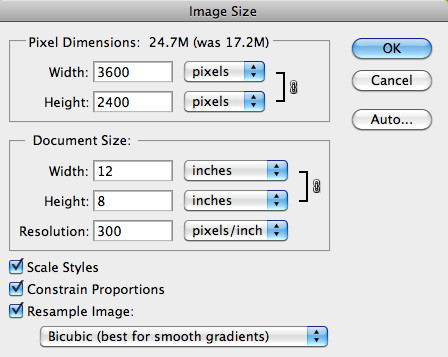 Changing the image size and resolution in Photoshop
A higher resolution generally results in a sharper image but also a larger file size. When resizing, you can adjust either the dimensions or the resolution, or both. Photoshop will automatically recalculate the other values based on your input.
Resampling Methods for Resizing Images
When changing the size of an image, Photoshop needs to either add or remove pixels. This process is called resampling. Choosing the right resampling method is critical for maintaining image quality.
Photoshop provides several resampling options:
- Bicubic: This method calculates the average of surrounding pixels and is generally suitable for smooth gradients.
- Bicubic Smoother (Best for Enlargements): This option is optimized for upscaling images, producing smoother results. It’s particularly helpful when enlarging images with noise.
- Bicubic Sharper (Best for Reductions): This method helps to preserve sharpness when reducing the image size.
Changing the Image Dimensions
To change the image dimensions, simply enter the desired width and height values in the Image Size dialog box. You can specify the dimensions in pixels, inches, centimeters, or other units. Make sure the “Constrain Proportions” option is checked (link icon) if you want to maintain the original aspect ratio of the image.
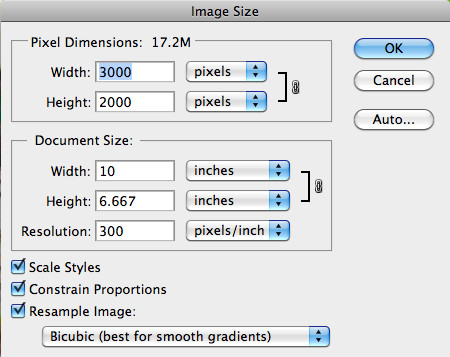 Comparing original and resized images in Photoshop
Adjusting the Resolution
To change the resolution, enter the desired PPI value. Increasing the resolution will make the image sharper but also larger in file size. Decreasing the resolution will reduce the file size but may result in a loss of detail.
Applying the Changes
Once you’ve made the necessary adjustments, click the “OK” button to apply the changes and resize your image. Remember to save your resized image with a new file name to avoid overwriting the original. By following these steps and understanding the principles of image resizing, you can effectively modify your photos in Photoshop while preserving their quality.