Do you need to convert your image to a JPG format or explore other file types like PNG and WebP? The world of image file formats is vast, ranging from the widely used JPEG/JPG to the web-friendly PNG and the modern WebP. While converting between these formats might once have seemed complicated, it’s now incredibly straightforward, thanks to built-in functionalities in both Windows and macOS.
This guide provides a comprehensive overview of how to easily change photo file types. Whether you’re aiming for JPG or any other format, we’ve got you covered with simple and effective methods.
Simple Methods to Change Your Photo File Type
Converting your photos to JPG or other formats doesn’t require complex software. Several free and accessible methods are available for both Windows and Mac users. These tools make image conversion a breeze, often achievable in just a few clicks.
Here, we will explore various user-friendly techniques to change your photo file type effectively.
Effective Ways to Change Photo File Type:
- Utilizing File Extension Modification
- Leveraging Photo Editing Software for Conversion
- Employing Online Image Conversion Tools
- Converting Image Formats with Smartphone Apps
Method 1: The File Extension Tweak
One of the most direct methods to change a photo file type to JPG, PNG, or other formats is by simply altering the file extension. This is a quick and easy trick, especially useful for basic conversions.
Step-by-Step Guide for Changing File Extension in Windows
-
Begin by typing File Explorer in the Windows search bar, located on your taskbar, and press Enter to open the File Explorer application.
-
Once File Explorer is open, navigate to the View tab in the toolbar at the top. Within the View options, find and check the box next to File name extensions. This action will make file extensions visible for all files in File Explorer.
-
Next, locate the photo you wish to convert. Right-click on the file to open the context menu and select Rename from the options. This will allow you to edit the file’s name, including its extension.
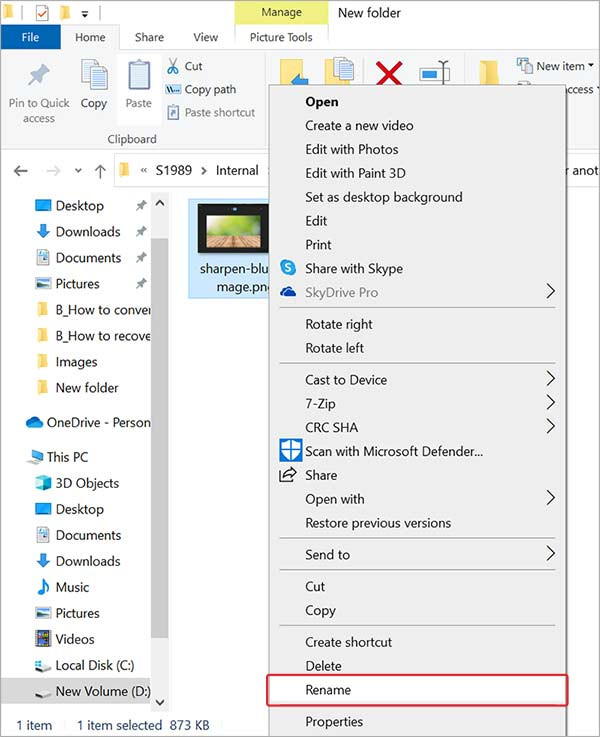 rename the file to convert an image to JPG
-
With the filename editable, carefully erase the original file extension (e.g., PNG, HEIC) and type in the new desired extension, such as jpg. Ensure you only change the extension and leave the filename itself untouched.
-
After typing the new extension, press Enter to save the change. Windows will display a warning message confirming if you want to change the file type, as this might make the file unusable if done incorrectly. Click Yes to proceed with changing the photo file type to JPG.
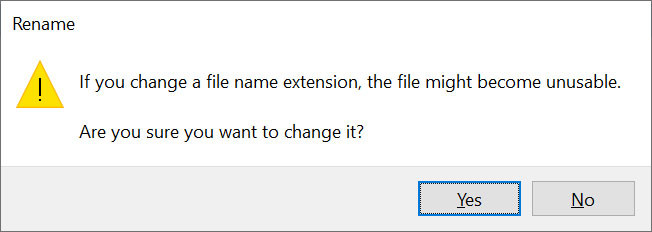 change the file extension to convert a picture to JPG
Step-by-Step Guide for Changing File Extension on Mac
- To enable visible file extensions on macOS, start by opening Finder. Then, in the Finder menu at the top of your screen, click on Finder and select Preferences from the dropdown menu.
- In the Finder Preferences window, navigate to the Advanced tab.
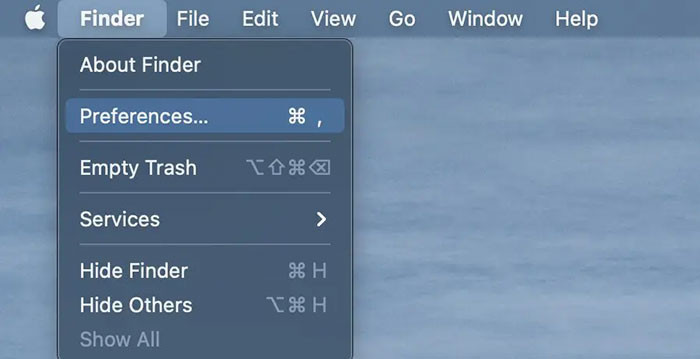 go to finder and then preferences
- Within the Advanced settings, find the checkbox labeled ‘Show all filename extensions’ and ensure it is ticked. This setting will make file extensions visible for all files in Finder.
 tick the checkbox next to show all filename extensions
- Locate the image file you want to convert. Right-click (or Control-click) on the image file to open the context menu, and select Rename.
- In the rename field, delete the existing file extension and type the new desired extension. For example, change
.pngto.jpg.
Method 2: Utilizing Photo Editors for File Type Conversion
Both Windows and macOS come equipped with built-in, free photo editors: Microsoft Paint on Windows and Preview on Mac. These readily available programs are perfectly capable of converting images to various file formats like JPG, PNG, and more. While professional software like Adobe Photoshop and Lightroom are also options for image conversion, Paint and Preview offer a convenient and cost-free alternative for simple file type changes. Let’s explore how to change a photo file type to JPG using Paint and Preview.
Converting Photos to JPG using Microsoft Paint
Windows users can utilize Microsoft Paint to open a wide array of image formats, including WebP, and then save them as JPG, PNG, or other desired file types.
Steps to Convert Image to JPG in Paint:
- Open Microsoft Paint. You can find it by typing ‘Paint’ in the Windows search bar and selecting the Paint application. Once Paint is launched, click on File in the top left corner, then select Open from the dropdown menu.
- In the Open dialog box, browse through your files to find the image you want to convert. Select your desired image and click Open to load it into Paint.
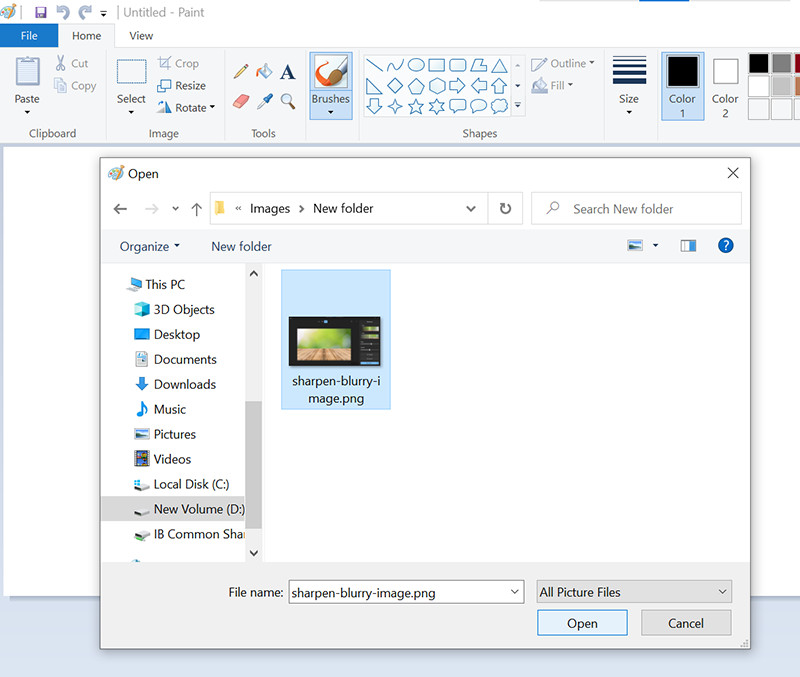 open png image in Microsoft Paint
- After your image is open in Paint, go to File again, but this time select Save As. From the ‘Save as type’ options, choose JPEG picture.
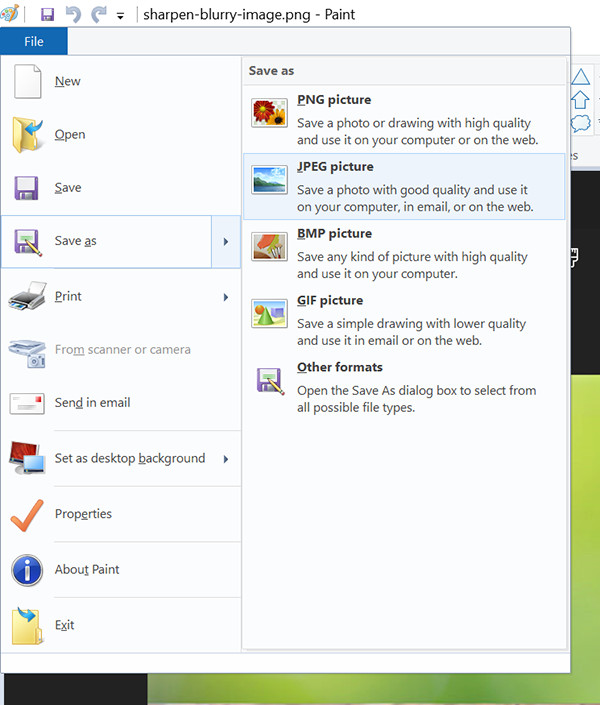 save the image in JPG format in Paint
- A Save As window will pop up. Here, you can rename the file if you wish and choose where to save it. Once you’ve selected your save location and potentially renamed the file, click Save. This action will change your photo file type to JPG.
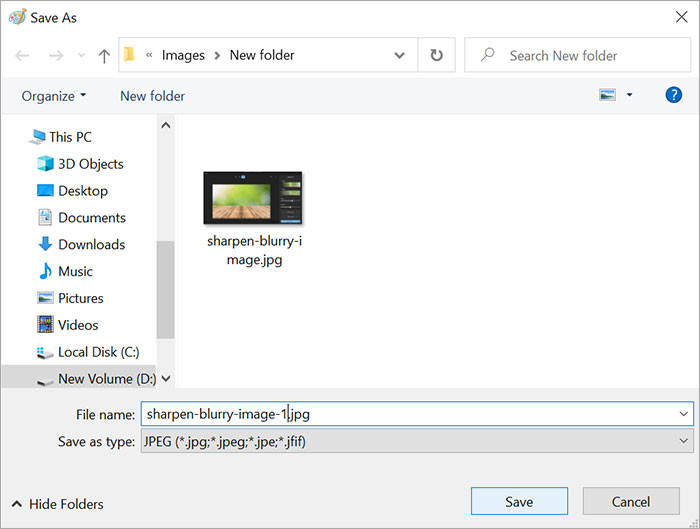 convert the picture to JPG from PNG in Paint
Converting Photos to JPG using Preview on Mac
Similar to Microsoft Paint on Windows, Preview is the default image viewer on macOS and includes the functionality to change a photo file type to JPG or other formats.
Steps to convert a picture to JPG using Preview:
- Open the image you wish to convert using Preview. Typically, you can do this by double-clicking the image file, or right-clicking, selecting ‘Open With’, and choosing ‘Preview’.
- Once the image is open in Preview, navigate to the menu bar at the top of your screen. Click on File, then select Export from the dropdown menu.
 open an image in Preview
- In the Export window that appears, find the Format dropdown menu. Click on it and select JPEG from the list of available formats. You can also adjust the Quality slider to control the JPG compression level, and optionally modify the Resolution if needed.
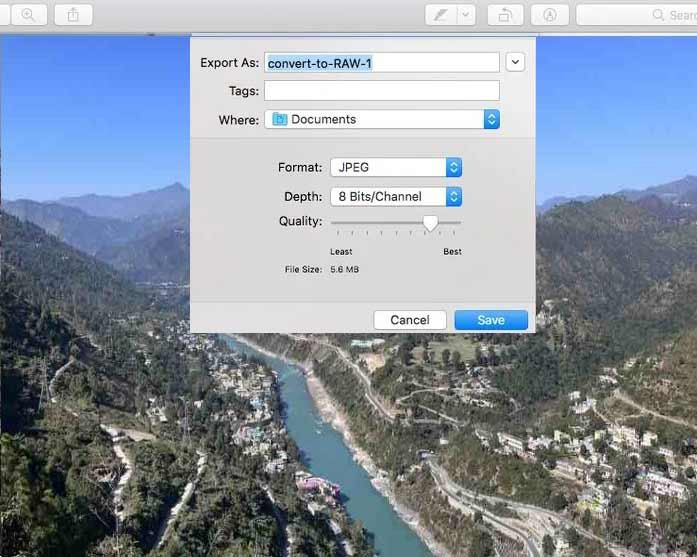 convert a picture to JPG using Preview in Mac
- Choose the desired location on your Mac to save the converted file. After selecting the location, click Save. Preview will then save a copy of your image as a JPG file in the specified location.
Converting RAW Images to JPEG with Adobe Photoshop
Adobe Photoshop is a powerful tool for both photo and video editing, offering advanced capabilities for converting RAW images to JPEG format. Here’s how to perform this conversion:
- Begin by opening your RAW photo in Adobe Photoshop. Once the image is open, go to the menu bar at the top, click on File, and then select Save As.
- In the Save As dialog box, you can Rename your file if desired and choose the location where you want to save it.
- Next, look for the Format dropdown menu (labeled as “Save as type” on Windows). Click on it and choose JPEG from the list of available formats.
- After selecting JPEG, click the Save button. A JPEG Options dialog box will then appear, giving you control over the image quality.
- In the JPEG Options dialog, you can adjust the Quality slider to set the level of image quality and compression. Higher quality settings will result in larger file sizes. Once you’ve set your desired quality, hit OK. Photoshop will then save your RAW image as a JPEG file.
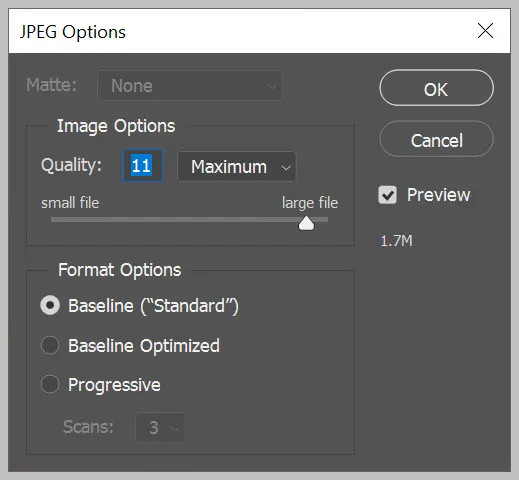 convert RAW image to JPG
Method 3: Utilizing Online Image Converters
For a quick and convenient way to change image file types, online image converters are an excellent choice. Numerous online tools specialize in converting between formats like JPG to PNG, PNG to JPG, and WEBP to JPG, among others. Popular online converters include CloudConvert, Convertio, Online-Convert.com, iLoveIMG, and ZamZar. These services often allow batch conversion, enabling you to convert multiple images at once. For a reliable option, Adobe Express offers a dedicated online tool for converting PNG to JPG files.
Step-by-step guide to convert WEBP to JPG using an online converter:
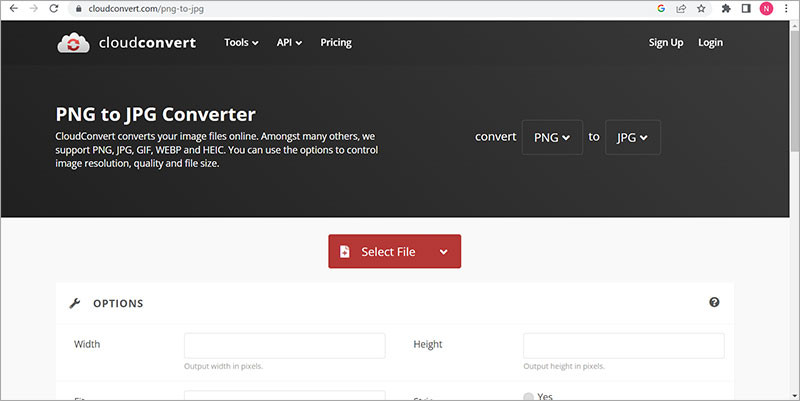 convert a image to JPG using online converter
- Start by clicking the Select File button on the online image converter website. This button usually allows you to upload images from your computer. In the file selection dialog, choose the image files you want to convert and click Open to upload them to the converter.
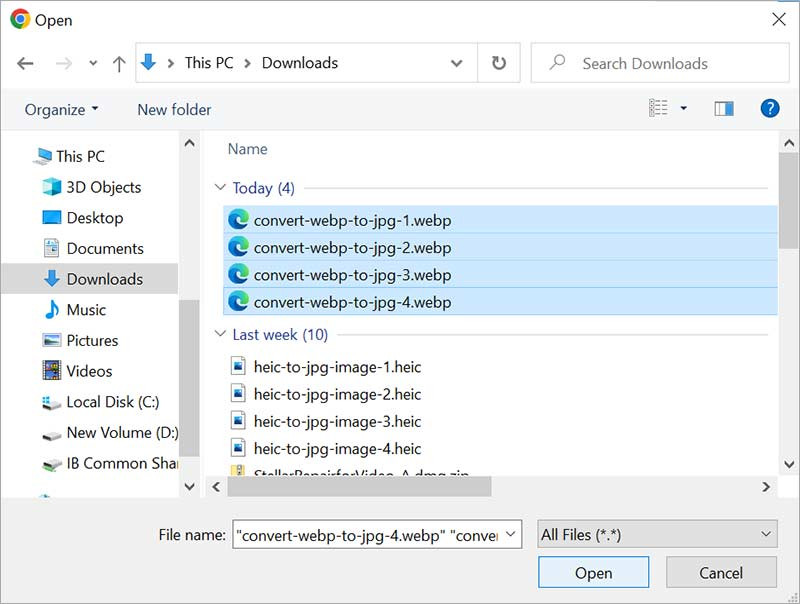 Select files – convert a image to JPG using online converter
- After uploading your image, you’ll typically need to specify the target format. Look for an option to select the output format, and choose JPG. Once you’ve selected JPG, initiate the conversion process by clicking a button labeled Convert or similar.
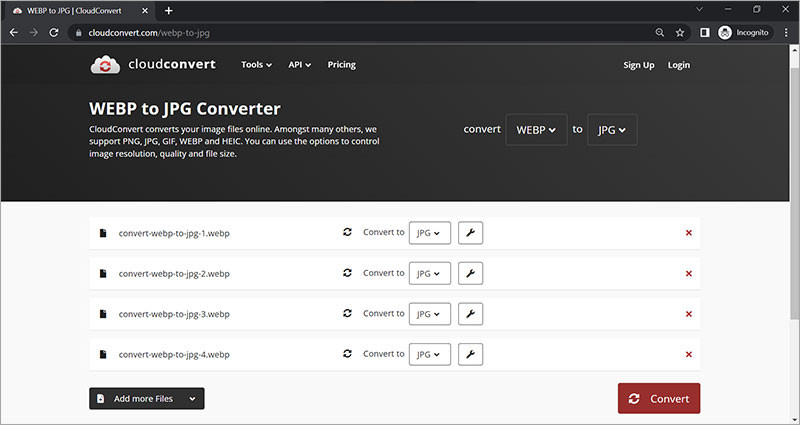 conversion process to convert a image to JPG using online converter
- The online converter will process your image. Once the conversion is complete, a Download button will appear. Click Download to save the converted JPG image to your computer.
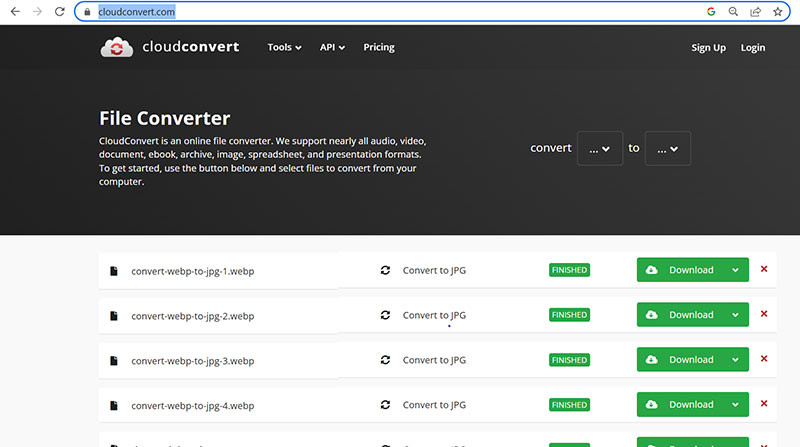 download the converted image
Method 4: Converting Image File Types on Smartphones
For on-the-go conversions, numerous image converter apps are available for both Android and iOS smartphones. Apps like The Image Converter, Image Converter Vector File, and File Converter to the Formats offer convenient mobile solutions for changing image file types. Let’s explore how to convert HEIC to JPG using a smartphone app as an example.
- First, access the App Store on iOS or the Google Play Store on Android. Search for “image converter” in the search bar.
- Browse through the search results and choose an image converter app that suits your needs. Download and install the app on your smartphone.
- Once installed, open the image converter app. Look for an option to select or upload an image. This might be a button or menu option like “Select Image,” “Upload,” or a “+” icon. Tap on this to proceed.
- Navigate to the location of your image within your phone’s storage, select the image you wish to convert, and tap Upload or a similar confirmation.
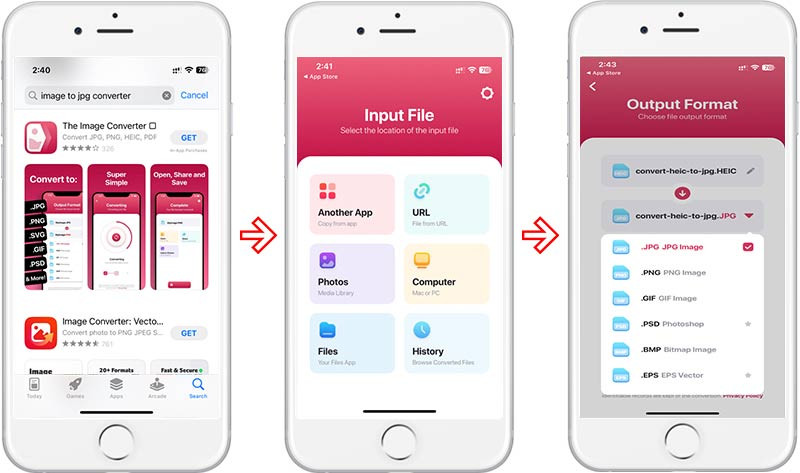 convert a image to JPG in smartphone
- After uploading, you’ll typically see options to choose the desired output format. Select JPG as the target format. Then, look for a Convert button and tap it to start the conversion process.
- Once the conversion is complete, the app will usually provide an option to save the converted image. Look for a “Save,” “Download,” or similar button and tap it to save the JPG image to your smartphone’s gallery or a designated folder.
Troubleshooting Image Corruption During Conversion
In some instances, images might become corrupted during the file type conversion process. This can result in images displaying as blank or showing errors when opened. If you encounter such issues, consider using Stellar Repair for Photo, a specialized tool designed to repair corrupted photos. This software can fix various issues, including invalid file structures, markers, and headers.
Download the free trial to preview the repair capabilities for your corrupted image files.
Conclusion: Changing Photo File Types Made Easy
Converting a photo to JPG or another image type is a straightforward process with multiple accessible methods. Whether you are working on a Windows or Mac computer, or using an iOS or Android smartphone, you can easily change image file types. From manually tweaking file extensions to utilizing built-in tools like Microsoft Paint and Preview, or employing online converters and mobile apps, you have a range of options at your fingertips. These methods simplify image conversion, making it accessible to everyone, regardless of their technical expertise.
Frequently Asked Questions (FAQ)
How to convert PDF to JPG?
You can easily convert PDF files to JPG using Adobe Acrobat. Here’s how:
- Open the PDF in Adobe Acrobat and select the Export PDF tool.
- Choose Image as the export format and then select JPEG.
- Click Export and choose a location to save the new JPG file.
Can I convert WebP to JPG in Photoshop?
Yes, Photoshop version 23.2 and later natively supports WebP files. You can open, edit, and export WebP images as JPG without needing any extra plugins.
How to change WebP to a PNG image?
To convert a WebP image to PNG, you can use MS Paint (Windows), Preview (Mac), or various online image converters that support both WebP and PNG formats.
Was this article helpful?
YES0
NO
About The Author
Vishakha Singh Vishakha Singh is a Senior Writer at Stellar Data Recovery with extensive experience in creating content across diverse tech areas. A tech enthusiast, she specializes in photo and video recovery and repair guides, along with comprehensive tutorials for iPhone and Android users.