Sharing moments on Instagram Stories is a fantastic way to connect with your audience, and sometimes, a single photo just doesn’t capture the whole picture. That’s when knowing how to add multiple photos to an Instagram Story becomes essential. Creating photo collages for your Instagram Stories is a great solution to deliver more visual information and engage your viewers effectively.
Whether you’re a brand showcasing your product range or an individual sharing highlights from an event, Instagram Story photo collages are a powerful tool. Luckily, Instagram offers a few methods to achieve this, and we’re here to guide you through them. There are three primary ways to add multiple photos to a single Instagram Story:
- Utilizing the built-in Layout template within Instagram Story’s create mode.
- Layering photos using the sticker feature in Instagram Story’s create mode.
- Uploading a pre-made custom collage created with a third-party app or photo editing software.
Let’s explore each of these methods in detail, ensuring you can choose the best approach for your needs and style.
The Easiest Way: Using Instagram’s Layout Feature
Many users are unaware that Instagram has a built-in feature specifically designed for creating collages directly within the app. This is the simplest method, perfect for quick and easy multi-photo Stories. Here’s how to use the Layout feature:
-
Launch the Instagram App: Open your Instagram app and tap the “+” icon, usually located at the top right or bottom center of your screen. Select “Story” from the options that appear.
-
Access Create Mode: Your camera roll will open by default. To access the Layout feature, you need to be in create mode. Tap on the camera icon, typically found on the left-hand side of the screen at the bottom, to switch to create mode.
-
Locate the Layout Icon: On the left side menu in create mode, you’ll see a vertical list of icons. Tap the third icon from the top. It looks like a square divided into smaller squares or grids – this is the Layout icon.
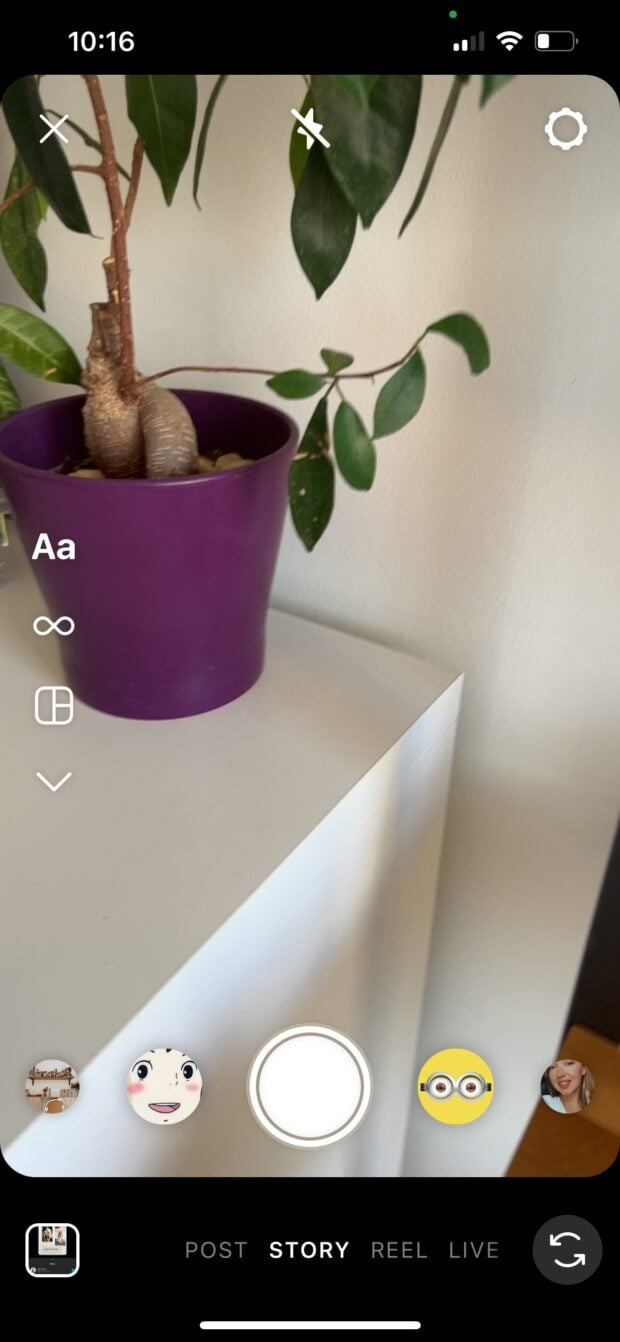 Tap the Layout icon to access Instagram's built-in collage templates
-
Choose Photos for Your Layout: Once you tap the Layout icon, a default grid (usually a four-square grid) will appear. You can now populate each section of this grid with photos. You have two options:
-
Option 1: Capture New Photos: To take a photo directly within each grid segment, simply tap the white circle capture button at the bottom center of the screen. Each tap will fill the next segment in the layout, starting from the top left and moving clockwise. To retake a photo in a specific segment, tap on that segment and then tap the delete icon to remove it and take a new one.
-
Option 2: Select from Camera Roll: To use existing photos from your phone’s camera roll, tap the small square camera roll preview icon located in the bottom left corner of the screen. This will open your camera roll. Select the photo you want to place in the current segment. Repeat this process to fill all segments of the layout with photos from your camera roll. Again, to change a photo, tap the segment and then the delete icon.
-
 Select photos from your camera roll to add to your Instagram Story collage
-
Confirm and Customize: After filling your layout with photos, tap the checkmark button to confirm your collage layout. You’ll then be taken to the standard Instagram Story editing screen where you can add text, stickers, filters, and effects to further enhance your collage.
-
Explore Different Layout Grids: If you want to experiment with different grid styles, while in Layout mode, tap the rectangular grid icon (it’s usually directly below the Layout mode icon in the left menu). This will open a menu showing various grid layouts, from two panels to more complex arrangements. Choose your preferred grid style, and then fill each section with photos as described in step 4.
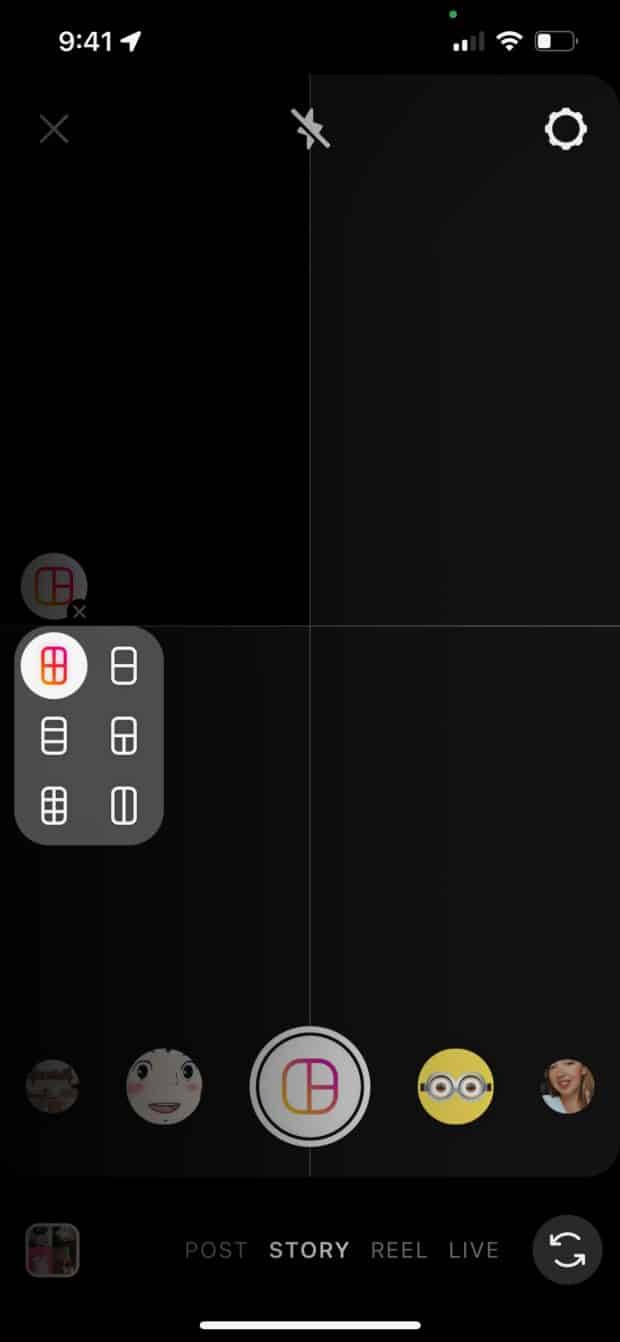 Choose a different grid layout for your Instagram Story collage
- Finalize and Share: Once you are satisfied with your collage and any added customizations, tap the arrow in the bottom right corner to proceed to sharing.
 Add stickers and text to your Instagram Story collage before sharing
- Share Your Story: Select your desired audience (Your Story, Close Friends, or send it as a Direct Message) and tap “Share” to post your multi-photo Instagram Story.
Unleash Your Creativity: The Layering Photos Method
For those seeking more creative freedom and less structure than the Layout feature provides, the layering method is an excellent alternative. This technique allows you to overlap, resize, and position photos freely on your Instagram Story.
-
Open Instagram Story: As with the Layout method, start by opening the Instagram app, tapping the “+” icon, and selecting “Story”.
-
Enter Create Mode: Tap the camera icon to access the create mode interface.
 Tap the camera icon to get started with creating your layered photo Instagram Story
-
Use the Camera Roll Sticker: Tap the sticker icon at the top of the screen (it’s the square smiley face icon). Scroll through the sticker options until you find the Camera Roll sticker. It usually appears as a circle previewing your most recent photo with a mountain and sun icon overlaid. Tap this sticker.
-
Add and Position Your Photos: Select a photo from your camera roll. It will be added as a sticker to your Story background. You can now drag it to position it anywhere on the screen and use pinch-to-zoom gestures to resize it. You can also rotate the photo using two fingers. To add more photos, repeat step 3 and 4, adding each photo as a separate sticker.
 Select photos to layer from your camera roll using the sticker option
-
Customize Background and Shapes: To change the background color of your Story, tap the color circle icon at the top of the screen. You can also add text, drawings, and other stickers to complement your photo layers. Furthermore, you can change the shape of each photo sticker by tapping on the photo itself. This allows you to display your photos as circles, squares, or other available shapes.
-
Share Your Layered Story: Once you’ve arranged and customized your layered photo collage to your liking, tap the arrow icon to proceed. Select your audience and tap “Share”.
Maximum Customization: Using Third-Party Apps
If Instagram’s built-in tools don’t quite meet your creative vision, numerous third-party apps offer advanced collage creation features specifically for Instagram Stories. These apps provide a wider range of templates, design elements, and customization options.
-
Choose and Use a Collage App: Download and install an Instagram collage app of your choice. Popular options include Unfold, Canva, PicCollage, and many others. Alternatively, you can use professional photo editing software like Adobe Photoshop. Design your collage within the app, using its templates, adding text, graphics, and other design elements.
For this example, we’ll reference using Unfold, a popular app known for its stylish templates.
 Creating an Instagram Story collage using the Unfold app
-
Save Your Collage: Once you’ve finished designing your collage in the app, export and save the image to your phone’s camera roll. Ensure you save it in a Story-friendly aspect ratio (typically 9:16) and as a JPG or PNG file.
-
Upload to Instagram Story: Create a new Instagram Story as you normally would. Instead of taking a photo or video, swipe up from the bottom of the screen (or tap the camera roll icon in the bottom left corner) to access your camera roll. Select the collage image you just created and upload it to your Story.
 Upload your pre-made collage image to your Instagram Story from your camera roll
Posting Your Collage to Your Instagram Story
Regardless of which method you chose to create your multi-photo collage, the final step of posting it to your Instagram Story is the same. Here’s a quick recap:
-
Open Instagram Story and Access Camera Roll: Open the Instagram app, tap the “+” icon, and select “Story”. This will directly open your camera roll. Tap on your collage image to select it.
-
Add Final Touches: At this stage, you can still add any additional text, stickers, or effects directly within Instagram Story to further enhance your post. When you’re satisfied, tap the arrow in the bottom right corner.
 Add any last-minute text or stickers before posting your Instagram Story collage
- Share Your Story: Choose your sharing preference – “Your Story,” “Close Friends,” or send it as a private message. Tap “Share” to publish your Instagram Story collage.
By mastering these three methods, you can effectively add multiple photos to your Instagram Stories, creating visually engaging content that captures attention and tells a more complete story. Experiment with each technique to find your preferred style and enhance your Instagram presence.
