iCloud Photos is a fantastic service that seamlessly integrates with Apple’s ecosystem, ensuring your precious photo and video memories are safely stored and readily accessible across all your devices. But you might be wondering, “How Do You Update Icloud Photos?” The beauty of iCloud Photos lies in its automatic update system, designed to keep your library synchronized effortlessly. Let’s dive into understanding how this update process works and how you can ensure your memories are always up-to-date.
Understanding Automatic iCloud Photos Updates
The core concept of iCloud Photos is continuous, automatic syncing. Once you set it up, any new photo or video you capture on your iPhone, iPad, or even Apple Vision Pro is immediately and securely uploaded to iCloud. Similarly, any changes you make – be it editing, deleting, or organizing – are reflected across all your devices logged into the same Apple ID. This means there isn’t a manual “update” button you need to press; the system is designed to work in real-time, keeping everything synchronized in the background.
This automatic update process ensures that you always have the latest version of your photo library, no matter which device you’re using. Whether you’re browsing on your Mac, showcasing pictures on your Apple TV, or quickly checking on your iPhone, you’ll see the same, up-to-date collection. This seamless synchronization is a key benefit of iCloud Photos, eliminating the need for manual transfers or worrying about outdated libraries.
Setting Up iCloud Photos for Automatic Syncing
To benefit from these automatic updates, iCloud Photos needs to be properly enabled on each of your Apple devices. The setup process is straightforward and only needs to be done once per device. Here’s how to turn on iCloud Photos across different Apple platforms:
On Your iPhone, iPad, or Apple Vision Pro:
- Open the Settings app.
- Tap on [Your Name] at the top.
- Select iCloud.
- Tap Photos.
- Toggle the switch next to Sync this [Device] to the on position.
 Toggle switch to turn on Sync this iPhone for iCloud Photos update
On Your Mac:
- Click the Apple menu in the top left corner of your screen.
- Choose System Settings (or System Preferences in older macOS versions).
- Click on [Your Name].
- Select iCloud from the sidebar.
- Ensure Photos is selected in the list of iCloud services.
- Click the switch next to Sync this Mac to enable it.
On Apple TV 4K and Apple TV HD:
- Go to Settings from the Apple TV Home screen.
- Navigate to Users and Accounts.
- Select iCloud.
- Turn on iCloud Photos.
On Your Windows PC:
For Windows users, you’ll need to download and install iCloud for Windows from the Microsoft Store. Once installed and you’ve signed in with your Apple ID, you can configure iCloud Photos to sync your photos between your PC and iCloud. You can find detailed instructions on setting this up in this Apple support document.
How Edits and Deletions Update Across Devices
The “update” in iCloud Photos isn’t just about adding new photos; it also encompasses any modifications you make to your existing library. When you edit a photo using the Photos app on any of your devices – whether you’re cropping, adjusting colors, or applying filters – these edits are non-destructive. This means the original photo is safely stored, and the edits are applied as an overlay. Crucially, these edits are synced across all your devices almost instantly. You can start editing a photo on your iPhone and seamlessly continue refining it on your Mac, seeing the updates reflected everywhere.
Similarly, when you delete photos or videos, the update is also immediate and universal. Deleting a photo on one device removes it from your iCloud Photo Library and consequently from all your other devices connected to iCloud Photos. However, Apple provides a safety net: deleted items are moved to a “Recently Deleted” album for 30 days. This gives you a window to recover any photos or videos accidentally deleted before they are permanently removed.
Managing Storage to Ensure Smooth Updates
iCloud Photos uses your iCloud storage. While 5GB of free storage is included with every Apple ID, for extensive photo and video libraries, you might need to consider upgrading to iCloud+. Running out of iCloud storage space can impact the update process. If your iCloud storage is full, new photos and videos won’t be able to upload, and therefore your library won’t be fully updated across devices.
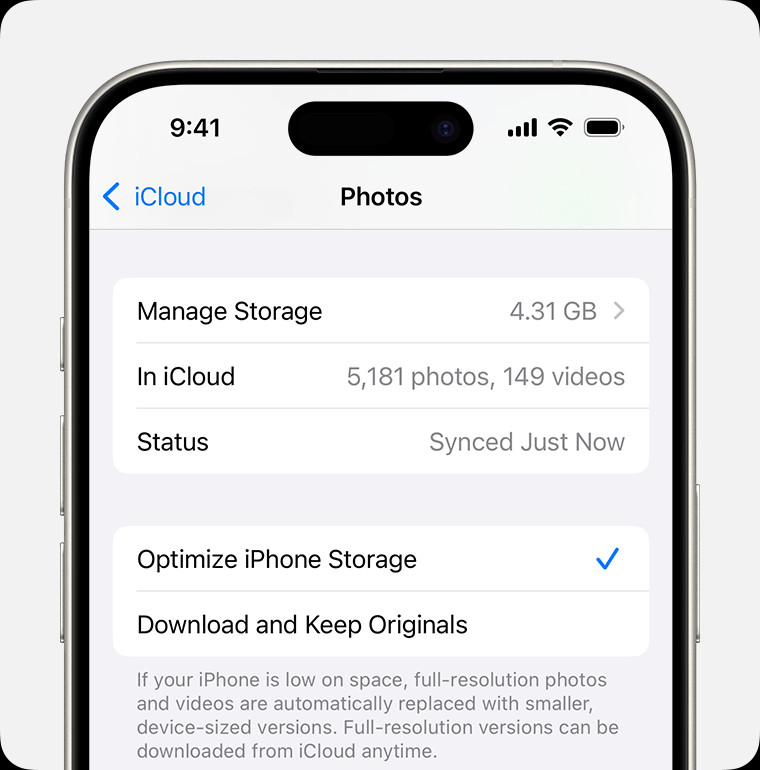
Apple provides tools to manage your iCloud storage effectively. You can choose between “Optimize iPhone Storage” (or iPad/Mac Storage) and “Download and Keep Originals.” Optimize Storage is designed to save space on your device. With this option selected, full-resolution originals are stored in iCloud, while space-saving versions are kept on your device. When you need the original, it’s downloaded on demand. Download Originals, on the other hand, keeps full-resolution versions both in iCloud and on your device, which consumes more device storage but ensures immediate access to originals.
To check and manage these settings:
On iPhone, iPad, or Apple Vision Pro:
- Go to Settings > [Your Name] > iCloud > Photos.
- Here, you can choose between Optimize iPhone Storage or Download and Keep Originals.
On Mac:
- Open the Photos app.
- In the menu bar, click Photos > Settings (or Preferences).
- Go to the iCloud tab.
- Select your desired storage setting.
Choosing “Optimize Storage” can be a smart strategy to ensure you have enough space for ongoing iCloud Photos updates without filling up your device storage.
Pausing and Resuming iCloud Photo Updates
While iCloud Photos updates are designed to be automatic, there might be situations where you want to temporarily pause uploads. For example, if you are on a limited or slow internet connection, or if you are about to exceed your data limit. iCloud allows you to pause photo uploads for one day.
To pause uploads:
- On iPhone, iPad, or Apple Vision Pro: Open the Photos app, scroll to the bottom of the Library tab and tap Pause. Alternatively, tap your profile picture in Photos and tap Pause.
- On Mac: Open the Photos app, select Library in the sidebar, then All Photos. Scroll to the bottom and click Pause.
This pause feature gives you temporary control over the update process, allowing you to manage bandwidth usage or data consumption. You can resume uploads at any time, and iCloud Photos will continue syncing your library.
Conclusion: Enjoying an Up-to-Date Photo Library
“How do you update iCloud Photos?” The answer is, largely, you don’t need to manually! The system is built for automatic, seamless updates, ensuring your photo and video library is consistently synchronized across all your Apple devices and even your Windows PC. By understanding how iCloud Photos works, setting it up correctly, and managing your storage effectively, you can enjoy the peace of mind knowing your precious memories are always updated, safe, and accessible whenever you need them. Embrace the convenience of automatic updates and focus on capturing more moments, knowing iCloud Photos has your memories covered.
