Are you an iPhone enthusiast who also owns an iPad? Like many Apple users, you might find yourself wanting to view your iPhone photos on the larger screen of your iPad. Transferring photos between these devices is a common need, whether you’re backing up memories, editing on a bigger display, or simply sharing moments across your Apple ecosystem.
Fortunately, the Apple ecosystem offers several seamless methods to transfer photos from iPhone to iPad. This guide will walk you through various effective techniques, from using Apple’s built-in features to third-party applications, ensuring your precious photos are easily accessible on all your devices. Whether you are looking for wireless solutions or methods using your computer, we’ve got you covered with step-by-step instructions to make the process straightforward and efficient.
Let’s explore the best ways to get your iPhone photos onto your iPad.
Part 1: How to Transfer Photos from iPhone to iPad via MobileTrans – Phone Transfer
For users seeking a direct and versatile solution, MobileTrans – Phone Transfer emerges as a powerful application designed for seamless data migration between devices. Available for both Windows and Mac, MobileTrans simplifies the process of transferring photos and various other data types from your iPhone to your iPad. Its intuitive interface and broad compatibility make it an excellent choice for users of all technical levels looking for an efficient way to manage their device data.
MobileTrans – Phone Transfer: Your One-Click Solution
Easy to use interface of MobileTrans application
MobileTrans stands out with its user-friendly approach and robust features:
- Broad Compatibility: Supports over 6000 device models across iOS, Android, and Windows operating systems.
- Cross-Platform Transfer: Enables data transfer between iPhones and iPads, Android devices, and more.
- Comprehensive Data Support: Transfers 18+ data types, including photos, videos, contacts, messages, documents, and call logs.
- User-Friendly Operation: Requires no technical expertise with its simple, click-through process.
- Additional Features: Supports WhatsApp data transfer, phone-to-computer transfers, and phone backup & restore functionalities.
Step-by-Step Guide to Transfer Photos Using MobileTrans:
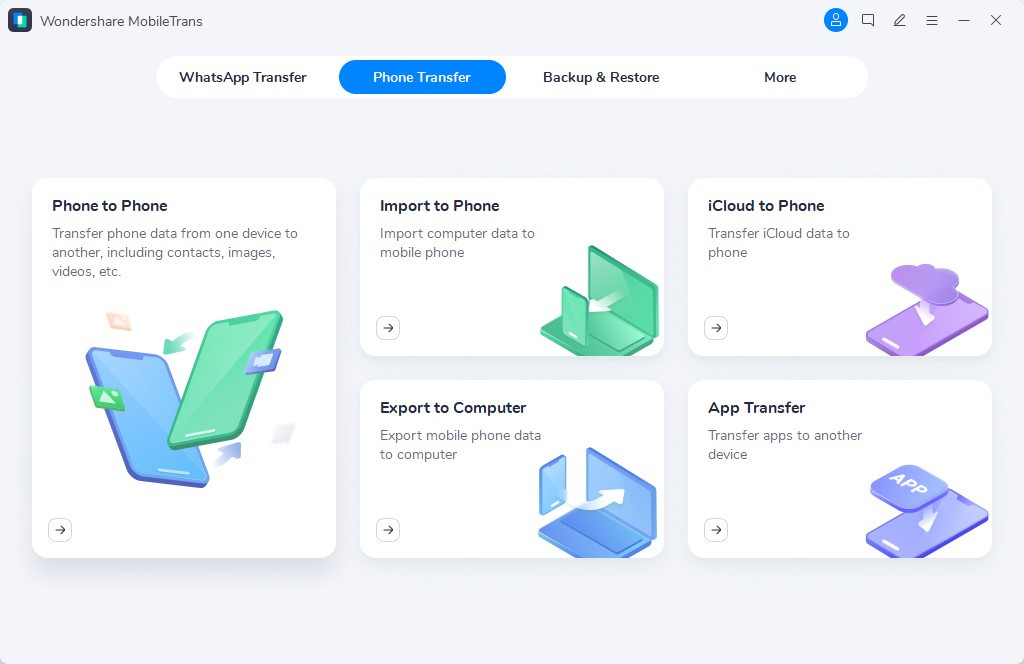
Step 1: Install and Launch MobileTrans
Begin by downloading and installing MobileTrans on your computer. Launch the application and from the main interface, select the “Phone Transfer” option, followed by “Phone to Phone” transfer to initiate the process.
Step 2: Connect Your iPhone and iPad
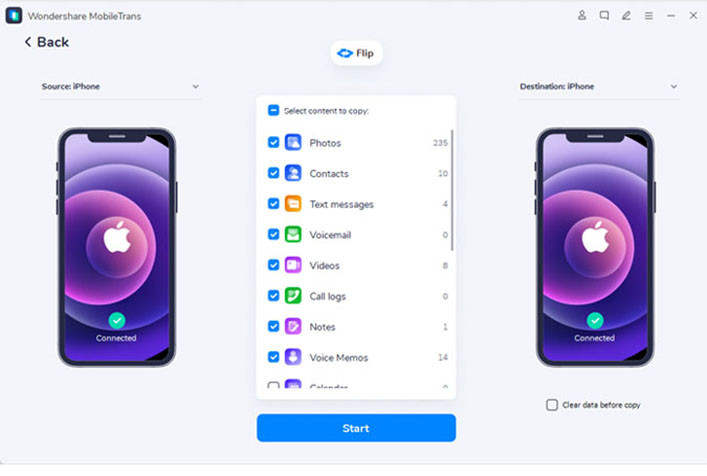 Selecting file types to transfer from iPhone to iPad using MobileTrans
Connect both your iPhone (as the source) and iPad (as the destination) to your computer using USB cables. MobileTrans will automatically detect both devices. Ensure that your iPhone is selected as the source and your iPad as the destination device. You might need to trust the computer on your iPhone and iPad to allow connection. Select “Photos” from the list of data types to transfer.
Step 3: Start the Photo Transfer
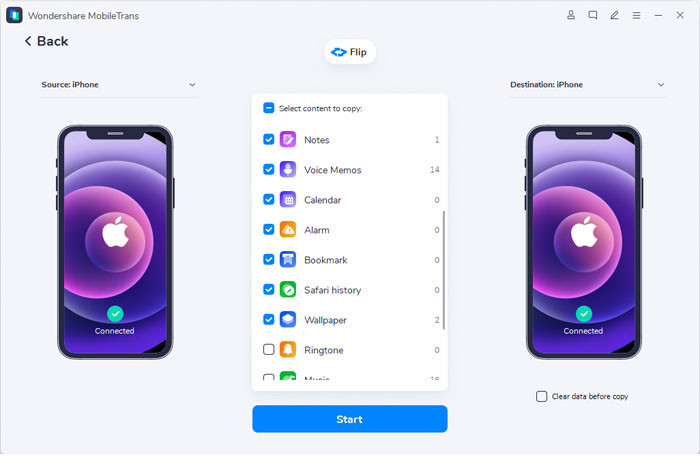 Transferring photos from iPhone to iPad using MobileTrans
Once you have selected photos, click the “Start” button to begin the transfer process. MobileTrans will efficiently move your selected photos from your iPhone to your iPad. Wait for the process to complete. The duration will depend on the number of photos being transferred.
Step 4: Completion
After the transfer is complete, you will receive a notification. You can now safely disconnect both devices and find your iPhone photos readily available in the Photos app on your iPad.
Try It Free Try It Free safe & secure
Part 2: How to Sync Photos from iPhone to iPad via iCloud
iCloud, Apple’s native cloud storage service, offers a seamless way to keep your photos synchronized across all your Apple devices, including your iPhone and iPad. By enabling iCloud Photos, any photos you take on your iPhone will automatically upload to iCloud and become accessible on your iPad, provided both devices are logged in with the same Apple ID and iCloud Photos is activated.
With over 900 million users leveraging iCloud for their Apple devices, it’s a popular and reliable method for syncing various data, including photos. To sync photos from iPhone to iPad using iCloud, follow these steps:
Step 1: Enable iCloud Photos on Your iPhone
Navigate to “Settings” on your iPhone and tap on your Apple ID profile at the top. Then, select “iCloud”.
Step 2: Access iCloud Photos Settings
Within the iCloud settings, tap on “Photos”.
Step 3: Turn On iCloud Photos
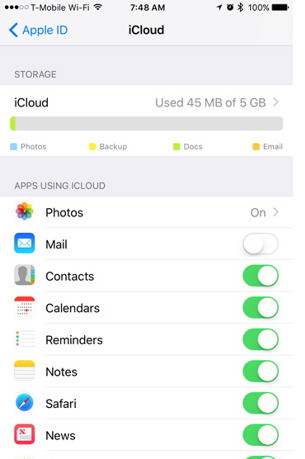 iCloud Photos settings on iPhone
Toggle the switch next to “iCloud Photos” to turn it on. Ensure you are connected to Wi-Fi, as this process may consume a significant amount of data, especially for large photo libraries.
Step 4: Enable iCloud Photos on Your iPad
Repeat steps 1-3 on your iPad. Ensure you are logged in with the same Apple ID as your iPhone.
Once iCloud Photos is enabled on both devices and they are connected to Wi-Fi, your photos will automatically begin to sync. Photos taken on your iPhone will appear on your iPad, and vice versa. This keeps your photo library consistent across your Apple ecosystem.
Part 3: How to Transfer Photos from iPhone to iPad Using AirDrop
AirDrop is Apple’s ad-hoc wireless file transfer service, ideal for quickly sharing photos and other files between nearby Apple devices like iPhones and iPads. AirDrop utilizes Bluetooth to discover devices and Wi-Fi Direct for fast data transfer, making it a secure and efficient way to transfer photos from iPhone to iPad wirelessly. It’s perfect for sending a selection of photos directly without needing cloud storage or computer intermediary.
Here’s how to use AirDrop to move your photos:
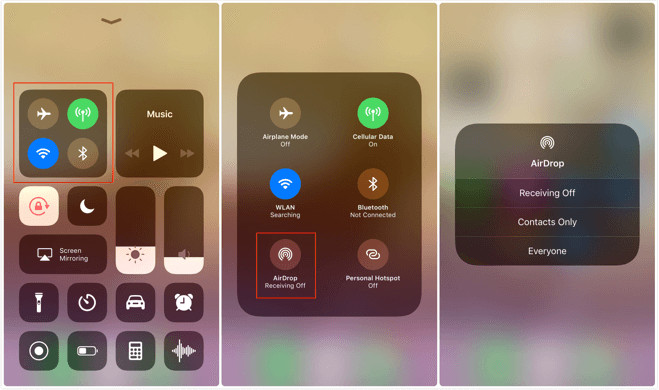
Step 1: Enable AirDrop on Both iPhone and iPad
Open the Control Center on both your iPhone and iPad by swiping down from the top-right corner of the screen (or swiping up from the bottom on older iPhones).
Step 2: Turn On AirDrop, Wi-Fi, and Bluetooth
 Turning on AirDrop on iPhone Control Center
In the Control Center, tap and hold the Wi-Fi or Bluetooth card to expand it. Then, tap the AirDrop icon. Choose either “Contacts Only” (if both devices are associated with the same iCloud contacts) or “Everyone” to be discoverable. Ensure both Wi-Fi and Bluetooth are also turned on.
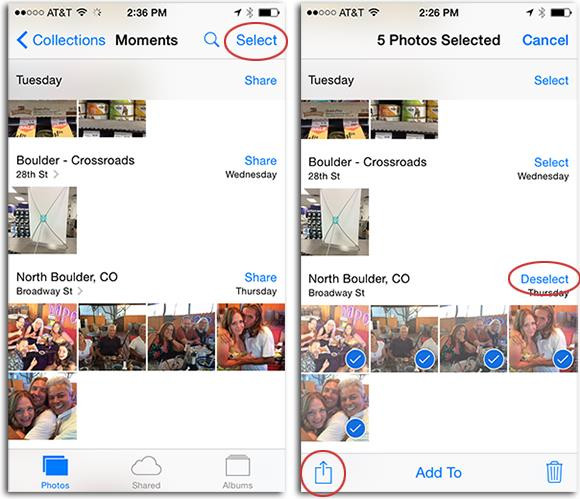
Step 3: Select Photos on Your iPhone
 Selecting photos to transfer via AirDrop
Open the “Photos” app on your iPhone and select the photos you wish to transfer. Tap the “Select” button, then choose the desired images.
Step 4: Share and AirDrop Photos
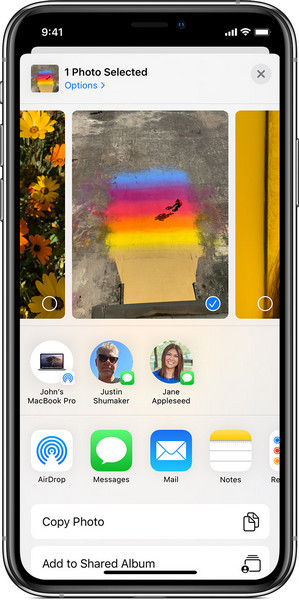 Sharing photos via AirDrop from iPhone
Tap the “Share” icon (the square with an arrow pointing upwards) at the bottom-left corner. In the share sheet, you should see AirDrop options. Tap on your iPad’s name when it appears under the AirDrop section.
Step 5: Accept Photos on Your iPad
On your iPad, a preview of the photos will appear with an “Accept” or “Decline” option. Tap “Accept” to receive the photos. The transferred photos will be saved in the Photos app on your iPad.
Part 4: How to Move Photos from iPhone to iPad Using iTunes (Finder on macOS Catalina and later)
iTunes (or Finder on macOS Catalina and later) provides a method to sync photos from your computer to your iPad, which can indirectly be used to get photos from your iPhone to your iPad. This method involves first transferring photos from your iPhone to your computer, and then syncing those photos to your iPad using iTunes or Finder. While slightly more complex, it’s a viable option, especially for managing photo albums and libraries.
Here’s how to use iTunes (or Finder) for photo transfer:
Step 1: Transfer Photos from iPhone to Computer
Connect your iPhone to your computer using a USB cable. On your computer, open the Photos application (on macOS) or File Explorer (on Windows) to import photos from your connected iPhone. Follow the prompts to transfer your photos to a folder on your computer.
Step 2: Connect iPad to Computer and Open iTunes (or Finder)
Connect your iPad to your computer using a USB cable. If you are using macOS Mojave or earlier, or Windows, open iTunes. If you are using macOS Catalina or later, open Finder.
Step 3: Access iPad Settings in iTunes/Finder
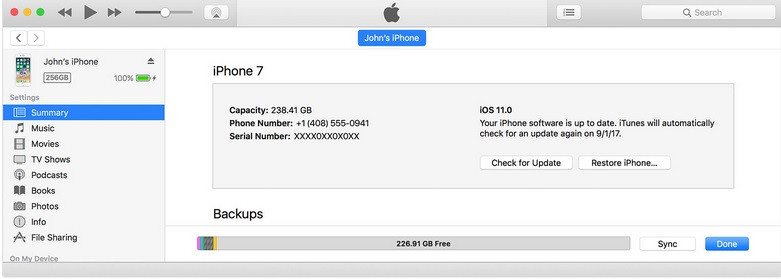 Selecting Photos option to sync in iTunes
In iTunes, click on the iPad icon when it appears. In Finder, your iPad will appear in the sidebar under “Locations”. Select your iPad.
Step 4: Navigate to Photo Sync Options
In iTunes, go to the “Photos” section typically found in the sidebar under “Settings”. In Finder, click on “Photos” in the top menu bar.
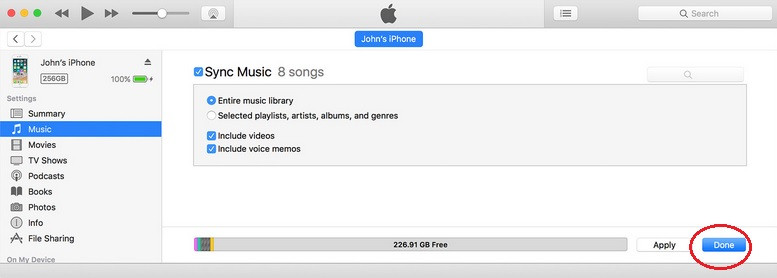
Step 5: Configure Photo Syncing
 Syncing photos to iPad using iTunes
Check the box to “Sync Photos”. Choose to sync photos from a folder you have on your computer where you saved photos from your iPhone. You can choose to sync “All photos” or “Selected albums”. Click “Apply” in iTunes or “Sync” in Finder to start syncing photos to your iPad.
Step 6: Complete Sync
Wait for the sync process to complete. Once done, the photos from the selected folder on your computer will be available in the Photos app on your iPad.
Part 5: Transfer Pictures from iPhone to iPad using Photo Stream (My Photo Stream)
My Photo Stream was a free, albeit now discontinued, Apple service that allowed users to automatically upload recent photos to iCloud and access them on other devices. While it’s no longer actively supported and has been replaced by iCloud Photos, users who might still have it enabled or are familiar with its concept can understand a similar approach using iCloud Photos. My Photo Stream would upload your most recent photos over Wi-Fi and make them available on your other devices.
For users who are looking for a method similar to the legacy Photo Stream, enabling iCloud Photos (as described in Part 2) is the recommended approach. However, understanding how Photo Stream worked can provide context for cloud-based photo syncing.
Understanding the Legacy of Photo Stream:
Step 1: Enable Photo Stream (If it were still active)
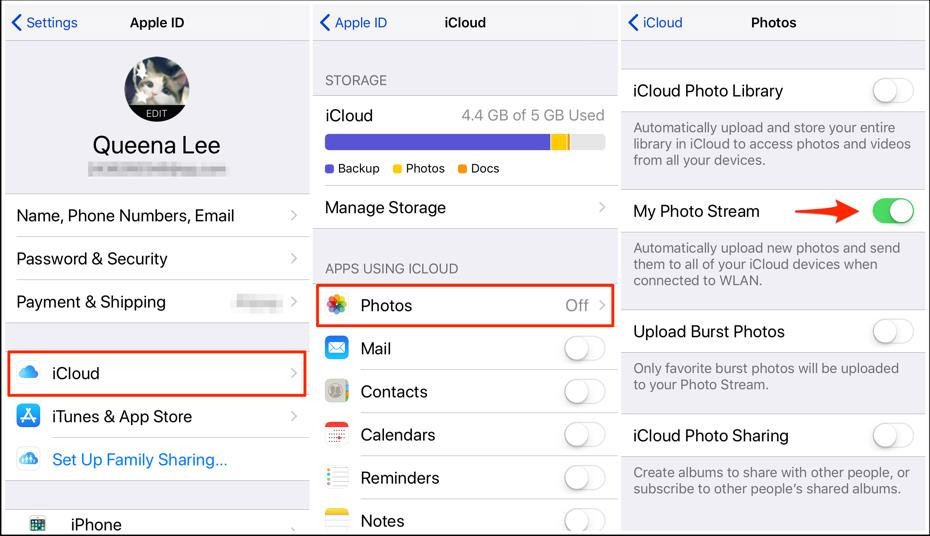
In the past, to use Photo Stream, you would go to “Settings” on your iPhone, navigate to “Photos & Camera” (or just “Photos” on newer iOS versions), and turn on “My Photo Stream”. You would repeat this on your iPad, ensuring both devices were logged into the same Apple ID.
Step 2: Automatic Photo Upload
 Enabling Photo Stream on iPhone (Illustrative Image)
With Photo Stream enabled, any new photos taken on your iPhone (excluding Live Photos and videos) would automatically upload to iCloud when connected to Wi-Fi.
Step 3: Access Photos on iPad
On your iPad, you would open the “Photos” app and find the streamed photos in the “My Photo Stream” album under the “Albums” tab.
Note: My Photo Stream has limitations such as not supporting Live Photos or videos, and it only stored photos for 30 days (up to 1000 photos). iCloud Photos is the current, more robust solution that supersedes My Photo Stream, offering comprehensive syncing of all photo and video types with larger storage options.
Conclusion
You now have a range of effective methods to transfer pictures from iPhone to iPad. From the simplicity of AirDrop for quick transfers and the comprehensive syncing of iCloud Photos, to the versatile MobileTrans for direct device-to-device transfer and the more involved method using iTunes or Finder, you can choose the technique that best suits your needs and preferences.
While all methods are effective, for users seeking a straightforward, feature-rich solution that goes beyond just photo transfer, MobileTrans stands out. Its ability to transfer a wide range of data types with a simple, user-friendly interface makes it an excellent tool for managing your mobile data. Whether you prioritize ease of use, speed, or comprehensive functionality, there’s a method here to ensure your photos are where you need them, when you need them. Choose the method that aligns with your workflow and enjoy your iPhone photos on your iPad today!
Try It Free Try It Free safe & secure
Recommended reading: How to transfer music from iPad to Android.