Even in the evolving landscape of social media, images remain a cornerstone of a robust content strategy, especially for professional Instagram accounts. As highlighted in our 2022 Instagram Study, visual content continues to be a priority for accounts of all sizes. In fact, the study revealed that individual images make up the majority of posts, underscoring the importance of mastering image uploads.
On average, individual images account for 6.3 out of every 10 posts, followed by 2.5 carousels and 1.3 video posts.
Therefore, understanding various methods to effectively upload your photos to Instagram is crucial. Let’s explore the different ways you can post your images, ensuring you’re always ready to share compelling visual content. Discover the methods below and let us know in the comments which one you prefer!
Uploading Photos to Instagram from Your Mobile Device
Instagram was initially designed as a mobile-first platform, and its mobile application remains highly optimized for all functionalities, including uploading images. The process is designed to be straightforward and intuitive right from your smartphone. Here’s how to do it:
⚠️ Make sure you have the most recent version of the Instagram app installed on your device, whether it’s iOS or Android. Keeping your app updated ensures you have access to the latest features and improvements.
- Launch the Instagram App: Open the Instagram application on your mobile phone. Look for the ‘+’ icon typically located at the top right of your feed screen, or at the bottom navigation bar. Tap this button to start a new post.
- Select Your Photo: You will be prompted to choose the type of content you want to create. Select the option to upload a photo. You can then choose an existing image from your phone’s photo library or take a new photo directly using your camera.
- Edit Your Image: Instagram provides a range of built-in editing tools to enhance your photos before posting. You can apply filters to alter the mood and style of your image, crop it to the desired dimensions, adjust the size and orientation, and make other enhancements like brightness, contrast, and saturation. Take advantage of these tools to make your photo visually appealing.
- Craft Your Caption and Details: Write an engaging caption to accompany your image. This is your opportunity to tell a story, ask a question, or provide context. You can also tag other users who are in the photo or relevant to the post, add relevant hashtags to increase discoverability, and include a location to make your post geographically relevant.
- Publish Your Post: Once you are satisfied with your image, caption, and details, give it one final review. Then, tap the ‘Share’ or ‘Publish’ button, usually located at the top right, to post your photo to your Instagram feed.
 Person uploading a photo to Instagram using the mobile app
Posting to Instagram from a PC: Using Instagram Web
For those who often work from a computer, Instagram doesn’t limit you to mobile uploads only. The desktop version of Instagram, known as Instagram Web, offers a convenient way to upload photos directly from your computer through any web browser. This can streamline your workflow, especially if you edit photos on your desktop.
- Access Instagram Website: Go to the Instagram website in your preferred web browser and log in using your Instagram account credentials.
- Initiate a New Post: Once logged in, look for the ‘+’ button. On the Instagram website, this is typically located in the top navigation bar, next to the direct messages icon. Click this button to start creating a new post.
- Upload Your Photo: A window will appear, allowing you to choose the image you wish to upload from your computer’s files. You can either browse your folders to select the file or simply drag and drop an image file directly into the window.
- Adjust and Edit: After selecting your image, you’ll have options to adjust its appearance. You can resize it to different aspect ratios such as original, square (1:1), portrait (4:5), or landscape (16:9), or simply zoom in. Similar to the mobile app, Instagram Web also provides filters and adjustment tools to modify saturation, temperature, contrast, and more.
- Add Details and Share: Just like on mobile, you can add a compelling caption, incorporate relevant hashtags, and tag other Instagram accounts. You can also access advanced settings, such as options to disable comments or hide like counts, if needed.
- Share Your Post: After finalizing all details, click the ‘Share’ button to publish your photo to your Instagram feed directly from your desktop.
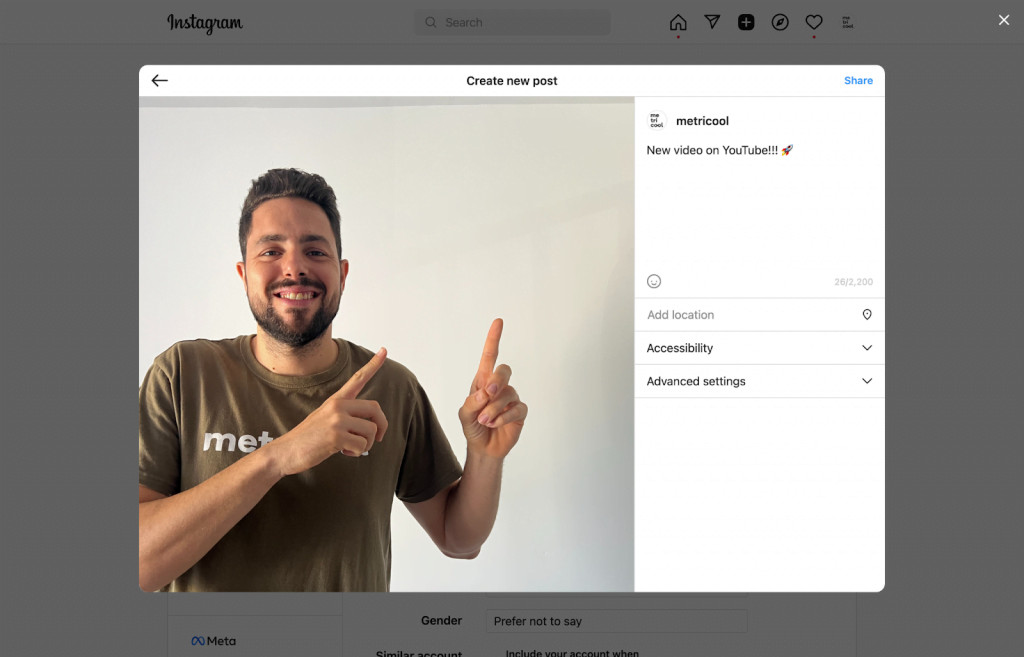 Screenshot of uploading a photo to Instagram using Instagram Web on desktop
How to Upload Photos to Instagram Using Metricool
The third method to upload photos to Instagram introduces a powerful social media management tool: Metricool. Consider Metricool as your all-in-one social media command center, offering extended functionalities beyond just uploading photos.
📍 Sign up for FREE at Metricool and schedule your first Instagram photo post
- Navigate to Metricool Planning: Access the Metricool website and log in to your account. Go to the ‘Planning’ section, which is designed for managing and scheduling content across various social media platforms.
- Create a New Post: Within the ‘Planning’ dashboard, click on ‘Create Post’. This will open the post composer screen. Select the Instagram icon and then choose the option to ‘Post in feed’.
- Customize Your Post: In the post composer, you can fully personalize your Instagram photo post. Add a captivating caption, incorporate relevant hashtags, and tag other accounts. Metricool also provides a preview feature, allowing you to see exactly how your post will look in your Instagram feed before it goes live.
- Utilize Image Finder (Optional): If you’re looking for the perfect image to post and need inspiration, Metricool integrates with Pexels, a free stock photo platform. You can search for images directly within Metricool using keywords or color palettes to find visually appealing content.
- Publish or Schedule: To post immediately, ensure the ‘Publish Now’ checkbox is selected and click ‘Save’. Alternatively, you can schedule your post for a future date and time, which is a significant advantage for content planning.
By clicking ‘Save’, your photo will be published to Instagram through Metricool.
Beyond just uploading photos to Instagram, Metricool offers a suite of benefits for managing your social media presence:
- Cross-Platform Content Planning: Efficiently plan and schedule content for Instagram and all your other social media networks from one centralized platform.
- In-depth Analytics: Access comprehensive metrics to analyze the performance of your posts and the overall health of your social media profiles, helping you understand what resonates with your audience.
- Community Management: Manage interactions effectively by responding to comments and private messages from all your social channels directly from Metricool’s ‘Inbox’ feature, ensuring you never miss an engagement opportunity.
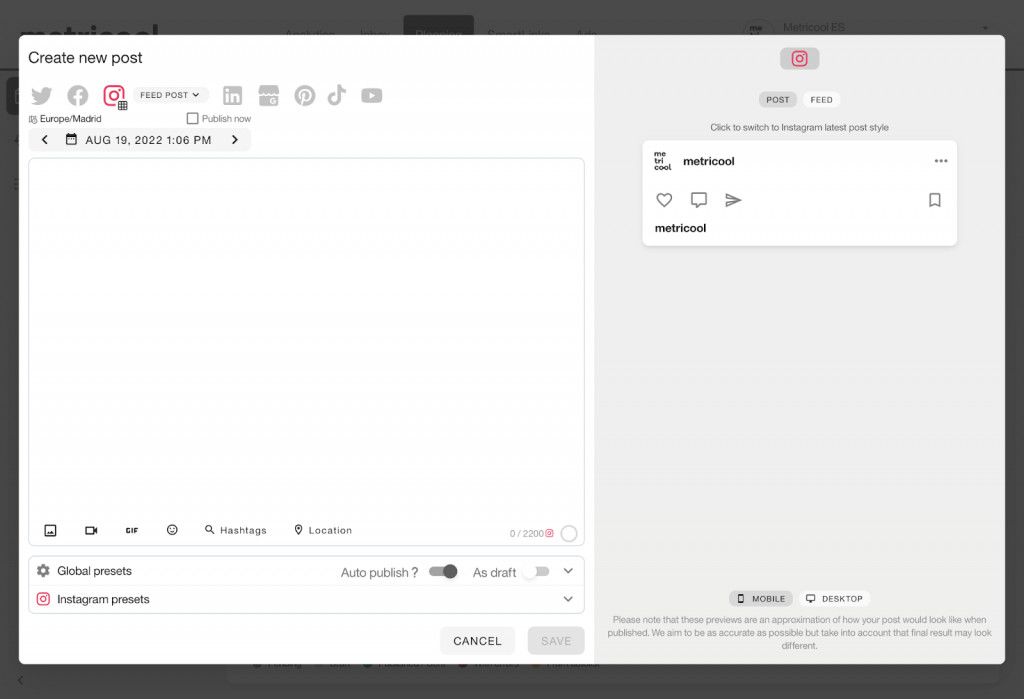 Screenshot of uploading a photo to Instagram using Metricool platform
Now you are equipped with three distinct methods for uploading photos to Instagram: via the mobile app, through Instagram Web on your computer, and using Metricool. Each method offers its own advantages depending on your workflow and needs.
Which method do you typically use to upload your Instagram content? Share your preference in the comments below!
For a deeper dive into mastering Instagram, check out Metricool’s Instagram Marketing guide.
Anniston Ward , 06 October 2022