Sharing photos from your iPhone via email is a straightforward process, perfect for sending memories to family, collaborating with colleagues, or submitting images for work. Whether you want to send a single snapshot or a collection of pictures, your iPhone offers multiple easy ways to attach photos to your emails. This guide will walk you through the simple steps to email photos from your iPhone, ensuring your precious moments are delivered seamlessly.
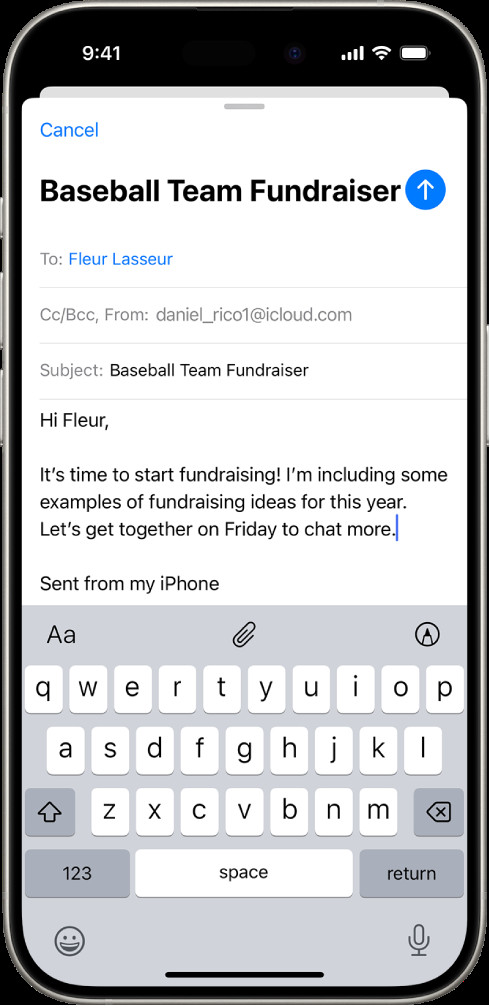 A draft email being composed with the attachment options above the keyboard.
Method 1: Attaching Photos and Videos Directly to Your Email
This is the most common and quickest method to email photos from your iPhone. You can directly attach photos and videos while composing your email in the Mail app. Here’s how:
- Open the Mail App: Launch the Mail app on your iPhone.
- Compose a New Email: Tap the compose button to start a new email. Fill in the recipient’s email address, subject line, and your message body.
- Insert Attachment: In the body of your email, tap where you want to insert the photo. Look for the Expand Toolbar button (it appears as an arrow pointing upwards above the keyboard) and tap it. Then, tap the Attachment button (it looks like a paperclip).
- Select Your Photo or Video:
- From Photo Library: Tap the Photos icon. Your photo library will appear, allowing you to browse your albums and select the photos or videos you wish to attach. Tap on the desired media to select them. Once you’ve chosen all your files, tap Done in the top right corner to return to your email draft.
- Take a New Photo or Video: If you need to take a fresh picture or video, tap the Take Photo or Video button (camera icon). This will open your camera. Capture your photo or video, and then tap Use Photo or Use Video to attach it to your email. If you’re not satisfied, tap Retake.
Method 2: Attaching Documents and Files from the Files App
Besides photos and videos, you might need to email documents or other files from your iPhone. The Files app makes this process simple:
- Follow Steps 1-3 from Method 1: Open the Mail app, start a new email, and tap the Expand Toolbar button and then the Attachment button.
- Attach from Files: Tap the Attach File button (folder icon). This will open the Files app interface.
- Locate Your Document: In the Files app, you can browse through:
- Recent: Access recently opened files.
- Shared: View files shared with you.
- Browse: Explore files stored on your iPhone, iCloud Drive, or other connected cloud services like Dropbox or Google Drive.
- Navigate to the location of your document, and tap on the file to select it and attach it to your email.
Method 3: Scanning Paper Documents and Emailing as PDF
Need to send a hard copy document? Your iPhone can scan it and attach it as a PDF to your email:
- Follow Steps 1-3 from Method 1: Open Mail, start a new email, and access the attachment options.
- Scan Document: Tap the Scan Document button (icon resembling a document with a camera). This will activate your iPhone’s camera for scanning.
- Scan Your Document: Position your iPhone over the document. It will automatically detect the edges and capture the page. You can also manually capture by tapping the shutter button or a volume button. Use the flash icon to toggle flash settings if needed.
- Review and Save: After scanning, you can:
- Tap Retake if you are not satisfied with the scan.
- Tap Keep Scan to save the scanned page.
- Scan additional pages if you have a multi-page document.
- Once all pages are scanned, tap Save.
- Edit Scanned Document (Optional): Before sending, you can tap on the scanned document to edit it:
- Crop: Adjust the borders of the scan using the crop tool.
- Filters: Apply different filters to enhance readability.
- Rotate: Rotate the image if needed.
- Delete: Remove the scanned page if necessary.
Method 4: Creating and Attaching Drawings to Emails
For times when words aren’t enough, you can create a quick sketch or drawing and send it as an attachment:
- Follow Steps 1-3 from Method 1: Open Mail, begin a new email, and access attachment options.
- Access Markup Toolbar: Tap the Markup button (pen icon) to bring up the drawing toolbar.
- Create Your Drawing: Choose a drawing tool (pen, marker, pencil) and color from the toolbar. Use your finger to draw directly in the provided space.
- Insert Drawing: When finished, tap Done, then tap Insert Drawing to attach your creation to the email.
- Edit Drawing (If Needed): To continue working on a drawing, tap on the attached drawing in your email and then tap the edit button to reopen the Markup toolbar.
Dealing with Large Files: Mail Drop
If you are trying to email large photos or videos and exceed your email account’s size limits, your iPhone may offer to use Mail Drop. Mail Drop is an Apple service that allows you to send attachments up to 5 GB in size. If prompted, follow the on-screen instructions to use Mail Drop to send your large files. Keep in mind that recipients will receive a link to download the attachment, which is typically available for 30 days.
Conclusion
Emailing photos and various attachments from your iPhone is a versatile and user-friendly process. Whether you’re sharing photos, sending documents, or even sketching out ideas, your iPhone’s Mail app provides the tools you need. With these methods, you can efficiently communicate and share information directly from your iPhone. Start emailing your photos and files today and take full advantage of your iPhone’s capabilities!