Taking your own passport photo might seem daunting, but with the right approach and a sprinkle of know-how, it’s absolutely achievable. Forget expensive studio visits and rigid schedules. In today’s digital age, your smartphone and a few minutes are all you need to create a compliant passport photo from the comfort of your home.
This comprehensive guide will walk you through each step of the process, ensuring your DIY passport photo not only meets official requirements but also saves you time and money.
Get a perfectly compliant passport photo in just minutes with a reliable passport photo maker like PhotoAiD.
- Simply upload a photo or take a new one directly through the tool.
- Let the intelligent AI instantly analyze and adjust your image for compliance.
- Have your photo double-checked by a dedicated compliance expert.
- Download the digital version or order high-quality prints. It’s that easy!
 Collage showing the PhotoAiD interface on a phone with features like AI check, expert verification, and download options.
Discover the ease of creating a digital passport photo or order professional prints with the trusted services of PhotoAiD®.
Unmatched Assurance & Convenience:
- 100% Acceptance Guarantee: Be confident your photo will pass official checks.
- Expert Verification: Real professionals review your photo for guaranteed compliance.
- Lightning Fast: Get your passport photo ready in as little as 3 minutes.
- Trusted by Millions: Join over 11,000,000 satisfied users.
“As a busy parent, finding time for passport photos was a struggle. PhotoAiD was a lifesaver! I took a quick photo at home, uploaded it, and had a perfect passport photo almost instantly. Even taking a photo of my toddler was surprisingly easy!”
Sarah J.
Rated Excellent by over 7,000 reviewers on
Want to learn more about the passport application process? Let’s first understand the official guidelines for passport photos.
Understanding the Official Passport Photo Rules
Before you embark on your Do It Yourself Passport Photo journey, it’s crucial to familiarize yourself with the precise regulations. These rules are in place to ensure your photo is accepted without delays. Let’s break down the essential US passport photo requirements you need to know.
- Photo Dimensions: Your passport photo must be a square, measuring exactly 2×2 inches (51×51 mm). Within this square, specific head size proportions are critical. The head height, measured from the bottom of your chin to the top of your head, should be between 1 inch and 1.4 inches (25 mm and 35 mm).
- Head Position and Alignment: Position yourself squarely facing the camera. Your head should be centered in the frame, and your eyes must be level with the camera lens. Ensure both your eyes and the top of your shoulders are clearly visible in the photo.
- Facial Expression: A neutral expression is key. While a slight, closed-mouth smile is permitted, it’s best to relax your facial muscles and maintain a natural expression. Keep your eyes wide open and avoid squinting or raising your eyebrows excessively.
- Photo Quality and Lighting: Image clarity is paramount. The photo must be sharp, without any blurriness, pixelation, or distracting shadows. Lighting should be even across your face, eliminating shadows, especially around the eyes and neck. Overexposure or underexposure can also lead to rejection.
- Background Requirements: The background must be plain white or off-white. Avoid backgrounds with patterns, textures, or any visible objects. Ensure the background is smooth and free from shadows or creases.
- Digital Alterations and Editing: Absolutely no digital retouching or enhancements are allowed. This includes removing blemishes, smoothing skin, or altering colors. Only professional, compliance-ensured adjustments are acceptable (like those provided by services like PhotoAiD).
- Headroom (White Space): While not explicitly defined, there should be a small amount of white space between the top of your head and the upper edge of the photo. This ensures proper cropping and head size.
- Print Specifications: If you need printed passport photos, use high-quality glossy or matte photo paper. Avoid regular paper as it may not be accepted.
Beyond these technical aspects, there are guidelines regarding attire and accessories for your passport photo:
- Head coverings: Headwear is generally prohibited unless worn daily for religious or medical reasons. If worn, it must not obscure your facial features. Small hair accessories are permitted only if they do not cover your eyebrows or eyes. If bangs obscure your face, use bobby pins to keep them off your face.
- Dress Code: The passport photo dress code is relatively lenient. Avoid wearing white tops (as they can blend into the white background), camouflage patterns, or uniforms. Opt for plain, dark-colored clothing to create contrast with the background.
- Eyeglasses: Prescription glasses are generally not allowed in passport photos anymore. Exceptions are made only for documented medical conditions, requiring a signed statement from a medical professional.
- Makeup: Makeup is permitted, but it should be natural and not alter your everyday appearance. Avoid heavy contouring, fake eyelashes, and dramatic eye makeup. Steer clear of shimmery or glossy products as they can cause unwanted reflections and distort your features.
- Hairstyle: Your passport photo hair can be styled as you prefer, as long as it doesn’t obstruct your face. Ensure your forehead, eyebrows, and eyes are fully visible.
- Jewelry: Subtle jewelry is generally acceptable. Small earrings and delicate necklaces are usually fine. However, avoid bulky or distracting jewelry that could cause glare or obscure your facial features.
It might seem like a lot of rules, but don’t be discouraged! Taking a do it yourself passport photo is still straightforward. Tools and services are available to simplify the process and ensure compliance. Let’s explore how to take a passport-size photo at home in just four easy steps.
4 Simple Steps to Take a Passport-Size Photo at Home
Ready to create your do it yourself passport photo? Follow these four clear steps to achieve professional-quality results without leaving your home.
Step 1: Prepare Yourself for the Photo Session
No need for elaborate preparations, but a little attention to detail will make the process smoother and the outcome better. Let’s get you ready for your passport photo.
- Clothing Choice: Opt for plain, dark-colored clothing. This provides a good contrast against the white background and ensures you are the focus of the photo.
- Makeup – Keep it Natural: If you wear makeup, keep it simple and natural. Avoid heavy, glossy, or shimmery products that can reflect light or alter your appearance in the photo.
- Hair Accessories and Headgear: Remove any non-religious head accessories or headgear. If you wear hairbands or large clips, take them off. If you have bangs that cover your eyebrows, pin them back temporarily.
- Hairstyle: Style your hair so that your face is fully visible. Tuck hair behind your ears if needed to ensure your face, especially your eyes and eyebrows, is not obscured.
- Eyeglasses Removal: Take off your eyeglasses unless you have a documented medical reason to wear them (and supporting documentation).
- Jewelry – Less is More: Remove bulky or flashy jewelry. Small, understated pieces are usually acceptable, but it’s best to minimize jewelry to avoid any potential issues.
Once you’ve checked off these points, you’re ready to set up your camera.
Step 2: Camera Setup and Settings
Modern smartphone cameras are more than capable of capturing high-quality passport photos. Here’s how to optimize your camera settings.
-
Resolution Check: Ensure your camera is set to the highest resolution. Most smartphones default to high resolution, but it’s worth verifying.
- iOS Devices: Go to Settings → Camera → Formats. Select “Most Compatible” for “Camera Capture” to ensure maximum compatibility and highest quality. For “Photo Capture” choose the highest photo mode available.
- Android Devices: Open your camera app and look for settings (often a gear icon). Find “Picture size” or “Resolution” and select the highest option. For Samsung Galaxy devices, resolution settings might be at the top of the screen within the camera app.
-
Rear Camera vs. Front Camera: While front-facing cameras are convenient for selfies, rear cameras generally offer superior image quality and resolution. Whenever possible, use your phone’s rear camera for your passport photo. However, high-end smartphone front cameras (like iPhone 15’s 12MP front camera) can also be sufficient if image quality is high.
-
Avoid Filters and Editing: It’s crucial to disable any filters or editing features on your camera app. Passport photos must be completely unaltered and represent your natural appearance. Turn off any settings that automatically adjust exposure, saturation, or contrast.
Step 3: Taking the Photo – Lighting and Position are Key
You don’t need professional studio equipment to achieve excellent results. Natural daylight is your best friend for do it yourself passport photos.
- Optimal Lighting – Natural Daylight: The best time to take your photo is during daylight hours, ideally between 9 am and 1 pm when natural light is soft and even. Avoid direct sunlight, which can create harsh shadows.
- Positioning for Natural Light:
- Stabilize Your Phone: Place your phone on a stable surface like a window sill or a table. Use books or any stable object to prop it up and prevent tilting. Ensure the camera lens is at your eye level when you are seated or standing.
- Facing the Light Source: Position yourself facing a window to maximize natural light. The light should illuminate your face evenly from the front.
- Taking Photo with Assistance: If someone is helping you, position yourself at about a 30-degree angle to the window to prevent the photographer from casting shadows on your face in the photo.
- Using Timer or Burst Mode: Set a timer (e.g., 10 seconds) on your phone to give yourself time to get into position and compose yourself. Alternatively, use burst mode to take multiple photos in quick succession, increasing the chances of capturing a perfect shot.
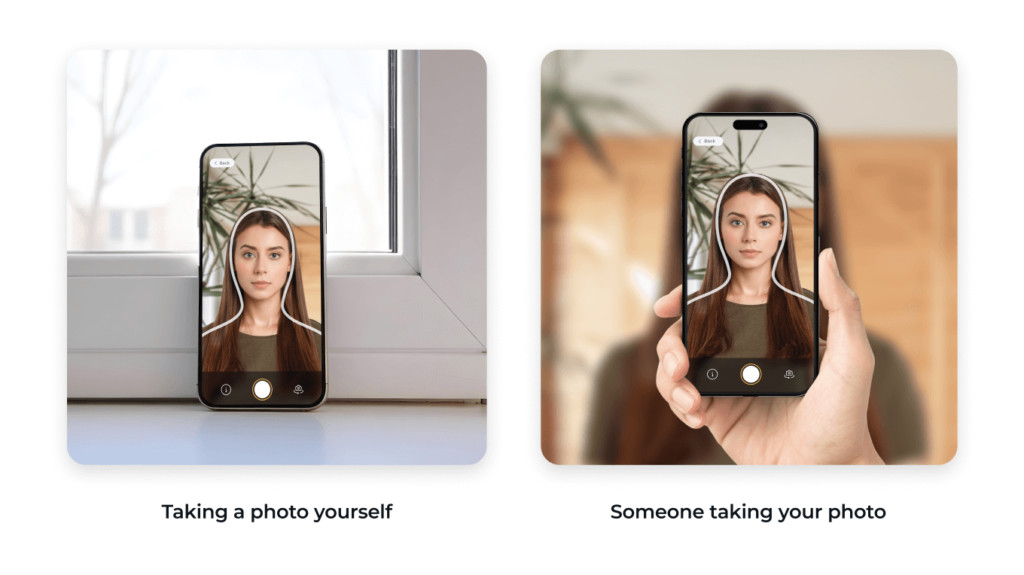 Illustration showing how to take a passport photo at home alone using a timer and with help from someone, both using natural window light.
Step 4: Photo Editing and Compliance Check
Once you have captured your photo, the final step is to ensure it meets all passport photo requirements regarding size, background, and overall compliance.
-
DIY Editing vs. Professional Tools: You can attempt to crop and adjust your photo manually using free online tools for cropping and background removal. However, achieving perfect compliance with all regulations can be challenging.
-
Utilize a Passport Photo Editor: For guaranteed compliance and ease of use, consider using a dedicated passport photo editor app like PhotoAiD® app for iOS or PhotoAiD® for Android. These tools are designed specifically for passport photos and offer:
- AI-Powered Adjustments: Advanced AI automatically resizes, crops, and adjusts your photo to meet exact size and head dimension specifications. It also ensures the background is compliant.
- Expert Human Review: Professional photo experts manually review your photo to ensure it adheres to all official passport photo guidelines, providing an added layer of assurance.
-
Digital Delivery and Print Options: Passport photo apps typically provide a digital passport photo instantly via email. They also often offer templates for printing multiple passport photos on standard 4×6-inch photo paper, which you can print at home or at a local photo printing service. Some services also offer high-quality printed passport photos delivered to your doorstep.
-
Acceptance Guarantee and Support: Reputable passport photo services often provide an acceptance guarantee and customer support. If your photo is rejected (which is highly unlikely with expert-verified services), they offer assistance in taking a new photo or even a refund.
By following these four steps and utilizing helpful tools, creating a compliant do it yourself passport photo becomes a simple and stress-free process.
Common Mistakes to Avoid: Passport Photo Don’ts
To further increase your chances of success and avoid common pitfalls, let’s look at the top “don’ts” when taking passport photos at home. Based on analysis of thousands of user photos, here are ten frequent mistakes to avoid:
- Insufficient Torso Visibility (33.5%): Do not zoom in too closely. Ensure your upper shoulders are visible in the frame.
- Mouth Not Fully Closed (21.3%): Keep your mouth completely closed. Even a slightly open mouth can lead to rejection.
- Uneven Lighting (14.7%): Avoid uneven lighting that creates shadows on your face. Ensure lighting is consistent and balanced.
- Low Resolution (13.2%): Do not use low-resolution camera settings. Use the highest resolution possible to prevent grainy or pixelated photos.
- Face Shadows (10.6%): Be mindful of shadows obscuring your facial features. Position yourself to eliminate shadows, especially on your face and around your eyes.
- Insufficient Lighting (9.4%): Ensure your face is adequately lit. Poor lighting can make crucial facial features unclear.
- Blurry Photo (8.3%): Avoid blurry or out-of-focus photos. Stabilize your camera and ensure you remain still while taking the photo.
- Side Lighting Imbalance (7.4%): Avoid side lighting that makes one side of your face significantly brighter than the other. Frontal, even lighting is preferred.
- Photo of a Photo (5.4%): Do not submit a photograph of a physical photo. Submit a digital image taken directly with a digital camera or smartphone.
- Unnatural Facial Expression (4.3%): Avoid broad or unnatural smiles that distort your facial features. Maintain a neutral and relaxed expression.
By being aware of these common mistakes, you can proactively avoid them and create a passport photo that is much more likely to be accepted. For visual examples of dos and don’ts, refer to a comprehensive guide with passport photo examples.
Taking Baby Passport Photos at Home: Tips and Tricks
Taking passport photos of babies, especially newborns, can present unique challenges. However, it’s often more comfortable and less stressful for both the baby and parents to do it at home. Here are some specific tips for successful baby passport photos at home.
Positioning Your Baby
- Baby Alone in Photo: The baby must be the only person in the photo. You cannot hold the baby in the picture.
- Car Seat Method: For infants who cannot sit up unaided, a car seat can be helpful. Drape a plain white sheet or blanket over the car seat to create a suitable background. Position the baby in the car seat and ensure they are facing forward.
- Laying Down Method: Another option is to lay the baby on their back on a white blanket or sheet placed on the floor or a bed. Take the photo from directly above, ensuring the entire face is visible and well-lit.
- Head Support: Use a rolled-up blanket or towel placed under the baby’s neck for support. This can help keep their head straight and prevent it from tilting to the side.
Facial Expression and Getting Baby’s Attention
- Neutral Expression Ideal: Ideally, the baby should have a neutral expression and look directly at the camera. However, authorities understand this is challenging with infants.
- Eyes Partially Open Acceptable: For infants, eyes being partially open is acceptable. Even a slight grimace is usually tolerated. Crying, however, is generally unacceptable.
- Attention-Grabbing Techniques:
- Toys and Sounds: Hold a favorite toy or make gentle sounds above the camera to capture the baby’s attention and encourage them to look forward.
- Background Entertainment: Play a quiet cartoon or soothing music in the background to keep the baby somewhat still and focused, then quickly take the photo when they are looking in the general direction of the camera.
- Avoid Funny Faces: Do not make funny faces or loud noises to get the baby’s attention, as this might make them laugh or cry, resulting in an unsuitable photo.
 Three-step illustration showing how to take a baby passport photo at home using the PhotoAiD app.
With patience and these baby-specific techniques, you can successfully capture an acceptable passport photo of your infant at home.
Do It Yourself Passport Photo: Is It Really Possible?
Absolutely! Taking a do it yourself passport photo is not only possible but also increasingly convenient and popular. It offers numerous advantages, including:
- Convenience: Take photos at any time that suits you, without appointment scheduling or travel.
- Cost-Effective: Significantly cheaper than professional studio photos.
- Comfort and Control: Especially beneficial for babies, children, and individuals with mobility issues, allowing photos to be taken in a familiar and comfortable environment.
- Time-Saving: Eliminates travel time and waiting at photo studios or pharmacies.
While I might be a proponent of DIY passport photos, don’t just take my word for it. Here are real-life experiences from users who found do it yourself passport photos incredibly beneficial, as shared in Trustpilot reviews:
“Taking passport photos for my newborn at home was incredibly convenient and stress-free. PhotoAiD made the whole process so easy, ensuring the photo was perfect without any hassle.” – Vie (AU)
“As someone with a disability, the ability to take my passport photo at home was a game-changer. The service was simple, efficient, and the expert check gave me confidence in my photo.” – Gill Harvey (GB)
“Using PhotoAiD for our family passport photos has been fantastic. It’s quick, easy, and we can do it all from home. Highly recommend!” – Tyra Ivy (US)
Frequently Asked Questions (FAQ)
Is a phone photo good enough for a passport photo?
Yes, definitely. Smartphones with cameras of 5 megapixels or higher are perfectly capable of taking passport-sized photos at home. Just ensure you adhere to all official passport photo guidelines regarding lighting, background, and facial expression.
Can I use an app to take a passport photo?
Yes, using a dedicated passport photo app like PhotoAiD® for iOS or PhotoAiD® for Android is a highly recommended method. These apps are designed to guide you through the process and ensure your photo meets all requirements. They often come with acceptance guarantees and refund policies.
Can I submit a passport photo that I took of myself?
While selfies are not recommended, taking a passport photo yourself is entirely acceptable. The key is to follow all passport photo criteria meticulously. Using a timer or getting someone to assist you is advisable to avoid the selfie style and ensure proper positioning and photo quality. If you are unsure about compliance, using a service like PhotoAiD® with expert review can provide peace of mind.
Can I print my own passport photo?
Yes, you can print passport photos on 4×6-inch paper at home using a color printer or at local stores like CVS or Walgreens. Remember to use high-quality glossy or matte photo paper for printing to ensure acceptance.
Is it really possible to take passport photos at home?
Absolutely! Taking passport photos at home is not only possible but also very practical. By using your smartphone and a reliable passport photo app like PhotoAiD®, you can simplify the process significantly. Here’s a quick recap of how easy it is with PhotoAiD®:
- Take a photo of yourself and upload it to the app.
- Let the AI automatically adjust the background, size, and cropping.
- Opt for a manual compliance check by experts.
- Choose between a digital photo or printed copies.
- Download your do it yourself passport photo or wait for your prints to arrive!
How useful was this post?
Click on a star to rate it!
Average rating 4.6 / 5. Vote count: 23
No votes so far! Be the first to rate this post.
Sources:
Sylwia Green
Sylwia is a skilled writer with a BA in English Studies and an active SPJ member. For nearly three years now, she’s been writing captivating articles for international companies, turning her lifelong passion into a career.