Need a passport photo but dreading the trip to a photo studio? Good news! You can absolutely take your own passport photo right in the comfort of your home. With a smartphone and a few simple steps, you can create a compliant passport photo that meets all official requirements, saving you time and money.
This comprehensive guide will walk you through everything you need to know about taking passport photos at home, ensuring your DIY efforts result in a picture-perfect application.
Understanding the Official Passport Photo Rules
Before you grab your phone and start snapping, it’s crucial to understand the official guidelines for passport photos. These rules are in place to ensure your photo is accepted and doesn’t cause any delays in your passport application. Let’s break down the key requirements:
Size and Dimensions
Your passport photo must be a square, measuring 2×2 inches (51×51 mm). Within this square, the head size is also strictly regulated. The head height, measured from the bottom of your chin to the top of your head (including hair), should be between 1 inch and 1.4 inches (25 mm and 35 mm).
Position and Posture
Proper positioning is essential for passport photo compliance. You must:
- Face the camera directly: Position yourself straight in front of the camera, ensuring your face is square to the lens.
- Center your head: Your head should be centered within the frame.
- Eye Level: Ensure your eyes are level with the camera lens.
- Visible Shoulders: The top portion of your shoulders should be visible in the photo.
Facial Expression
While passport photos aren’t meant to be glamour shots, your facial expression still matters. The rules state:
- Neutral Expression: A neutral expression is best.
- Closed Mouth Smile: A natural smile with your mouth closed is generally acceptable. Avoid broad, toothy smiles or any exaggerated expressions.
- Open Eyes: Your eyes must be wide open and clearly visible.
Photo Quality and Lighting
The technical quality of your photo is just as important as your pose. Pay attention to these factors:
- Sharp Focus: The photo must be in sharp focus, free from blur or pixelation.
- Even Lighting: Ensure the lighting is even across your face and the background. Avoid harsh shadows, especially on your face or behind you.
- No Glare or Reflections: Make sure there are no distracting glare or reflections on your face or glasses (if worn for medical reasons).
Background Requirements
The background of your passport photo is strictly defined:
- Plain White or Off-White: The background must be a plain white or off-white color.
- No Shadows or Patterns: The background should be free of shadows, patterns, or any objects. A plain wall or a white sheet works perfectly.
Restrictions on Editing
Passport photos must accurately represent your current appearance. Therefore, editing is heavily restricted:
- No Digital Alterations: You cannot digitally alter your photo to change your appearance. This includes removing blemishes, smoothing skin, or changing colors.
- Professional Retouching (Limited): Only minimal, professional retouching for minor blemishes might be acceptable, but it’s generally best to avoid any editing.
White Space
While not explicitly defined, there should be a small amount of white space between the top of your head and the top edge of the photo. This ensures proper cropping and head size.
Print Quality
If you need to submit a printed passport photo, use:
- Glossy or Matte Paper: Print your photo on high-quality glossy or matte photo paper. Avoid regular printer paper.
Additional Guidelines: What You Can and Cannot Wear
Beyond the technical aspects, there are also guidelines about what you can wear in your passport photo:
- Head Coverings: Head coverings are generally not allowed unless worn daily for religious or medical reasons. If worn, they must not obscure your face.
- Hair Accessories: Hair accessories are generally discouraged. If bangs cover your eyebrows or eyes, use bobby pins to keep them out of your face.
- Dress Code: Avoid white tops as they can blend into the background. Darker, plain clothing is recommended. Avoid uniforms or camouflage patterns.
- Eyeglasses: Eyeglasses are generally not allowed in passport photos anymore. They are only permitted for documented medical reasons with a doctor’s note.
- Makeup: Makeup is allowed as long as it doesn’t alter your natural appearance. Avoid heavy makeup, contouring, fake lashes, or shimmery/glossy products that can cause glare.
- Hair Style: Any hairstyle is acceptable as long as it doesn’t obscure your face, eyebrows, or eyes.
- Jewelry: Small, discreet jewelry is usually acceptable. Avoid large, bulky jewelry that could cause glare or be distracting.
Step-by-Step Guide: Taking Passport Photos at Home in 4 Easy Steps
Now that you understand the rules, let’s get to the practical part. Here’s a simple 4-step guide to taking your own passport photo at home:
Step 1: Prepare Yourself – Looking the Part
Getting ready for your passport photo is straightforward. Here’s a quick checklist to ensure you’re prepared:
- Clothing Choice: Opt for plain, dark-colored clothing. This helps you stand out against the white background and ensures your attire isn’t distracting.
- Makeup (Keep it Natural): If you wear makeup, keep it simple and natural. Avoid heavy makeup, contouring, fake eyelashes, and glossy products. Matte finishes are best to prevent glare.
- Hair and Accessories: Keep your hair neat and away from your face. Avoid headbands, large hair clips, or anything that could obscure your face. If you wear glasses for medical reasons and they are permitted, ensure they are clean and don’t cause glare.
- Jewelry (Keep it Minimal): Remove any bulky or flashy jewelry. Small earrings or necklaces are generally acceptable if they are not distracting.
- Facial Appearance: Ensure your face is clean and free of anything that might temporarily alter your appearance, like temporary tattoos or face paint.
Step 2: Camera and Setup – Getting the Right Equipment
You don’t need professional photography equipment to take a passport photo at home. Your smartphone camera is perfectly capable! Here’s how to set up:
- Smartphone Camera: Most modern smartphones have cameras that exceed the required megapixels for a passport photo. Ensure your camera settings are set to the highest resolution for the best image quality.
- For iPhones: Go to Settings → Camera → Formats and choose “Most Compatible” for photo capture and the highest resolution in “Photo Capture”.
- For Androids: Open your Camera app and look for settings (usually a gear icon). Find the resolution settings and select the highest option.
- Use the Rear Camera: The rear camera on your phone generally offers better resolution than the front-facing camera. Ask someone to help you take the photo, or use a tripod or phone stand.
- Avoid Digital Zoom: Do not use digital zoom as it can reduce image quality and make the photo blurry. Instead, physically move closer to the subject if needed.
- Disable Filters and Editing: Make sure all filters and editing options are turned off in your camera app. Passport photos must be unedited and accurately represent your natural appearance.
Step 3: Taking the Photo – Lighting and Posing
Proper lighting and posing are key to a successful DIY passport photo. Follow these tips:
- Natural Daylight is Best: Take your photo in natural daylight. The ideal time is between 9 am and 1 pm when the light is soft and even. Avoid direct sunlight, which can create harsh shadows.
- Position Near a Window: Stand or sit facing a window. The natural light will illuminate your face evenly. If the light is too harsh, use a thin white curtain to diffuse it.
- Background Setup: Find a plain white or off-white wall in your home. If you don’t have a suitable wall, hang a white sheet or use a white poster board as a backdrop. Make sure the background is smooth and free of wrinkles or shadows.
- Stabilize Your Camera: To avoid blurry photos, stabilize your camera. Use a tripod, phone stand, or prop your phone against a stable object like a stack of books. This is especially important if you are taking the photo yourself using a timer.
- Posing and Expression:
- Stand or sit straight with good posture.
- Face the camera directly.
- Keep your head level and centered in the frame.
- Maintain a neutral expression or a slight, closed-mouth smile.
- Keep your eyes open and look directly at the camera lens.
- Take Multiple Shots: Take several photos to choose from. Use a timer or burst mode to capture a range of shots and increase your chances of getting a perfect one.
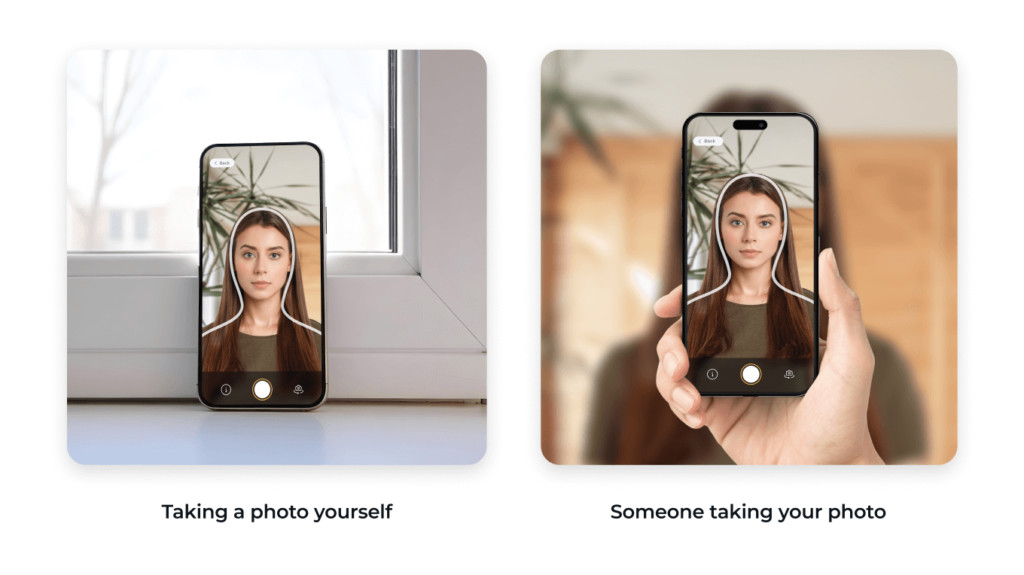 Setting up for a DIY passport photo: using a stabilized camera alone versus getting assistance to avoid shadows by positioning near a window.
Step 4: Editing and Ensuring Compliance – Getting it Right
Once you have taken your photos, the final step is to ensure they meet all the passport photo requirements.
- Cropping to 2×2 inches: Crop your photo to the correct 2×2 inch size. Ensure the head size is within the required dimensions (1-1.4 inches). Pay attention to the white space around your head.
- Background Check: Verify that the background is plain white or off-white and free of shadows or objects.
- Quality Check: Review your photo for sharpness, even lighting, and proper exposure. Make sure there are no shadows on your face and that the photo is not blurry or pixelated.
- Professional Passport Photo Tools: To ensure 100% compliance and save yourself time and worry, consider using a dedicated passport photo service or app like PhotoAiD. These tools use AI and expert review to:
- Automatically Crop and Resize: Ensure your photo is the correct size and head dimensions.
- Background Removal and Correction: Automatically remove or correct the background to meet requirements.
- Compliance Checks: Verify your photo against all official passport photo guidelines.
- Expert Verification: Offer manual review by passport photo experts to guarantee acceptance.
By using such a service, you can get a digital passport photo instantly or order prints delivered to your door, with the peace of mind that your photo will be accepted.
Top 10 Don’ts for DIY Passport Photos – Avoid Common Mistakes
To further help you succeed, here are the top 10 mistakes to avoid when taking passport photos at home, based on common rejection reasons:
- Poor Torso Visibility: Don’t zoom in too much. Ensure your upper shoulders are visible in the photo.
- Mouth Open: Don’t have your mouth open. Keep your mouth fully closed or maintain a slight, closed-mouth smile.
- Uneven Lighting: Don’t have uneven lighting. Ensure consistent lighting across your face and background.
- Low Resolution: Don’t use low resolution settings. Use the highest resolution your camera offers to avoid grainy or pixelated photos.
- Face Shadows: Don’t allow shadows to obscure your facial features. Adjust lighting and positioning to eliminate shadows on your face.
- Insufficient Lighting: Don’t take photos in poorly lit environments. Ensure your face is clearly and brightly lit so all features are visible.
- Blurry Photos: Don’t submit blurry photos. Stabilize your camera and ensure proper focus.
- Side Lighting Imbalance: Don’t have imbalanced side lighting. Ensure both sides of your face are evenly lit.
- Photo of a Photo: Don’t submit a photo of a physical photo. Use a digital photo taken directly with your camera.
- Unnatural Facial Expression: Don’t make unnatural or exaggerated facial expressions. Stick to a neutral or slightly smiling expression.
Taking Baby Passport Photos at Home – Tips for Infants and Newborns
Taking passport photos of babies, especially newborns, requires extra patience and care. Here are specific tips for baby passport photos at home:
Positioning Your Baby
- Alone in the Photo: The baby must be the only person in the photo. You cannot hold them or be visible in the picture.
- Car Seat Method: For babies who cannot sit up, place them in a car seat covered with a plain white sheet or blanket to create a white background.
- Lying Down Method: Lay your newborn on a white blanket on the floor and take the photo from directly above.
- Head Support: Use a rolled-up white blanket or towel under the baby’s neck to help support their head and keep it straight.
Capturing the Right Expression
- Neutral Expression (Acceptable): While a neutral expression is ideal, passport authorities understand it’s challenging with infants. Partially closed eyes and grimaces are generally acceptable. Crying is not.
- Attract Attention: Use toys or sounds to get the baby’s attention and encourage them to look towards the camera. Hold a toy above your phone to draw their gaze.
- Use Background Noise (Carefully): Playing a quiet cartoon in the background might help capture their attention. Angle the camera to get a clear shot while they are briefly focused.
- Avoid Funny Faces: Don’t try to make funny faces to get them to smile or laugh, as this can result in an unacceptable photo.
 Three simple steps to capture a compliant passport photo for your baby at home using the PhotoAiD app.
DIY Passport Photos: Convenient, Easy, and Possible!
Taking your passport photo at home is not only possible but also a convenient and reliable option. It eliminates the need to visit a photo studio, saving you time and money. With a smartphone and attention to the guidelines, you can achieve professional-quality results from the comfort of your home. For added assurance and ease, services like PhotoAiD are available to help you every step of the way, guaranteeing your photo meets all requirements and is accepted.
FAQ: Your Questions Answered
Is a phone photo good enough for a passport?
Yes, absolutely! Smartphones with cameras of 5 megapixels or more are perfectly capable of taking passport photos at home. Just ensure you follow all the official passport photo guidelines regarding lighting, background, pose, and quality.
Can I use an app to take a passport photo?
Yes, you can and it’s highly recommended for ease and compliance! Apps like PhotoAiD® for iOS or PhotoAiD® for Android are designed specifically for this purpose. They ensure your photos meet all official requirements and often come with acceptance guarantees.
Can I submit a passport photo which I took of myself?
While you can’t submit a selfie (arm visible), you can definitely take your own passport photo. Use a timer, tripod, or ask someone to take the photo for you, ensuring you adhere to all passport photo criteria.
Can I print my own passport photo?
Yes, you can print your own passport photos. You can easily print passport photos on 4×6-inch paper at home using a photo printer or at local stores like CVS or Walgreens. Remember to use high-quality matte or glossy photo paper for printing.
Can I take passport photos at home?
Absolutely! Taking passport photos at home is a simple and effective solution. By following these guidelines and utilizing helpful tools like PhotoAiD®, you can confidently create compliant passport photos from the convenience of your home.
Sources:
Sylwia Green
Sylwia is a skilled writer with a BA in English Studies and an active SPJ member. For nearly three years now, she’s been writing captivating articles for international companies, turning her lifelong passion into a career.