Want to personalize your photos and messages with fun, custom stickers? Your iPhone makes it incredibly easy to create stickers directly from your own photos within the Photos app. Whether you want to add a playful touch to your messages, decorate your notes, or simply get creative with your images, turning your photos into stickers is a fantastic way to do it. This guide will show you exactly How Do I Add A Sticker To A Photo on your iPhone, step by step.
Turning a Photo into a Sticker
Creating static stickers from your photos is a straightforward process. These stickers are perfect for adding a personal touch to any image or message. Here’s how to make a sticker from a still photo:
-
Open the Photos App: Start by navigating to the Photos app on your iPhone’s home screen and tap to open it.
-
Select Your Photo: Browse through your photo library and tap on the photo you want to turn into a sticker. Open the photo to view it in full screen mode.
-
Touch and Hold the Subject: This is where the magic happens. Identify the main subject of your photo – the person, pet, or object you want to make into a sticker. Touch and hold your finger on this subject. You’ll see a white outline appear around the subject as your iPhone intelligently isolates it from the background. After a moment, release your finger.
-
Tap “Add Sticker”: A menu will pop up above the selected subject. From the options presented, tap “Add Sticker”.
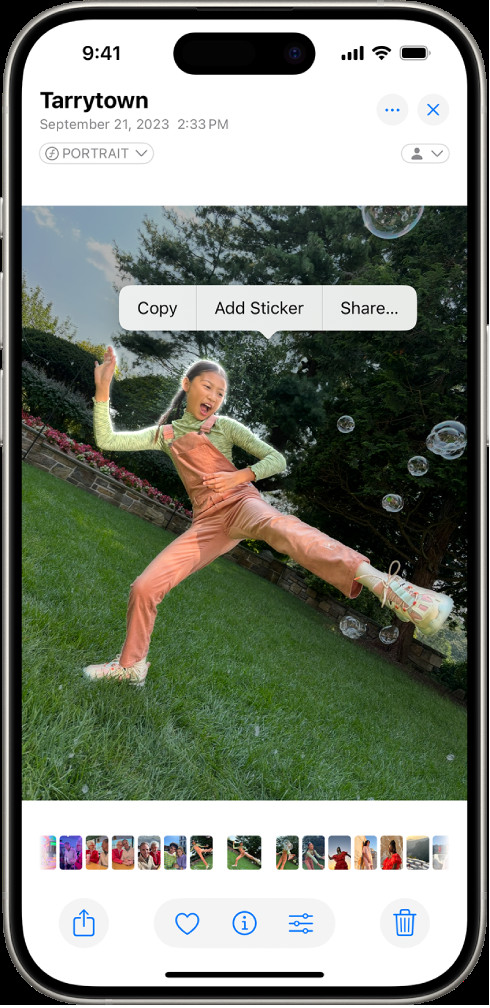 Person selected in Photos app with "Add Sticker" option highlighted in the menu.
 -
Access Your Sticker: Congratulations! You’ve just created a sticker. It will now be saved in your stickers menu. You can access this menu whenever you use the iPhone onscreen keyboard in apps like Messages, Notes, Mail, and when using Markup tools to edit photos or screenshots.
-
Add Effects (Optional): To further customize your sticker, tap “Add Effect”. You’ll be presented with visual effects like “Outline”, “Comic”, and “Puffy” to make your sticker even more unique and eye-catching. Experiment with these effects to find the perfect look for your sticker.
Tip: Once you’ve created stickers, you can use them to decorate other photos directly in the Photos app using Markup. This is a fun way to create layered images and add personality to your pictures.
Creating Animated Stickers from Live Photos
Want to take your stickers to the next level? You can also create animated stickers from your Live Photos! These moving stickers are perfect for adding dynamic flair to your messages and creations. Here’s the process:
-
Go to the Photos App: Just like with static stickers, start by opening the Photos app on your iPhone.
-
Select a Live Photo: Navigate to your photo library and choose a Live Photo – these are photos with a short motion video embedded. Tap to open it in full screen.
-
Touch, Hold, and Slide Up the Subject: Identify the moving subject in your Live Photo. Touch and hold your finger on the subject, and this time, instead of just releasing, slide your finger upwards without lifting it from the screen. Keep sliding until you see a slightly transparent, duplicate image of the subject appear floating above your finger. Then, release your finger. This slide-up gesture is key to creating an animated sticker.
-
Tap “Add Sticker”: Just as with static stickers, a menu will appear. Tap “Add Sticker”.
-
Animated Sticker in Your Menu: Your animated sticker is now created and added to your sticker menu. You can access and use it in the same way you use static stickers – via the iPhone keyboard and Markup tools. When you use an animated sticker, it will play its animation, adding a lively touch.
-
Apply Effects (Optional): You can also apply effects like Outline, Comic, or Puffy to your animated stickers to further enhance their visual appeal, just like with static stickers.
Deleting a Sticker
If you want to declutter your sticker collection or remove a sticker you no longer need, deleting them is simple:
-
Open Photos and Edit a Photo: Go to the Photos app and open any photo. Tap “Edit” in the top right corner.
-
Access Markup and Stickers: Tap the Markup button (usually looks like a pen icon or three dots depending on your iOS version), and then tap the “Add” button (often a plus sign icon).
-
Go to Add Sticker: From the Markup menu options, tap “Add Sticker”.
-
Remove the Sticker: In your sticker menu, touch and hold the sticker you wish to delete. A menu will appear. Tap “Remove”. The sticker will be deleted from your collection.
Stickers Across Your Apple Devices
A great feature of iPhone stickers is their seamless integration with iCloud. Once you create stickers on your iPhone, they automatically sync across your other Apple devices – including your iPad, Mac, and Apple Vision Pro – as long as you are signed in to the same Apple ID. This means you can create a sticker on your phone and then easily use it when messaging from your Mac or decorating a document on your iPad.
Start creating your own stickers today and discover a fun new way to personalize your digital communications and photo creations!
See also:
Add emoji, Memoji, and stickers with the iPhone keyboard
Use Markup to add text, shapes, stickers, and more to documents on iPhone
Send stickers in Messages on iPhone