Photos capture our precious memories, but they can also consume significant storage space on your MacBook. If you’re running low on disk space or simply want to declutter your digital life, deleting photos is a necessary task. Don’t worry about losing those memories forever; this guide will walk you through various methods to safely and effectively delete photos from your MacBook, ensuring you free up space without accidental data loss.
Understanding What Happens When You Delete Photos on a Mac
Before diving into the deletion process, it’s crucial to understand where your photos go when you hit that delete button. When you delete a photo on your Mac, it’s not immediately gone for good. Instead, it’s typically moved to either the Trash folder in Finder or the Recently Deleted album within the Photos app. This grace period allows you to recover accidentally deleted images within 30 days before they are permanently erased.
Multiple Ways to Delete Photos on Your MacBook
Deleting photos on a MacBook is straightforward, with several methods available depending on your needs and preferences. Let’s explore the most common and efficient ways to remove photos from your Apple computer.
1. Using the Trash Folder to Delete Photos from Your Mac
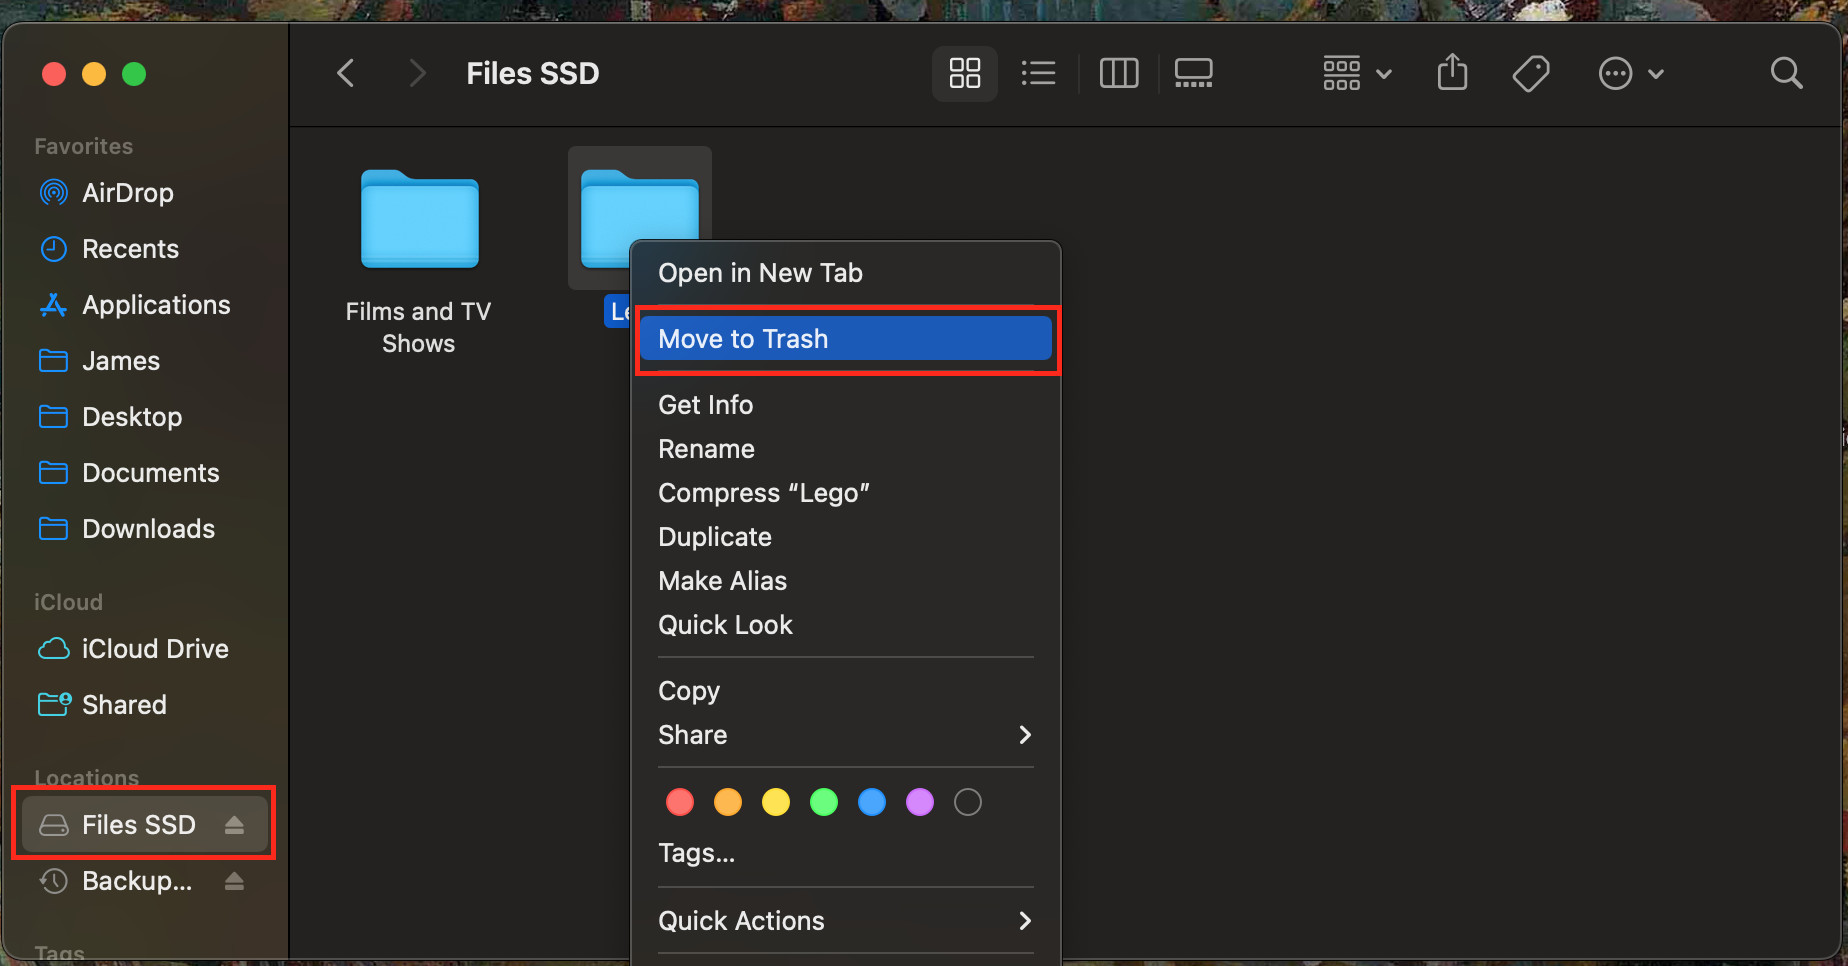
The simplest method for deleting individual photos is by dragging them to the Trash. This method is ideal for quickly removing a few unwanted images.
Here’s how to delete photos using the Trash Folder:
- Open Finder on your MacBook.
- Locate and select the photo(s) you wish to delete.
- Drag and drop the selected photo(s) to the Trash icon in your Dock.
- Alternatively, you can right-click on the photo(s) and select Move to Trash from the context menu.
 Find photos in Finder, right-click, and select Move to Trash to delete photos on a Mac using the Trash folder.
2. Utilizing Keyboard Shortcuts to Delete Photos in the Photos App
For users who primarily manage photos within the Apple Photos app, keyboard shortcuts offer a faster way to delete images.
Follow these steps to delete photos using shortcuts in the Photos app:
- Open the Photos app on your MacBook.
- Select the photo or photos you want to delete.
- Press the Backspace key on your keyboard. The selected photos will be moved to the Recently Deleted album.
- To permanently delete them sooner than 30 days, navigate to the Recently Deleted album in the Photos app and choose to delete them immediately.
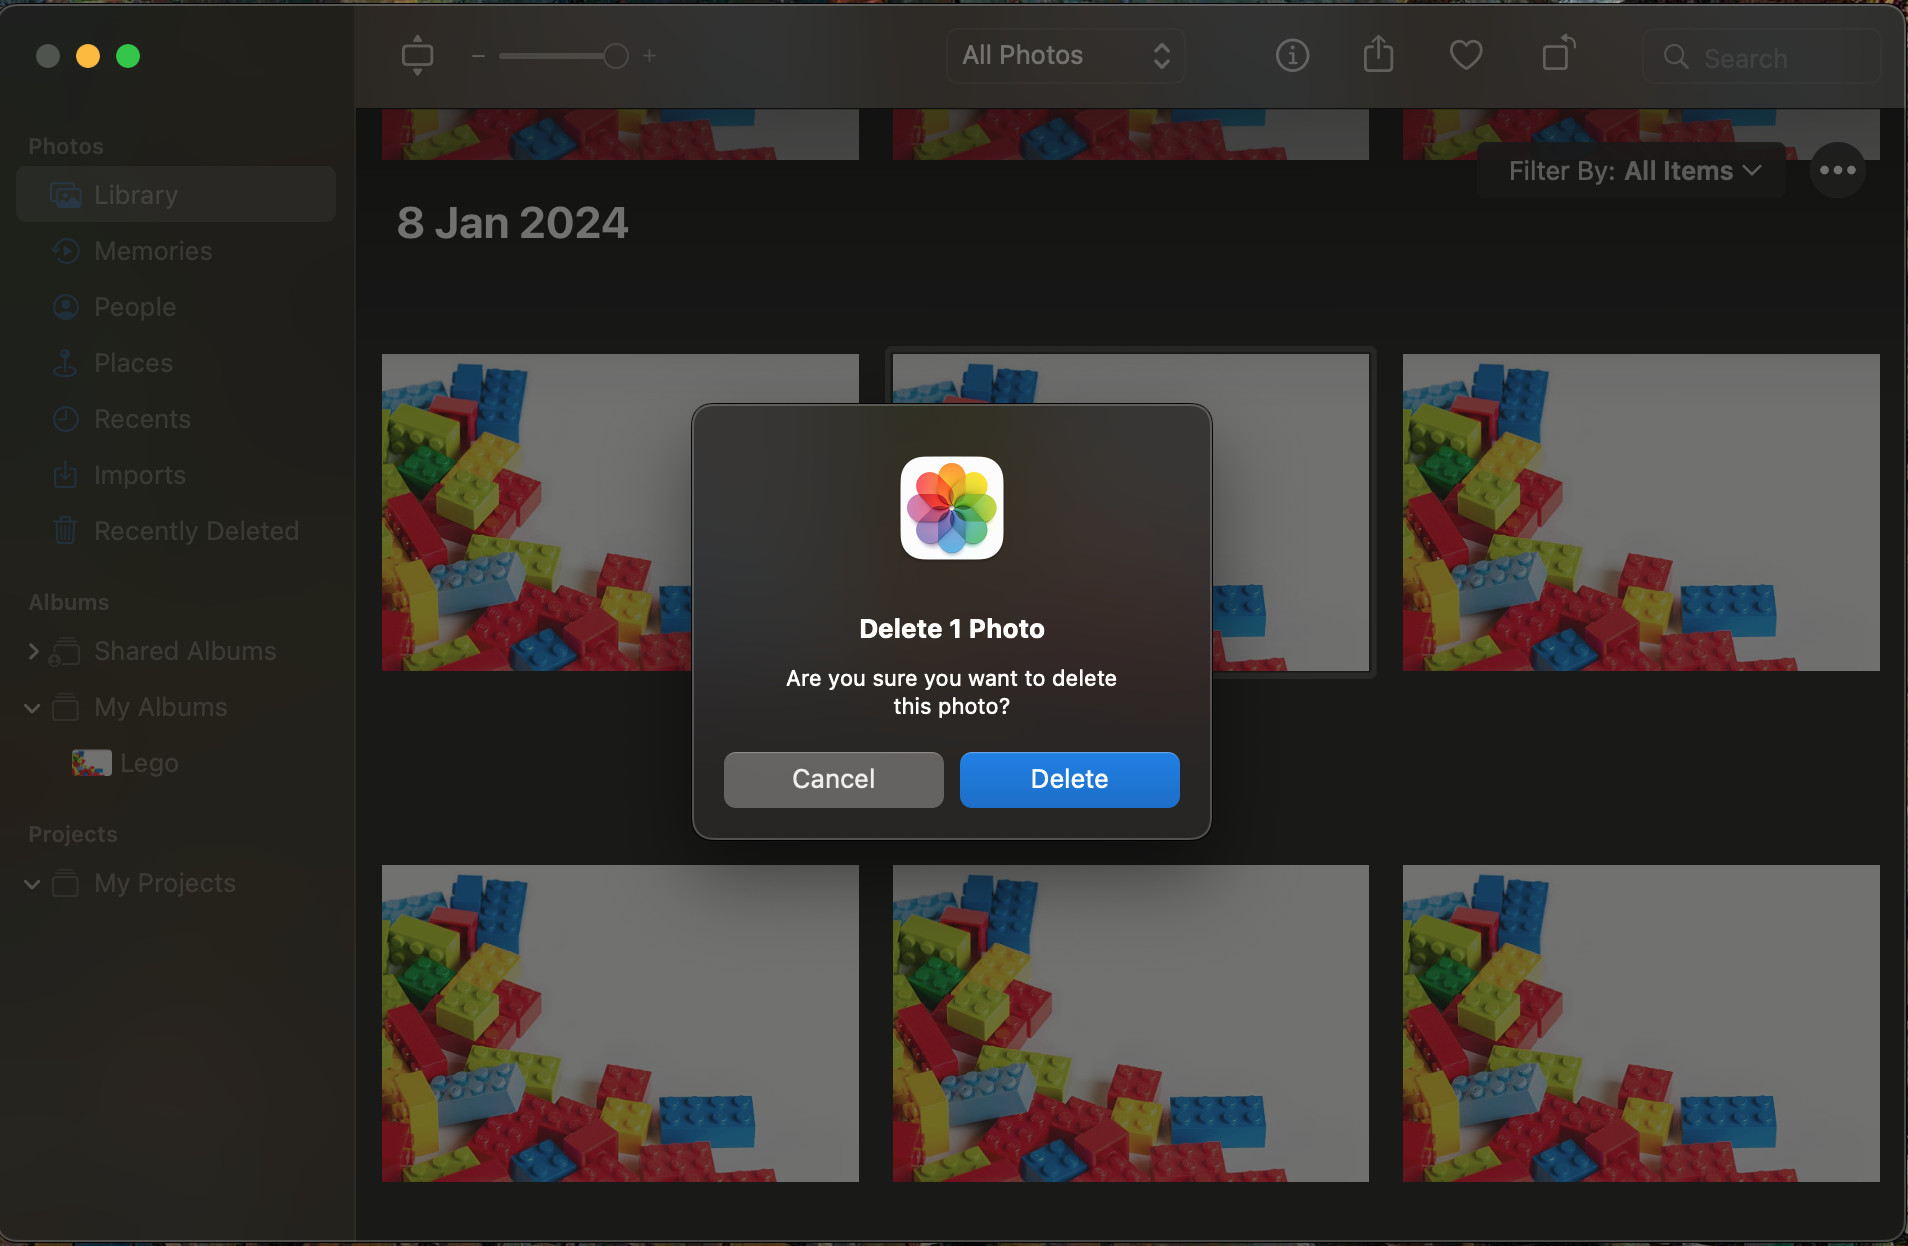 Open the Photos app, select images, and press Backspace to delete photos using shortcuts on a Mac.
3. Deleting Entire Albums in the macOS Photos App
If you’ve organized your photos into albums within the Photos app and want to remove an entire album, the process is equally simple.
Here’s how to delete a photo album in the Photos app:
- Launch the Photos app.
- Click on My Albums in the left sidebar menu.
- Right-click on the album you want to delete.
- Select Delete Album from the context menu.
- Note that deleting an album does not delete the photos themselves from your library, it only removes the album organization. If you wish to delete the photos within the album, you need to select and delete them from within the album or from the main library view.
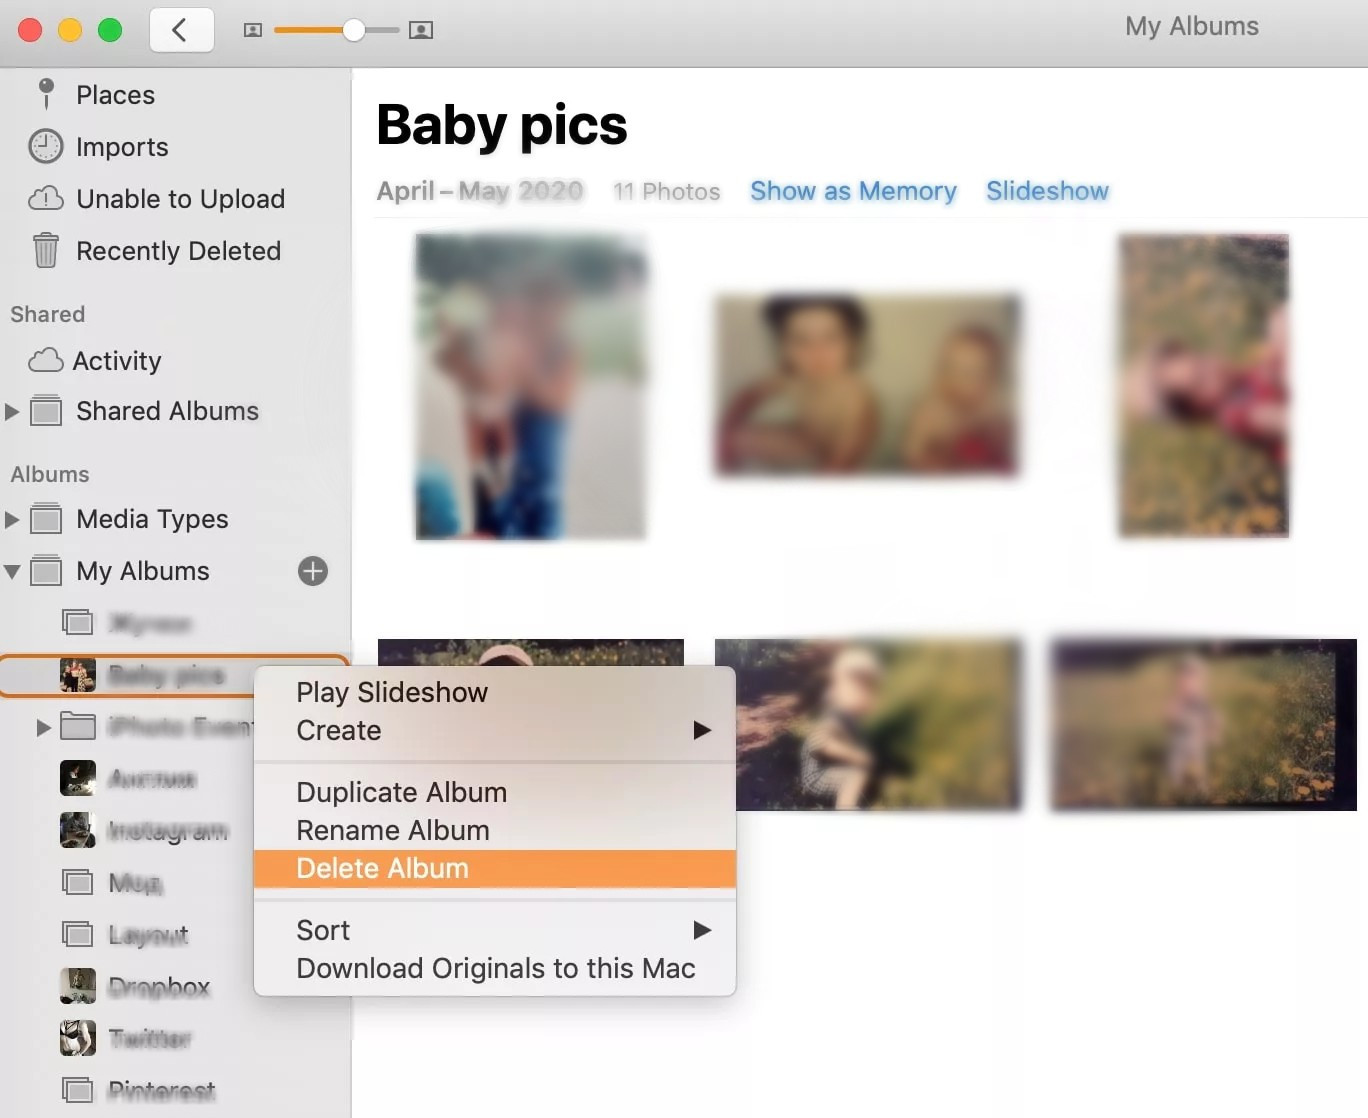 Right-click on an album in the Photos app and select Delete Album to remove an entire photo album on macOS.
4. How to Delete All Photos from Your MacBook
For users who want to completely clear out their photo library, perhaps before selling their MacBook or after backing up all photos elsewhere, deleting all photos at once is an option.
Here’s how to delete all photos from your MacBook using the Photos app:
- Open the Photos app.
- Select Library in the left sidebar.
- Press Command + A (Cmd + A) to select all photos in your library.
- Press the Backspace key to move all selected photos to the Recently Deleted album.
- Click on Recently Deleted in the sidebar.
- Click the Delete All or Delete X Items button in the top-right corner to permanently delete all photos in the Recently Deleted album.
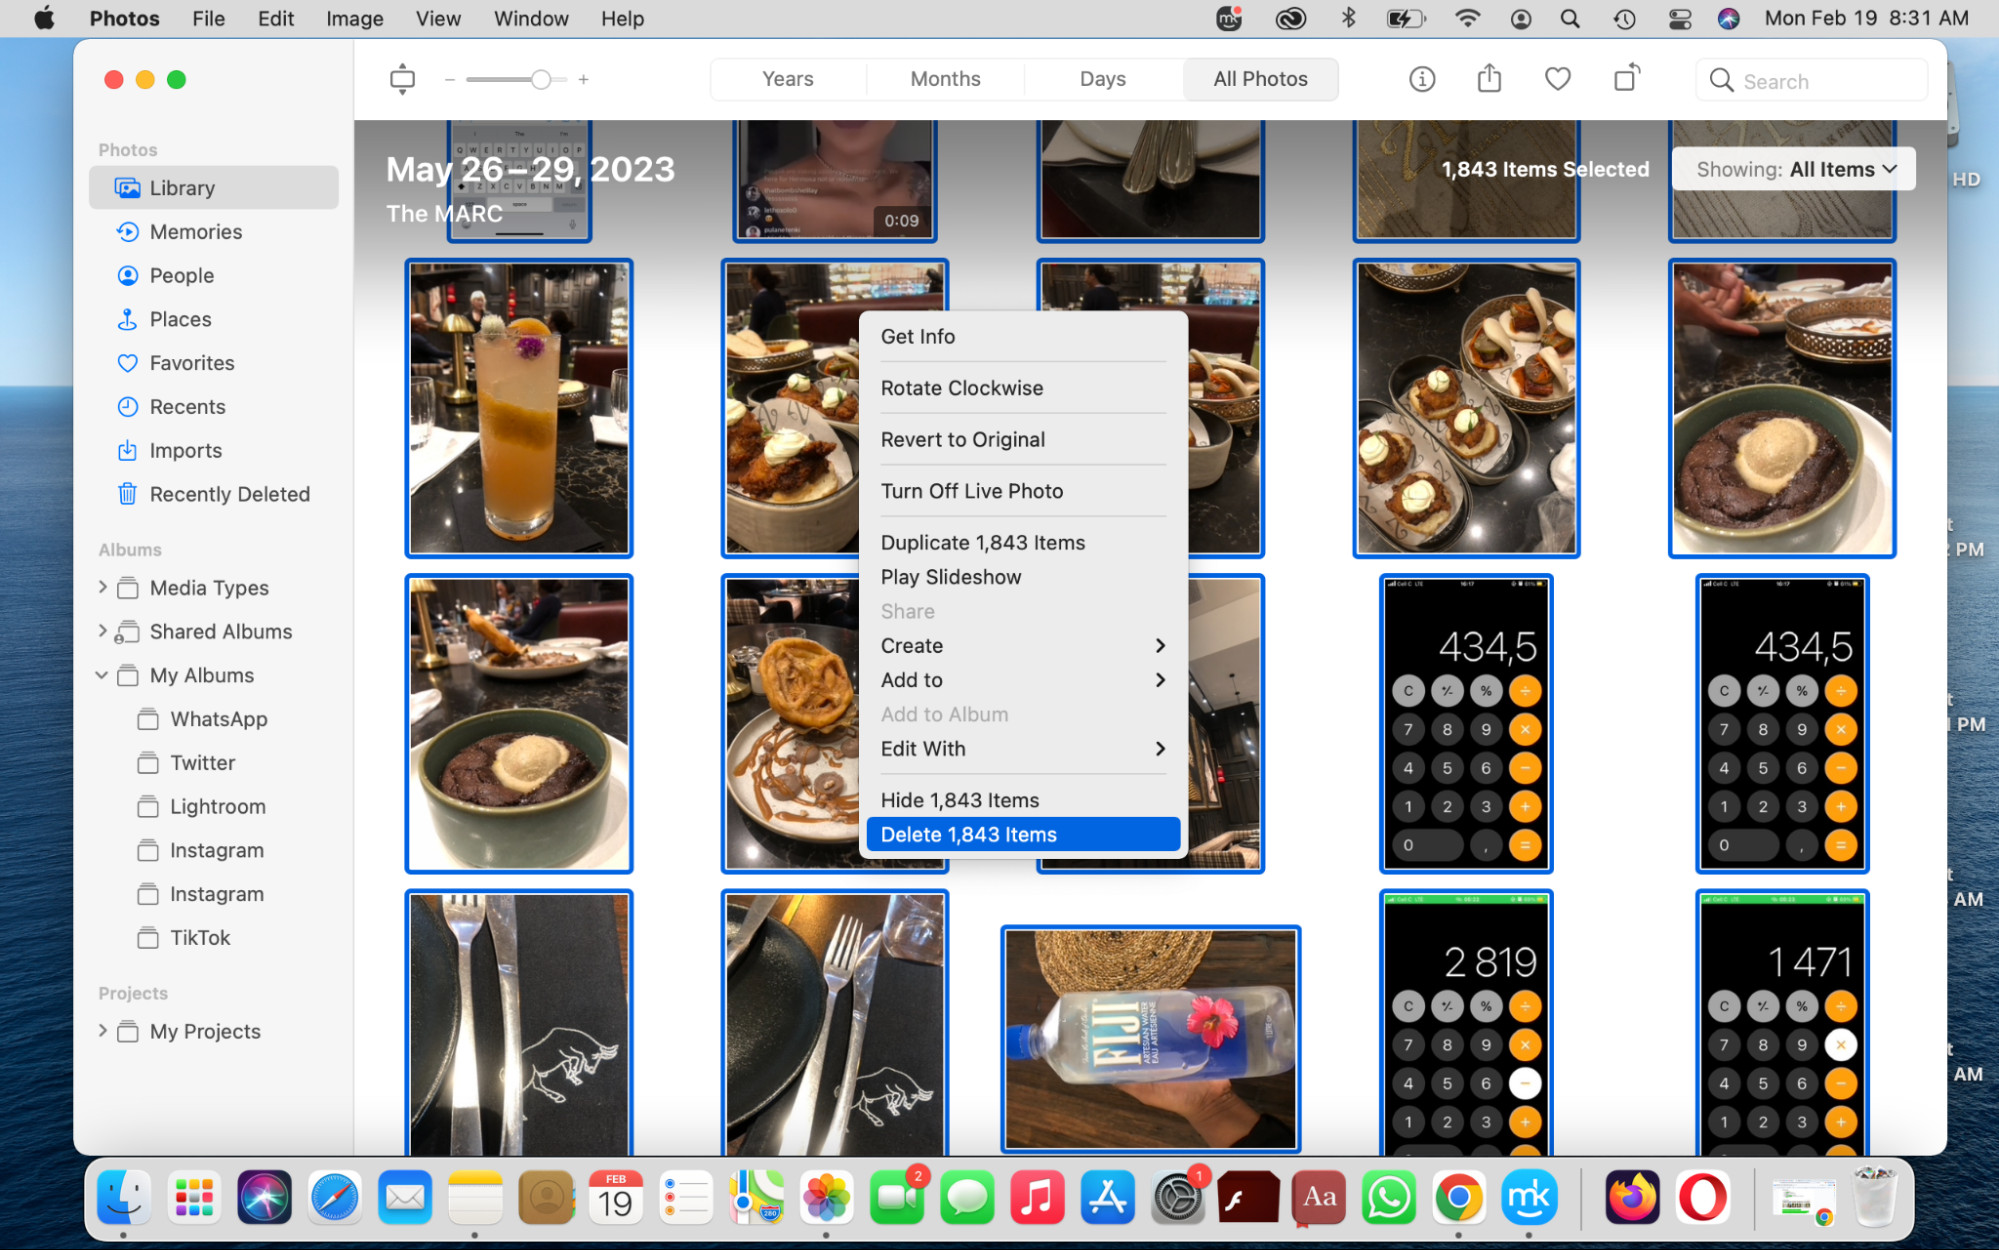 Select all photos with Cmd + A and press Backspace to delete all photos from the Photos Library on a Mac.
 Click Delete Items in the Recently Deleted album to permanently delete all photos from a MacBook.
5. Removing Multiple Photos Efficiently on a MacBook
Often, you might need to delete a large number of photos from specific categories, such as screenshots or images from messaging apps. The Photos app allows for efficient bulk deletion.
Here’s how to remove multiple photos on a MacBook:
- Launch the Photos app.
- Select the category or album in the left sidebar (e.g., Imports, Screenshots, or a specific album).
- Press Command + A (Cmd + A) to select all photos in that category or album.
- If you want to keep some photos within the selection, hold down the Command key and click on the photos you want to deselect.
- Press the Backspace key to move the selected photos to the Recently Deleted album.
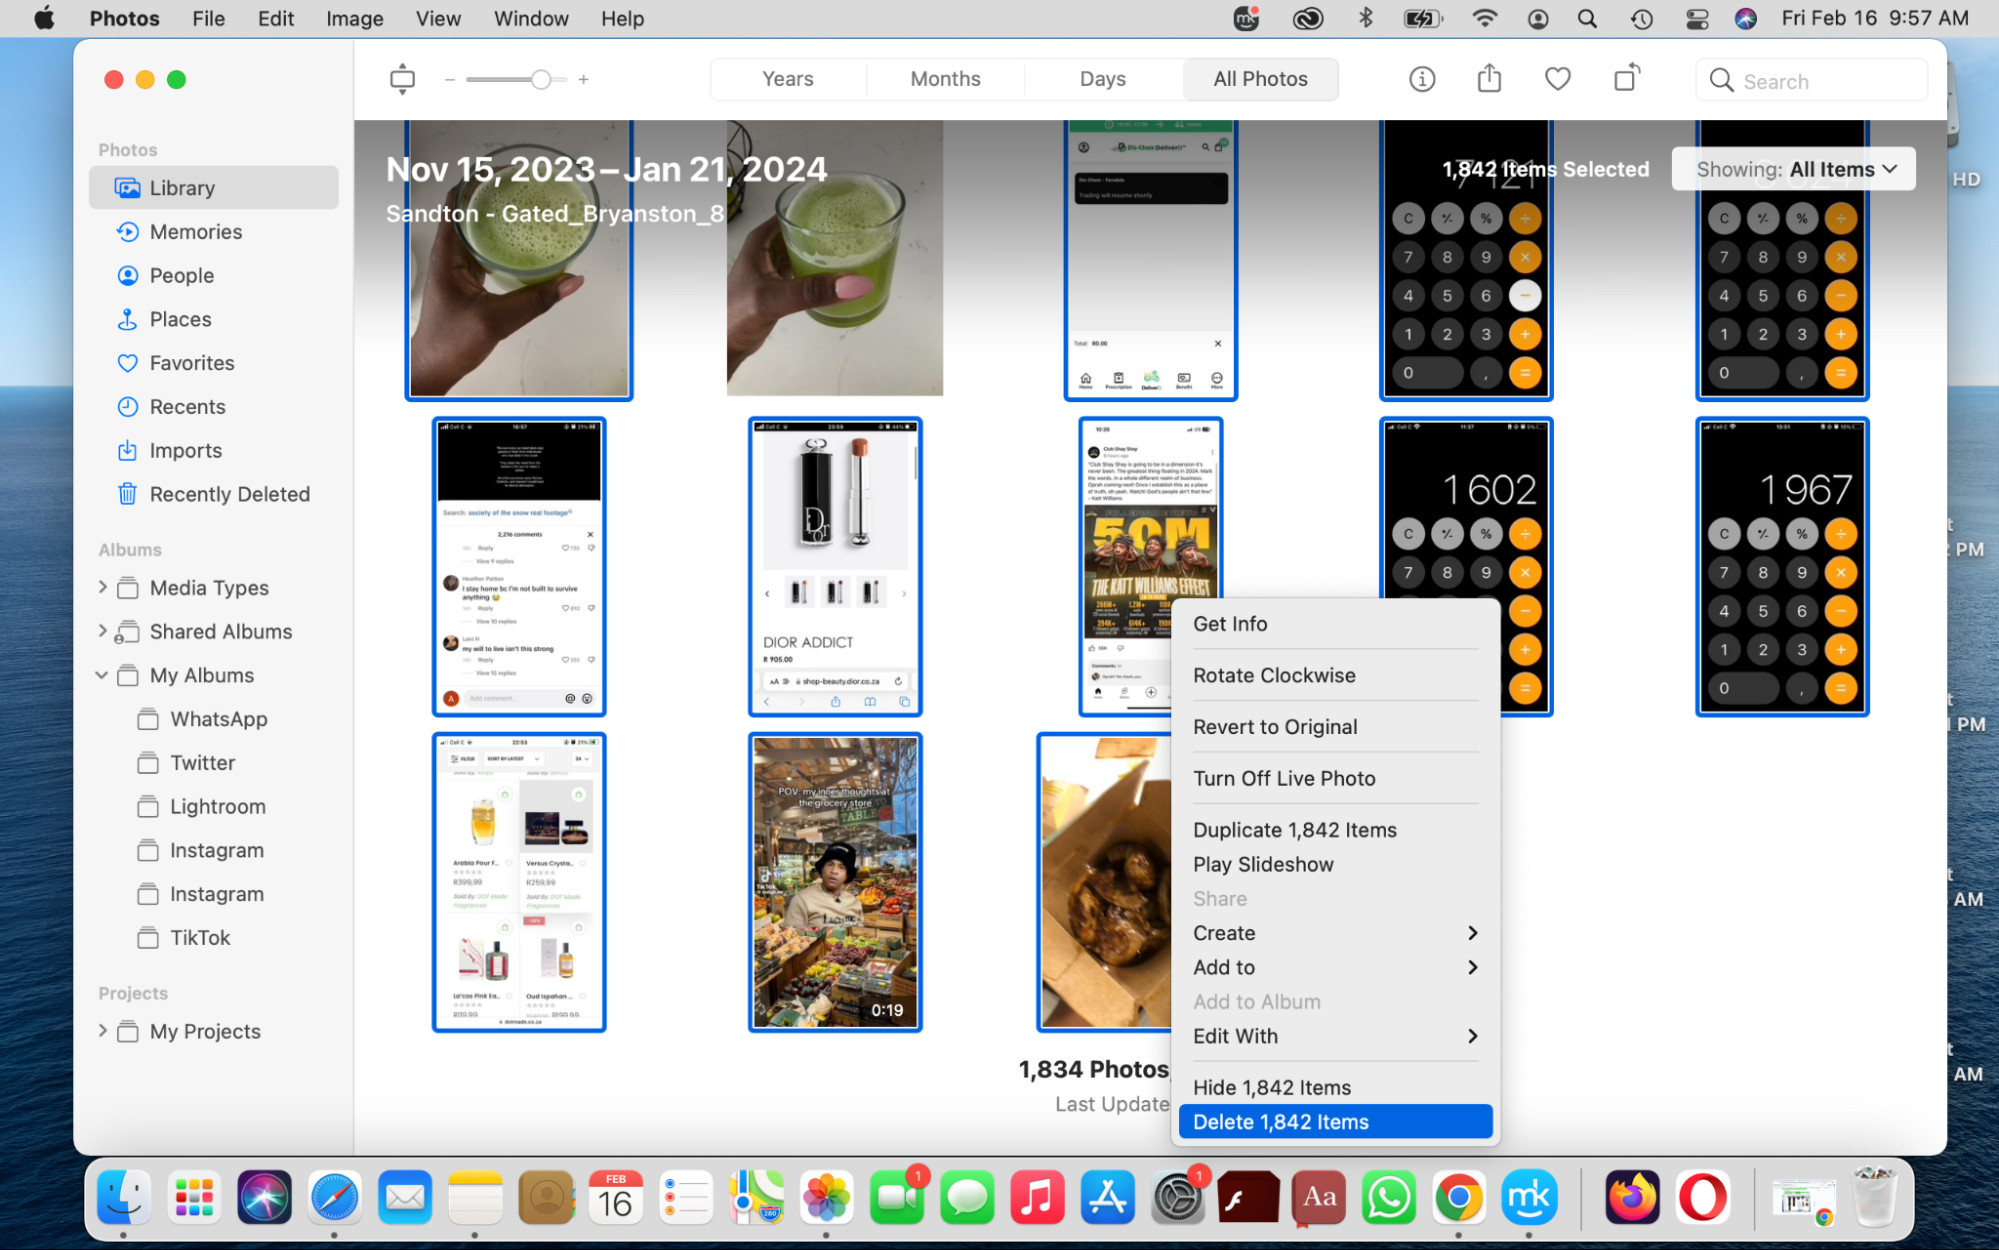 Select an album, press Cmd + A to select all, and then right-click to Delete Items to remove multiple photos on a MacBook.
6. Deleting Photos from the Photos Library (iCloud Sync)
If you use iCloud Photos, deleting photos from your MacBook’s Photos app will also remove them from iCloud and any other devices synced with the same Apple ID.
Here’s how to delete photos from the Photos Library which syncs with iCloud:
- Open the Photos app.
- Select the photo(s) you want to delete. You can select multiple photos by holding down the Shift key and clicking, or using Command + A to select all.
- Right-click on the selected photos.
- Choose Delete Photos from the dropdown menu.
- Confirm the deletion if prompted. The photos will be moved to the Recently Deleted album and will be removed from iCloud after a short synchronization period. Remember to empty the Recently Deleted album to permanently remove them and free up iCloud storage as well.
 Hold shift and click to select multiple photos, then right-click and select Delete Photos to delete photos from the Photos Library on a Mac.
7. Removing Photos from Mac While Keeping Them in iCloud
In scenarios where you want to free up local storage on your MacBook but retain your photos in iCloud, you need to disable iCloud Photos syncing temporarily before deleting photos locally.
Caution: Disabling iCloud Photos and deleting locally can be complex and potentially lead to data loss if not done correctly. Ensure you understand the implications before proceeding. A safer approach is to optimize storage (explained below).
If you still want to proceed, here’s a general outline (use with extreme caution):
- Temporarily Disable iCloud Photos Syncing:
- Click the Apple menu () > System Settings (or System Preferences in older macOS versions).
- Click Apple ID > iCloud > Photos > Manage (or just Photos in older versions).
- Uncheck the box next to Sync this Mac or similar wording to disable iCloud Photos. You might be prompted about downloading originals – choose to keep originals if you want a local backup before proceeding with deletion.
- Delete Photos from Your MacBook: Follow any of the deletion methods described above (Trash, Photos app shortcuts, etc.) to delete photos locally on your MacBook.
- Re-enable iCloud Photos Syncing (Optional): If you want to resume syncing new photos to iCloud, re-enable iCloud Photos in System Settings/Preferences.
A Safer and Recommended Alternative: Optimize Mac Storage for iCloud Photos
Instead of disabling sync and potentially risking data loss, macOS provides a built-in feature to optimize storage. With “Optimize Mac Storage” enabled in iCloud Photos settings, your Mac will keep smaller, space-saving versions of your photos on your device, while the original, high-resolution photos are stored in iCloud. This way, you save local storage without deleting your photos from iCloud.
To enable “Optimize Mac Storage”:
- Open the Photos app.
- Go to Photos in the menu bar > Settings (or Preferences).
- Click the iCloud tab.
- Select Optimize Mac Storage.
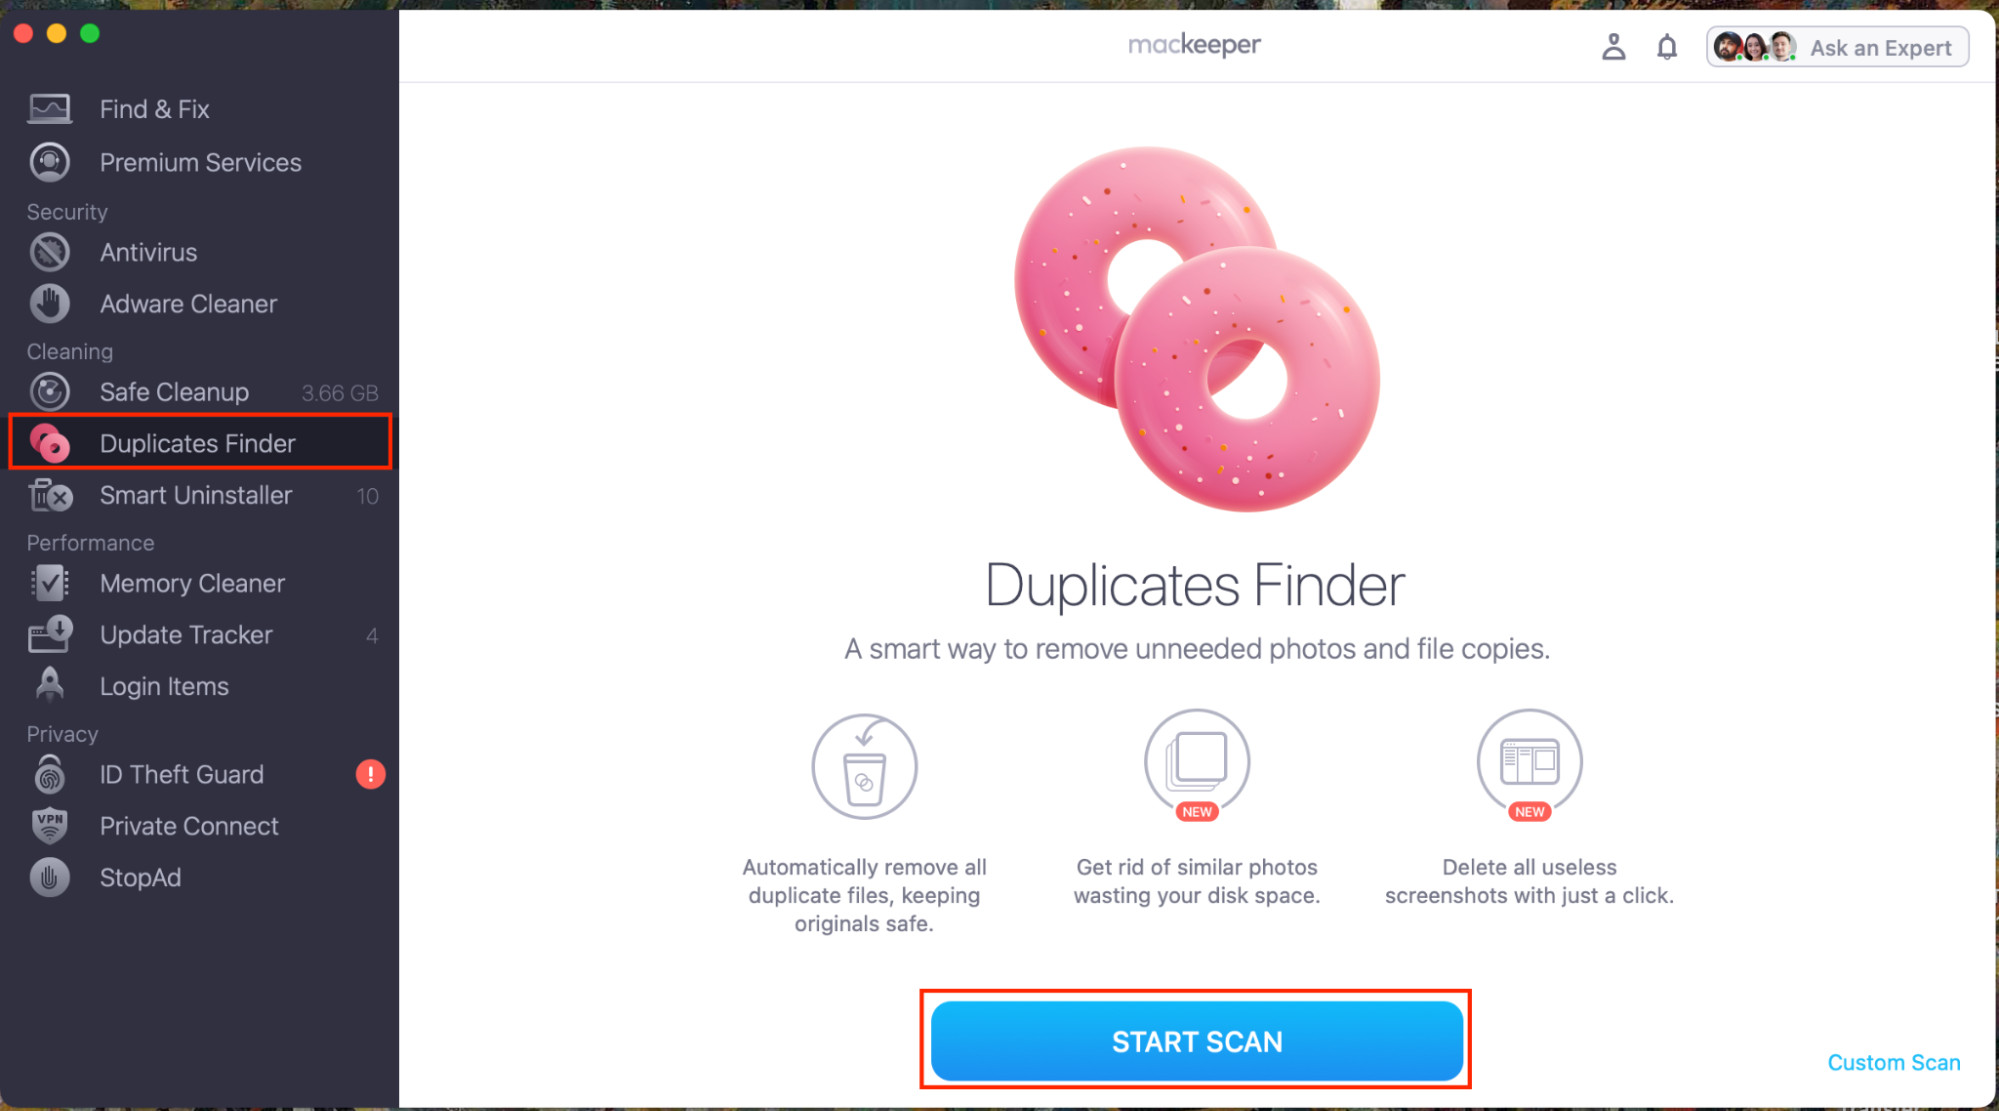
8. Using MacKeeper to Remove Duplicate Photos and More
For a more streamlined approach to managing photos and freeing up space, consider using dedicated Mac cleaning software like MacKeeper. MacKeeper includes a Duplicates Finder tool that can automatically identify and remove duplicate photos, which are often unnecessary and consume valuable storage.
Here’s how to use MacKeeper to delete duplicate photos:
- Download and install MacKeeper.
- Launch MacKeeper and select Duplicates Finder from the sidebar menu.
- Click Start Scan. MacKeeper will scan your Mac for duplicate files, including photos.
- Review the identified duplicates. MacKeeper intelligently selects duplicates for removal, but you have full control and can adjust the selection.
- Click Remove Duplicates to delete the selected duplicate photos.
 Open MacKeeper and select Duplicates Finder to start scanning for duplicate photos on a Mac.
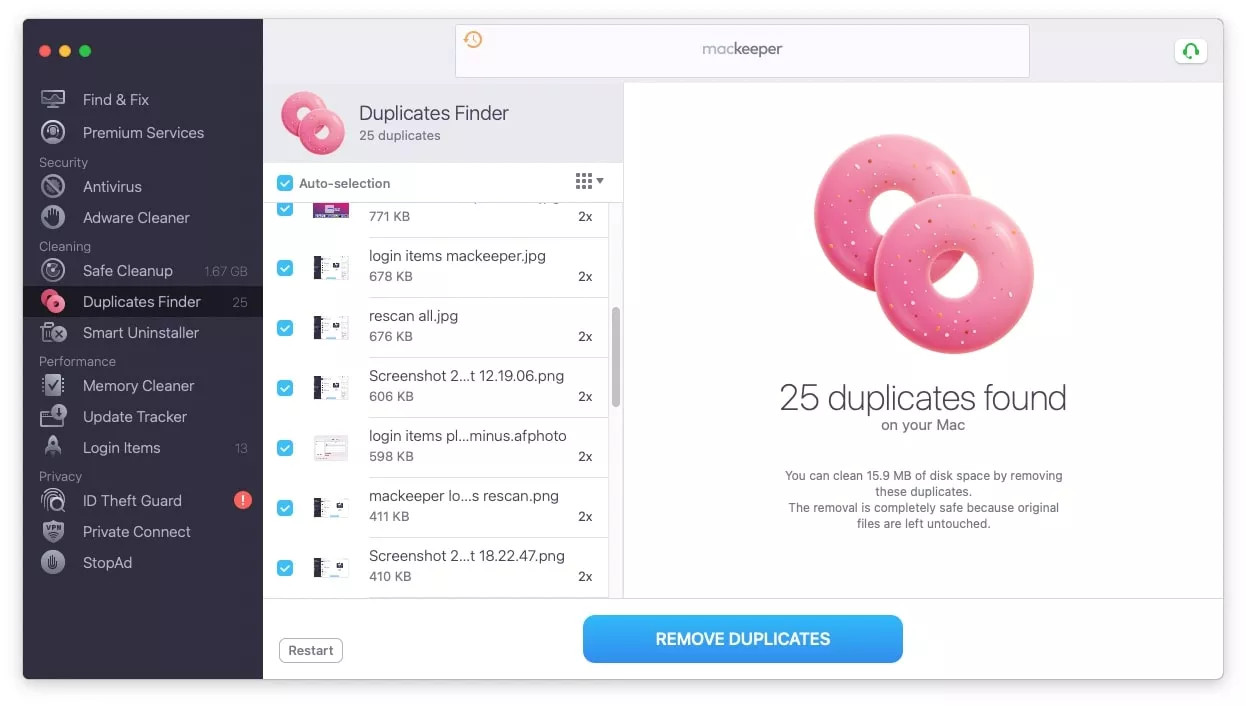 Review and select duplicate photos in MacKeeper Duplicates Finder, then click Remove Duplicates to delete them.
9. Deleting Photos from an External Hard Drive Connected to Your Mac
If you store photos on an external hard drive, deleting them is similar to deleting files from your MacBook’s internal drive.
Here’s how to delete photos from an external hard drive:
- Connect your external hard drive to your MacBook.
- Open Finder.
- Locate and select your external drive from the sidebar.
- Navigate to the folder containing the photos you want to delete.
- Right-click on the folder or individual photos and select Move to Trash.
- Alternatively, drag the folder or photos to the Trash icon in the Dock.
- To permanently delete them and reclaim space on your external drive, you need to empty the Trash. Important: Emptying the Trash will permanently delete files from all connected drives, including your external drive. Be absolutely sure you want to delete these files before emptying the Trash.
 Select an external drive in Finder, right-click on the photos folder, and select Move to Trash to delete photos from an external drive on a Mac.
Safely Deleting Photos and Managing Your MacBook Storage
Deleting photos from your MacBook is a common task to manage storage and keep your digital life organized. By understanding the different methods and the implications of deletion, you can confidently remove unwanted photos while preserving your precious memories.
Remember to regularly back up your important photos, whether to iCloud, an external drive, or another cloud storage service. Consider using tools like MacKeeper to help manage duplicate photos and optimize your MacBook’s storage efficiently. By taking proactive steps, you can ensure you have enough space for new memories without losing the old ones.