If you’re like many people, you’re capturing more photos and videos than ever before. But in this digital age, there’s a crucial step that’s often missed: effectively organizing and safeguarding these precious memories. This is where Google Photos steps in as a powerful and user-friendly solution for storing, organizing, and sharing your visual life.
Google Photos is a favorite for many, and for good reason. It’s easy to use, packed with features, and offers a robust free tier. Yet, despite its popularity, many still don’t fully grasp how this service works and how to leverage its full potential. Consider this your in-depth guide to understanding Google Photos, from the basics to advanced tips and tricks, ensuring you get the most out of this invaluable tool.
Multiple accounts icon representing the accessibility of Google Photos across different Google accounts.
Understanding the Basics of Google Photos
What Exactly Is Google Photos?
At its core, Google Photos is a photo and video sharing and storage service developed by Google. Launched in 2015, it has quickly become a globally recognized platform for managing digital memories. The key to understanding how Google Photos works lies in the concept of “the cloud.” Essentially, the cloud is just a common term for online data storage, a network of servers that allows you to access your files from anywhere with an internet connection.
In the traditional way of managing photos, you might connect your phone or camera to your computer and manually transfer your photos and videos. Then, you might back up your computer to an external hard drive. While local backups are still wise for crucial files, cloud storage for photos and videos through Google Photos offers significant advantages:
- Speed and Ease: Setting up automatic backups is incredibly simple. Once configured, your photos and videos can be backed up automatically whenever you are connected to Wi-Fi.
- Universal Access: Access your photos and videos from any device – your phone, tablet, or computer – as long as you have internet access and are logged into your Google account.
- Effortless Sharing: Sharing albums, individual photos, or videos with friends and family becomes a breeze.
- Free Up Device Space: Running out of storage on your phone becomes less of a concern. After your photos and videos are safely uploaded to Google Photos, you can remove them from your device to free up valuable space.
While various cloud storage services exist, Google Photos stands out due to its specific focus on photos and videos and the rich set of features it provides.
Navigation menu icon, visually representing the guide’s content structure for easy navigation.
Why Choose Google Photos? Key Benefits
Google Photos has become a top choice for cloud photo storage for several compelling reasons:
- Free Unlimited Storage (with conditions): Historically, Google Photos offered truly unlimited storage for “High quality” (compressed) photos and videos. While the unlimited free storage for High quality ended in June 2021, photos and videos uploaded in “Storage Saver” quality (previously named “High quality”) before that date still do not count towards your Google Account storage. Currently, new uploads in “Storage Saver” quality, as well as “Original quality”, count towards your 15GB of free Google Account storage, which is shared across Gmail, Google Drive, and Google Photos. You can still pay for more storage if needed through Google One. For many users, the “Storage Saver” quality is perfectly adequate for everyday photos and videos. (Images over 16MP are compressed, and videos are capped at 1080p resolution).
- Feature-Rich Platform: Google Photos is more than just storage; it’s a comprehensive platform packed with features to organize, enhance, share, and manage your visual content effectively.
- Cross-Device Compatibility: It works seamlessly across all your devices, whether you’re using an Android phone, iPhone, tablet, or computer.
- Intuitive and User-Friendly: You don’t need to be a tech expert to use Google Photos. Its interface is designed to be intuitive and straightforward, making navigation and feature usage simple for everyone.
- Easy Sharing (No Recipient Account Required): When you share photos or albums, recipients don’t necessarily need a Google Photos account to view them. Sharing is entirely optional, and by default, your content remains private to you.
- Archiving for Organization: The archive feature allows you to declutter your main photo view by moving photos you want to keep but don’t need to see regularly, such as screenshots or receipts.
- Intelligent and Powerful Search: Finding a specific photo is incredibly easy. You don’t have to remember dates or file names. Google Photos’ powerful search capabilities allow you to search by people, places, objects, themes, and even text within photos.
- Creative Tools: Google Photos offers built-in tools to create movies, animations, collages, and albums directly within the app, making it easy to enhance and present your photos.
- Google Lens Integration: Access Google Lens directly within Google Photos to identify objects in your photos, copy text, translate languages, scan QR codes, and much more, adding a layer of intelligent interaction with your images.
- “Memories” Feature for Rediscovering Moments: The popular “Memories” feature automatically resurfaces your favorite photos and videos from the past, helping you relive cherished moments.
Google Photos has evolved into more than just a photo management app; it’s become a central hub for preserving and revisiting your life’s visual memories.
Here’s a quick summary of the benefits that make Google Photos a recommended choice:
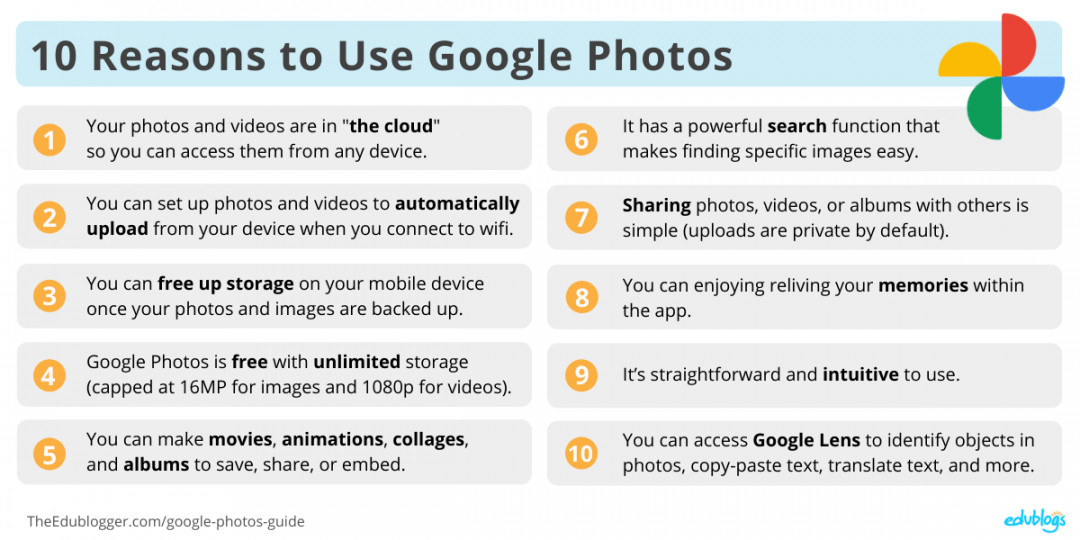 Benefits of Google Photos Summary
Summary graphic highlighting the key advantages of using Google Photos, including free storage options, feature richness, and ease of use.
Getting Started with Google Photos: A Quick Guide
Setting up Google Photos is a straightforward process:
- Download the App: Get the free Google Photos app from the App Store for iOS devices or the Google Play Store for Android devices.
- Sign In: Open the app and sign in using your Google Account. If you use Gmail or any other Google service, you likely already have one. If not, creating a Google Account is quick and free.
- Start Uploading: Once signed in, follow the on-screen prompts to begin uploading your photos and videos. Be aware that the initial upload can take time, especially if you have a large library. Ensure you are connected to Wi-Fi to avoid using excessive mobile data.
👉 Google Photos also has a web version accessible through any web browser. This is useful for uploading photos and videos directly from your computer and for managing your library on a larger screen. While the web version is excellent for organization, the mobile app is generally preferred for features like exploring “Memories” and creating movies.
Viewing Your Photos and Videos
Viewing your photos and videos in Google Photos is simple. Just open the app or visit the Google Photos website on any device and ensure you are logged in to your Google Account.
On the web, go to https://photos.google.com. In the app, tap the Photos tab usually located at the bottom. Your photos and videos will be displayed in reverse chronological order, with the most recent items first.
The beauty of Google Photos is its cross-device accessibility. Regardless of the device you used to capture or upload your media, as long as you are signed into the same Google Account, you can access your entire photo and video library.
Navigating the Google Photos App Interface
The Google Photos app is intuitively organized with three primary tabs at the bottom: Photos, Search, and Library. While the visual appearance might slightly differ between iOS and Android versions, the core functionality and tab structure remain consistent.
Let’s explore each tab:
- Photos Tab: This is your main timeline view. It displays your “Memories” at the top and your regular photo and video feed below, arranged by date.
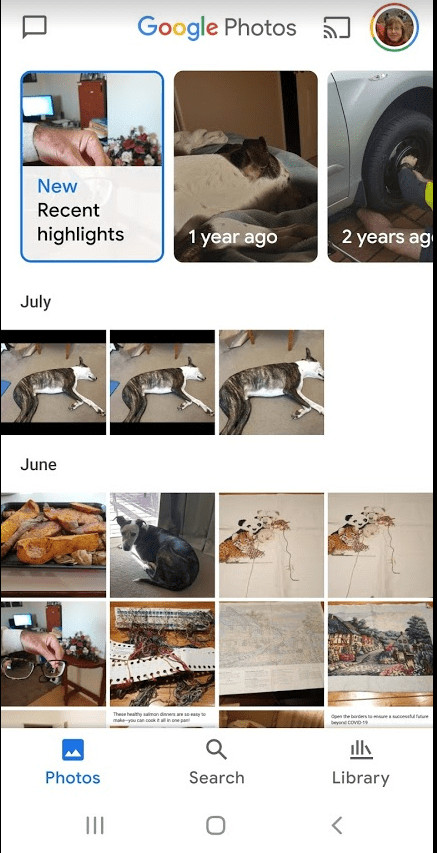 Google Photos photo tab screenshot
Screenshot of the Google Photos app “Photos” tab, showing the main timeline view with memories and recent photos.
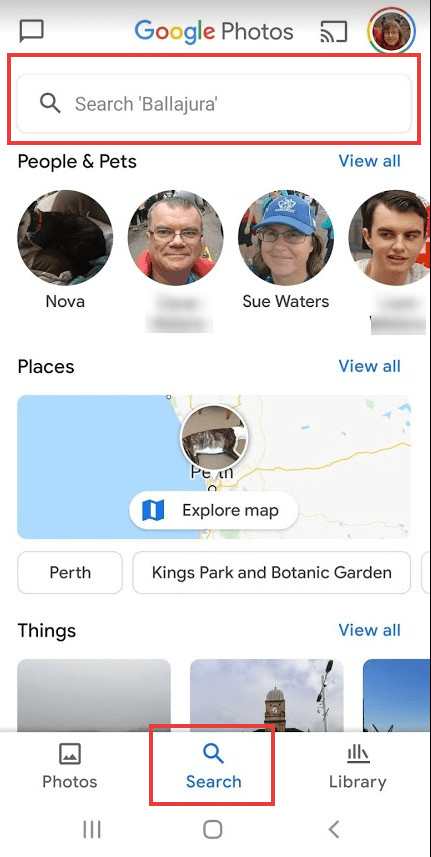
- Search Tab: This is where Google Photos’ intelligent search capabilities come to life. You can search for photos by people, categories (like “Beaches” or “Food”), places shown on a map, or “things” (objects recognized in your photos). This tab also houses your creations like animations, collages, and movies.
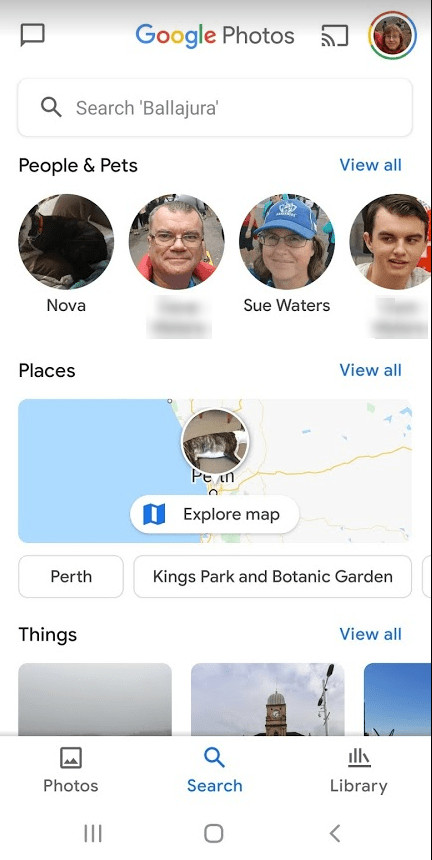 Google photos search screen
Screenshot of the Google Photos app “Search” tab, showcasing the search bar and categories for finding photos.
- Library Tab: Think of this as your organizational hub. Here you’ll find your Albums, Favorites, Archive, and Trash. The “Utilities” option within the Library tab is also where you can initiate creating animations, collages, and movies.
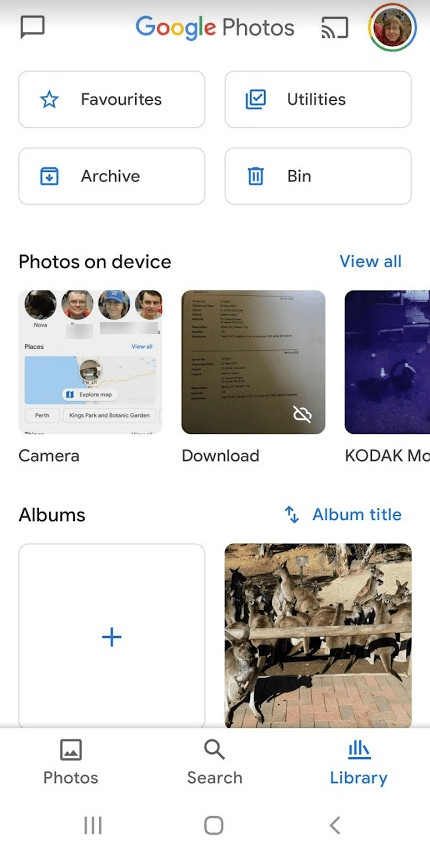 Google Photos Library
Screenshot of the Google Photos app “Library” tab, displaying options for albums, favorites, archive, and trash.
To view an individual photo in more detail, simply tap on it. Once opened, you’ll have access to various options at the bottom and top of the screen for editing, sharing, and more.
The following image breaks down the icons you typically see when viewing a single photo:
Iconography guide explaining the functions of icons when viewing an individual photo in Google Photos, including cast, favorite, options, share, edit and lens.
Here’s a breakdown of what these common icons represent:
- Cast to: (May not always be visible) This allows you to stream your photos or videos to a TV using Chromecast or a similar casting device.
- Favorite (Heart Icon): Tapping this adds the photo to your “Favorites” album for easy access later.
- More Options (Three Dots Icon): This opens a menu with further actions, including adding to an album, archiving, deleting, accessing photo information, and options to open the image in a more advanced photo editor like Snapseed.
- Share (Upward Arrow Icon): This is for quickly sharing the photo or video with others through various apps and methods. The icon’s design might slightly differ between iOS and Android but its function remains the same.
- Edit (Sliders Icon): This opens Google Photos’ built-in editing tools, allowing you to apply filters, adjust light and color, crop, rotate, and more. For more in-depth editing, use the “More Options” menu and select “Open in Snapseed.”
- Google Lens (Lens Icon): This icon activates Google Lens, Google’s image recognition software. Tapping it analyzes the photo and provides relevant information based on visual content. We’ll delve deeper into Google Lens later.
Backup & Sync: Ensuring Your Photos Are Safe
If you primarily take photos on your smartphone, utilizing the “Backup & sync” feature is the easiest way to automatically upload your photos to your Google Photos account.
Most phones can be configured to automatically back up photos to Google Photos whenever a Wi-Fi connection is available. This is especially useful if you have a limited mobile data plan, preventing accidental data overages.
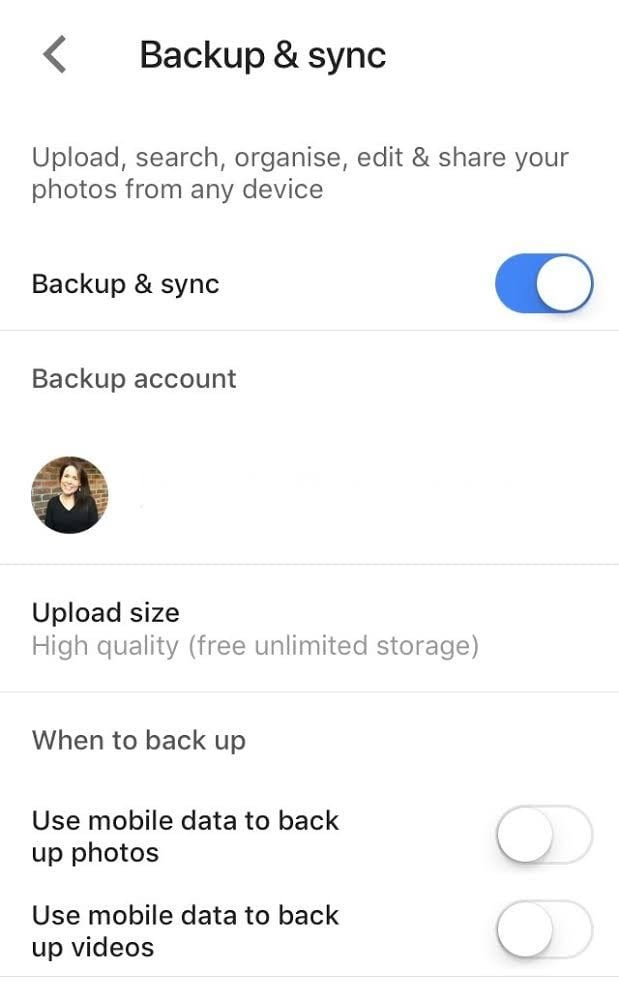
To verify or adjust your backup settings:
- Open the Google Photos app and tap your profile picture or initial, usually located in the top right corner.
- Tap Photos settings (the gear icon).
- Select Backup & sync. Ensure the toggle at the top is switched to the “on” position to activate backup and sync.
- To avoid using mobile data for backups, make sure the options “Use cellular data to back up photos” and “Use cellular data to back up videos” are toggled off. This ensures backups only occur when you are connected to Wi-Fi.
 How to turn on backup & sync Google Photos The Edublogger
Screenshot demonstrating how to access and enable the Backup & sync settings within the Google Photos app.
Mastering Google Photos Search: Finding Photos Effortlessly
Search icon emphasizing the powerful search functionality of Google Photos.
Google Photos’ search function is remarkably powerful, leveraging sophisticated image analysis techniques to categorize and group your photos, making it incredibly accurate.
You can search for virtually anything within your photos: people, pets, locations, objects, and even text contained within images. Try search terms like “beach vacation,” “dog playing fetch,” “birthday party 2022,” “recipe for pasta,” or “London trip.” You can even combine search terms like “Christmas morning family gifts.”
The true strength of Google Photos search is that you don’t need to remember specific dates, file names, or tags. Just type in what you’re looking for, and Google Photos intelligently sifts through your library to find relevant images.
Here’s how to use Google Photos search to find a specific image:
- Tap the Search tab at the bottom of the Google Photos app (or use the search bar at the top in the web version).
 Screenshot Google Photos app search
Screenshot showing the Google Photos app search interface with the search tab highlighted.
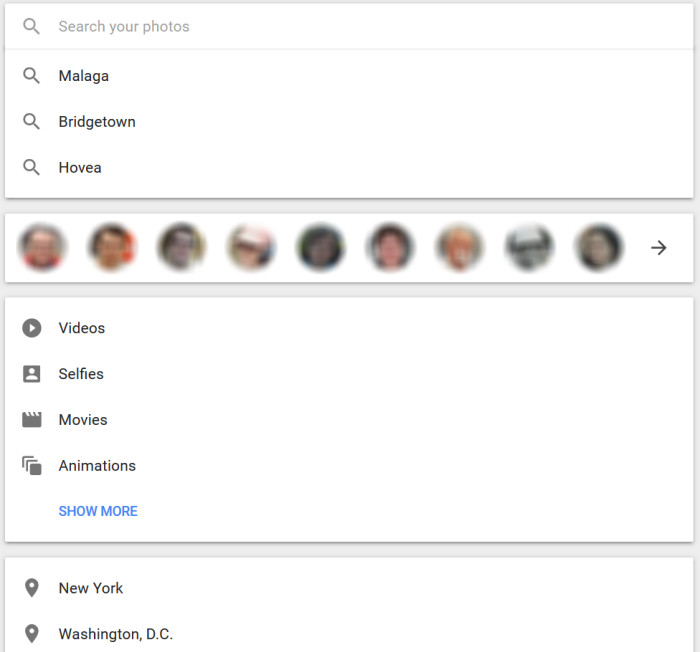
- As you begin typing your search term, Google Photos will offer suggestions based on recent searches, recognized people, locations, and categories.
 Google photo search
- After entering your complete search term, Google Photos will display all photos and videos that match your criteria. You can then scroll through the results to find the specific image you were looking for.
Search results displayed in Google Photos after searching for “kangaroo,” demonstrating image recognition capabilities.
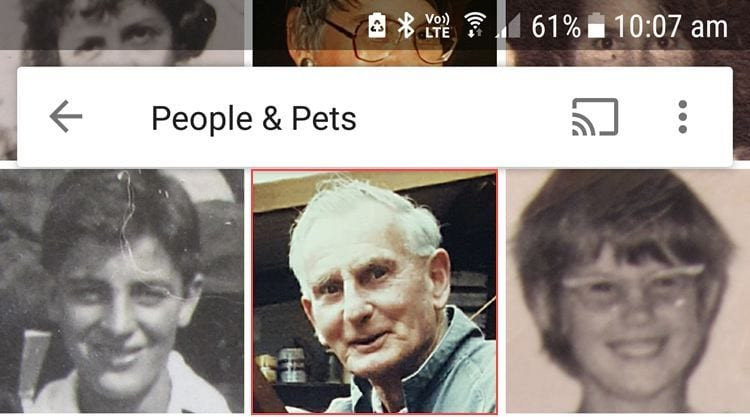
Naming People and Pets for Enhanced Search
For users who frequently use Google Photos, taking the time to name the people and pets that appear in your photos can significantly enhance the search experience.
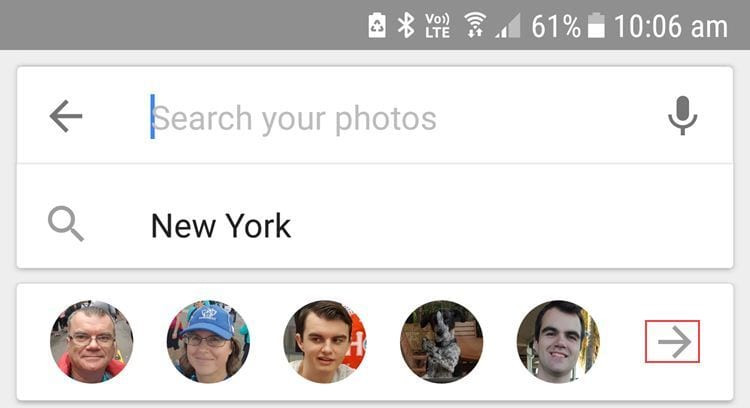
When you tap on a recognized face of a person or pet at the top of the Search tab, Google Photos will instantly display all photos in your library featuring that individual or pet.
👉 To ensure pets are included in face recognition, go to Photo settings > Group similar faces in your app and enable Show pets with people.
Here’s how to name faces for easier searching:
- In the Search tab of your app, you’ll see groups of faces of people and pets that Google Photos has recognized in your photos.
 Tap on More
- Tap on the group of faces representing the person or pet you want to name.
 Tap on photo
- Tap on Add a name.
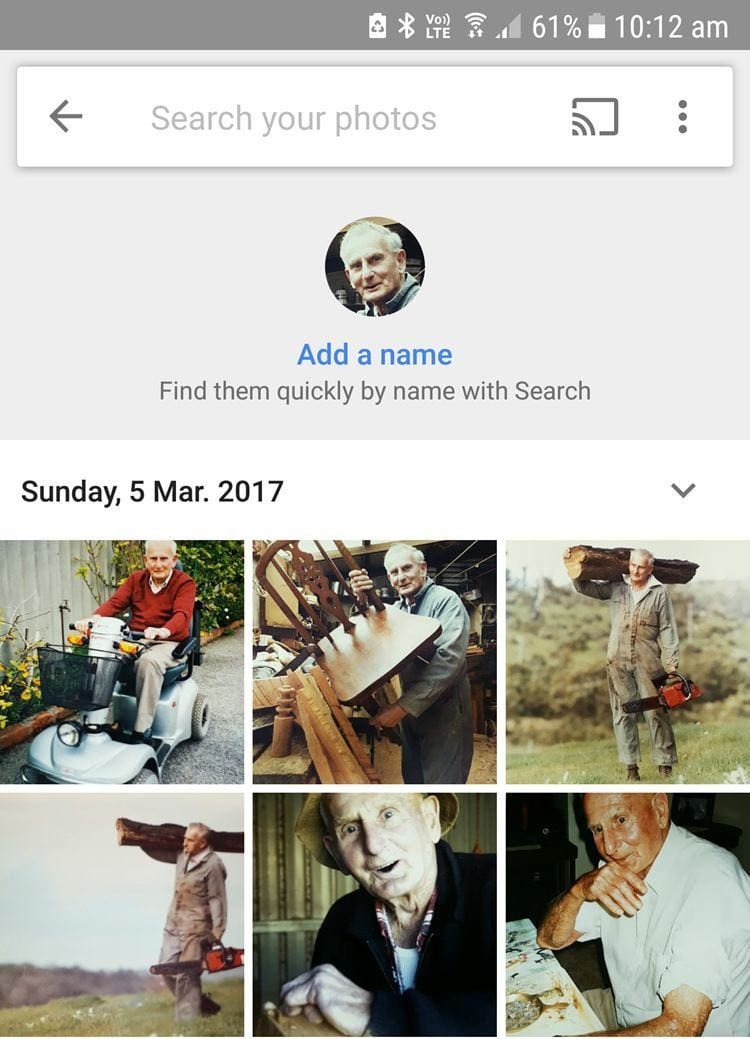 Tap on Add Name
- Type in the name and tap Done if it’s a new name. If the name matches someone you’ve already named, you can select from the existing list and tap Yes to merge the face groups.
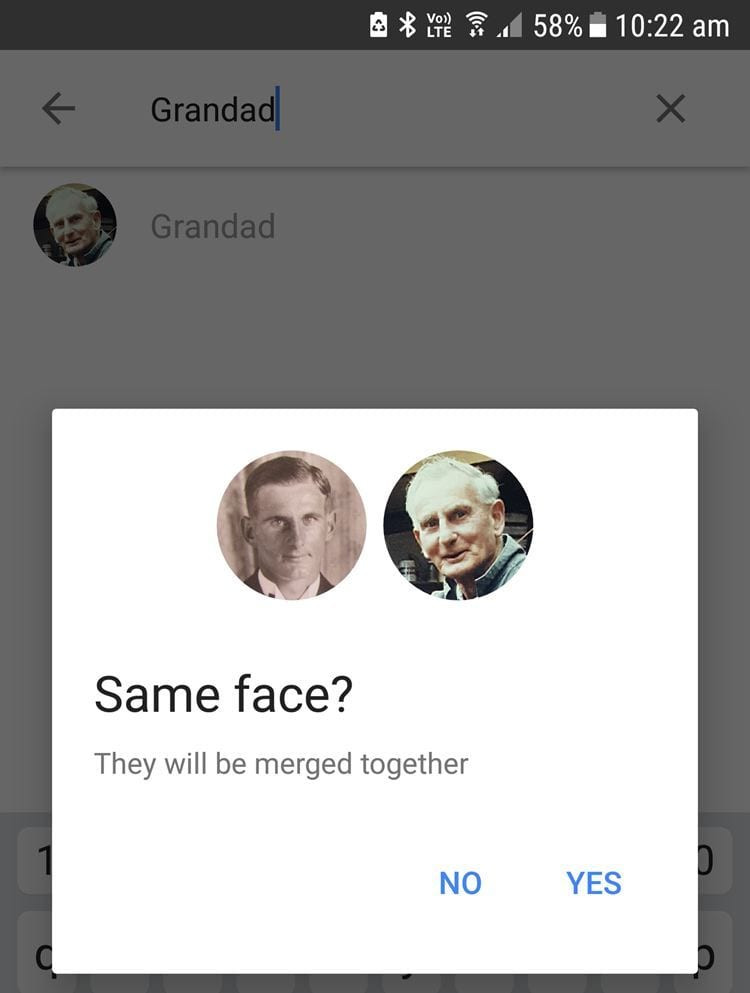 Tap Yes
Relive Your Memories with Google Photos
Memory icon representing the nostalgic “Memories” feature in Google Photos.
The “Memories” feature in Google Photos, introduced in 2019 and prominently featured in the app by mid-2020, has become a beloved aspect of the service.
“Memories” are automatically curated collections of your past photos and videos, surfacing moments from previous years. These are available in the Google Photos app on Android devices, iPhones, and iPads (but not currently in the web version).
Your “Memories” are private to you unless you choose to share them.
To access your “Memories,” simply go to the Photos tab in your app. “Memories” are displayed as a carousel at the top of your photo grid, above your most recent photos.
Tapping on a “Memory” preview for a specific year will open a slideshow-like view of photos and videos from that time period.
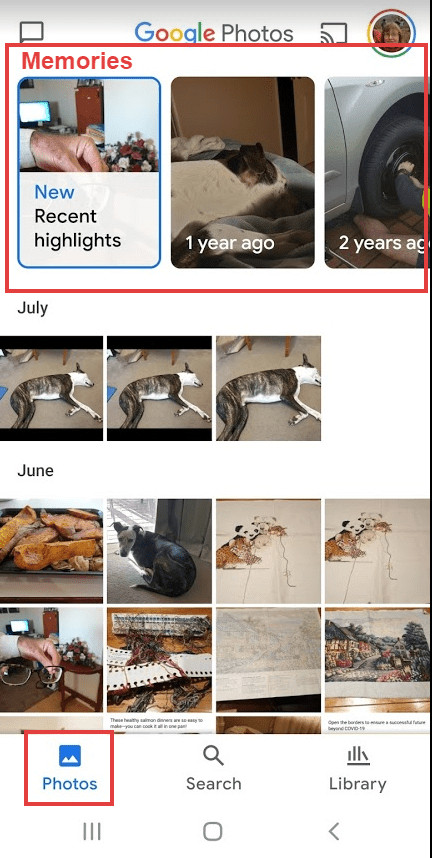 Memories on the Google Photos app.
Screenshot of the Google Photos app “Photos” tab, highlighting the “Memories” carousel at the top of the photo feed.
You can customize the types of “Memories” you see by adjusting your settings:
- Tap your account profile photo or initial at the top right of the app, then select Photo settings > Memories.
- From the “Memories” settings, you can choose to hide memories featuring specific people, pets, or dates if you prefer not to revisit certain moments.
This concludes the first part of our comprehensive guide to Google Photos. Stay tuned for the next sections where we’ll explore more advanced features and tips to further enhance your Google Photos experience.