Microsoft Excel is not just for numbers and calculations; it’s also versatile enough to incorporate visual elements like images directly into your spreadsheets. The “Picture in Cell” feature in Excel allows you to seamlessly insert photos into cells, enhancing the visual appeal and informational value of your data. This guide will walk you through various methods to add photos to Excel cells, ensuring your spreadsheets are both functional and visually engaging.
Excel supports a wide range of image file types for embedding in cells, including JPG/JPEG, PNG, BMP, ICO, WEBP, TIF/TIFF, and GIF (static GIFs only). Let’s explore the different ways you can insert these images.
Inserting a Picture into a Cell from the Excel Ribbon
The most straightforward method to add a photo to an Excel cell is by using the ribbon interface. Follow these simple steps:
- Navigate to the Insert tab on the Excel ribbon.
- In the Illustrations group, click on the Pictures dropdown menu.
- Select Place in Cell from the options provided.
- The Insert Picture From dialog box will appear, offering you three choices:
- This Device: Choose this option to insert a picture stored locally on your computer.
- Stock Images: Access Microsoft’s library of stock images for professional and royalty-free pictures.
- Online Pictures: Search and insert images directly from the web using Bing Image Search.
- Select your preferred source and locate the image you want to insert.
- Click Insert to embed the picture into the currently selected cell.
This method is ideal when you need to insert images one at a time and have the flexibility to choose from various sources.
Inserting Multiple Pictures Simultaneously
Excel also allows you to insert multiple images into cells at once, streamlining the process when you have several pictures to add. Here’s how:
- Follow steps 1-4 from the previous method to access the Insert Picture From dialog box and choose your image source.
- Instead of selecting a single image, select multiple pictures by holding down the Ctrl key (or Command key on Mac) and clicking on each image you want to insert.
- Click Insert.
Excel will insert the selected images starting from the active cell and moving downwards in the column. Each selected image will occupy one cell. Be aware that this action will overwrite any existing data in the cells where images are inserted.
Pasting a Picture Directly into a Cell
If you have copied an image to your clipboard, you can directly paste it into an Excel cell. This is a quick and efficient way to insert images you have readily available.
- Copy an image to your clipboard (e.g., by right-clicking on an image online or on your computer and selecting “Copy Image”).
- In Excel, right-click on the cell where you want to insert the picture.
- Under Paste Options, select the icon labeled Paste Picture in Cell (this icon usually looks like a picture within a cell grid).
 Inserting Picture in-cell in Excel using ribbon and right-click menu
Important Note: Using the standard Paste command (Ctrl+V or right-click Paste without selecting “Paste Picture in Cell”) will paste the image as a floating picture over the cells, not in the cell. Always choose the “Paste Picture in Cell” option to embed the image correctly.
Switching Between Picture in Cell and Picture over Cells
Excel provides the flexibility to switch between having a picture placed in a cell and having it float freely over cells. This is useful if you change your mind about how you want to display your images.
Converting a Picture over Cells to Picture in Cell:
- Select the picture that is currently floating over cells. You’ll know it’s a floating picture if you can move and resize it independently of the cell grid.
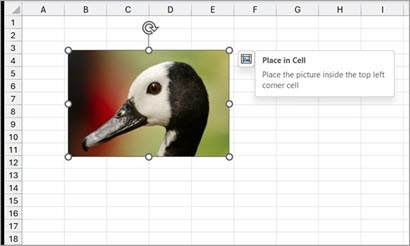
- Go to the Picture Format tab in the ribbon (this tab appears when you select a picture).
- In the Adjust group, click Place in Cell. The picture will now be embedded into the top-left cell it was overlapping.
Converting a Picture in Cell to Picture over Cells:
- Right-click on the cell containing the picture you want to convert.
- In the context menu, navigate to Picture in Cell.
- Select Place over Cells. The picture will now become a floating image, no longer confined to the cell.
Enhancing Accessibility by Adding Alt Text to Pictures in Cells
For accessibility and SEO best practices, it’s crucial to add alternative text (alt text) to your images. Alt text provides a textual description of the image for screen readers, assisting users with visual impairments in understanding the content of your spreadsheets. It also helps search engines understand the image content, which can be beneficial if your Excel sheets are shared online or converted to web pages.
To add alt text to a picture in an Excel cell:
- Right-click on the cell containing the picture.
- Select View Alt Text from the context menu.
- The Alt Text pane will open on the right side of your Excel window.
- In the Description field, type a concise and descriptive alt text for your image. For example, if the image is a product photo, you might use alt text like “Product photo of a blue coffee mug”.
By adding alt text, you make your Excel spreadsheets more accessible and user-friendly for everyone.
Conclusion
Adding photos to Excel cells is a simple yet powerful way to enhance your spreadsheets. Whether you are creating visual dashboards, product catalogs, or simply want to add a personal touch to your data, Excel’s “Picture in Cell” feature offers versatile options to meet your needs. By mastering these methods, you can create more engaging and informative Excel spreadsheets.