Looking to enhance your photos right on your Mac? You’re in luck! macOS comes equipped with powerful built-in tools like the Photos app and Preview, offering a range of editing capabilities from basic adjustments to quick fixes. Whether you’re a beginner or looking to refine your workflow, understanding how to utilize these tools is key to making your images shine. Let’s dive into how you can easily edit photos on your Mac.
The Photos app, a staple on macOS, provides an array of user-friendly editing tools perfect for everyday enhancements. To start, simply open your image in the Photos app and click “Edit” in the top right corner. You’ll find yourself in a dedicated editing interface ready to transform your picture.
One of the primary adjustments you can make is with Light. Click on the “Light” adjustment tab, and you’ll see options to fine-tune Exposure, Highlights, Shadows, Brightness, Contrast, and Black Point. These tools are essential for correcting images that are too dark, too bright, or lack depth. By subtly adjusting these sliders, you can bring out details and create a more balanced and visually appealing photo.
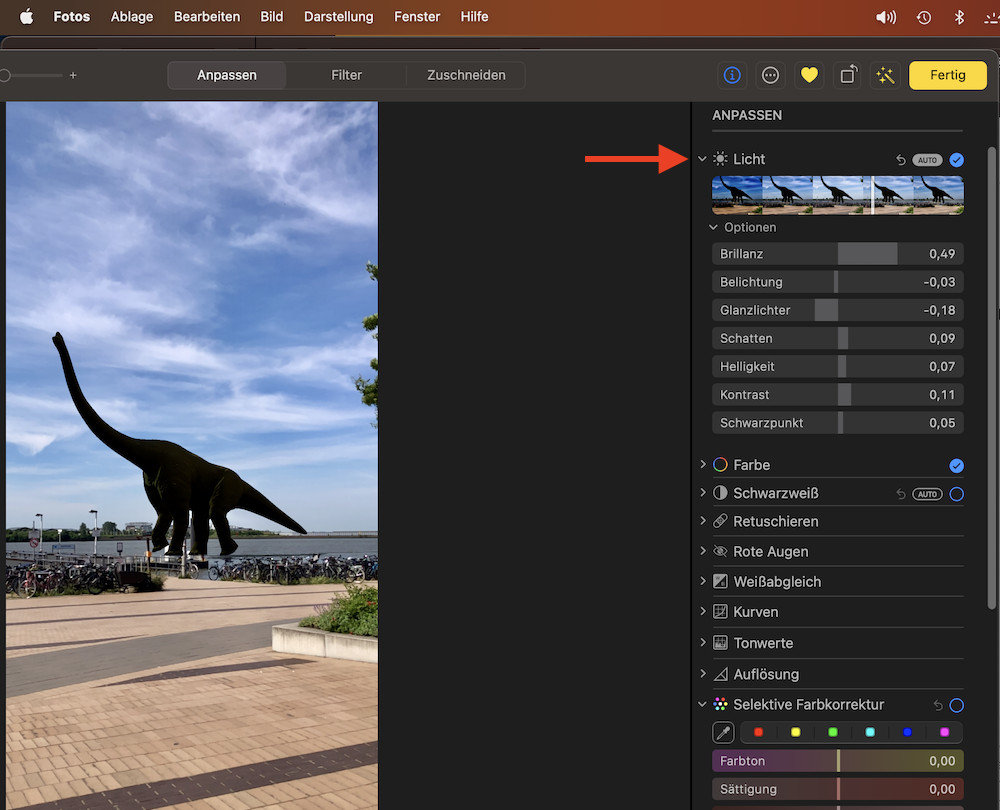 Adjusting Light in Photos App on Mac
Next, explore the Color adjustments. Here, you can modify Saturation, Contrast, Cast, and Sharpness. These controls allow you to enhance the vibrancy of your colors, correct any unwanted color casts, and sharpen details for a crisper image. For example, increasing saturation can make your landscapes pop, while adjusting sharpness can bring focus to your subject.
Beyond basic light and color corrections, the Photos app also includes powerful Retouch tools. If you have blemishes or minor imperfections in your photos, the Retouch tool, symbolized by a bandage icon, is your go-to solution. Simply select the tool and brush over the areas you want to correct. The Photos app intelligently blends the surrounding pixels to seamlessly remove distractions, leaving you with a cleaner and more polished image.
 Retouch tool in Photos App for blemish removal
For quick edits and specific tasks, Preview is another excellent built-in macOS application. While often used for viewing PDFs and images, Preview also packs a surprisingly useful set of editing features. To access these, open your image in Preview and click the “Show Markup Toolbar” button.
One standout feature in Preview is the background removal tool. This is incredibly handy when you want to isolate a subject from its background. Using the “Instant Alpha” tool (which looks like a magic wand), you can click and drag on the background to select and remove it. This is perfect for creating transparent backgrounds or focusing solely on the main subject of your photo.
 Using Instant Alpha tool in Preview to remove background
While Photos and Preview offer robust editing capabilities for many users, those seeking more advanced features might consider exploring third-party photo editing software available on the Mac App Store. Applications range from free to professional-grade, offering tools for complex manipulations, layering, and specialized effects. Furthermore, for those looking to automate editing workflows, Shortcuts on Mac can be utilized to create custom photo editing actions, streamlining repetitive tasks and enhancing productivity.
In conclusion, editing photos on your Mac is accessible and powerful thanks to built-in tools like Photos and Preview. From adjusting lighting and color to removing blemishes and backgrounds, these applications provide a solid foundation for enhancing your images. Whether you stick with the basics or venture into more advanced techniques with additional software, your Mac offers a versatile platform for unleashing your photo editing creativity.