Google Photos is a fantastic service for backing up and organizing your photos and videos. But what if you have some images you’d prefer to keep private, away from prying eyes? Perhaps they are photos of sensitive documents, personal moments, or anything else you want to keep under wraps. The good news is Google Photos on Android offers a built-in feature to address this: the Locked Folder.
This secure space allows you to hide photos and videos behind your device’s screen lock, ensuring only you can access them. Think of it as a digital vault within your photo library.
Why use a Locked Folder?
There are several compelling reasons to utilize the Locked Folder in Google Photos:
- Protect Sensitive Documents: Store images of your passport, driver’s license, medical information, or financial documents securely.
- Keep Personal Photos Private: Hide photos and videos of a personal nature that you wouldn’t want others to accidentally stumble upon.
- Enhanced Privacy: Add an extra layer of security to your most private media, ensuring peace of mind.
However, it’s crucial to understand a key limitation: photos and videos in the Locked Folder are not backed up to the cloud. This means they are only stored locally on your device. If you lose your device or uninstall Google Photos, these items will be deleted. Therefore, use the Locked Folder for truly private items and consider keeping a separate backup of these files if they are irreplaceable.
Let’s walk through the process of setting up and using the Locked Folder on Google Photos for Android. This guide is based on Android 12 and may be slightly different on older versions, but the core steps should be similar.
Creating Your Locked Folder in Google Photos
What you need:
- An Android phone or tablet.
- The Google Photos app installed and signed in to your Google account.
- A screen lock set up on your device (fingerprint, PIN, pattern, or password).
Step 1: Open Google Photos
Launch the Google Photos application on your Android device. You’ll typically find it on your home screen or in your app drawer.
The main view of the Google Photos app on an Android device.
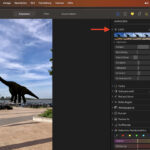
Step 2: Navigate to Utilities and Set Up Locked Folder
At the bottom of the Google Photos screen, you’ll see a navigation menu. Tap on “Utilities”. This will take you to a screen with various Google Photos features. Scroll down until you find “Locked Folder” and tap “Set up Locked Folder”.
The Utilities menu in Google Photos highlighting the “Set up Locked Folder” option.
Step 3: Complete Setup and Authenticate
Tap “Set up” to begin the process. Google Photos will then prompt you to verify your identity using your device’s screen lock method (fingerprint, face unlock, PIN, or pattern). This is a crucial security step to ensure only you can access the locked folder.
Step 4: Move Photos to the Locked Folder
Once authenticated, you’ll see a message indicating “Nothing here yet” and a “Move items” button. Tap “Move items” to select the photos and videos you want to hide.
Selecting photos from your Google Photos library to move into the Locked Folder.
Choose the photos and videos you want to hide by tapping on them. Once you’ve selected everything, tap “Move” at the top right corner. You may be asked to authenticate again for confirmation.
Google Photos will display a final warning reminding you that items in the Locked Folder are not backed up and will be deleted if the app is uninstalled. Tap “Continue” and then “Move” to finalize the process. Your selected photos and videos are now hidden in your Locked Folder.
Accessing Your Hidden Photos
To view your hidden photos and videos, open Google Photos, go to “Utilities,” and scroll down to the “Locked Folder” option. Tap on “Locked Folder.” You will need to authenticate using your screen lock again to access the contents.
The Locked Folder option located at the bottom of the Utilities menu in Google Photos.
From here, you can view, move items out of the Locked Folder back to your regular Google Photos library, or delete items as needed.
Conclusion: Take Control of Your Photo Privacy
The Locked Folder in Google Photos is a simple yet effective tool to enhance your photo privacy on Android. By following these steps, you can easily hide sensitive photos and videos, ensuring they remain private and secure on your device. Remember to use this feature wisely, keeping in mind the local storage limitation and the importance of backing up truly essential private files separately. Take control of your digital privacy and enjoy the added security of the Google Photos Locked Folder.