Running out of storage on your iPhone? Or simply want a secure backup of your precious photos and videos? Transferring your iPhone photos to an SD card is an excellent solution. This guide will walk you through the process step-by-step, ensuring you can easily move your memories from your iPhone to an SD card using Apple’s official adapters.
Why Transfer Photos from iPhone to SD Card?
Before diving into the how-to, let’s understand why transferring photos to an SD card is beneficial:
- Free Up iPhone Storage: Photos and videos consume significant storage space. Moving them to an SD card frees up valuable space on your iPhone, improving performance and allowing you to capture more memories.
- Secure Backup: SD cards provide a physical backup of your photos, safeguarding them against data loss from device malfunction, software issues, or accidental deletion.
- Easy Sharing and Access: SD cards are universally compatible. You can easily access your photos on computers, TVs, and other devices with an SD card reader, making sharing a breeze.
- Travel-Friendly Solution: When traveling, transferring photos to an SD card allows you to continue capturing memories without worrying about cloud storage limitations or internet connectivity.
What You’ll Need to Transfer Photos
To transfer photos from your iPhone to an SD card, you’ll need the following:
-
iPhone or iPad: The device containing the photos you want to transfer.
-
SD Card: Ensure it has sufficient storage capacity for your photos and videos.
-
Apple Camera Adapter: You’ll need one of these official Apple adapters to connect your SD card to your iPhone:
- Lightning to SD Card Camera Reader
- Lightning to USB 3 Camera Adapter
- Lightning to USB Camera Adapter
- Apple USB-C to SD Card Reader (for newer iPhones and iPads with USB-C ports)
-
Photos App: The built-in Photos app on your iPhone or iPad is used for both importing and exporting.
Step-by-Step Guide: Importing Photos from SD Card to iPhone
While the main keyword is about transferring from iPhone to SD card, understanding the import process is helpful context and shares similar steps. Here’s how to import photos to your iPhone from an SD card or digital camera, which uses the same adapters and interface, helping users understand the tool’s capabilities.
- Connect the Adapter: Plug the Apple camera adapter into the Lightning or USB-C port of your iPhone or iPad.
- Connect SD Card or Camera: Insert your SD card into the SD card slot on the adapter. Alternatively, you can connect your digital camera to the adapter using a USB cable.
- Open Photos App: The Photos app should automatically open to the Import tab in iOS 17 and earlier. In newer versions, open the Photos app and look for the “Devices” section at the bottom.
- Select Photos to Import: Tap on your SD card or digital camera name in the “Devices” section.
- Import Photos:
- To import all photos and videos, tap “Import All.”
- To select specific items, tap the photos and videos you want to import, then tap “Import.”
- Choose to Keep or Delete: Once the import is complete, you may be prompted to choose whether to “Keep” or “Delete” the media on the SD card or camera.
Troubleshooting Import Issues
If you encounter issues during the import process, here are some troubleshooting steps:
- Update iOS: Ensure your iPhone or iPad is running the latest version of iOS. Outdated software can sometimes cause compatibility issues.
- Camera Mode: Verify that your digital camera is turned on and set to the correct mode for exporting images. Refer to your camera’s manual for instructions.
- Adapter Connection: Disconnect the adapter, wait for about 30 seconds, and then reconnect it firmly.
- SD Card/Camera Reconnection: Unplug the SD card or camera, wait for 30 seconds, and reconnect it securely.
- Restart Devices: Restart your iPhone or iPad and turn your camera off and then back on. This can often resolve temporary glitches.
- Test with Different Media: If possible, try using a different SD card or digital camera to see if the issue persists. This helps identify whether the problem lies with the SD card, camera, or adapter.
- Data Compatibility: Apple camera adapters are designed to import media files captured by digital cameras. Files that have been renamed, edited, or copied to the SD card might not be importable.
- Format Compatibility: Ensure the media format is compatible with iOS. Incompatible formats may not be viewable on your device, although you might still be able to import them to a computer later.
Step-by-Step Guide: Exporting Photos from iPhone to SD Card
Now, let’s focus on the main task: transferring photos from your iPhone to an SD card. This is essentially the reverse process of importing and is referred to as “exporting.”
-
Connect Adapter and SD Card: Follow steps 1 and 2 from the “Importing Photos” section to connect the Apple camera adapter to your iPhone and insert the SD card into the adapter.
-
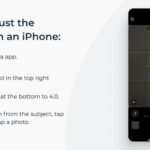
Open Photos App and Select Photos: Open the Photos app on your iPhone and tap “Select” in the top right corner. Then, tap to select the photos and videos you wish to export to the SD card.
-
Share and Export Originals: Tap the Share button (the square with an upward arrow) at the bottom left. In the Share Sheet that appears, scroll down and tap “Export Unmodified Originals.” This ensures you transfer the full-resolution versions of your photos and videos without any compression or edits.
-
Choose SD Card as Location: After tapping “Export Unmodified Originals,” you might briefly see a progress indicator. Then, tap the “Back” button (it may appear as a “<” arrow or similar, depending on your iOS version) until you see the “Cancel” option at the top and the “Locations” section appears. Select your SD card or digital camera from the “Locations” section.
-
Save to SD Card: Finally, tap “Save” to begin the export process. Your selected photos and videos will now be transferred from your iPhone to the SD card. The transfer time will depend on the number and size of the files being transferred.
Supported SD Card Types and Transfer Protocols
Apple camera adapters support a wide range of SD card types and image transfer protocols, including:
- Protocols: Picture Transfer Protocol (PTP), Mass Storage Device protocol
- SD Card Types: SDSC, SDHC, SDXC, miniSD, microSD, MMC
It’s important to note that standard USB flash drives or thumb drives are not supported for direct image importing or exporting using these adapters.
For users with the Lightning to USB 3 Camera Adapter and specific iPad Pro models (iPad Pro 12.9-inch 1st and 2nd generation, iPad Pro 10.5-inch) or newer iPhones like iPhone 15 Pro, iPhone 15 Pro Max, iPhone 16 Pro, and iPhone 16 Pro Max, data transfer speeds can reach USB 3 speeds for faster transfers. All other adapters and iOS devices utilize USB 2 speeds.
Conclusion
Transferring photos from your iPhone to an SD card is a straightforward process using Apple’s camera adapters. By following these steps, you can efficiently back up your photos, free up iPhone storage, and easily share your memories. Whether you are importing or exporting, understanding the process and troubleshooting tips will ensure a smooth and successful transfer experience. Embrace the convenience of SD card storage and keep capturing life’s precious moments without storage limitations.