Trying to figure out how to download all your Google Photos to your PC or Mac? You’re definitely not alone. Many individuals have countless images and videos stored in the cloud, and while it seems like it should be a straightforward process to download them all to a hard drive, it can actually require a bit of effort.
Luckily, it is indeed possible to download all your Google Photos, and this guide is designed to walk you through the process, regardless of whether you are using a high-performance laptop, a desktop computer, or prefer Apple MacBooks and Macs.
Before we get started, let’s briefly consider the cloud storage functionality of Google Photos and why you might want to download your photos and videos from there to a local drive. Google Photos offers a fantastic way to securely store your memories, and it’s known for its user-friendliness and excellent support across different platforms.
Despite Google Photos being a top-tier cloud storage solution for photos in 2024, maintaining a personal backup of your photo library is a smart move. Whether it’s due to concerns about being locked out of your Google account or dealing with limited internet access while traveling, having offline copies of your cherished photos ensures you can access and view them anytime, anywhere.
Below, we will explore various methods to download all your Google Photos to your PC or Mac. And if you are interested in exploring alternative options, you might want to check out guides to the best Google Photos alternatives.
In brief, here are the main steps for downloading all your Google Photos:
- Navigate to takeout.google.com
- Select the checkbox next to ‘Google Photos’
- Specify your preferred download destination, frequency, file type, and size
- Click ‘Create export’
Step-by-Step Guide: Downloading All Google Photos with Google Takeout
If you’re looking to download all your Google Photos to your PC or Mac at once, you won’t find a direct option within Google Photos itself. Instead, the quickest way to perform a complete backup is by using Google Takeout. This versatile tool is designed to export various types of user data from Google services, including Google Photos, Keep notes, Gmail messages, and your Chrome browsing history.
1. Access Google Takeout and Select Google Photos
(Image: © Future)
First, go to takeout.google.com in your web browser and log in to your Google account.
Once logged in, you can initiate the download process and choose the data you want to download from your Google account. In this case, we are focusing on downloading your Google Photos images and videos. To streamline the process and only select photos, click ‘Deselect all’ under the ‘Select data to include’ section.
Scroll down through the list of Google services until you locate Google Photos, and then check the box next to it. This action will include your entire Google Photos library in the export. If downloading everything is your goal, proceed to step #3. If you want to download specific albums, continue to step #2.
2. Choose Specific Albums to Download (Optional)
If you prefer to download only specific albums instead of your entire library, click the ‘All photo albums included’ button. A pop-up window will appear, allowing you to select or deselect individual albums or even entire years from your Google Photos library. Google Takeout helpfully maintains the album structure in the downloaded folder.
It’s important to note that Google Takeout does not provide a preview of album contents. Therefore, it may be helpful to open Google Photos in another browser tab to cross-reference album contents before making your selections in Takeout. After selecting your desired albums, click ‘OK’ to confirm your choices.
Scroll down to the bottom of the page and click ‘Next step’ to proceed.
3. Customize Your Export Settings
 Choosing export settings in Google Takeout for Google Photos
(Image: © Future)
Next, you will be presented with several export customization options. The ‘Delivery method’ dropdown menu lets you choose how you want to receive your downloaded files. The default option is to receive a download link via email once the export is ready.
Alternatively, you can opt to directly transfer your photos and videos to another cloud storage service, such as Dropbox, OneDrive, or Box. If your intention is to migrate your library to one of these platforms, a direct transfer can save considerable time and bandwidth.
You can also select the export frequency, choosing between a one-time export or scheduled periodic exports. For most users looking to create a backup, a one-time export is suitable. You can also choose your desired file type. The .zip format is generally the most compatible and convenient choice for most users.
Additionally, you can specify the maximum size of the download files. For example, selecting 1GB will split larger exports into 1GB chunks, making them easier to download and manage, especially if you have a slower internet connection or are downloading to a device with limited storage.
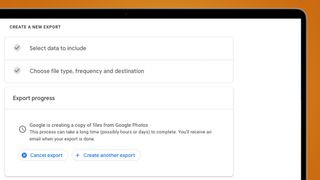
4. Initiate the Export Process
 Starting the Google Photos export in Google Takeout
(Image: © Future)
Once you have configured your export settings to your preferences, click ‘Create export’. You will see a notification stating ‘Google is creating a copy of files from Google Photos’. The duration of this process depends largely on the size of your Google Photos library. It can range from a few minutes for smaller libraries to several hours for very large collections.
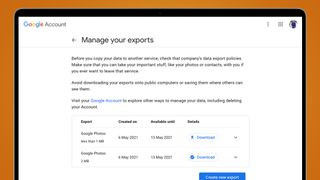
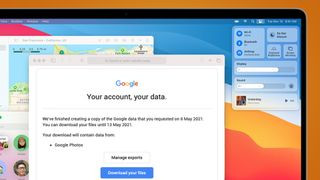
5. Download Your Files from the Email Notification
 Email notification to download Google Photos from Google Takeout
(Image: © Future)
You will receive an email notification in your Gmail inbox once your Google Photos download is ready. If you chose to save the files to your device, click ‘Download your files’ in the email to begin the download process. It’s important to note that the download links remain active for approximately one week after creation, so ensure you download your files within this timeframe.
Step-by-Step Guide: Downloading Individual Google Photos
Of course, you may not always want to download all your Google Photos at once. In some cases, downloading photos individually might be more appropriate. Here’s how to do it:
- Go to Google Photos in your browser and open the specific photo you wish to download.
- Click on the three vertical dots icon located in the top right corner of the screen.
- From the dropdown menu that appears, select ‘Download’. The photo will then be downloaded to your computer’s default download location.
Step-by-Step Guide: Downloading Multiple Google Photos
If you want to download several Google Photos at once, follow these steps:
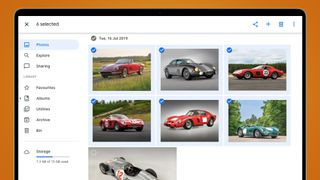
1. Select Multiple Photos for Download
 Selecting multiple photos in Google Photos for download
(Image: © Future)
Open Google Photos on the web. To select multiple images, hover your cursor over a photo thumbnail and click the checkmark that appears in the top left corner.
Continue to click the checkmarks on other images you wish to download to add them to your selection. For downloading a sequence of photos, you can select the first photo, hold down the Shift key, and then select the last photo in the sequence to select all photos in between.
2. Download Your Selected Images
Once you have selected all the photos you want to download, click the three vertical dots icon located at the top right of the Google Photos interface.
From the dropdown menu, click ‘Download’. Google Photos will then compress your selected photos into a single .zip archive, which will be downloaded to your computer, ready for saving and organization.
This method, while not downloading your entire library at once, provides a convenient way to save data by selecting only the photos you need. Google Photos also offers a handy free storage management tool to help identify and delete blurry or underexposed photos, making it easier to curate your collection and download only your best shots.
If you are planning to organize your photos on your hard drive into categories, downloading photos in batches can streamline this process. Use the Google Photos search bar to filter images by criteria like location or date, and then download relevant batches of photos. This allows you to easily save and group similar images, such as photos from a specific trip or event.
Step-by-Step Guide: Downloading Google Photos Albums
If you have already organized your photos into albums in Google Photos, or if you utilize Google’s automatically generated ‘smart albums’, downloading entire albums is a straightforward process:
- In Google Photos, navigate to the ‘Albums’ tab. If you don’t see it directly, click ‘View all albums’ to see your complete album collection.
- Click on the specific album you want to download to open it.
- Once the album is open, click the three vertical dots in the top right corner of the screen and select ‘Download all’. This action will compress all the images and videos within the album into a single .zip file, which you can then download to your computer.
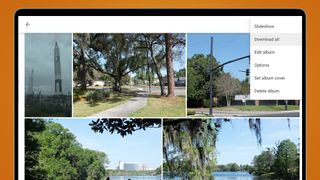 Downloading an album from Google Photos
(Image credit: Future)
The advantage of downloading albums is the ability to selectively download organized sets of photos with just a few clicks, keeping your photos organized on your local storage in the same album structure.
However, the limitation is that you can only download one album at a time. Downloading multiple albums requires repeating the process for each album, which can be time-consuming if you have a large number of albums to download.
And there you have it: four effective methods to download Google Photos to your PC or Mac. You might also find it helpful to explore guides on how to edit photos in Google Photos, how to back up to Google Photos, and how to save Google Photos to iPhone or iCloud for more tips on managing your Google Photos library.