In today’s digital age, a professional email signature is more than just contact details; it’s an extension of your brand and personality. Adding an image to your Gmail signature, whether it’s your company logo, a headshot, or social media icons, can significantly enhance your email’s impact. This guide will walk you through the simple steps to insert a photo into your Gmail signature, making your emails stand out.
If you’re interested in a broader overview of creating effective email signatures in Gmail, be sure to explore our comprehensive article on how to create an email signature in Gmail.
Why Include a Photo in Your Gmail Signature?
Wondering if adding a photo to your Gmail signature is worth it? The answer is a resounding yes! Visual elements in your signature can bring numerous advantages, making your communication more engaging and professional. Let’s explore the key benefits:
Benefit #1: Enhance Personal Branding
A picture is worth a thousand words. Including your professional headshot or company logo in your signature helps recipients instantly recognize you or your brand. This visual reinforcement builds familiarity and strengthens your personal or company identity with every email you send.
Benefit #2: Boost Professionalism and Credibility
A Gmail signature with a well-placed logo or professional photo exudes competence and attention to detail. It signals that you are serious about your communication and brand representation, enhancing your credibility in the eyes of clients, partners, and colleagues.
Benefit #3: Drive Social Media Engagement
Social media badges in your signature are a subtle yet effective way to grow your online presence. By linking these icons to your social media profiles, you make it easy for recipients to connect with you on other platforms, expanding your network and engagement.
Benefit #4: Improve Visual Appeal and Readability
A signature with just text can look cluttered and overwhelming. Incorporating images, especially social media badges instead of lengthy text links, cleans up your signature, making it visually appealing and easier to read. This improved aesthetics contributes to a more positive impression.
Ready to leverage the power of visuals in your Gmail signature? Let’s get started with the step-by-step process.
Step-by-Step Guide: Adding a Photo to Your Gmail Signature
Adding an image to your Gmail signature is a straightforward process that can be completed in just a few minutes. Follow these simple steps to enhance your email signature with a photo:
Accessing Gmail Signature Settings
Step #1: Open Gmail and Navigate to Settings.
Begin by logging into your Gmail account. Once you’re in your inbox, locate the gear icon in the top right corner of the page. Click on this icon to open the Quick settings menu.
Step #2: Access Full Settings and Signature Options.
From the Quick settings dropdown menu, select ‘See all settings’. This will take you to the comprehensive Gmail settings page. In the settings panel, make sure you are under the ‘General’ tab, which is usually the default. Scroll down until you find the ‘Signature’ section.
Within the ‘Signature’ section, you might need to enable signatures if you haven’t already. Select the Gmail account you want to create or edit a signature for from the dropdown menu. If you don’t have a signature yet, click ‘Create new’ to set up your first signature.
Step #3: Insert Image into Your Signature.
Now that you’re in the signature editor, position your cursor where you want to insert your image within your signature text. You have several options to add your photo:
Option 1: Using the ‘Insert image’ Icon
This is the most direct method to add an image to your Gmail signature using Gmail’s built-in tools.
-
Click the ‘Insert Image’ icon.
Look for the ‘Insert Image’ icon in the formatting toolbar above the signature text box. It typically looks like a small picture icon. Click on this icon to open the image insertion dialog.
 Gmail Insert Image icon in signature settings
 -
Choose Your Image Source.
A window will appear presenting you with a few options to choose your image from:
-
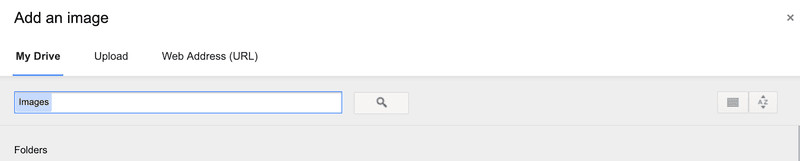
a) My Drive: This option allows you to select an image that is already stored in your Google Drive. If your logo or photo is saved in your Drive, this is a convenient way to access it.
Gmail Insert Image icon in signature settings -
b) Upload: Select this to upload a new image directly from your computer. This is ideal if the image you want to use is saved locally on your device.
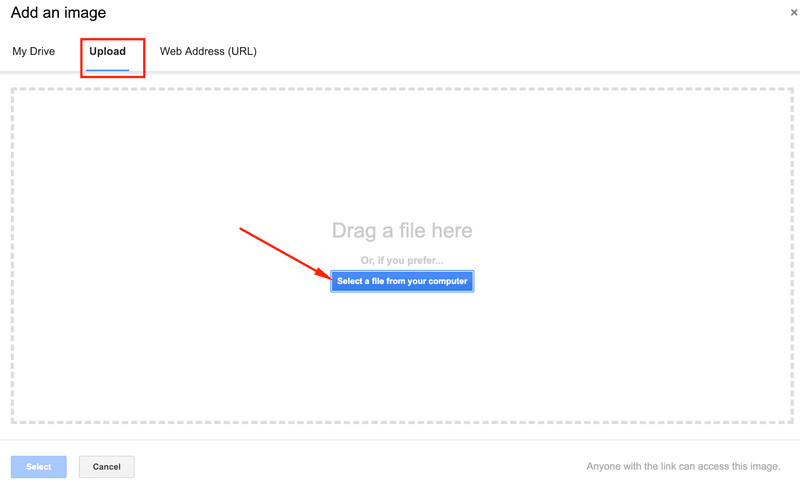 Gmail Insert Image Upload option from computer
 -
c) Web Address (URL): This option lets you insert an image using its direct URL. This is useful if your image is hosted online, such as on your company website or an image hosting service.
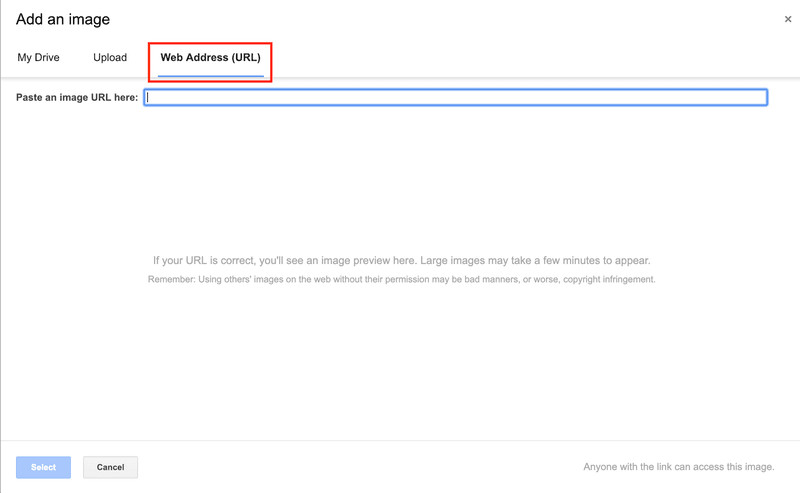 Gmail Insert Image using Web Address URL option
-
Option 2: Copy and Paste Method
For a quick and straightforward approach, especially if you’re working with images in other Google Workspace applications, the copy and paste method can be very efficient.
-
Copy Image from Source.
First, locate your image. This could be in a Google Doc, a website, or even on your desktop. If it’s in a Google Doc, simply select the image and press
Ctrl+C(Windows) orCmd+C(Mac) to copy it. -
Paste into Gmail Signature.
Go back to your Gmail signature editor. Position your cursor where you want the image to appear and press
Ctrl+V(Windows) orCmd+V(Mac) to paste the image directly into the signature block.
Saving Your Signature
After inserting your image using either method, remember to scroll down to the bottom of the ‘General’ settings page and click ‘Save Changes’. This crucial step ensures that your new signature, complete with the image, is saved and will be applied to all your outgoing emails.
Troubleshooting Common Image Issues in Gmail Signatures
While adding images to your Gmail signature is generally easy, you might encounter a few common issues. Here’s how to troubleshoot them:
Issue #1: Image Not Displaying in Signature.
- Solution: Check Google Drive Sharing Settings. If you’ve used an image from Google Drive, ensure that the sharing settings for the image are set to ‘Anyone with the link can view’. If the image is not publicly accessible, it might not display correctly in your signature for recipients.
Issue #2: Image Appears as an Attachment.
- Solution: Avoid Direct Uploads to Signature Block. Directly uploading very large images into the signature block can sometimes cause them to be treated as attachments by certain email clients. Instead, try hosting the image on Google Drive or using the ‘Web Address (URL)’ option to link to an externally hosted image.
Issue #3: Missing ‘My Drive’ and ‘Upload’ Options.
- Solution: Contact Google Workspace Admin or Clear Cache/Cookies. If you’re missing ‘My Drive’ and ‘Upload’ options in the ‘Insert Image’ dialog, it might be due to Google Workspace settings. Contact your Google Workspace administrator to ensure external sharing is enabled in the Google Admin Console. Alternatively, try clearing your browser’s cookies and cache or using an Incognito window, especially if you are logged into multiple Google accounts, as this can sometimes resolve display issues.
Issue #4: Hosting Images Externally.
-
Solution: Use Image Hosting Services. If you prefer to host your image externally, use image hosting services like Postimages or Imgbox. Upload your photo or logo to one of these services. After uploading, copy the image address (URL). In Gmail signature settings, use the ‘Web Address (URL)’ option and paste the copied URL.
Gmail Insert Image using Web Address URL option
Enhance Engagement with Social Media Badges in Your Signature
Social media badges are a fantastic way to encourage recipients to connect with you on social platforms directly from your email. Here’s how to add and link social media badges to your Gmail signature:
Step #1: Find Social Media Badges.
Start by finding high-quality social media badges. Websites like Iconfinder offer a wide variety of free social media icons for platforms like Facebook, X (formerly Twitter), LinkedIn, Instagram, and more.
Step #2: Choose the Right Size.
When downloading badges, select an appropriate size for email signatures. For optimal display across devices, especially mobile, it’s recommended to use smaller sizes such as 32×32 pixels. Avoid sizes larger than 48×48 pixels, as they may appear blurry on smaller screens and overwhelm your signature.
Step #3: Add Badges to Your Gmail Signature.
Go to your Gmail signature settings. Click the ‘Insert image’ icon and use the ‘Upload’ option to add the downloaded social media badge images to your signature. Position the badges where you want them to appear in your signature, typically below your contact information.
Step #4: Hyperlink Social Media Badges.
Simply adding the badge image isn’t enough; you need to link it to your social media profile. To do this, select the social media badge image in the signature editor. Then, click the ‘Link’ button (it looks like a chain link icon) in the formatting toolbar.
In the link dialog box, paste the URL of your social media profile (e.g., your LinkedIn profile URL, your Facebook page URL). Click ‘OK’ to apply the hyperlink to the image. Repeat this process for each social media badge you’ve added.
Step #5: Save and Test Your Signature.
After adding and linking all your social media badges, scroll down and click ‘Save Changes’ in your Gmail settings. To ensure everything looks perfect, send a test email to yourself or a colleague to see how your signature appears in a real email. Check the links to make sure they direct to the correct social media profiles.
Optimizing Image Sizes for Gmail Signatures
The size of your signature image is crucial for ensuring it displays correctly and doesn’t negatively impact email loading times or appearance. Here are some guidelines for optimizing image sizes in your Gmail signature:
Banner Images:
If you’re using a banner image in your signature, keep it compact. Aim for a width of 600 pixels or less. This ensures it fits well within most email layouts and doesn’t overflow in recipient’s inboxes, especially on mobile devices.
Logos and Photos:
For logos or personal photos, an optimal width is typically between 100 to 300 pixels. This size range allows for clear visibility without being too large and overpowering the text in your signature. Adjust the size within this range based on your logo’s dimensions and overall signature design.
Social Media Icons:
As mentioned earlier, it is best to use social media icons that are 32×32 pixels or 48×48 pixels. These smaller sizes are ideal for icons, keeping them clickable and clear without cluttering your signature.
For more insights into choosing the best image format for your email signature, explore resources like best format for email signature.
File Size Considerations
Beyond dimensions, file size is also critical. Large image files can slow down email loading times and may even be blocked by some email clients if they exceed size limits. Aim to keep your signature images under 50kb in file size.
Pro Tip: Use image optimization tools to reduce file size without significantly compromising image quality. Online tools like TinyPNG or ImageOptim can compress images effectively. For image enhancement without increasing file size, consider AI-powered tools like Picsart to improve image quality before adding it to your signature.
Note: For a simple yet professional email signature, consider using a free email signature generator to streamline the process.
By optimizing your image sizes and file sizes, you ensure your Gmail signature looks professional, loads quickly, and enhances your email communication effectively.
Streamline Image Management with Newoldstamp for Gmail Signatures
For businesses and professionals looking for a more robust and efficient solution for managing Gmail signatures with images, Newoldstamp offers a dedicated email signature generator. It simplifies the process of creating and managing professional signatures across Gmail and other email platforms.
Newoldstamp provides a wide array of features designed to make email signature creation and management seamless:
-
Extensive Template Gallery: Choose from a variety of professionally designed templates to find a layout that perfectly matches your brand and style.
-
Customization Options: Tailor every aspect of your signature, from colors and fonts to the arrangement of fields and social media icon styles, ensuring brand consistency across all emails.
Key Advantages of Using Newoldstamp:
1. Easy Image Upload and Adjustment: Upload any image without needing to pre-resize or crop. Newoldstamp’s editor allows you to adjust the shape, size, and cropping of your image directly within the platform.
2. High-Quality Images: Newoldstamp ensures your images look sharp and clear, with support for retina and 4K displays, preventing blurry images and maintaining professional visual standards.
3. Intuitive Image Placement: Simply select a template, and Newoldstamp intelligently places your image in the optimal location within the signature layout, making design effortless.
4. Comprehensive Social Media Icon Library: Access over 150 pre-designed social media badges, eliminating the need to search for individual icons and ensuring a consistent and professional look.
5. Hosted Images, No Attachments: Newoldstamp hosts your signature images, preventing them from being sent as attachments and keeping your emails clean and professional.
6. Image Hyperlinking: Easily turn any image in your signature into a hyperlink, driving traffic and engagement to your website, social media profiles, or promotional landing pages.
Note: For inspiration and ideas, explore various email signature examples to see how different professionals and brands utilize images in their signatures.
Newoldstamp simplifies the process of creating visually impactful email signatures, even without technical skills. It’s a user-friendly solution that empowers you to create a lasting impression with every email you send.
Here’s a quick comparison highlighting the benefits of Newoldstamp over traditional methods:
| Feature | Traditional Method | Newoldstamp |
|---|---|---|
| Template Selection | Limited, manual customization | Diverse gallery, drag-and-drop editing |
| Image Integration | Resizing, cropping, third-party tools | Upload and adjust within editor |
| Image Hosting | Attachment risk, size limits | Seamless hosting, streamlined emails |
| Social Media Icons | Find & edit individual icons | 150+ pre-designed options |
| Technical Expertise | Coding knowledge often required | No coding skills needed, user-friendly |