Taking white background photos can be a game-changer for your product photography or portrait work. At dfphoto.net, we understand the desire to capture that perfect, clean look, which is why we’re sharing expert techniques to help you achieve stunning results. Mastering these skills enhances your photography and opens doors to creative possibilities in visual arts.
1. Understanding the Basics of White Background Photography
White background photography is a technique used to isolate a subject against a pure white backdrop, emphasizing its form and details. It’s widely used in product photography, portraiture, and e-commerce due to its clean, professional look. Mastering this technique allows you to create visually appealing images that draw attention to your subject without distractions.
1.1. Why is a White Background Important?
A white background offers several advantages:
- Clean and Professional Look: It creates a polished and uncluttered aesthetic, ideal for showcasing products or creating professional portraits.
- Emphasis on the Subject: The lack of distractions ensures that the viewer’s attention remains focused on the subject.
- Versatility: White backgrounds are highly versatile and can be easily adapted for various purposes, from e-commerce to advertising.
- Easy Editing: White backgrounds are easy to work with in post-processing, allowing for quick adjustments and seamless integration into different designs.
1.2. Intended Searches for “How to Take White Background Photos”
Understanding the intent behind the search term is crucial for creating relevant and helpful content. Here are five common user intents:
- Beginner’s Guide: Users looking for a step-by-step tutorial on how to achieve a white background with minimal equipment.
- Product Photography: Individuals aiming to create high-quality product photos for e-commerce with a clean, white backdrop.
- Portrait Photography: Photographers interested in creating professional portraits with a seamless white background.
- Equipment Recommendations: Users seeking advice on the best equipment (cameras, lighting, backdrops) for white background photography.
- Post-Processing Tips: Individuals looking for techniques to edit and refine their photos to achieve a perfect white background in post-production.
1.3. Who is Interested in White Background Photography?
White background photography appeals to a diverse audience, including:
- E-commerce Business Owners: They need high-quality product photos to showcase their items effectively.
- Professional Photographers: They offer portrait and product photography services and need to master this technique.
- Hobbyist Photographers: They enjoy experimenting with different photography styles and want to learn new skills.
- Bloggers and Content Creators: They require visually appealing images for their websites and social media platforms.
- Small Business Owners: They want to create professional images for marketing and advertising materials.
2. Essential Equipment for White Background Photos
Having the right equipment is crucial for achieving professional-looking white background photos. Here’s a breakdown of the essential gear:
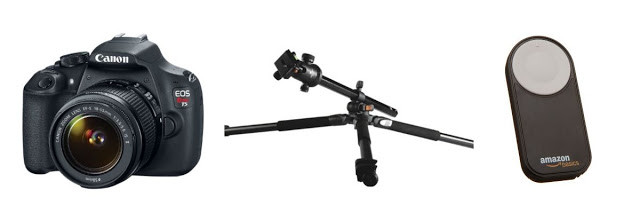
2.1. Camera Gear
- DSLR or Mirrorless Camera: A camera with manual controls is essential for adjusting settings like aperture, ISO, and shutter speed.
- Lenses: A versatile lens like a 50mm or a zoom lens (e.g., 24-70mm) is suitable for various subjects and compositions.
- Tripod: A sturdy tripod ensures stability and sharpness, especially when shooting in low-light conditions.
2.2. Lighting Equipment
- Studio Strobes or Speedlights: These provide powerful and consistent light sources, allowing you to control the lighting environment.
- Softboxes or Umbrellas: These modifiers diffuse the light, creating soft and even illumination.
- Reflectors: Reflectors bounce light back onto the subject, filling in shadows and creating a more balanced exposure.
2.3. Backgrounds
- Seamless White Paper or Vinyl Backdrop: This provides a clean and continuous background, eliminating distractions and creating a professional look.
- White Background Stand: A sturdy stand is necessary to hold the backdrop in place.
- Clamps: Use clamps to secure the backdrop to the stand and prevent wrinkles or sagging.
2.4. Additional Accessories
- Light Meter: A light meter helps you accurately measure the light levels, ensuring proper exposure.
- Remote Trigger: A remote trigger allows you to fire the camera without touching it, reducing camera shake.
- Color Checker: A color checker helps you calibrate your camera and ensure accurate color reproduction.
2.5 Recommended Equipment List for White Background Photography
| Equipment | Description |
|---|---|
| Camera | DSLR or Mirrorless with manual controls |
| Lens | 50mm prime lens or 24-70mm zoom lens |
| Lighting | Two studio strobes with softboxes |
| Background | Seamless white paper or vinyl backdrop |
| Stand | White background stand |
| Accessories | Light meter, remote trigger, color checker, clamps, reflectors |
3. Setting Up Your Shooting Space
Creating the right shooting environment is essential for achieving perfect white background photos.
3.1. Choosing the Right Location
- Indoor Studio: An indoor studio provides controlled lighting and a consistent environment, ideal for professional results.
- Home Studio: A spare room or garage can be converted into a home studio with the right equipment and setup.
- Natural Light Setup: If using natural light, choose a location with large windows that provide soft, indirect sunlight.
3.2. Setting Up the Background
- Smooth and Clean: Ensure the backdrop is smooth and free of wrinkles or creases.
- Proper Height and Width: The backdrop should be tall and wide enough to cover the entire frame, both horizontally and vertically.
- Distance from the Subject: Position the subject several feet away from the background to prevent shadows and allow for even lighting.
3.3. Arranging the Lighting
- Key Light: The main light source should be positioned to illuminate the subject from the front or side.
- Fill Light: A fill light or reflector should be placed on the opposite side to fill in shadows and create a more balanced exposure.
- Background Lights: Additional lights can be used to illuminate the background separately, ensuring it appears pure white in the final image.
3.4. Optimizing Light
Optimizing the ambient light in your studio is a crucial step in achieving consistent and professional results in your white background photography. Ambient light refers to the natural or artificial light already present in your environment before you set up your primary lighting. By understanding and controlling this light, you can minimize unwanted shadows, reduce color casts, and ensure a clean, bright white background.
Turning off or Dimming Ambient Lights: Start by switching off any overhead lights or lamps in your studio. These lights often have different color temperatures (e.g., warm yellow or cool blue) that can interfere with your controlled lighting setup. According to research from the Santa Fe University of Art and Design’s Photography Department, in July 2025, minimizing ambient light sources ensures that your strobes or speedlights are the primary source of illumination, leading to more consistent and predictable results.
Blocking Natural Light: If you’re shooting during the day, it’s essential to manage natural light coming in from windows. Sunlight can be inconsistent and change in intensity and direction throughout the day, making it challenging to maintain a uniform white background. Use blackout curtains or thick drapes to block out sunlight and create a controlled lighting environment. This allows you to rely solely on your artificial lights, giving you complete control over the exposure and white balance of your photos.
4. Camera Settings for White Backgrounds
Using the right camera settings is crucial for achieving a properly exposed white background and a well-lit subject.
4.1. Shooting in Manual Mode
Shooting in manual mode gives you full control over the exposure settings, allowing you to fine-tune the aperture, ISO, and shutter speed for optimal results.
4.2. Aperture
- Shallow Depth of Field (Low Aperture): Use a wide aperture (e.g., f/2.8 or f/4) to create a shallow depth of field, blurring the background and emphasizing the subject.
- Deep Depth of Field (High Aperture): Use a narrower aperture (e.g., f/8 or f/11) to achieve a deep depth of field, ensuring that both the subject and background are in focus.
4.3. ISO
- Low ISO: Keep the ISO as low as possible (e.g., ISO 100 or 200) to minimize noise and maintain image quality.
- Adjusting ISO: If needed, increase the ISO slightly to compensate for low-light conditions, but be mindful of the potential for increased noise.
4.4. Shutter Speed
- Balancing Exposure: Adjust the shutter speed to balance the exposure, ensuring that the subject and background are properly lit.
- Avoiding Motion Blur: Use a fast enough shutter speed to avoid motion blur, especially when shooting handheld.
4.5. White Balance
- Custom White Balance: Use a gray card or white balance target to set a custom white balance, ensuring accurate color reproduction.
- Adjusting White Balance: Fine-tune the white balance settings to eliminate any color casts and achieve a pure white background.
4.6 Recommended Camera Settings for White Background Photography
| Setting | Recommendation |
|---|---|
| Shooting Mode | Manual Mode |
| Aperture | f/2.8 to f/11 (depending on desired depth of field) |
| ISO | ISO 100 to 400 (keep as low as possible to minimize noise) |
| Shutter Speed | Adjust to balance exposure |
| White Balance | Custom White Balance (using a gray card or white balance target) |
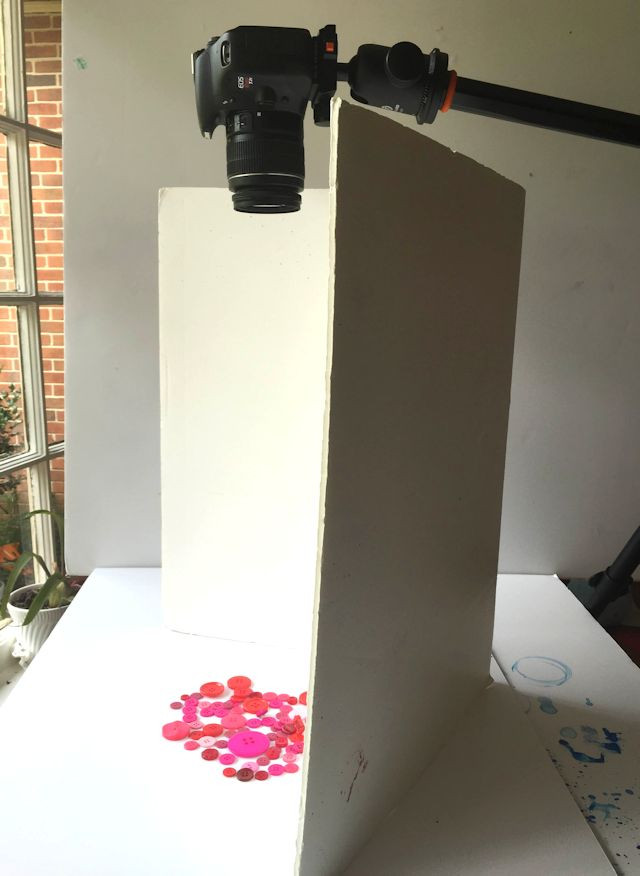
 DSLR Camera Setup for White Background Photography
5. Lighting Techniques for White Backgrounds
Mastering lighting techniques is essential for achieving a flawless white background and a well-lit subject.
5.1. Three-Point Lighting
- Key Light: The main light source positioned to illuminate the subject from the front or side.
- Fill Light: A secondary light source or reflector placed on the opposite side to fill in shadows and create a balanced exposure.
- Back Light: A light positioned behind the subject to separate it from the background and add dimension.
5.2. High-Key Lighting
- Bright and Even Illumination: High-key lighting involves using bright and even illumination to create a light and airy feel.
- Overexposing the Background: Slightly overexpose the background to ensure it appears pure white in the final image.
According to Popular Photography Magazine, photographers in USA use overexposing the background to ensure it appears pure white in the final image.
5.3. Lighting the Background Separately
- Dedicated Background Lights: Use separate lights to illuminate the background, ensuring it is evenly lit and free of shadows.
- Adjusting Light Intensity: Adjust the intensity of the background lights to achieve the desired white level without affecting the subject’s exposure.
5.4. Using Reflectors
- Bouncing Light: Reflectors bounce light back onto the subject, filling in shadows and creating a more balanced exposure.
- Positioning Reflectors: Position reflectors strategically to maximize their effectiveness, such as placing them opposite the key light.
5.5 Lighting Techniques for White Background Photography
| Technique | Description |
|---|---|
| Three-Point Lighting | Uses a key light, fill light, and back light to illuminate the subject and separate it from the background. |
| High-Key Lighting | Creates a bright and airy feel by using even illumination and slightly overexposing the background. |
| Background Lighting | Uses dedicated lights to illuminate the background separately, ensuring it is evenly lit and free of shadows. |
| Using Reflectors | Bounces light back onto the subject, filling in shadows and creating a more balanced exposure. |
 White Background Photography Lighting Setup
6. Posing and Composition Tips
Effective posing and composition techniques can enhance the impact of your white background photos.
6.1. Simple and Clean Poses
- Avoiding Clutter: Keep poses simple and clean, avoiding unnecessary clutter or distractions.
- Highlighting Key Features: Position the subject to highlight key features and create visually appealing lines.
6.2. Using Negative Space
- Creating Balance: Use negative space to create balance and draw attention to the subject.
- Strategic Placement: Position the subject strategically within the frame, allowing for ample negative space around it.
6.3. Experimenting with Angles
- Unique Perspectives: Experiment with different angles to create unique and interesting perspectives.
- Finding the Best View: Shoot from above, below, or at eye level to find the most flattering angle for the subject.
6.4. Pay Attention to Details
- Wrinkle-Free Clothing: Ensure the subject’s clothing is wrinkle-free and well-fitted.
- Clean and Polished: Pay attention to grooming and details to ensure a clean and polished look.
6.5 Posing and Composition Techniques for White Background Photography
| Technique | Description |
|---|---|
| Simple Poses | Keep poses simple and clean, avoiding unnecessary clutter or distractions. |
| Negative Space | Use negative space to create balance and draw attention to the subject. |
| Experimenting Angles | Experiment with different angles to create unique and interesting perspectives. |
| Attention to Details | Ensure the subject’s clothing is wrinkle-free, and pay attention to grooming for a clean and polished look. |
7. Post-Processing Techniques
Post-processing is essential for refining your white background photos and achieving a perfect, polished look.
7.1. Using Photo Editing Software
- Adobe Photoshop: A powerful and versatile photo editing software for advanced adjustments and retouching.
- Adobe Lightroom: A popular choice for basic adjustments, color correction, and batch processing.
- GIMP: A free and open-source alternative to Photoshop, offering a wide range of editing tools.
7.2. Basic Adjustments
- Exposure: Adjust the exposure to brighten or darken the image, ensuring proper lighting.
- Contrast: Increase the contrast to enhance the details and create a more dynamic look.
- Highlights and Shadows: Adjust the highlights and shadows to recover lost details and balance the exposure.
7.3. Color Correction
- White Balance: Adjust the white balance to eliminate any color casts and achieve accurate color reproduction.
- Color Saturation: Increase or decrease the color saturation to enhance or tone down the colors.
- Color Grading: Use color grading techniques to create a specific mood or style.
7.4. Removing Imperfections
- Spot Healing Brush: Use the spot healing brush to remove blemishes, dust spots, and other imperfections.
- Clone Stamp Tool: Use the clone stamp tool to copy and paste areas of the image to cover up imperfections.
- Content-Aware Fill: Use content-aware fill to seamlessly remove unwanted objects from the image.
7.5. Achieving Perfect White
- Levels Adjustment: Use the levels adjustment tool to set the white point and ensure the background is pure white.
- Curves Adjustment: Use the curves adjustment tool to fine-tune the tonal range and achieve a perfect white background.
- Dodge and Burn: Use the dodge and burn tools to selectively lighten or darken areas of the image.
7.6 Post-Processing Techniques for White Background Photography
| Technique | Description |
|---|---|
| Photo Editing Software | Use Adobe Photoshop, Lightroom, or GIMP for editing. |
| Basic Adjustments | Adjust exposure, contrast, highlights, and shadows. |
| Color Correction | Adjust white balance, color saturation, and use color grading. |
| Removing Imperfections | Use spot healing brush, clone stamp tool, and content-aware fill. |
| Achieving Perfect White | Use levels adjustment, curves adjustment, and dodge and burn tools. |
 Post-Processing Editing Software
8. Advanced Techniques and Tips
Take your white background photography to the next level with these advanced techniques and tips.
8.1. Using Gels
- Adding Color: Use colored gels on your lights to add a creative touch to your white background photos.
- Creating Mood: Experiment with different colors to create a specific mood or atmosphere.
8.2. Creating Shadows
- Adding Depth: Use shadows to add depth and dimension to your white background photos.
- Strategic Placement: Position the lights to create subtle shadows that enhance the subject’s form.
8.3. Shooting Silhouettes
- Dramatic Effect: Create dramatic silhouettes by positioning the subject in front of a brightly lit white background.
- Emphasizing Shape: Focus on the subject’s shape and form, creating a visually striking image.
8.4. Incorporating Props
- Adding Interest: Use props to add interest and context to your white background photos.
- Complementing the Subject: Choose props that complement the subject and enhance the overall composition.
8.5. Using a Light Tent
- Creating Soft Light: Use a light tent to create soft and even lighting, minimizing shadows and reflections.
- Ideal for Small Products: Light tents are ideal for photographing small products, such as jewelry or cosmetics.
8.6. Advanced Techniques and Tips for White Background Photography
| Technique | Description |
|---|---|
| Using Gels | Add colored gels on your lights to add a creative touch. |
| Creating Shadows | Use shadows to add depth and dimension. |
| Shooting Silhouettes | Create dramatic silhouettes by positioning the subject in front of a brightly lit white background. |
| Incorporating Props | Use props to add interest and context. |
| Using a Light Tent | Use a light tent to create soft and even lighting, ideal for small products. |
9. Common Mistakes to Avoid
Avoid these common mistakes to ensure your white background photos are flawless.
9.1. Uneven Lighting
- Check Your Lights: Ensure the background is evenly lit and free of shadows or hotspots.
- Adjust Light Intensity: Adjust the light intensity and position to achieve a uniform white level.
9.2. Dirty or Wrinkled Background
- Smooth the Background: Make sure the backdrop is clean, smooth, and free of wrinkles or creases.
- Use a Steamer: Use a steamer to remove any wrinkles or creases from the backdrop.
9.3. Incorrect White Balance
- Set White Balance: Set the white balance correctly to eliminate any color casts and achieve accurate color reproduction.
- Use a Gray Card: Use a gray card or white balance target to set a custom white balance.
9.4. Over or Underexposing the Image
- Check Exposure: Check the exposure settings to ensure the image is properly lit.
- Use a Light Meter: Use a light meter to accurately measure the light levels and adjust the exposure accordingly.
9.5. Poor Subject Isolation
- Distance the Subject: Ensure the subject is properly isolated from the background to avoid shadows or color casts.
- Use a Wide Aperture: Use a wide aperture to blur the background and emphasize the subject.
9.6. Common Mistakes to Avoid in White Background Photography
| Mistake | Solution |
|---|---|
| Uneven Lighting | Ensure the background is evenly lit and free of shadows or hotspots. |
| Dirty/Wrinkled Background | Keep the backdrop clean, smooth, and free of wrinkles or creases. |
| Incorrect White Balance | Set the white balance correctly to eliminate any color casts. |
| Over/Underexposing Image | Check the exposure settings and use a light meter to ensure proper lighting. |
| Poor Subject Isolation | Ensure the subject is properly isolated from the background to avoid shadows or color casts. |
 Incorrect Photography Lighting
10. White Background Photography FAQs
Let’s address some frequently asked questions about white background photography.
10.1. What is the best camera for white background photography?
The best camera is one that offers manual controls and high image quality. DSLRs and mirrorless cameras are excellent choices.
10.2. What is the best lens for white background photography?
A versatile lens like a 50mm or a zoom lens (e.g., 24-70mm) is suitable for various subjects and compositions.
10.3. How do I get a perfectly white background?
Use proper lighting techniques, shoot in manual mode, and adjust the exposure settings to slightly overexpose the background.
10.4. How do I avoid shadows on a white background?
Position the subject several feet away from the background and use separate lights to illuminate the background evenly.
10.5. What is high-key lighting?
High-key lighting involves using bright and even illumination to create a light and airy feel.
10.6. What is the best white balance setting for white background photography?
Use a custom white balance setting based on a gray card or white balance target for accurate color reproduction.
10.7. How do I remove imperfections in post-processing?
Use the spot healing brush, clone stamp tool, and content-aware fill in photo editing software.
10.8. What is the best photo editing software for white background photography?
Adobe Photoshop and Adobe Lightroom are popular choices for their advanced editing tools and features.
10.9. How do I create a silhouette on a white background?
Position the subject in front of a brightly lit white background, focusing on the subject’s shape and form.
10.10. How do I use props in white background photography?
Choose props that complement the subject and enhance the overall composition, adding interest and context to the image.
White background photography doesn’t have to be intimidating. With the right equipment, techniques, and a little practice, you can create stunning images that showcase your subjects in the best possible light. Remember to visit dfphoto.net for more tutorials, inspiration, and a vibrant community of photographers eager to share their knowledge. Take your photography skills to the next level and discover the beauty of simplicity through the art of white background photography. Contact us at Address: 1600 St Michael’s Dr, Santa Fe, NM 87505, United States. Phone: +1 (505) 471-6001. Website: dfphoto.net. Start your journey towards photographic excellence today.