Retrieving your photos is possible even after deletion or if they seem to have disappeared, and this guide from dfphoto.net will provide the steps to recover them. Whether you’re dealing with accidental deletion, hidden albums, or iCloud syncing issues, we’ll walk you through the necessary steps to recover your precious memories and offer tips on preventing future data loss.
1. Understanding the Intent Behind the Search “How Do I Retrieve My Photos”
When users search for “How Do I Retrieve My Photos,” they typically have one of five key intentions:
- Accidental Deletion Recovery: They’ve accidentally deleted photos and want to recover them from the recycle bin or a similar feature.
- Lost on Device: They can’t find photos on their device (phone, computer, or tablet) and need help locating them.
- iCloud Sync Issues: Users who rely on cloud services like iCloud may be experiencing sync problems and need guidance to restore their photos.
- Hidden Photos: They may have hidden photos and forgotten how to unhide them.
- Device Transfer: Users who have recently transferred data between devices may have lost some photos and need to retrieve them.
2. Check Your Recently Deleted Album
If you’ve accidentally deleted a photo or video, the first place to look is the Recently Deleted album. This album acts as a temporary holding space for deleted media, giving you a chance to recover them before they are permanently erased.
2.1. Recovering Photos on Your iPhone or iPad
- Open Photos App: Launch the Photos app on your iPhone or iPad.
- Navigate to Recently Deleted: Scroll down to the Utilities section and tap on “Recently Deleted.”
- Unlock Album: Use Face ID, Touch ID, or your passcode to unlock the Recently Deleted album.
- Select and Recover:
- Single Photo: Tap on the photo or video you want to recover, then tap “Recover.”
- Multiple Photos: Tap “Select,” choose the photos or videos, tap the “More” button (three dots), and then tap “Recover.”
- Confirm Recovery: Confirm that you want to recover the selected media.
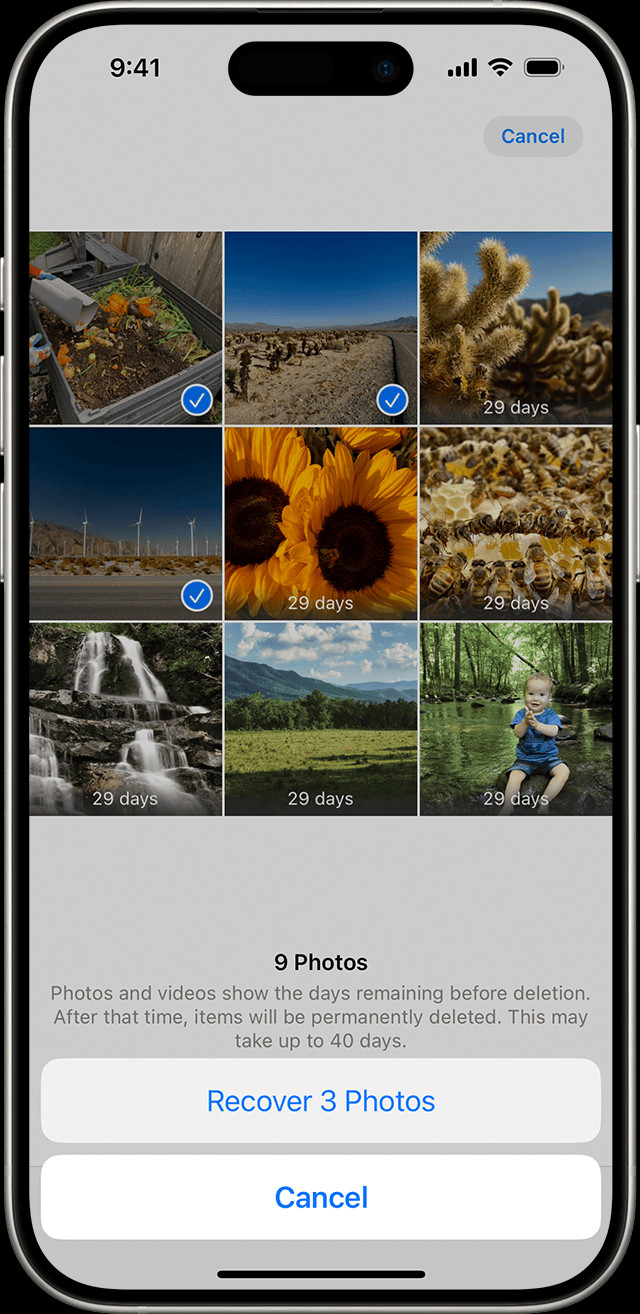 Recovering Photos from Recently Deleted Album on iPhone
2.2. Recovering Photos on Your Mac
- Open Photos App: Open the Photos app on your Mac.
- Find Recently Deleted: In macOS Ventura or later, select “Recently Deleted” in the Utilities section of the sidebar.
- Unlock Album: Use Touch ID or your login password to unlock the album.
- Select and Recover: Click on the photo or video you want to recover, then click “Recover.”
2.3. Recovering Photos on iCloud.com
- Go to iCloud.com: Open your web browser and navigate to iCloud.com.
- Sign In: Log in using your Apple ID and password.
- Open Photos: Click on the “Photos” icon.
- Access Recently Deleted: Select “Recently Deleted” in the sidebar. If the sidebar isn’t visible, click the “Show Sidebar” button in the upper-left corner.
- Select and Recover: Choose the photo you want to recover, then click “Recover.”
2.4. Recovering Photos on Apple Vision Pro
- Open Photos App: Open the Photos app on your Apple Vision Pro.
- Navigate to Recently Deleted: Tap “Collections” in the sidebar, then scroll down and tap “Recently Deleted” in the Utilities section.
- Unlock Album: Tap “View Album” and use Optic ID or your passcode.
- Select and Recover:
- Single Photo: Tap and hold a photo or video, then tap “Recover.”
- Multiple Photos: Tap “Select,” choose the photos or videos, tap the “More” button, then tap “Recover.”
- Confirm Recovery: Tap “Recover” to confirm.
2.5. Important Considerations for Recently Deleted Album
- 30-Day Limit: Items in the Recently Deleted album are stored for 30 days. After this period, they are permanently deleted.
- Permanent Deletion: Once a photo or video is permanently deleted from the Recently Deleted album, it cannot be recovered through standard means.
- iCloud Sync: If you use iCloud Photos, deleting a photo on one device will remove it from all devices synced with the same Apple ID.
3. Unhide Your Photos
Photos and videos can sometimes seem missing because they are hidden. The Hidden album provides a way to keep certain media out of your main photo library. Here’s how to check and unhide your photos:
3.1. Unhiding Photos on Your iPhone or iPad
- Open Photos App: Launch the Photos app on your iPhone or iPad.
- Access Hidden Album: Scroll down to the Utilities section and tap “Hidden.”
- Unlock Album: Use Face ID, Touch ID, or your passcode to unlock the Hidden album.
- Select and Unhide:
- Tap the photo or video you want to unhide.
- Tap the “More” button (three dots).
- Tap “Unhide.”
3.2. Unhiding Photos on Your Mac
- Open Photos App: Open the Photos app on your Mac.
- Show Hidden Album: In the menu bar, click “View” and select “Show Hidden Photo Album.”
- Access Hidden Album: In the sidebar, select “Hidden,” then click “View Album.”
- Unlock Album: In macOS Ventura or later, use Touch ID or your login password.
- Select and Unhide:
- Select the photo or video you want to unhide.
- Control-click the photo and choose “Unhide Photo.” Alternatively, choose “Image > Unhide Photo” from the menu bar, or press Command-L.
3.3. Unhiding Photos on iCloud.com
- Go to iCloud.com: Open your web browser and go to iCloud.com.
- Sign In: Log in using your Apple ID and password.
- Open Photos: Click on the “Photos” icon.
- Access Hidden Album: Select “Hidden” in the sidebar. If you don’t see the sidebar, click the “Show Sidebar” button.
- Show Hidden Photos: Tap or click “Show Hidden Photos.”
- Select and Unhide: Select a photo, click the “More” button, and then click “Unhide.”
3.4. Unhiding Photos on Apple Vision Pro
- Open Photos App: Open the Photos app on your Vision Pro.
- Access Hidden Album: Tap “Collections” in the sidebar and scroll down to “Hidden” in the Utilities section.
- Unlock Album: Tap “View Album” and use Optic ID or enter your passcode.
- Select and Unhide:
- Tap and hold a thumbnail, then tap “Unhide.”
- To unhide multiple photos, tap “Select,” choose the photos or videos, tap the “More” button, and then tap “Unhide.”
3.5. Additional Tips for Hidden Photos
- Hidden Album Visibility: With iOS 14 and later, you can hide the Hidden album itself, making it even less visible. Ensure the Hidden album is turned on in your Photos settings.
- iCloud Sync: If you use iCloud Photos, hiding a photo on one device will hide it on all your devices.
- Accidental Hiding: Sometimes, photos are accidentally hidden. Regularly check your Hidden album if you suspect photos are missing.
4. Ensure iCloud Photos is Enabled
iCloud Photos is a powerful feature that keeps your photos and videos synced across all your Apple devices. If you can’t find your photos, ensure that iCloud Photos is turned on.
4.1. Enabling iCloud Photos on Your iPhone or iPad
- Open Settings: Go to Settings > [Your Name] > iCloud.
- Access Photos: Tap “Photos.”
- Turn on Sync: Enable “Sync this [Device].”
4.2. Enabling iCloud Photos on Your Mac
- Open Photos App: Open the Photos app on your Mac.
- Access Settings: Choose “Photos > Settings” (or Preferences) from the menu bar.
- Go to iCloud Tab: Click the “iCloud” tab.
- Select iCloud Photos: Check the box next to “iCloud Photos.”
4.3. Enabling iCloud Photos on Apple Vision Pro
- Open Settings: Go to Settings > [Your Name] > iCloud.
- Access Photos: Tap “Photos.”
- Turn on Sync: Enable “Sync this Apple Vision Pro.”
4.4. What to Do After Enabling iCloud Photos
- Wi-Fi Connection: Connect to a stable Wi-Fi network.
- Wait for Sync: Allow some time for your photos to sync. This may take a few minutes or longer, depending on the size of your photo library.
- Check Again: After syncing, check your Photos app to see if your missing photos have reappeared.
4.5. Troubleshooting iCloud Photos
- Storage: Ensure you have enough iCloud storage. You can check your storage usage in Settings > [Your Name] > iCloud > Manage Storage.
- Apple ID: Confirm you are signed in with the correct Apple ID on all your devices.
- Software Updates: Make sure your devices are running the latest version of iOS, macOS, or visionOS.
5. Check Your iCloud Shared Photo Library
The iCloud Shared Photo Library, introduced in iOS 16.1 and iPadOS 16.1, allows you to share photos and videos with up to five other people. If you’re missing photos, they might be in the Shared Library instead of your Personal Library.
5.1. Switching Between Libraries on Your iPhone or iPad
- Open Photos App: Launch the Photos app.
- Tap Profile Button: Tap the profile button in the upper-right corner.
- Choose Library View: Select “Both Libraries,” “Personal Library,” or “Shared Library” in the Library View Options section.
5.2. Identifying Photos in the Shared Library
- Shared Library Icon: In “Both Libraries” or “Shared Library” view, photos in the Shared Library are marked with the Shared Library icon.
- Personal Library Icon: Photos in your Personal Library are marked with the Personal Library icon.
![]() Shared Library Icon and Personal Library Icon in Photos App
Shared Library Icon and Personal Library Icon in Photos App
5.3. Managing Your Shared Library
- Adding Photos: You can choose to add existing photos to the Shared Library or automatically share photos taken after the feature is set up.
- Permissions: Each participant in the Shared Library has equal permissions to add, edit, and delete photos.
- Privacy: Be mindful of what you share in the Shared Library, as all participants will have access to those photos and videos.
6. Verify You Are Signed In With the Correct Apple ID
To keep your photos and videos synced across all your devices, it’s crucial to use the same Apple ID on every device. Using different Apple IDs can cause confusion and make it seem like your photos are missing.
6.1. Checking Your Apple ID on iPhone or iPad
- Open Settings: Go to the Settings app.
- View Apple ID: At the top of the Settings menu, you’ll see your name and email address. This email address is your Apple ID.
6.2. Checking Your Apple ID on Mac
- Open System Settings: Click the Apple menu in the top-left corner and select “System Settings.”
- View Apple ID: Click on your name at the top of the sidebar to see your Apple ID.
6.3. Checking Your Apple ID on iCloud.com
- Go to iCloud.com: Open your web browser and navigate to iCloud.com.
- View Account Information: After signing in, your Apple ID will be displayed in the account settings.
6.4. What to Do If You Have Multiple Apple IDs
- Consolidate Accounts: If possible, consolidate all your data into one Apple ID.
- Sign Out and Sign In: Sign out of iCloud and the App Store on all your devices, then sign back in with the correct Apple ID.
- Family Sharing: Use Family Sharing to share purchased content and subscriptions with family members without needing to use the same Apple ID.
7. Exploring Third-Party Data Recovery Software
If you’ve exhausted the built-in recovery options and your photos are still missing, third-party data recovery software might be able to help. These tools scan your device’s storage for deleted files that haven’t been overwritten.
7.1. Popular Data Recovery Software Options
- EaseUS Data Recovery Wizard: Known for its user-friendly interface and comprehensive scanning capabilities.
- Recuva: A free and effective tool for recovering deleted files from various storage devices.
- Disk Drill: Offers advanced scanning algorithms and supports a wide range of file types.
- Stellar Data Recovery: Provides robust recovery features and supports both macOS and Windows.
7.2. Steps for Using Data Recovery Software
- Download and Install: Download and install the data recovery software on your computer.
- Select Drive: Choose the drive or storage device where your photos were located.
- Scan for Lost Files: Start the scanning process. The software will search for deleted files.
- Preview and Recover: Preview the found files and select the photos you want to recover.
- Save Recovered Files: Save the recovered files to a different drive or storage device to avoid overwriting data.
7.3. Important Considerations When Using Data Recovery Software
- Act Quickly: The sooner you use data recovery software after deleting files, the higher the chance of successful recovery.
- Avoid Overwriting: Do not save new files to the drive where you lost the photos until after you’ve tried to recover them.
- Read Reviews: Before purchasing data recovery software, read reviews and compare features to find the best option for your needs.
8. Seeking Professional Data Recovery Services
In situations where the data loss is severe, or you’re not comfortable using data recovery software, consider seeking professional data recovery services. These services have specialized tools and expertise to recover data from damaged or corrupted storage devices.
8.1. Benefits of Professional Data Recovery
- Advanced Tools: Professionals use advanced hardware and software tools to recover data.
- Expertise: They have extensive experience in data recovery and can handle complex situations.
- Cleanroom Environments: Some data recovery services use cleanroom environments to safely work with physically damaged devices.
8.2. Finding a Reputable Data Recovery Service
- Research: Look for data recovery services with positive reviews and a proven track record.
- Certifications: Check if the service has relevant certifications, such as ISO certifications.
- Free Evaluation: Many services offer a free evaluation to assess the damage and provide a quote.
- Data Privacy: Ensure the service has strict data privacy policies to protect your personal information.
9. Checking Cloud Backups
If you use other cloud services like Google Photos, Dropbox, or OneDrive to back up your photos, check these services for your missing files.
9.1. Google Photos
- Open Google Photos: Go to photos.google.com or open the Google Photos app.
- Check Trash: Look in the “Trash” or “Bin” section for recently deleted photos.
- Search Library: Use the search bar to find photos by date, location, or keywords.
9.2. Dropbox
- Open Dropbox: Go to dropbox.com or open the Dropbox app.
- Check Deleted Files: Look in the “Deleted files” section for recently deleted photos.
- Search Library: Use the search bar to find photos by file name or date.
9.3. OneDrive
- Open OneDrive: Go to onedrive.live.com or open the OneDrive app.
- Check Recycle Bin: Look in the “Recycle bin” for recently deleted photos.
- Search Library: Use the search bar to find photos by file name or date.
9.4. Tips for Cloud Backups
- Regular Backups: Set up automatic backups to ensure your photos are regularly saved to the cloud.
- Check Settings: Verify that your cloud backup settings are configured correctly.
- Storage Space: Ensure you have enough storage space in your cloud account.
10. Understanding Storage Locations
Understanding where your photos are stored can help you locate missing files. Photos can be stored on your device’s internal storage, SD cards, external hard drives, or cloud services.
10.1. Internal Storage
- Location: Typically, photos are stored in the “DCIM” (Digital Camera Images) folder on your device’s internal storage.
- Access: You can access internal storage using a file manager app on your phone or by connecting your device to a computer.
10.2. SD Cards
- Location: If you use an SD card in your camera or phone, photos will be stored on the SD card.
- Access: You can access the SD card by inserting it into a card reader connected to your computer.
10.3. External Hard Drives
- Location: If you’ve backed up your photos to an external hard drive, they will be stored in the folders you created on the drive.
- Access: Connect the external hard drive to your computer and browse the folders to find your photos.
10.4. Cloud Services
- Location: Photos stored in cloud services like iCloud, Google Photos, Dropbox, or OneDrive are stored on the service’s servers.
- Access: You can access your photos by logging into the cloud service’s website or app.
10.5. Best Practices for Managing Storage
- Organization: Organize your photos into folders with clear names and dates.
- Backups: Regularly back up your photos to multiple locations (e.g., internal storage, SD card, external hard drive, cloud service).
- Storage Limits: Be aware of storage limits on your devices and cloud services.
11. Checking Hidden Folders on Android
On Android devices, some photos might be stored in hidden folders. These folders are typically hidden by default to prevent accidental deletion or modification of important files.
11.1. How to Show Hidden Folders
- Open File Manager: Open your device’s file manager app.
- Access Settings: Tap the menu button (usually three dots or lines) and select “Settings” or “View.”
- Show Hidden Files: Look for an option to “Show hidden files” or “Show hidden folders” and enable it.
11.2. Common Hidden Folders
- .thumbnails: This folder contains thumbnail images of your photos and videos.
- .nomedia: If a folder contains a “.nomedia” file, the media files in that folder will not be displayed in the Gallery app.
11.3. Finding Your Photos
- Browse Folders: After enabling the option to show hidden files, browse through your device’s folders to see if your missing photos are in any of the hidden folders.
- Rename Folders: If you find photos in a folder with a “.nomedia” file, you can rename the folder or delete the “.nomedia” file to make the photos visible in the Gallery app.
12. Confirming Photo App Settings
Sometimes, photos might appear missing because of incorrect settings in your photo app. For instance, filters or view options may be hiding certain photos.
12.1. Checking View Options
- Filters: Make sure no filters are active that might be hiding certain photos based on criteria like date, location, or keywords.
- Sorting: Check the sorting options to ensure photos are displayed in the correct order (e.g., by date, name, or size).
12.2. Resetting App Settings
- Clear Cache: Clearing the app’s cache can resolve display issues. Go to Settings > Apps > [Photo App] > Storage and tap “Clear Cache.”
- Clear Data: Clearing the app’s data will reset it to its default settings. Go to Settings > Apps > [Photo App] > Storage and tap “Clear Data.” Note that this will delete any custom settings you’ve configured.
12.3. Updating the App
- Check for Updates: Make sure you’re using the latest version of your photo app. Outdated apps may have bugs that cause photos to disappear. Go to the App Store or Google Play Store to check for updates.
13. Investigating Water Damage
Water damage can cause photos to become inaccessible. If your device has been exposed to water, take immediate steps to minimize the damage.
13.1. Immediate Steps
- Power Off: Turn off the device immediately to prevent short circuits.
- Remove Components: Remove the battery, SIM card, and SD card if possible.
- Dry the Device: Use a soft cloth to dry the exterior of the device.
- Desiccant: Place the device in a bag of desiccant (e.g., rice or silica gel packets) to absorb moisture.
13.2. Professional Repair
- Seek Help: Take the device to a professional repair service as soon as possible.
- Data Recovery: Inquire about data recovery services to retrieve your photos from the damaged device.
13.3. Prevention
- Waterproof Cases: Use waterproof cases or bags to protect your devices from water damage.
- Avoid Exposure: Avoid using your devices in wet environments.
14. Avoiding Data Loss
Preventing data loss is better than trying to recover lost photos. Follow these best practices to protect your precious memories:
14.1. Regular Backups
- Cloud Backups: Use cloud services like iCloud, Google Photos, Dropbox, or OneDrive to automatically back up your photos.
- Local Backups: Back up your photos to an external hard drive or computer.
- Multiple Backups: Keep multiple backups in different locations to protect against data loss from device failure, theft, or natural disasters.
14.2. Organizing Photos
- Folders: Organize your photos into folders with clear names and dates.
- Tags: Use tags or keywords to make it easier to find specific photos.
- Metadata: Preserve metadata like date, time, and location information.
14.3. Device Maintenance
- Storage Space: Regularly clear out unnecessary files to free up storage space.
- Software Updates: Keep your devices and apps up to date to ensure compatibility and security.
- Antivirus Software: Use antivirus software to protect against malware that could corrupt or delete your photos.
15. Leveraging Photo Recovery Apps
Photo recovery apps are specialized tools designed to recover deleted photos from your smartphone or tablet. They scan your device’s storage for recoverable files and can often restore photos that have been accidentally deleted.
15.1. Top Photo Recovery Apps
- DiskDigger Photo Recovery (Android): This app scans both internal and external storage for deleted photos and videos.
- Remo Recover (Android & iOS): Known for its deep scanning capabilities, Remo Recover can find photos that other apps might miss.
- Photo Recovery – Restore Image (Android): A simple, user-friendly app that focuses on recovering deleted photos quickly.
- iMobie PhoneRescue (iOS): While primarily a data recovery tool for iOS devices, PhoneRescue can also recover deleted photos from your iPhone or iPad.
15.2. How to Use Photo Recovery Apps
- Download and Install: Download and install the photo recovery app from the App Store (iOS) or Google Play Store (Android).
- Grant Permissions: Grant the app the necessary permissions to access your device’s storage.
- Scan for Deleted Photos: Start the scanning process. The app will search for recoverable photos.
- Preview and Select: Preview the found photos and select the ones you want to recover.
- Restore Photos: Restore the selected photos to a safe location on your device or to a cloud storage service.
15.3. Important Considerations
- Root Access (Android): Some photo recovery apps may require root access to perform a deeper scan of your Android device.
- Free vs. Paid: Many photo recovery apps offer a free version with limited features and a paid version with advanced recovery options.
- Success Rate: The success rate of photo recovery apps can vary depending on the amount of time that has passed since the photos were deleted and whether new data has been written to the storage.
16. Seeking Assistance from Online Communities
Online communities can be a valuable resource for troubleshooting photo recovery issues. Forums, social media groups, and Q&A sites dedicated to photography and technology can provide insights and solutions from experienced users.
16.1. Online Forums
- Photography Forums: Look for forums dedicated to photography, such as the DPReview Forums or the Fred Miranda Forums.
- Technology Forums: Explore technology forums like the XDA Developers Forums or the MacRumors Forums.
16.2. Social Media Groups
- Facebook Groups: Join Facebook groups dedicated to photography or specific devices (e.g., iPhone Photography, Android Photography).
- Reddit Communities: Participate in Reddit communities (subreddits) like r/photography or r/techsupport.
16.3. Q&A Sites
- Stack Exchange: Ask questions on Stack Exchange sites like Super User or Photography.
- Quora: Search for answers on Quora or ask your own questions.
16.4. Tips for Seeking Assistance
- Be Specific: Provide detailed information about your issue, including the device you’re using, the steps you’ve already taken, and any error messages you’ve encountered.
- Be Polite: Be respectful and courteous when asking for help.
- Follow Instructions: Carefully follow any instructions or suggestions you receive from community members.
17. Understanding File Formats
Different file formats can affect how photos are stored and recovered. Understanding the common photo file formats can help you troubleshoot recovery issues.
17.1. Common Photo File Formats
- JPEG (JPG): A widely used format that balances file size and image quality.
- PNG: A lossless format that preserves image quality but results in larger file sizes.
- RAW: An uncompressed format that contains all the data captured by the camera sensor.
- HEIC (HEIF): A modern format used by Apple devices that offers better compression than JPEG.
17.2. How File Formats Affect Recovery
- Compression: Compressed formats like JPEG may lose some image data during compression, making it more difficult to recover the original image quality.
- Fragmentation: Over time, files can become fragmented on the storage device, making them more difficult to recover.
- File Headers: If the file header is corrupted, the photo may not be recognized by recovery software.
17.3. Tips for Managing File Formats
- Choose the Right Format: Choose the appropriate file format based on your needs. For example, use RAW for professional photography and JPEG for everyday photos.
- Convert Formats: Convert photos to different formats using image editing software like Adobe Photoshop or GIMP.
- Preserve Originals: Always keep a copy of the original, unedited photo in a safe location.
18. Understanding Photo Metadata
Metadata is data about data. In the context of photos, metadata includes information like the date, time, location, camera settings, and copyright information. Understanding photo metadata can help you locate missing photos and preserve important information.
18.1. Types of Photo Metadata
- EXIF (Exchangeable Image File Format): Stores information about the camera settings used to capture the photo, such as aperture, shutter speed, ISO, and focal length.
- IPTC (International Press Telecommunications Council): Stores information about the content of the photo, such as keywords, captions, and copyright information.
- XMP (Extensible Metadata Platform): A flexible metadata standard used by Adobe products.
18.2. How Metadata Helps with Recovery
- Location: Use location data to find photos taken at a specific place.
- Date and Time: Use date and time information to find photos taken on a specific day or time.
- Keywords: Use keywords to find photos related to a specific topic or event.
18.3. Tips for Managing Metadata
- Preserve Metadata: Ensure that metadata is preserved when transferring or editing photos.
- Edit Metadata: Use photo editing software to add or edit metadata.
- Backup Metadata: Back up your metadata along with your photos to ensure that it is not lost.
19. Considering Device-Specific Recovery Methods
Different devices may have specific recovery methods or features that can help you retrieve your photos.
19.1. iPhone and iPad
- iCloud Backup: Restore your device from an iCloud backup to recover missing photos.
- iTunes Backup: Restore your device from an iTunes backup to recover missing photos.
19.2. Android Devices
- Google Drive Backup: Restore your device from a Google Drive backup to recover missing photos.
- Manufacturer Backup: Some Android manufacturers offer their own backup services. Check your device’s settings for more information.
19.3. Digital Cameras
- Card Recovery: Use card recovery software to recover deleted photos from your camera’s SD card.
- Firmware Updates: Keep your camera’s firmware up to date to ensure compatibility and stability.
19.4. Computers
- System Restore (Windows): Use System Restore to revert your computer to a previous state.
- Time Machine (macOS): Use Time Machine to restore your computer to a previous state.
20. Addressing Physical Damage
If your storage device has been physically damaged, you may need to take additional steps to recover your photos.
20.1. Types of Physical Damage
- Water Damage: Exposure to water can cause corrosion and short circuits.
- Impact Damage: Dropping or hitting the device can damage the internal components.
- Fire Damage: Exposure to fire can melt or burn the storage device.
20.2. Steps to Take
- Do Not Attempt Repair: Do not attempt to repair the device yourself, as this could cause further damage.
- Professional Data Recovery: Seek professional data recovery services to recover your photos from the damaged device.
- Cleanroom Environment: Ensure that the data recovery service uses a cleanroom environment to prevent contamination.
20.3. Prevention
- Protective Cases: Use protective cases to protect your devices from physical damage.
- Proper Handling: Handle your devices with care to avoid dropping or hitting them.
- Safe Storage: Store your devices in a safe place away from water, fire, and extreme temperatures.
Losing photos can be distressing, but with the right approach, many photos can be recovered. By understanding the various causes of photo loss and the available recovery methods, you can increase your chances of retrieving your precious memories. Remember to back up your photos regularly and take steps to protect your devices from damage to prevent future data loss.
For more tips and tricks on photography and data management, visit dfphoto.net.
Address: 1600 St Michael’s Dr, Santa Fe, NM 87505, United States.
Phone: +1 (505) 471-6001.
Website: dfphoto.net.
Seeking inspiration and elevating your photography skills? Dive into dfphoto.net today, where a wealth of tutorials, stunning photo collections, and a vibrant community await. Let your creative journey begin!