Downloading your entire Google Photos library might seem daunting, but it’s absolutely achievable, and this guide from dfphoto.net will show you exactly how. Whether you’re a professional photographer or just cherish personal memories, having a local backup provides peace of mind. We will explore several methods, ensuring you can safeguard your precious moments. Learn about cloud storage, image archive, and photo management.
1. Why Should You Download Your Entire Google Photos Library?
Google Photos is a fantastic service for storing and organizing your photos and videos. However, relying solely on cloud storage can have its drawbacks. Here’s why downloading your entire Google Photos library is a smart move:
- Data Security: While Google employs robust security measures, having a local backup ensures your photos are safe even if something happens to your Google account or the cloud service itself.
- Offline Access: Internet access isn’t always guaranteed. Downloading your library allows you to view your memories anytime, anywhere, without needing an internet connection. This is especially useful when traveling or in areas with poor connectivity.
- Control Over Your Data: Having a local copy gives you complete control over your data. You can organize, edit, and manage your photos without being subject to Google’s terms of service or potential changes in their storage policies.
- Protection Against Service Changes: Cloud services can change their pricing, features, or even shut down altogether. Having a backup protects you from losing your precious memories if Google Photos undergoes significant changes.
- Easier Migration: If you ever decide to switch to a different photo storage service, having a local copy makes the migration process much smoother.
2. Understanding Google Takeout: Your Key to Bulk Downloading
Google Takeout is a service provided by Google that allows you to export your data from various Google services, including Google Photos. It’s the most efficient way to download your entire library in one go. Here’s how it works:
-
Accessing Google Takeout: Go to takeout.google.com and sign in with your Google account credentials.
-
Selecting Google Photos: You’ll see a list of Google services. Click “Deselect all” to clear the pre-selected options, then scroll down and check the box next to “Google Photos.”
-
Customizing Your Export (Optional):
- Albums: By default, Google Takeout will download all your photos and videos. If you want to download specific albums, click the “All photo albums included” button. A pop-up will appear, allowing you to select or deselect individual albums or even entire years.
- File Type: Choose your preferred file type. The default is
.zip, which is suitable for most users. - File Size: You can set the maximum size of the archive files. If your library is large, splitting it into smaller chunks (e.g., 2GB or 4GB) can make downloading and managing the files easier.
-
Initiating the Export: After customizing your settings, click “Next step.” Choose your delivery method. You can receive a download link via email or directly transfer your files to another cloud storage provider like Dropbox, OneDrive, or Box.
-
Creating the Export: Click “Create export.” Google will begin creating a copy of your Google Photos library. The process can take anywhere from a few minutes to several hours, depending on the size of your library.
-
Downloading Your Files: Once the export is complete, you’ll receive an email notification with a download link. Click the link and follow the instructions to download your files. The download links are valid for seven days.
3. Step-by-Step Guide: Downloading Your Entire Google Photos Library Using Google Takeout
Here’s a detailed, step-by-step guide to downloading your entire Google Photos library using Google Takeout:
- Go to Google Takeout: Open your web browser and navigate to takeout.google.com.
- Sign In: Sign in to your Google account using your email address and password.
- Deselect All: On the “Select data to include” page, click the “Deselect all” button. This will uncheck all the Google services listed.
- Select Google Photos: Scroll down the list until you find “Google Photos” and check the box next to it.
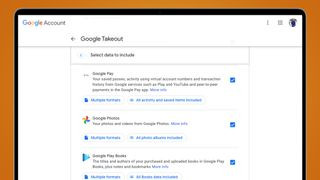 Selecting Google Photos in Google Takeout
 - Customize Your Export (Optional):
- Specific Albums: If you don’t want to download your entire library, click the “All photo albums included” button.
- Select Albums: In the pop-up window, you can select or deselect specific albums or years. Use the checkboxes to make your selections.
- Confirm Selection: Click “OK” to confirm your album selections.
- Click Next Step: Scroll down and click the “Next step” button.
 Choosing Export Options in Google Takeout
 - Choose Delivery Method: In the “Delivery method” dropdown menu, choose how you want to receive your files. You can select:
- Send download link via email: Google will send you an email with a link to download your files once the export is complete.
- Add to Dropbox, OneDrive, or Box: Google will directly transfer your files to your chosen cloud storage provider.
- Choose Frequency: Select whether you want to export your data once or schedule periodic exports.
- Export once: This option creates a one-time export of your data.
- Schedule exports every 2 months for 1 year: This option creates an export every two months for a year.
- Choose File Type & Size:
- File type: Choose your preferred file type. The default is
.zip, but you can also select.tgz..zipis generally recommended for most users. - File size: Set the maximum size of the archive files. If you have a large library, choose a smaller size (e.g., 2GB or 4GB) to make downloading and managing the files easier.
- File type: Choose your preferred file type. The default is
- Create Export: Click the “Create export” button.
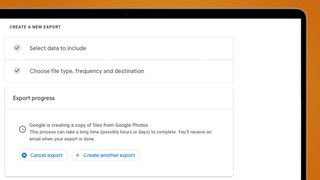 Creating Export in Google Takeout
 - Wait for the Export to Complete: Google will now create a copy of your Google Photos library. The process can take a few minutes to several hours, depending on the size of your library. You’ll see a message indicating that the export is in progress.
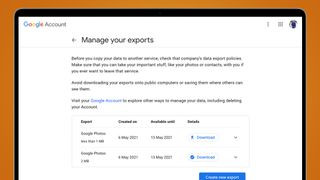
- Check Your Email: Once the export is complete, you’ll receive an email from Google Takeout with the subject “Google Takeout export is ready.”
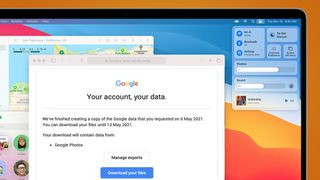 Download Notification Email from Google Takeout
 - Download Your Files: Open the email and click the “Download your files” button. You’ll be redirected to a page where you can download the archive files.
- Extract the Files: Once the download is complete, extract the archive files to your desired location on your computer. You’ll now have a local copy of your Google Photos library.
4. Downloading Individual Photos or Albums
While Google Takeout is ideal for bulk downloads, you might sometimes need to download individual photos or albums. Here’s how to do it:
Downloading Individual Photos
- Open Google Photos: Go to photos.google.com and sign in to your Google account.
- Select the Photo: Open the photo you want to download.
- Click the Three Dots: Click the three vertical dots in the top right corner of the screen.
- Select Download: Choose “Download” from the menu. The photo will be downloaded to your computer.
Downloading Multiple Photos at Once
- Open Google Photos: Go to photos.google.com and sign in to your Google account.
- Select Photos: Hover over a photo’s thumbnail and click the checkmark in the top left corner. Repeat this for all the photos you want to download. You can also hold the Shift key to select a range of photos between your first and last clicks.
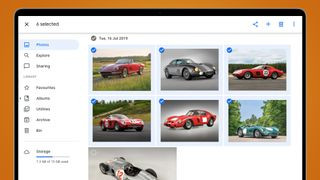 Selecting Multiple Photos in Google Photos
 - Click the Three Dots: Click the three vertical dots in the top right corner of the screen.
- Select Download: Choose “Download.” Google will compress your selected photos into a single
.ziparchive, which you can then download to your computer.
Downloading Albums
- Open Google Photos: Go to photos.google.com and sign in to your Google account.
- Go to Albums: Click the “Albums” tab on the left-hand side of the screen.
- Select the Album: Click the album you want to download.
- Click the Three Dots: Once the album is open, click the three vertical dots in the top right corner of the screen.
- Select Download All: Choose “Download all.” Google will compress all the photos and videos in the album into a single
.zipfile for you to download.
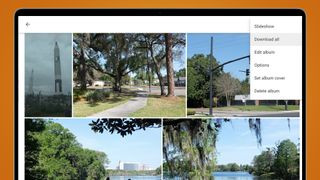 Downloading an Album from Google Photos
5. Organizing Your Downloaded Google Photos
Once you’ve downloaded your Google Photos library, you’ll want to organize it for easy access and management. Here are some tips:
- Create a Dedicated Folder: Create a main folder on your computer specifically for your Google Photos library.
- Organize by Year and Month: Within the main folder, create subfolders for each year and then subfolders within each year for each month. This mirrors the way Google Photos organizes your images.
- Rename Files: Google Takeout often uses generic filenames. Consider renaming your files with descriptive names that include the date and a brief description of the content.
- Use Metadata: Utilize metadata tags (e.g., keywords, captions, location) to further organize and search your photos.
- Consider Photo Management Software: Photo management software like Adobe Lightroom, Capture One, or even the built-in Photos app on macOS can help you organize, edit, and manage your library more efficiently.
6. Choosing the Right Storage Solution for Your Downloaded Photos
After downloading your Google Photos library, you need a reliable storage solution. Here are a few options:
- External Hard Drive: An external hard drive is a cost-effective option for storing large amounts of data. Choose a drive with ample storage space and a reputable brand.
- Network-Attached Storage (NAS): A NAS device is a dedicated storage device that connects to your home network, allowing you to access your photos from multiple devices.
- Cloud Storage (Secondary Backup): While you’re downloading from Google Photos, consider using another cloud storage service as a secondary backup for your downloaded library. This provides an extra layer of protection against data loss.
7. How to Find Inspiration from dfphoto.net
Looking for inspiration for your next photography project? dfphoto.net is your perfect resource. It offers:
- Photography Tutorials: Access detailed guides on various photography techniques.
- Stunning Photo Galleries: Explore a wide array of stunning photographs from talented photographers.
- Community Engagement: Connect with a community of passionate photographers to share ideas and get feedback.
8. Understanding the Different Search Intents for “How to Download Entire Google Photos Library”
Users searching for “How To Download Entire Google Photos Library” have various underlying intents. Understanding these intents allows us to tailor the information to meet their specific needs:
- Complete Backup: Users want to create a complete backup of their entire Google Photos library for safekeeping.
- Offline Access: Users need to access their photos offline due to limited internet connectivity.
- Migration to Another Service: Users plan to migrate their photos to another photo storage service.
- Account Security: Users are concerned about the security of their Google account and want a local backup as a precaution.
- Data Control: Users desire more control over their data and want to manage their photos independently of Google Photos.
9. Common Challenges and Solutions When Downloading Google Photos
Downloading your entire Google Photos library can sometimes present challenges. Here are some common issues and their solutions:
- Slow Download Speeds:
- Solution: Ensure you have a stable and fast internet connection. Avoid downloading during peak hours when network congestion is high. Consider using a download manager to resume interrupted downloads.
- Large File Sizes:
- Solution: Split your export into smaller chunks using Google Takeout’s file size option. Use a file compression tool to reduce the size of the downloaded files.
- Corrupted Archive Files:
- Solution: Ensure the download is complete before attempting to extract the files. If the archive is corrupted, try downloading it again.
- Missing Photos or Videos:
- Solution: Verify that all your photos and videos are properly backed up to Google Photos before initiating the download. Check the Google Takeout settings to ensure all albums are selected.
- Difficulty Organizing Downloaded Files:
- Solution: Develop a clear folder structure and naming convention before you start organizing your files. Use photo management software to automate the organization process.
10. FAQ: Downloading Your Google Photos Library
Q1: How long does it take to download my entire Google Photos library?
The time it takes depends on the size of your library and your internet connection speed. It can range from a few minutes to several hours.
Q2: What file format will my photos be downloaded in?
Google Takeout typically downloads photos in .zip archives. You can choose between .zip and .tgz formats.
Q3: Will my photos be downloaded in their original quality?
Yes, Google Takeout downloads your photos in their original quality, provided they were uploaded in original quality.
Q4: Can I download specific albums instead of my entire library?
Yes, you can select specific albums to download using Google Takeout’s customization options.
Q5: Is there a limit to how much data I can download from Google Photos?
There is no specific limit, but large downloads may be split into multiple archive files.
Q6: Can I download my Google Photos library directly to an external hard drive?
Yes, but you’ll need to download the files to your computer first and then transfer them to the external hard drive.
Q7: What happens to the metadata of my photos when I download them?
Most metadata, such as date, time, and location, is preserved when you download your photos.
Q8: Can I schedule automatic backups of my Google Photos library?
Google Takeout doesn’t offer automatic backups, but you can schedule periodic exports every two months for one year.
Q9: Is it safe to use third-party tools to download my Google Photos library?
Using third-party tools can be risky, as they may compromise your account security. It’s best to use Google Takeout for downloading your data.
Q10: What should I do if my download fails or gets interrupted?
Try downloading the files again. Consider using a download manager to resume interrupted downloads.
Downloading your entire Google Photos library is a crucial step in safeguarding your precious memories. By following this comprehensive guide from dfphoto.net, you can ensure your photos are safe, accessible, and under your control. Remember to visit dfphoto.net for more photography tips, inspiration, and a vibrant community of fellow photography enthusiasts. Visit us at 1600 St Michael’s Dr, Santa Fe, NM 87505, United States. Call us at +1 (505) 471-6001. Or visit our website at dfphoto.net. Don’t wait—start downloading and preserving your memories today!
Call to Action
Ready to take control of your Google Photos and ensure your precious memories are safe and accessible? Visit dfphoto.net today! Discover detailed guides, stunning photo galleries, and a vibrant community to inspire your photographic journey. Don’t miss out—explore dfphoto.net now and elevate your photography skills!