Are you looking for the best way to share your precious memories captured on your phone with friends and family? At dfphoto.net, we understand the importance of easily transferring photos between phones, so we’ve put together a comprehensive guide on How To Send Photos From Phone To Phone. Discover the easiest ways to transfer photos from Android to Android or iOS to Android, ensuring your memories are always within reach, offering solutions for local transfers, cloud services, and even PC-based options for secure photo sharing and image transfer.
1. Understanding Your Needs: Choosing the Right Method
Selecting the right method to transfer photos from phone to phone depends on several factors. Let’s explore these considerations to help you make the best choice:
- Photo Storage: Determine where you want your photos to be stored after the transfer. Do you prefer keeping them locally on the receiving phone, leveraging cloud storage, or having a backup on your computer? Each option has its advantages and limitations.
- Support and Compatibility: Ensure that the chosen method is compatible with both the sending and receiving devices. Some methods might be exclusive to certain operating systems (like Android or iOS) or require specific versions of the operating system.
- Scope of Transfer: Consider whether you need to transfer only photos or other types of content as well, such as videos, documents, or contacts. Some methods are limited to specific file types, while others offer broader support.
2. Method 1: Transferring Photos Locally via PC Using Droid Transfer
For users who prefer a hands-on approach with complete control over their photo library, transferring photos via a PC offers a secure and versatile solution. Droid Transfer is a powerful Windows PC application that facilitates the transfer of photos and other content between Android phones and computers.
2.1. Key Features of Droid Transfer
- Comprehensive Content Management: Droid Transfer isn’t just for photos; it supports the transfer of music, contacts, call logs, and other file types.
- Dual Connectivity: Connect your Android to your PC via Wi-Fi or USB cable, providing flexibility based on your environment and preferences.
- Photo Backup: The “Export New Photos” feature automatically detects and backs up photos that haven’t been previously saved to your PC, ensuring you never lose precious memories.
- Versatile Compatibility: Droid Transfer works with PCs running Windows 10 and higher, and supports any Android device running Android 5 or higher.
- More Than Just Transfer: It provides a plethora of Android management tools like exporting, editing, deleting, restoring and syncing.
2.2. Step-by-Step Guide to Transferring Photos via Droid Transfer
- Connect Android to PC: Connect the Android phone containing your photos to your PC using Droid Transfer. You can connect via Wi-Fi or USB cable.
- Open Photos Feature: Launch the Photos feature in Droid Transfer.
- Select Photos: Select the photos you want to transfer.
- Save to PC: Click “Save to PC” and choose a location on your computer to save the photos.
- Disconnect and Connect New Android: Safely disconnect the old Android and connect the new Android phone to the PC.
- Add Photos to Device: Open the Photos feature again and click “Add Photos to Device”.
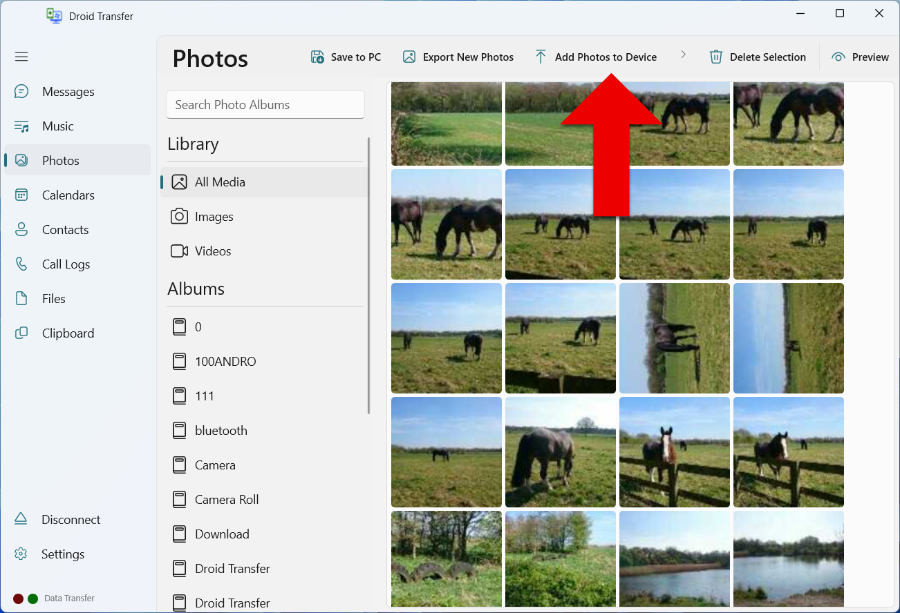 Transfer photos from PC to Android with Droid Transfer
- Select Photos to Add: Choose to add an entire folder of photos or specific photos. Select the photos you saved to your PC that you want to add to your new Android device!
2.3. Advantages of Using Droid Transfer
- Photo Storage: Photos are stored locally on your Android devices and on your PC, providing secure and private storage.
- Offline Access: Local transfer and storage are safe and secure, and you can access your photos without the need for an internet connection.
- Versatile Functionality: Beyond photo transfers, Droid Transfer offers a range of Android management tools, making it a comprehensive solution.
- Flexible Connectivity: Transfer photos via Wi-Fi or USB cable, depending on your preference.
- Cost-Effective: Droid Transfer offers fantastic value for money with regular updates and customer support.
2.4. Disadvantages of Using Droid Transfer
- Indirect Transfer: The transfer process is indirect, requiring you to first copy the photos to your PC and then transfer them to the new Android device.
3. Method 2: Using Bluetooth for Direct Wireless Transfers
Bluetooth, a tried-and-true technology, remains a popular option for sending files directly from one device to another.
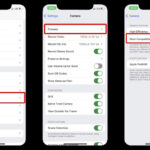
3.1. How to Enable Bluetooth on Android
- Access Settings: Go to Settings on both Android devices.
- Navigate to Bluetooth: Find the Bluetooth option.
- Toggle On: Toggle the Bluetooth switch to the ON position.
- Pair Devices: In Bluetooth settings, tap “Pair new device” on either device and select the other Android device to pair them.
3.2. Transferring Photos via Bluetooth
-
Open Photos App: Open the photos app on the Android phone containing the photos you want to transfer.
-
Select Photos: Select the photos you wish to transfer. To select multiple photos, touch and hold one photo, then tap the other photos.
-
Share via Bluetooth: Tap Share, choose Bluetooth, then select the destination device.
-
Accept Transfer: On the receiving device, accept the transfer request.
-
Begin Transfer: The photos will begin to transfer.
3.3. Advantages of Using Bluetooth
- Wireless Transfer: Direct, wireless transfer from Android to Android.
- Local Storage: Photos are stored locally on your Android devices.
- Wide Compatibility: The vast majority of modern smartphones have Bluetooth built in.
- Versatile File Transfer: Transfer pictures, video, audio, and other files.
3.4. Disadvantages of Using Bluetooth
- Slow Transfers: Slower transfer speeds compared to Wi-Fi or USB cable.
- Low Bandwidth: Unsuitable for transferring large files due to low bandwidth.
- Connectivity Issues: Interference and pairing issues can cause a loss of connection.
- Security Concerns: Bluetooth has historical security concerns, making devices potential targets for hackers.
According to a study by Norton, it’s crucial to keep your device software updated and to turn off Bluetooth when not in use to minimize these security risks.
4. Method 3: Leveraging Google Photos for Cloud-Based Transfers
Cloud storage offers a convenient and efficient method to transfer photos between devices. Google Photos allows you to store your entire photo library in the cloud, saving space on your devices.
4.1. Setting Up Google Photos Backup
-
Open Google Photos: Open Google Photos on your first Android device and ensure you are signed in with your Google account.
-
Access Profile: Tap your profile picture or initials in the top-right corner of the app.
-
Turn On Backup: If Backup is off, tap “Turn on backup“.
-
Select Google Account: Select the Google account you will be using on your new Android device.
-
Confirm Backup: Tap “Turn on backup“. The backup process can take a while, depending on the number of photos and videos and your internet connection speed.
4.2. Accessing Photos on the New Device
- Open Google Photos: Open the Google Photos app on your new Android device and ensure you are signed into the account you backed up your photos to.
- View Backed-Up Photos: You can now view all your backed-up photos, which are saved in the cloud.
- Download Photos: To download a photo from Google Photos storage to your device, select the photo, tap More, and then Download.
4.3. Advantages of Using Google Photos
- Fast and Easy: Fast, easy, and wireless transfer.
- Flexible Storage: Photos can be stored in the cloud, on your Android device, or both.
- Broad Compatibility: Supported on all Android devices.
4.4. Disadvantages of Using Google Photos
- Limited Scope: Transfers photos and videos only. Google One/Google Drive is required for other types of content.
- Storage Limits: Limited free storage space before a purchase is required. Google offers 15GB of free storage, which is shared across Google Drive, Gmail, and Google Photos.
5. Method 4: Using Quick Share for Enhanced Wireless Transfers
Quick Share (formerly known as Nearby Share) is a Google and Samsung collaboration that offers a faster and more efficient way to wirelessly share files between Android devices in close proximity.
5.1. Enabling Quick Share
- Check Compatibility: Ensure both Android devices support Quick Share (Android 6 and higher).
- Turn On Bluetooth and Wi-Fi: Bluetooth is used to find nearby devices, while Wi-Fi enables fast file transfers.
5.2. Transferring Photos via Quick Share
-
Open Photos App: Open the Photos app on your Android device.
-
Select Photos: Select the photos you want to transfer. Touch and hold one photo to select multiple photos.
-
Share via Quick Share: Tap Share at the bottom of your screen, then tap “Quick Share“.
-
Scan for Devices: Your device will scan for other devices nearby with Quick Share enabled and Bluetooth turned on.
-
Select Device: Select the Android device you want to send your photos to.
-
Accept Transfer: On the recipient device, accept the transfer request to receive the photos.
5.3. Advantages of Using Quick Share
- Wireless Transfer: Direct, wireless transfer from Android to Android.
- Local Storage: Photos are stored locally on your Android devices.
- Wide Compatibility: Supported on most devices running Android 6 and higher.
- Versatile File Transfer: Transfer pictures, video, audio, and other files.
- Fast Transfers: Offers fast transfers when Wi-Fi is available.
5.4. Disadvantages of Using Quick Share
- Security Risks: The use of Bluetooth can pose security risks.
6. Method 5: Using Android Beam for NFC-Based Transfers
Android Beam, an older technology, uses NFC (Near Field Communication) to establish a connection between two devices. This method requires the devices to be very close to each other, almost touching.
6.1. Enabling NFC and Android Beam
- Check Compatibility: Ensure both Android devices have NFC and Android Beam capabilities.
- Access Settings: Go to Settings on both Android devices.
- Enable NFC and Beam: The location of these settings may vary depending on the device. Look for “Connected Devices” or, under “Wireless & Networks”, tap “More”. Ensure that NFC and Android Beam are turned ON.
6.2. Transferring Photos via Android Beam
-
Open Photos App: On the Android phone containing your photos, open the Photos app.
-
Select Photos: Select the photos you want to transfer. Touch and hold one photo to select multiple photos.
-
Bring Devices Together: Ensure your Android devices are unlocked and bring the backs of both devices together.
-
Tap to Beam: On the first device, you will now have the option to “Tap to Beam” your selected photos.
-
Tap Screen: Tap the screen to beam your photos to the other Android device!
6.3. Advantages of Using Android Beam
- Wireless Transfer: Direct, wireless transfer from Android to Android.
- Local Storage: Photos are stored locally on your Android devices.
- Versatile File Transfer: Transfer pictures, video, audio, and other files.
6.4. Disadvantages of Using Android Beam
- Limited Compatibility: Supported on some devices using Android 4 to Android 10.
- Deprecated Technology: Android Beam is now deprecated, meaning it will be usable on fewer and fewer devices.
- Proximity Requirement: Requires devices to be very close together (or touching).
7. Method 6: Migrating Data with Smart Switch
Smart Switch is a specialized app designed for users switching from an old Android device to a new Samsung Galaxy device. It simplifies the migration of content from one device to another.
7.1. Setting Up Smart Switch
- Install Smart Switch: Ensure you have the Smart Switch app on both Android devices. The app comes preloaded on new Samsung Galaxy devices.
- Launch Smart Switch: Launch Smart Switch on your new Samsung Galaxy and tap Receive data > Galaxy/Android.
- Choose Connection Method: Connect via USB cable or Wi-Fi. Follow the steps to establish a connection between the two Android devices.
7.2. Transferring Data via Smart Switch
- Select Content Types: Select all the content types you want to transfer.
- Tap Transfer: Tap Transfer.
- Complete Process: Once the process is complete, tap Done!
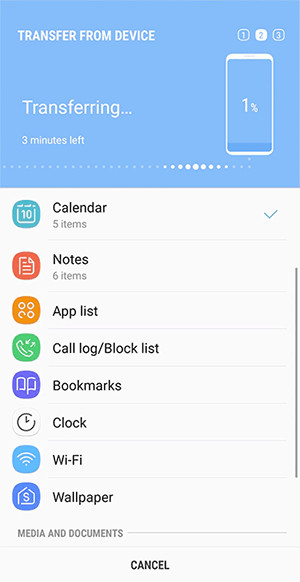 Samsung Smart Switch
Samsung Smart Switch (Image credit : Samsung)
7.3. Advantages of Using Smart Switch
- Direct Transfers: Direct transfers from Android to Android.
- Flexible Connectivity: Transfer via Wi-Fi, USB cable, or SD card.
- Local Storage: Photos are stored locally on the Android devices.
- Comprehensive Transfer: Transfer photos, videos, music, messages, and more.
7.4. Disadvantages of Using Smart Switch
- Limited Compatibility: Supported on Android devices running 4.3 or later, but only transfers content to Samsung Galaxy devices.
8. Transferring Photos from iPhone to Android
Transferring photos from an iPhone to an Android device can seem daunting, but several methods make it straightforward.
8.1. Using Google Photos
Similar to transferring between Android devices, Google Photos is an excellent choice for transferring photos from iPhone to Android.
- Backup iPhone Photos:
- Download and install the Google Photos app from the App Store on your iPhone.
- Sign in with your Google account.
- Enable Backup & Sync to upload your photos to Google Photos.
- Access Photos on Android:
- On your Android device, download and install the Google Photos app from the Google Play Store.
- Sign in with the same Google account you used on your iPhone.
- Your photos will now be accessible on your Android device.
8.2. Using Google Drive
Google Drive offers another easy way to transfer photos from iPhone to Android.
- Upload Photos to Google Drive from iPhone:
- Download and install the Google Drive app from the App Store on your iPhone.
- Sign in with your Google account.
- Upload your photos to Google Drive.
- Download Photos on Android:
- On your Android device, download and install the Google Drive app from the Google Play Store.
- Sign in with the same Google account.
- Download the photos to your Android device.
8.3. Using SHAREit
SHAREit is a third-party app that allows you to transfer files between devices regardless of the operating system.
- Install SHAREit:
- Download and install the SHAREit app on both your iPhone and Android device.
- Transfer Photos:
- On your iPhone, select the photos you want to transfer and tap “Send”.
- On your Android device, tap “Receive”.
- Follow the on-screen instructions to complete the transfer.
8.4. Using a Computer
You can also use a computer as an intermediary to transfer photos from your iPhone to your Android device.
- Transfer Photos from iPhone to Computer:
- Connect your iPhone to your computer.
- Trust the computer on your iPhone if prompted.
- Copy the photos from your iPhone to a folder on your computer.
- Transfer Photos from Computer to Android:
- Connect your Android device to your computer.
- Copy the photos from the folder on your computer to your Android device.
9. Maximizing Your Photography Experience with dfphoto.net
Now that you know how to transfer photos between phones, dfphoto.net can enhance your photography journey. Our website offers a wealth of resources for photography enthusiasts:
- Detailed Tutorials: Master various photography techniques with our comprehensive guides on exposure, aperture, shutter speed, and composition.
- Equipment Reviews: Stay informed with our evaluations of cameras, lenses, and accessories. Make confident decisions about your gear.
- Inspiring Galleries: Discover stunning images from talented photographers, sparking your creativity and providing inspiration for your projects.
- Editing Tips: Learn how to professionally edit your photos with tutorials on Adobe Photoshop and Lightroom.
- Portfolio Guidance: Get advice on building a powerful portfolio that showcases your best work and attracts opportunities.
- Community Connection: Engage with a vibrant community of photographers. Share your work, receive feedback, and collaborate on projects.
- Legal Insights: Understand copyright issues and image usage rights.
- Trend Updates: Keep up-to-date with the latest advancements in photography technology and trends.
10. Frequently Asked Questions (FAQ)
1. What is the easiest way to send photos from phone to phone?
The easiest way to send photos from phone to phone is often using cloud storage services like Google Photos, as they offer seamless syncing and accessibility across devices.
2. How can I transfer photos from Android to iPhone?
You can transfer photos from Android to iPhone using Google Photos, Google Drive, SHAREit, or by using a computer as an intermediary.
3. Is it possible to transfer photos via Wi-Fi Direct?
Yes, Wi-Fi Direct allows you to directly transfer photos between devices without needing an internet connection, offering a faster alternative to Bluetooth.
4. What should I do if Bluetooth transfer is too slow?
If Bluetooth transfer is slow, consider using Quick Share, Wi-Fi Direct, or a cloud-based service like Google Photos for faster transfer speeds.
5. How much free storage does Google Photos offer?
Google Photos offers 15GB of free storage, shared across Google Drive, Gmail, and Google Photos.
6. Can I transfer photos without losing quality?
To transfer photos without losing quality, use methods that don’t compress the images, such as USB cable transfer, Wi-Fi Direct, or cloud services with original quality settings.
7. What are the security risks of using Bluetooth?
Bluetooth can pose security risks, making devices potential targets for hackers. Keep your device software updated and turn off Bluetooth when not in use to minimize these risks.
8. Is Android Beam still a viable option for photo transfer?
Android Beam is now deprecated and usable on fewer devices, so it is not the most viable option for photo transfer anymore. Consider using Quick Share instead.
9. Can I use Smart Switch to transfer photos to a non-Samsung device?
No, Smart Switch is designed to transfer content only to Samsung Galaxy devices.
10. Where can I find tutorials on editing photos for free?
You can find free tutorials on editing photos on dfphoto.net, offering guidance on using software like Adobe Photoshop and Lightroom.
Conclusion
Transferring photos from phone to phone doesn’t have to be a daunting task. Whether you prefer direct wireless transfers, cloud-based solutions, or using your computer as an intermediary, there’s a method that suits your needs. Explore dfphoto.net for more tips and tricks to elevate your photography skills and discover the beauty of capturing life’s moments.
Ready to elevate your photography skills and share your beautiful moments? Visit dfphoto.net today for detailed tutorials, inspiring galleries, and a vibrant community of photography enthusiasts. Connect with us at 1600 St Michael’s Dr, Santa Fe, NM 87505, United States, or call +1 (505) 471-6001. Let’s capture the world together!