Reducing photo size is key for faster loading times and better SEO. At dfphoto.net, we provide the insights and tools you need to optimize your images effectively, ensuring they look great without slowing down your website. Learn practical methods for image compression, resizing, and format conversion to enhance your online presence.
1. Why Is It Important to Reduce the Size of Photos?
Reducing the size of photos is essential for improving website performance, enhancing user experience, and optimizing SEO. Large image files can significantly slow down page loading times, which can lead to higher bounce rates and lower search engine rankings. According to a study by Google, 53% of mobile site visitors leave a page that takes longer than three seconds to load. Optimizing your images ensures faster loading times, keeping visitors engaged and improving your site’s visibility.
- Improved Website Performance: Smaller image files mean faster loading times, providing a better user experience.
- Enhanced User Experience: Faster loading times reduce bounce rates and improve visitor engagement.
- SEO Optimization: Search engines favor websites with fast loading times, boosting your site’s ranking.
- Reduced Bandwidth Usage: Smaller images consume less bandwidth, saving on hosting costs.
- Better Mobile Experience: Optimized images load quickly on mobile devices, catering to a growing mobile audience.
2. What Are the Main Reasons for Large Photo Sizes?
Large photo sizes are typically due to high resolution, uncompressed file formats, and unnecessary metadata. High-resolution images contain a large amount of pixel data, resulting in larger file sizes. Uncompressed formats like BMP or TIFF retain all image data, leading to significantly larger files compared to compressed formats like JPEG or PNG. Additionally, embedded metadata, such as camera settings, GPS data, and copyright information, can contribute to the overall file size.
- High Resolution: Images with many pixels (e.g., 4000×3000) inherently have larger file sizes.
- Uncompressed File Formats: Formats like BMP and TIFF store all image data without compression.
- Metadata: Embedded information (camera settings, location data) increases file size.
- Incorrect Export Settings: Saving images with suboptimal settings in editing software.
- Lack of Optimization: Failing to compress images before uploading them to a website.
3. What Are the Different File Formats and Their Impact on Image Size?
Different file formats use various compression algorithms, which significantly affect image size and quality. JPEG is a lossy compression format ideal for photographs, offering a good balance between file size and image quality. PNG is a lossless compression format suitable for images with sharp lines and text, such as logos and graphics. GIF is limited to 256 colors and is best for simple animations and small graphics. WebP, a modern image format developed by Google, provides superior compression and quality compared to JPEG and PNG.
- JPEG (Joint Photographic Experts Group):
- Compression: Lossy
- Best For: Photographs, images with many colors
- Pros: Small file sizes, widely supported
- Cons: Loss of quality with high compression
- PNG (Portable Network Graphics):
- Compression: Lossless
- Best For: Graphics, logos, images with text
- Pros: Retains image quality, supports transparency
- Cons: Larger file sizes compared to JPEG
- GIF (Graphics Interchange Format):
- Compression: Lossless
- Best For: Simple animations, small graphics
- Pros: Supports animation, good for simple images
- Cons: Limited to 256 colors, not suitable for photographs
- WebP:
- Compression: Lossy and Lossless
- Best For: Web images, offering superior compression and quality
- Pros: Excellent compression, supports transparency and animation
- Cons: Not universally supported by all browsers (though support is growing)
4. How Can I Resize Images Without Losing Quality?
Resizing images without significant quality loss involves using appropriate software and techniques. Adobe Photoshop and GIMP offer advanced resizing options that preserve image detail. When resizing, use resampling methods like bicubic or Lanczos, which minimize pixelation and maintain sharpness. Reducing image dimensions to match the display size needed on your website or application can significantly decrease file size without noticeable quality loss.
- Use High-Quality Software: Adobe Photoshop, GIMP, or Affinity Photo
- Resampling Methods: Choose bicubic or Lanczos for smoother results
- Resize Appropriately: Match image dimensions to the display size
- Avoid Over-Resizing: Don’t enlarge images beyond their original resolution
- Save for Web: Use the “Save for Web” option in Photoshop to optimize for online use
5. What Are the Best Image Compression Techniques?
Effective image compression techniques include both lossy and lossless methods. Lossy compression, like JPEG, reduces file size by discarding some image data, which can result in a loss of quality if overdone. Lossless compression, like PNG, reduces file size without discarding any data, preserving the original image quality. Tools like TinyPNG and ImageOptim use advanced compression algorithms to minimize file size while maintaining acceptable image quality.
- Lossy Compression:
- Method: Discards some image data
- Format: JPEG
- Use When: File size is a priority, and slight quality loss is acceptable
- Lossless Compression:
- Method: Reduces file size without discarding data
- Format: PNG
- Use When: Image quality is crucial, and file size is less of a concern
- Tools:
- TinyPNG: Compresses PNG and JPEG images
- ImageOptim: Optimizes images for Mac
- Compressor.io: Supports JPEG, PNG, GIF, and SVG
6. How Do Online Tools Help in Reducing Photo Size?
Online tools provide a convenient way to reduce photo size without requiring specialized software. Websites like TinyPNG, Compressor.io, and I Love IMG offer user-friendly interfaces for compressing images. These tools typically use a combination of lossy and lossless compression techniques to reduce file size while preserving acceptable image quality. Users can upload images directly to the website, compress them, and then download the optimized versions.
- Convenience: No software installation required
- Ease of Use: Simple, user-friendly interfaces
- Accessibility: Available on any device with internet access
- Variety of Options: Support for multiple file formats (JPEG, PNG, GIF)
- Quick Results: Fast compression and download times
7. What Are the Recommended Image Dimensions for Different Platforms?
Using the correct image dimensions for various platforms ensures optimal display and reduces file size. For websites, recommended dimensions depend on the image’s placement, but generally, images should be no larger than the container they are displayed in. Social media platforms like Facebook, Instagram, and Twitter have specific recommended dimensions for profile pictures, cover photos, and in-feed images.
| Platform | Image Type | Recommended Dimensions |
|---|---|---|
| Website | General Use | Match container size |
| Featured Image | 1200×628 pixels | |
| Profile Picture | 170×170 pixels | |
| Cover Photo | 851×315 pixels | |
| In-Feed Image | 1200×630 pixels | |
| Profile Picture | 110×110 pixels | |
| Post | 1080×1080 pixels | |
| Story | 1080×1920 pixels | |
| Profile Picture | 400×400 pixels | |
| Header Image | 1500×500 pixels | |
| In-Feed Image | 1200×675 pixels |
8. How Does DPI Affect Image Size and Quality?
DPI (dots per inch) refers to the number of dots or pixels in an inch of an image, primarily affecting print quality. For web use, DPI is less critical because screens display images based on pixel dimensions, not DPI. A higher DPI is necessary for printing high-resolution images, while a lower DPI (e.g., 72 DPI) is sufficient for web display, reducing file size without affecting online appearance.
- Definition: Dots per inch, used for print quality
- Web vs. Print: DPI is more important for print than web
- Web Standard: 72 DPI is sufficient for web images
- Print Standard: 300 DPI is recommended for high-quality prints
- Impact on File Size: Higher DPI increases file size
9. What Are the Best WordPress Plugins for Image Optimization?
WordPress plugins can automate image optimization, making it easier to manage image sizes. Popular plugins like Smush, Imagify, and ShortPixel automatically compress images upon upload, resize them, and convert them to more efficient formats like WebP. These plugins often include features like bulk optimization, lazy loading, and CDN integration to further improve website performance.
- Smush:
- Features: Lossless compression, bulk smush, lazy loading
- Pros: User-friendly, free version available
- Cons: Limited features in the free version
- Imagify:
- Features: Lossless and lossy compression, WebP conversion, bulk optimization
- Pros: Excellent compression, various optimization levels
- Cons: Requires an API key, paid plans for higher usage
- ShortPixel:
- Features: Lossy, glossy, and lossless compression, WebP conversion, CDN integration
- Pros: High-quality compression, supports multiple file formats
- Cons: Paid plans based on credits
10. How Can I Optimize Images for Mobile Devices?
Optimizing images for mobile devices involves resizing images to fit smaller screens, using responsive images, and implementing lazy loading. Responsive images use the HTML <picture> element or the srcset attribute in the <img> tag to serve different image sizes based on the device’s screen size. Lazy loading defers the loading of off-screen images until they are needed, reducing initial page load time.
- Resizing: Reduce image dimensions for smaller screens
- Responsive Images: Use
<picture>element orsrcsetattribute - Lazy Loading: Defer loading of off-screen images
- Compression: Use optimized compression techniques
- Adaptive Bitrate: Adjust image quality based on network conditions
11. How To Reduce Size Of Photos in Lightroom?
Lightroom is a powerful tool for photographers, and it offers excellent options for exporting and resizing images for web use. When exporting from Lightroom, you can control the image quality, dimensions, and file format, allowing you to reduce file size without significant quality loss.
Here’s how to reduce image size in Lightroom:
- Select Images: Choose the images you want to export.
- Export Settings: Go to File > Export.
- File Settings:
- Image Format: Choose JPEG for a good balance of size and quality.
- Quality: Adjust the quality slider. A setting of 70-80 usually provides a good balance.
- Color Space: sRGB is recommended for web use.
- Image Sizing:
- Resize to Fit: Check this box.
- Width & Height: Specify the maximum width and height in pixels. For example, 1200 pixels for the longest edge.
- Resolution: Set to 72 pixels per inch for web use.
- Output Sharpening:
- Sharpen For: Choose Screen.
- Amount: Select Standard or Low to add a bit of sharpening without overdoing it.
- Export: Click Export to save your optimized images.
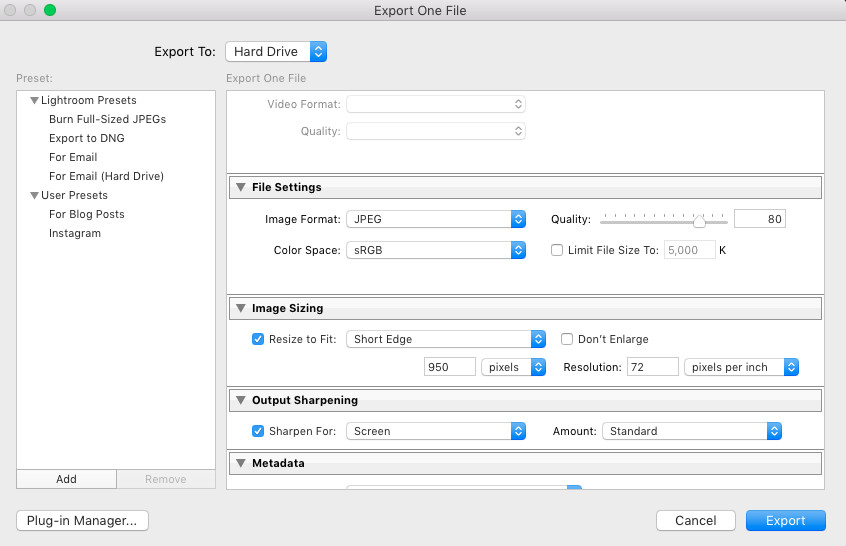 Lightroom Export Settings for Reducing Image Size
12. How To Reduce Size Of Photos in Photoshop?
Photoshop is another industry-standard tool for image editing. It offers even more granular control over image optimization, allowing you to fine-tune settings for the best balance between file size and image quality.
Here’s how to reduce image size in Photoshop:
- Open Image: Open your image in Photoshop.
- Save for Web (Legacy): Go to File > Export > Save for Web (Legacy).
- Optimization Settings:
- File Format: Choose JPEG for photographs or PNG-24 for graphics with transparency.
- Quality: Adjust the quality slider to find a good balance. Usually, 60-80 is sufficient.
- Optimized: Make sure this box is checked.
- Convert to sRGB: Ensure this is checked for web compatibility.
- Image Size:
- Width and Height: Specify the desired width and height in pixels.
- Constrain Proportions: Keep this checked to maintain the aspect ratio.
- Preview and Save:
- Preview: Use the preview window to check the image quality and file size.
- Save: Click Save to save your optimized image.
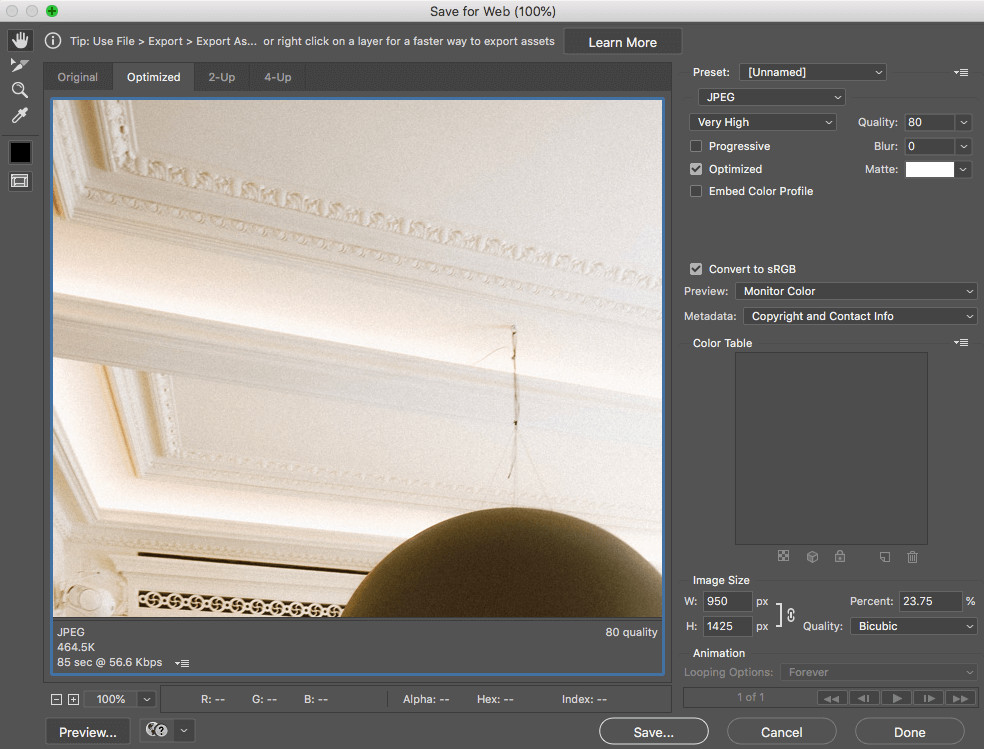 Saving Photo with Reduced Size in Photoshop
13. How To Reduce Size Of Photos on iPhone?
If you’re using an iPhone, you can adjust camera settings to capture smaller images or use built-in editing tools to reduce the size of existing photos.
Here’s how to reduce image size on an iPhone:
- Adjust Camera Settings:
- Go to Settings > Camera > Formats.
- Choose “Most Compatible” for JPEG format, which is more compressed than HEIF.
- Use Mail App:
- Open the Photos app and select the image.
- Tap the Share icon and choose Mail.
- The Mail app will offer different size options (Small, Medium, Large, Actual Size). Choose a smaller size.
- You can then save the image from the email back to your phone.
- Use Third-Party Apps:
- Download a photo compression app from the App Store like “Compress Photos & Pictures.”
- Open the app and follow the instructions to compress your images.
14. How To Reduce Size Of Photos on Android?
Android devices also offer options for reducing photo size, either through camera settings or third-party apps.
Here’s how to reduce image size on an Android device:
- Adjust Camera Settings:
- Open the Camera app and go to Settings.
- Look for options like “Picture Size” or “Image Quality.”
- Choose a lower resolution to capture smaller images.
- Use Google Photos:
- Open the Google Photos app and select the image.
- Tap the Edit icon, then tap Crop.
- Adjust the crop area to reduce the image size.
- Save a copy of the cropped image.
- Use Third-Party Apps:
- Download a photo compression app from the Google Play Store like “Photo & Picture Resizer.”
- Open the app and follow the instructions to compress your images.
15. How Can Metadata Removal Help Reduce Photo Size?
Metadata, which includes information like camera settings, GPS coordinates, and copyright data, can add to the overall file size of an image. Removing unnecessary metadata can help reduce photo size without affecting image quality. Tools like ImageOptim and online metadata removal services can efficiently strip this data.
- Definition: Data about the image (camera settings, location, etc.)
- Impact on Size: Metadata increases file size
- Removal Tools: ImageOptim (Mac), ExifTool, online metadata removers
- Benefits: Reduces file size, protects privacy
- Considerations: Ensure you don’t need the metadata before removing it
16. What Role Does a Content Delivery Network (CDN) Play in Image Optimization?
A Content Delivery Network (CDN) stores and delivers cached versions of your website’s images from multiple servers located around the world. This ensures that users receive images from a server close to their location, reducing latency and improving loading times. CDNs also offer image optimization features like automatic compression and format conversion, further enhancing website performance.
- Definition: Network of servers that deliver content based on user location
- Benefits:
- Faster Loading Times: Delivers images from nearby servers
- Reduced Server Load: Offloads image delivery from your server
- Automatic Optimization: Some CDNs offer image compression and format conversion
- Popular CDNs: Cloudflare, Amazon CloudFront, Akamai
17. How Does Lazy Loading Contribute to Better Page Load Times?
Lazy loading is a technique that defers the loading of off-screen images until they are about to come into view. This reduces the initial page load time by only loading the images that are immediately visible to the user. As the user scrolls down the page, the remaining images are loaded on demand, improving the overall browsing experience.
- Definition: Deferring the loading of off-screen images
- Benefits:
- Faster Initial Load Time: Only loads visible images
- Reduced Bandwidth Usage: Saves bandwidth by not loading unnecessary images
- Improved User Experience: Faster page loading keeps users engaged
- Implementation: Use JavaScript libraries or WordPress plugins
18. How Do Different Browsers Handle Image Optimization?
Different browsers have varying levels of support for modern image formats like WebP and AVIF. While most modern browsers support WebP, older browsers may require a fallback to JPEG or PNG. Using the HTML <picture> element allows you to provide multiple image formats, enabling browsers to choose the most efficient format they support.
- WebP Support: Most modern browsers support WebP
- AVIF Support: Growing support, offering even better compression than WebP
- Fallback Options: Use the
<picture>element to provide JPEG or PNG fallbacks - Browser-Specific Optimization: Some browsers may optimize images automatically
19. What Are Some Common Mistakes to Avoid When Reducing Photo Size?
Avoiding common mistakes ensures effective image optimization without compromising quality. Over-compressing images, using the wrong file format, neglecting responsive images, and ignoring metadata are some pitfalls to watch out for. Always preview images after optimization to ensure they maintain acceptable quality and appearance.
- Over-Compression: Excessive compression leads to noticeable quality loss
- Incorrect File Format: Using JPEG for graphics with sharp lines or text
- Neglecting Responsive Images: Failing to provide different image sizes for different devices
- Ignoring Metadata: Leaving unnecessary metadata, increasing file size
- Skipping Preview: Not checking the image quality after optimization
20. How To Reduce Size Of Photos and Maintain Quality?
The key to reducing photo size while maintaining quality lies in finding the right balance between compression, resizing, and file format. Using appropriate software, experimenting with different settings, and previewing the results can help you achieve optimal image optimization.
Here are some tips to maintain quality while reducing size:
- Use High-Quality Software: Adobe Photoshop, Lightroom, GIMP
- Choose the Right Format: JPEG for photos, PNG for graphics
- Resize Appropriately: Match image dimensions to display size
- Compress Wisely: Experiment with compression levels
- Remove Metadata: Strip unnecessary metadata
- Preview Regularly: Check image quality after each optimization step
- Use Responsive Images: Serve different sizes based on the device
- Implement Lazy Loading: Defer loading of off-screen images
- Leverage CDNs: Utilize Content Delivery Networks for faster delivery
- Avoid Over-Compression: Don’t sacrifice too much quality for size
Reducing the size of photos is a crucial step in optimizing your website and improving user experience. By understanding the different techniques and tools available, you can effectively manage image sizes without compromising quality. Explore dfphoto.net for more in-depth guides, tutorials, and resources to enhance your photography skills and website performance.
Remember to visit dfphoto.net for more tips and resources on photography and image optimization. Our team at 1600 St Michael’s Dr, Santa Fe, NM 87505, United States, is dedicated to helping you improve your images. You can also reach us at +1 (505) 471-6001.
 Close-up shot of a camera lens with the focus on the aperture ring, symbolizing the balance between image size and quality in photography
FAQ: Reducing Photo Size
1. What is the ideal image size for a website?
The ideal image size for a website depends on the image’s placement and purpose, but generally, images should be no larger than the container they are displayed in. Aim to keep file sizes below 500KB for faster loading times, but this can vary based on the complexity and importance of the image.
2. Does reducing image size affect SEO?
Yes, reducing image size can positively affect SEO. Smaller image files lead to faster page loading times, which is a ranking factor for search engines. Optimized images improve user experience, reduce bounce rates, and enhance your site’s visibility.
3. What is the difference between lossy and lossless compression?
Lossy compression reduces file size by discarding some image data, which can result in a loss of quality if overdone. JPEG is a common lossy compression format. Lossless compression reduces file size without discarding any data, preserving the original image quality. PNG is a common lossless compression format.
4. How do I choose the right file format for my images?
Choose JPEG for photographs and images with many colors, as it offers a good balance between file size and image quality. Use PNG for graphics, logos, and images with text, as it preserves image quality and supports transparency. GIF is best for simple animations and small graphics.
5. Can I reduce image size without using software?
Yes, you can use online tools like TinyPNG, Compressor.io, and I Love IMG to reduce image size without installing software. These tools offer user-friendly interfaces for compressing images and are accessible on any device with internet access.
6. What is DPI, and how does it affect image size?
DPI (dots per inch) refers to the number of dots or pixels in an inch of an image, primarily affecting print quality. For web use, DPI is less critical because screens display images based on pixel dimensions, not DPI. A lower DPI (e.g., 72 DPI) is sufficient for web display, reducing file size without affecting online appearance.
7. How do I optimize images for mobile devices?
Optimize images for mobile devices by resizing images to fit smaller screens, using responsive images, and implementing lazy loading. Responsive images use the HTML <picture> element or the srcset attribute in the <img> tag to serve different image sizes based on the device’s screen size. Lazy loading defers the loading of off-screen images until they are needed, reducing initial page load time.
8. What are the best WordPress plugins for image optimization?
Popular WordPress plugins for image optimization include Smush, Imagify, and ShortPixel. These plugins automatically compress images upon upload, resize them, and convert them to more efficient formats like WebP.
9. How does lazy loading improve page load times?
Lazy loading improves page load times by deferring the loading of off-screen images until they are about to come into view. This reduces the initial page load time by only loading the images that are immediately visible to the user.
10. What is a Content Delivery Network (CDN), and how does it help with image optimization?
A Content Delivery Network (CDN) stores and delivers cached versions of your website’s images from multiple servers located around the world. This ensures that users receive images from a server close to their location, reducing latency and improving loading times. CDNs also offer image optimization features like automatic compression and format conversion, further enhancing website performance.
Call to Action
Ready to optimize your photos and boost your website’s performance? Visit dfphoto.net today to discover more valuable resources, tutorials, and a vibrant community of photographers. Explore our guides on advanced techniques, find inspiration in our stunning photo collections, and connect with fellow photography enthusiasts. Whether you’re a beginner or a seasoned pro, dfphoto.net has everything you need to elevate your skills and create captivating images. Don’t wait—start your journey to better photography now! Address: 1600 St Michael’s Dr, Santa Fe, NM 87505, United States. Phone: +1 (505) 471-6001.