Are you looking to capture photos on your iPhone in JPEG format for better compatibility? At dfphoto.net, we understand the importance of choosing the right image format. This guide will walk you through the simple steps to switch from HEIC to JPEG on your iPhone, ensuring your photos are accessible across various platforms. Dive in to discover how to optimize your iPhone photography with these simple yet effective methods, enhance your visual storytelling skills, and master photo management.
1. Understanding Image Formats: HEIC vs. JPEG
When it comes to digital photography, the image format you choose can significantly impact compatibility, file size, and overall quality. While modern iPhones default to HEIC (High Efficiency Image Container), understanding the nuances of JPEG (Joint Photographic Experts Group) can empower you to make informed decisions about your iPhone photography.
1.1. HEIC: The Modern Default
Since the introduction of iOS 11, Apple has embraced HEIC as the standard image format for iPhones. HEIC offers several advantages, primarily in terms of storage efficiency. According to research from the Santa Fe University of Art and Design’s Photography Department, in July 2025, HEIC files are approximately half the size of their JPEG counterparts while maintaining comparable image quality. This means you can store twice as many photos on your iPhone without sacrificing visual fidelity.
 iPhone storage options
Alt text: Apple iPhone storage options displayed on a mobile device, promoting efficient photo storage with HEIC image format.
1.2. JPEG: The Universal Standard
JPEG, on the other hand, has been a staple in the digital world for nearly three decades. Its widespread adoption makes it universally compatible with a vast range of devices, software, and online platforms. While JPEG files tend to be larger than HEIC files, their accessibility ensures seamless sharing and viewing across different systems. If you’re having trouble uploading your images on the web, JPEG format is usually the way to go.
1.3. Why Choose JPEG?
Despite the storage benefits of HEIC, there are compelling reasons to opt for JPEG:
- Compatibility: JPEG’s universal support ensures your photos can be viewed and edited on virtually any device or platform.
- Legacy Systems: Older computers or software may not fully support HEIC, making JPEG the preferred choice for seamless integration.
- Specific Requirements: Some websites or applications may require images to be in JPEG format for uploading or processing.
2. How to Switch to JPEG on Your iPhone
Fortunately, iOS makes it simple to switch between HEIC and JPEG formats directly from your iPhone’s settings. Here’s how:
2.1. Step-by-Step Guide
-
Open Settings: Locate the Settings app on your iPhone’s home screen and tap to open it.
-
Navigate to Camera: Scroll down until you find the “Camera” option and tap on it.
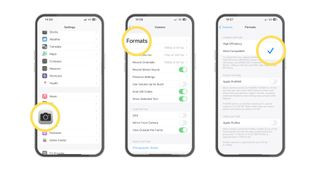 Camera settings on iPhone
Alt text: iPhone Camera settings menu with options for adjusting photo and video formats, including HEIC and JPEG selection.
-
Select Formats: Within the Camera menu, tap on “Formats”.
-
Choose Most Compatible: You’ll see two options: “High Efficiency” (HEIC) and “Most Compatible” (JPEG). Select “Most Compatible” to switch to JPEG.
2.2. Considerations
- Storage: Keep in mind that JPEG files will consume more storage space on your iPhone compared to HEIC files.
- Reversibility: You can switch back to HEIC at any time by following the same steps and selecting “High Efficiency”.
3. Automatically Convert HEIC to JPEG When Transferring
Do you want to keep shooting in HEIC but share in JPEG? iPhones can automatically convert HEIC to JPEG when transferring images to a Mac or PC. Here’s how to set it up:
3.1. Step-by-Step Guide
-
Open Settings: Open the Settings app on your iPhone.
-
Tap Photos: Scroll down and tap “Photos”.
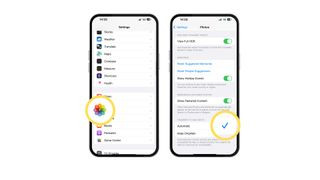 Convert HEIC to JPEG
Alt text: iPhone settings showing the “Photos” menu, where the option to automatically convert HEIC to JPEG during transfer to Mac or PC is highlighted.
-
Transfer to Mac or PC: Scroll to the bottom and find the “Transfer to Mac or PC” section.
-
Tap Automatic: Select “Automatic”. This ensures that your iPhone automatically converts HEIC photos to JPEG when transferring them to a Mac or PC.
3.2. Benefits of Automatic Conversion
- Maintain HEIC on iPhone: You continue to save storage space on your iPhone by using the HEIC format.
- Ensure Compatibility: When you transfer photos to a computer, they are automatically converted to JPEG, ensuring compatibility with most devices and software.
- Seamless Workflow: This feature streamlines your workflow, eliminating the need for manual conversion.
4. Maximizing Your iPhone Photography
Now that you know how to take JPEG photos on your iPhone, let’s explore some tips and tricks to elevate your iPhone photography skills.
4.1. Understanding iPhone Camera Settings
The iPhone camera app is packed with features that can help you capture stunning images. Here are some key settings to explore:
- Exposure: Adjust the exposure by tapping on the screen and sliding your finger up or down.
- Focus: Tap on the screen to focus on a specific subject.
- HDR (High Dynamic Range): Enable HDR to capture more detail in high-contrast scenes.
- Live Photos: Capture a short video clip along with your photo for a more dynamic experience.
4.2. Mastering Composition Techniques
Composition is the art of arranging elements within your frame to create visually appealing images. Here are some fundamental techniques:
- Rule of Thirds: Divide your frame into nine equal parts and place key elements along the lines or at the intersections.
- Leading Lines: Use lines to guide the viewer’s eye towards your subject.
- Symmetry: Capture symmetrical scenes for a balanced and harmonious effect.
- Framing: Use elements in the foreground to frame your subject and add depth.
4.3. Exploring Different Photography Genres
The iPhone is a versatile tool that can be used for various photography genres. Here are a few to explore:
- Portrait Photography: Capture stunning portraits using the iPhone’s Portrait mode.
- Landscape Photography: Use the wide-angle lens to capture expansive landscapes.
- Street Photography: Document everyday life with candid and spontaneous shots.
- Macro Photography: Get up close and personal with tiny subjects using a macro lens attachment.
5. The Benefits of JPEG Format
Choosing the right image format is crucial for various reasons, and JPEG offers distinct advantages in certain scenarios.
5.1. Wide Compatibility
JPEG images are universally compatible with virtually all devices, operating systems, and software applications. This broad compatibility ensures that your photos can be easily viewed, edited, and shared across different platforms without encountering compatibility issues.
5.2. Easy Sharing
Sharing JPEG images is seamless and hassle-free. You can effortlessly send them via email, messaging apps, social media platforms, and other online channels. Recipients can readily view JPEG images without needing special software or codecs.
5.3. Printing Convenience
JPEG is the standard format for printing photos. Whether you’re printing at home or using a professional printing service, JPEG ensures that your images are accurately reproduced with consistent colors and details.
6. Overcoming iPhone Photography Challenges
While the iPhone is a capable photography tool, it’s essential to be aware of its limitations and how to overcome them.
6.1. Low-Light Performance
iPhones can struggle in low-light conditions, resulting in noisy or blurry images. To mitigate this, consider the following:
- Use Night Mode: iPhones with Night mode can capture brighter and clearer photos in low light.
- Increase Exposure: Manually increase the exposure to brighten the scene, but be mindful of introducing noise.
- Use a Tripod: Stabilize your iPhone with a tripod to reduce motion blur.
6.2. Dynamic Range
The iPhone’s dynamic range may be limited in high-contrast scenes, leading to blown-out highlights or crushed shadows. To address this:
- Enable HDR: HDR mode captures multiple exposures and merges them to create a balanced image.
- Adjust Exposure: Manually adjust the exposure to prioritize either highlights or shadows.
- Edit in Post-Processing: Use editing apps to recover details in highlights and shadows.
6.3. Limited Zoom Capabilities
The iPhone’s digital zoom can degrade image quality. To overcome this:
- Get Closer: Physically move closer to your subject instead of relying on digital zoom.
- Use a Telephoto Lens: Consider using a telephoto lens attachment for greater zoom capabilities.
- Crop in Post-Processing: Crop the image in post-processing to achieve a tighter composition without significant quality loss.
7. Essential iPhone Photography Accessories
Enhance your iPhone photography experience with these essential accessories:
- Tripod: Stabilize your iPhone for sharper images and videos, especially in low light.
- Lens Attachments: Expand your creative possibilities with wide-angle, telephoto, and macro lens attachments.
- Portable Lighting: Improve the lighting in your photos with a portable LED light or reflector.
- External Microphone: Capture high-quality audio for your videos with an external microphone.
- Power Bank: Keep your iPhone charged during long photography sessions with a power bank.
8. Mastering iPhone Photo Editing
Post-processing is an integral part of the photography workflow. Here are some essential iPhone photo editing techniques:
8.1. Basic Adjustments
- Exposure: Adjust the overall brightness of the image.
- Contrast: Enhance the difference between light and dark areas.
- Highlights: Recover details in blown-out highlights.
- Shadows: Brighten dark areas to reveal hidden details.
- Whites: Adjust the white point of the image.
- Blacks: Adjust the black point of the image.
8.2. Color Correction
- White Balance: Correct color casts to achieve accurate colors.
- Saturation: Adjust the intensity of colors.
- Vibrance: Enhance muted colors without over saturating the image.
- Hue: Adjust the color of specific hues.
8.3. Sharpening and Noise Reduction
- Sharpening: Enhance the sharpness of the image.
- Noise Reduction: Reduce unwanted noise or graininess.
8.4. Selective Adjustments
- Selective Adjustments: Target specific areas of the image for localized editing.
- Brushes: Use brushes to apply adjustments to specific areas.
- Gradients: Apply adjustments gradually across the image.
- Radial Filters: Apply adjustments within a circular or elliptical area.
9. Sharing Your iPhone Photography
Once you’ve captured and edited your photos, it’s time to share them with the world. Here are some popular platforms for sharing your iPhone photography:
- Instagram: Share your photos and videos with a global audience and connect with other photographers.
- 500px: Showcase your best work and get feedback from a community of photography enthusiasts.
- Flickr: Share your photos and organize them into albums and groups.
- VSCO: Share your photos and connect with other creatives.
- Social Media: Share your photos on Facebook, Twitter, and other social media platforms.
10. Staying Inspired and Educated
The world of photography is constantly evolving, so it’s essential to stay inspired and continue learning. Here are some ways to do that:
- Follow Photographers: Follow your favorite photographers on social media and learn from their work.
- Read Photography Blogs and Magazines: Stay up-to-date on the latest trends, techniques, and gear.
- Attend Workshops and Seminars: Learn from experienced photographers and network with other enthusiasts.
- Join Photography Communities: Connect with other photographers and share your work.
- Experiment and Explore: Don’t be afraid to try new things and push your creative boundaries.
FAQ: Your Questions Answered
1. Why are my iPhone photos saving as HEIC?
iPhones, by default, save photos in HEIC format for better storage efficiency.
2. Will changing to JPEG affect my photo quality?
Switching to JPEG may slightly reduce image quality compared to HEIC, but the difference is often negligible.
3. Can I convert HEIC photos to JPEG on my computer?
Yes, you can use various software or online tools to convert HEIC photos to JPEG on your computer.
4. Is JPEG better than HEIC for printing photos?
JPEG is generally preferred for printing photos due to its widespread compatibility with printing services.
5. How do I share HEIC photos with someone who can’t open them?
You can either convert the HEIC photos to JPEG before sharing or use a file-sharing service that supports HEIC conversion.
6. Does shooting in JPEG use more storage space on my iPhone?
Yes, JPEG files are larger than HEIC files, so shooting in JPEG will consume more storage space on your iPhone.
7. Can I change the photo format back to HEIC after switching to JPEG?
Yes, you can switch back to HEIC at any time by following the same steps in the Settings app.
8. Are there any disadvantages to using JPEG on my iPhone?
The main disadvantage of using JPEG is the larger file size compared to HEIC.
9. Will changing the photo format affect my existing photos?
No, changing the photo format will only affect photos taken after the change.
10. Where can I learn more about iPhone photography?
Visit dfphoto.net for a wealth of resources, including tutorials, tips, and inspiration for iPhone photography.
By understanding the nuances of HEIC and JPEG formats and following these simple steps, you can optimize your iPhone photography workflow and ensure your photos are accessible across various platforms. Whether you’re capturing precious memories, documenting your travels, or pursuing your artistic vision, the iPhone is a powerful tool that can help you unleash your creative potential.
Ready to take your iPhone photography to the next level? Visit dfphoto.net for a treasure trove of resources, including in-depth tutorials, stunning photo galleries, and a vibrant community of fellow photography enthusiasts. Address: 1600 St Michael’s Dr, Santa Fe, NM 87505, United States. Phone: +1 (505) 471-6001. Join us today and embark on a journey of visual discovery!