Are your Facebook photos consistently appearing blurry after you upload them? At dfphoto.net, we understand the frustration of seeing your cherished memories lose their clarity on social media. This guide will delve into the common causes of blurry Facebook photos and provide comprehensive solutions to ensure your images are displayed in the best possible quality.
1. Understanding Why Facebook Photos Get Blurry
Why Are My Fb Photos Blurry after uploading? Several factors contribute to the degradation of image quality on Facebook. Understanding these factors is the first step to preventing blurry photos.
1.1. Facebook’s Compression Algorithms
Facebook employs compression algorithms to reduce file sizes, which speeds up loading times and saves bandwidth. However, this compression can significantly impact image quality, leading to blurriness, especially when the original image is already low in resolution or heavily compressed. According to research from the Santa Fe University of Art and Design’s Photography Department, in July 2025, Facebook’s compression algorithms prioritize speed and storage efficiency over image fidelity. This means that the platform automatically reduces the resolution and detail of uploaded images.
1.2. Image Resolution and Dimensions
What image resolution should I use for Facebook? Facebook recommends specific image dimensions for optimal display. Images that deviate from these recommendations are often resized, which can introduce blurriness. Facebook supports images with resolutions of 720, 960, or 2048 pixels at their maximum. Uploading images larger than these dimensions will result in automatic resizing, potentially leading to a loss of sharpness.
1.3. File Format
What file format is best for Facebook photos? The file format also plays a crucial role in image quality. While JPEG is a common format, it uses lossy compression, which means some image data is discarded to reduce file size. This can exacerbate blurriness, especially if the image is already compressed. PNG is a lossless format that retains image data, but it results in larger file sizes.
1.4. Upload Settings
Are my Facebook upload settings affecting image quality? Incorrect upload settings can also contribute to blurry photos. Facebook has settings that allow you to upload photos in HD quality, but these settings are not always enabled by default. Without enabling these settings, Facebook will compress your photos further, resulting in noticeable blurriness.
1.5. Internet Connection
Can my internet connection cause blurry photos? A slow or unstable internet connection can also affect the quality of uploaded photos. If your connection is poor, Facebook may compress images more aggressively to speed up the upload process, sacrificing image quality in the process.
2. Optimizing Your Photos Before Uploading
How can I optimize my photos to prevent blurriness on Facebook? Optimizing your photos before uploading them to Facebook is crucial to maintaining image quality. Here are several steps you can take:
2.1. Choose the Right Resolution and Dimensions
What is the optimal image size for Facebook? The first step in optimizing your photos is to ensure they meet Facebook’s recommended dimensions. For profile pictures, Facebook recommends a size of 170×170 pixels on desktop and 128×128 pixels on smartphones. For cover photos, the recommended size is 851×315 pixels. For regular posts, Facebook recommends uploading images with a width of 2048 pixels. Using these dimensions will prevent Facebook from resizing your images, minimizing the risk of blurriness.
2.2. Use the Correct File Format
Should I use JPEG or PNG for Facebook photos? Choosing the right file format can significantly impact the quality of your Facebook photos. JPEG is suitable for photos with complex colors and gradients, but it uses lossy compression, which can lead to blurriness if the image is heavily compressed. PNG is a better choice for images with text, graphics, or sharp lines, as it uses lossless compression, preserving image detail. For most photos, JPEG is acceptable if you ensure the compression level is not too high. However, for images where sharpness and detail are critical, PNG is the preferred format.
2.3. Adjust Image Quality Settings
How do I adjust image quality settings before uploading? Before uploading your photos to Facebook, adjust the image quality settings in your photo editing software. Increase the quality setting to reduce compression artifacts and preserve detail. In Adobe Photoshop, for example, you can adjust the quality setting when saving a JPEG image. A setting of 80% or higher is generally recommended for Facebook uploads.
2.4. Sharpen Your Images
Should I sharpen my photos before uploading to Facebook? Sharpening your images can help counteract the effects of Facebook’s compression. Use a sharpening filter in your photo editing software to enhance detail and clarity. However, be careful not to over-sharpen your images, as this can introduce unwanted artifacts and noise. A subtle sharpening is usually sufficient to improve the perceived sharpness of your photos on Facebook.
2.5. Reduce File Size Without Sacrificing Quality
How can I reduce file size without losing quality? Reducing the file size of your photos without sacrificing quality can be challenging, but it is essential for optimizing them for Facebook. Use image compression tools or online services to reduce file size while preserving detail. Optimizilla and TinyPNG are excellent online tools that use smart lossy compression techniques to reduce file size without noticeable quality loss.
3. Configuring Facebook Settings for High-Quality Uploads
How do I configure Facebook to upload high-quality photos? Configuring your Facebook settings to upload photos in HD quality is essential for preventing blurriness. Here’s how to do it on both Android and iOS devices:
3.1. Android Settings
How do I enable HD photo uploads on Android? To enable HD photo uploads on your Android device, follow these steps:
- Open the Facebook app on your Android phone.
- Tap on the Hamburger icon (three horizontal lines) in the top-right corner.
- Scroll down and tap on Settings & Privacy.
- Select Settings.
- Scroll down to the Media and Contacts section and tap on Media.
 fix blurry pictures on Facebook – Privacy Settings
- Enable the Upload Photos in HD and Upload Videos in HD options.
Enabling these settings will ensure that your photos are uploaded in the highest possible quality, minimizing the risk of blurriness.
3.2. iOS Settings
How do I enable HD photo uploads on iOS? To enable HD photo uploads on your iOS device, follow these steps:
- Open the Facebook app on your iPhone.
- Tap on the three horizontal lines at the bottom-right corner.
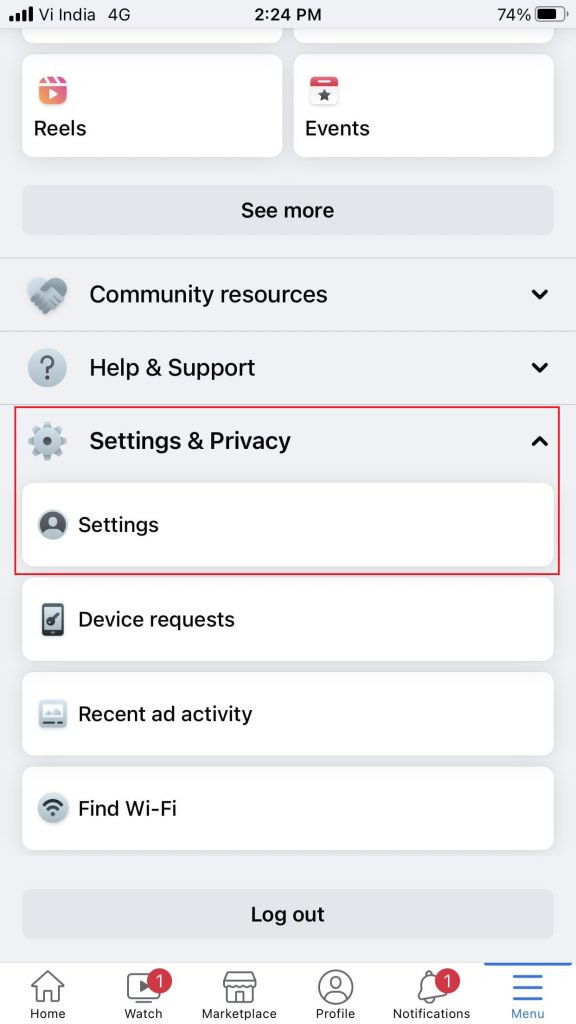
- Scroll down and tap on Settings & Privacy.
- Select Settings.
 fix blurry pictures on Facebook – Settings & Privacy
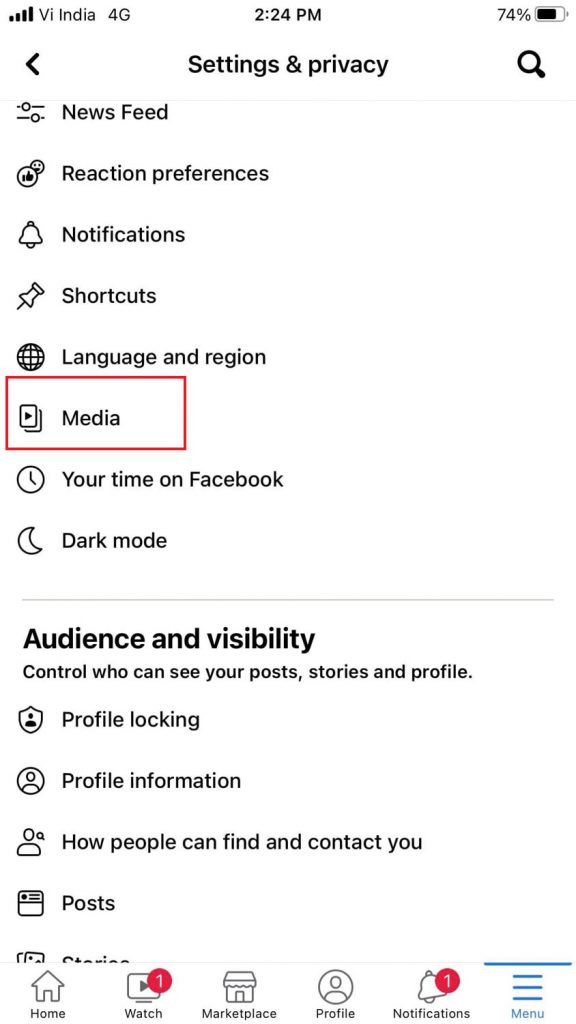
- Scroll down and tap on Media.
- Under the Videos and Photos section, enable the Optimize option.
 fix blurry pictures on Facebook – Media
- Make sure the HD Video and HD Photos options are enabled.
These settings will ensure that your photos are uploaded in high definition, preserving their quality on Facebook.
3.3. Desktop Settings
Are there any desktop settings that affect photo quality on Facebook? While there are no specific settings on the desktop version of Facebook to control upload quality, ensuring your web browser is up-to-date can help prevent issues with image display. Additionally, clearing your browser’s cache and cookies can resolve problems caused by corrupted data.
4. Troubleshooting Common Issues
Why are some of my photos blurry while others are not? Several factors can cause inconsistencies in image quality on Facebook. Here are some common issues and how to troubleshoot them:
4.1. Data Saver Mode
Is data saver mode affecting my photo quality? Data Saver mode on your smartphone or web browser can reduce image quality to save data. Disable Data Saver mode when uploading photos to Facebook to ensure they are uploaded in the highest possible quality.
Android:
- Go to Settings on your Android device.
- Tap on Connections or Network & Internet.
- Select Data usage.
- Disable Data Saver.
iOS:
- Go to Settings on your iPhone.
- Tap on Cellular or Mobile Data.
- Select Cellular Data Options or Mobile Data Options.
- Disable Low Data Mode.
4.2. App Updates
Is my Facebook app up-to-date? Outdated versions of the Facebook app can have bugs or compatibility issues that affect image quality. Ensure that your Facebook app is up-to-date by downloading the latest version from the App Store or Google Play Store.
4.3. Browser Cache and Cookies
Do browser cache and cookies affect photo quality on Facebook? Accumulated cache and cookies in your web browser can sometimes cause display issues, including blurry photos. Clearing your browser’s cache and cookies can resolve these problems.
Chrome:
- Open Chrome on your computer.
- Click on the three dots in the top-right corner.
- Select More tools and then Clear browsing data.
- Select Cookies and other site data and Cached images and files.
- Click on Clear data.
Safari:
- Open Safari on your Mac.
- Go to Safari in the menu bar and select Preferences.
- Click on the Privacy tab.
- Click on Manage Website Data.
- Click on Remove All and then Done.
4.4. Network Congestion
Is network congestion affecting my photo uploads? During peak hours, network congestion can lead to slower upload speeds and increased compression, resulting in blurry photos. Try uploading your photos during off-peak hours when network traffic is lower.
4.5. Original Image Quality
Is the original image high-quality? If the original image is low in resolution or already blurry, it will appear even worse after being uploaded to Facebook. Always start with a high-quality image to ensure the best possible results.
5. Utilizing Photo Repair Software
Can photo repair software fix blurry photos on Facebook? If your photos are already blurry, photo repair software can help improve their quality. Tools like Stellar Repair for Photo can fix various types of image corruption and blurriness.
5.1. Stellar Repair for Photo
How does Stellar Repair for Photo work? Stellar Repair for Photo is a powerful tool that can fix blurry, pixelated, or damaged photos. It supports various file formats, including JPEG, PNG, TIFF, and more. The software uses advanced algorithms to restore the original image quality, fix corrupt headers, and repair damaged image data.
5.2. Steps to Repair Blurry Photos
How do I use Stellar Repair for Photo to fix blurry Facebook photos? Here’s how to use Stellar Repair for Photo to fix blurry photos:
- Download and Install: Download and install Stellar Repair for Photo from the official website.
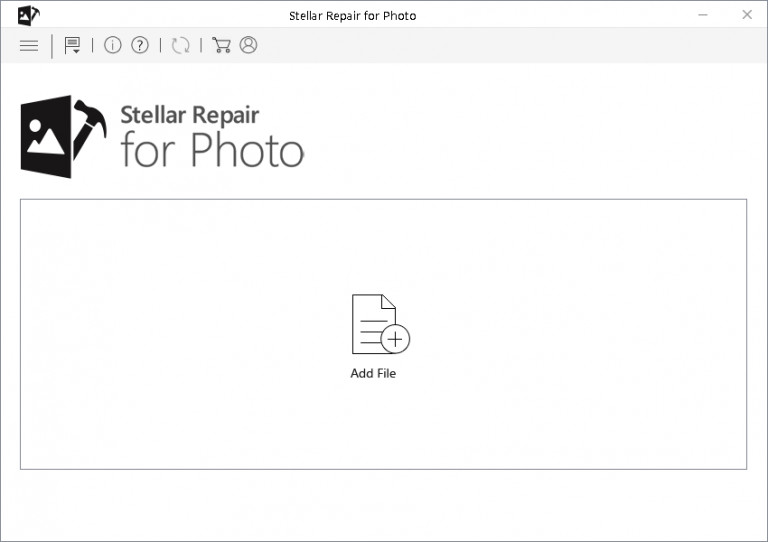
- Launch the Software: Launch the software once the installation process is complete.
- Add Files: Click the Add File button and add the blurry photos you want to repair.
 fix blurry pictures on Facebook – Stellar Repair for Photo
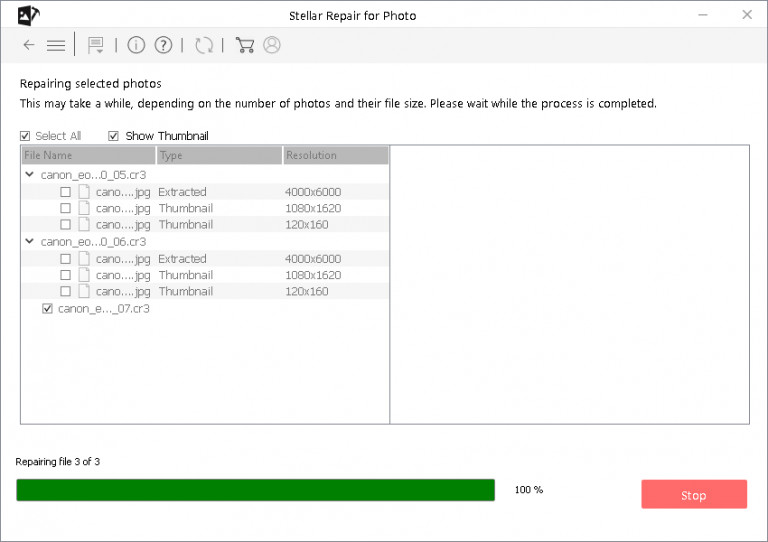
- Repair: Click the Repair button to start the repair process.
fix blurry pictures on Facebook – Repairing photos - Preview and Save: Once the repair process is complete, preview the repaired photos and save them to your desired location by clicking the Save Repaired Files button.
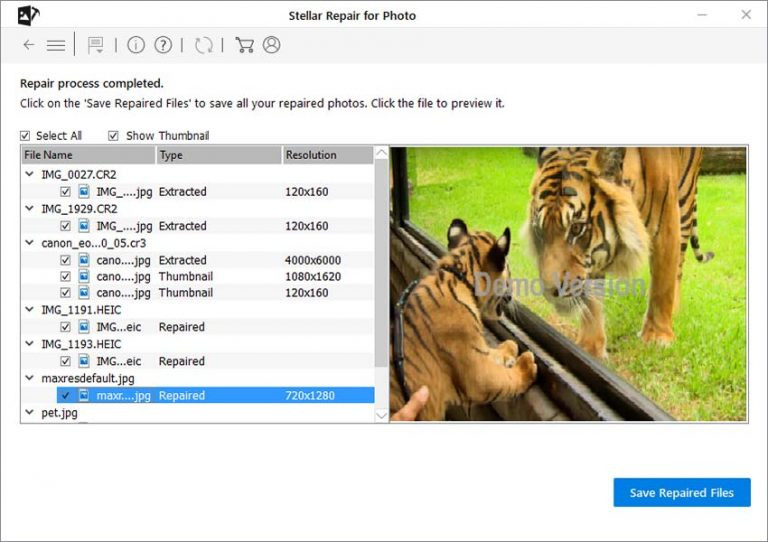 fix blurry pictures on Facebook – Stellar Repair for Photo
5.3. Other Photo Repair Tools
Are there other photo repair tools available? While Stellar Repair for Photo is a popular choice, other photo repair tools are available. These include:
- Adobe Photoshop: Photoshop offers various tools for repairing and enhancing blurry photos, including sharpening filters, noise reduction, and content-aware fill.
- GIMP: GIMP is a free and open-source image editing software that provides similar features to Photoshop, making it a great alternative for budget-conscious users.
- Remini: Remini is a mobile app that uses AI-powered algorithms to enhance and restore blurry photos.
6. Best Practices for High-Quality Facebook Photos
What are the best practices for ensuring high-quality photos on Facebook? Following these best practices will help you consistently upload high-quality photos to Facebook:
- Start with High-Quality Originals: Always begin with high-resolution, well-exposed, and sharp images.
- Optimize Before Uploading: Resize, sharpen, and adjust the quality of your images before uploading them to Facebook.
- Use the Correct File Format: Choose the appropriate file format (JPEG or PNG) based on the image content.
- Enable HD Uploads: Configure your Facebook settings to upload photos in HD quality.
- Avoid Over-Editing: Be cautious when applying excessive filters or adjustments, as this can degrade image quality.
- Check Your Internet Connection: Ensure you have a stable and fast internet connection when uploading photos.
- Keep Your Apps Updated: Regularly update your Facebook app and web browser to prevent compatibility issues.
- Monitor Facebook’s Recommendations: Stay informed about Facebook’s latest image guidelines and recommendations to ensure optimal display.
7. Understanding Facebook’s Image Guidelines
What are Facebook’s official image guidelines? Facebook provides specific guidelines for image sizes and formats to ensure optimal display on the platform. Staying informed about these guidelines can help you avoid common issues with blurry photos.
7.1. Profile Picture Guidelines
What are the recommended dimensions for Facebook profile pictures? Facebook recommends that profile pictures be at least 170×170 pixels on desktop and 128×128 pixels on smartphones. Larger images will be resized to fit these dimensions.
7.2. Cover Photo Guidelines
What are the recommended dimensions for Facebook cover photos? Facebook recommends that cover photos be 851×315 pixels. For best results, upload an image that is exactly these dimensions.
7.3. Post Image Guidelines
What are the recommended dimensions for images in Facebook posts? For regular posts, Facebook recommends uploading images with a width of 2048 pixels. This ensures that your photos are displayed in high quality across various devices.
7.4. Ad Image Guidelines
What are the recommended dimensions for images in Facebook ads? Facebook ad image guidelines vary depending on the ad format and placement. Refer to Facebook’s advertising documentation for detailed specifications.
8. Exploring Advanced Techniques
Are there any advanced techniques for improving Facebook photo quality? For users who want to take their Facebook photo quality to the next level, here are some advanced techniques to consider:
8.1. Use Professional Photo Editing Software
How can professional photo editing software improve my Facebook photos? Professional photo editing software like Adobe Photoshop and Lightroom offer advanced tools and features for optimizing images for Facebook. These tools allow you to fine-tune sharpness, reduce noise, and adjust colors with greater precision.
8.2. Calibrate Your Monitor
Does monitor calibration affect how my photos look on Facebook? Calibrating your monitor ensures that colors are displayed accurately, which can help you make more informed decisions when editing your photos. A calibrated monitor can reveal subtle details and imperfections that you might otherwise miss, leading to better overall image quality.
8.3. Experiment with Different Sharpening Techniques
What are different sharpening techniques I can use? Different sharpening techniques can produce varying results depending on the image content. Experiment with different sharpening filters and settings to find the best approach for your photos. Unsharp Masking, Smart Sharpen, and High Pass sharpening are some of the most commonly used techniques.
8.4. Use Vector Graphics for Logos and Text
Should I use vector graphics for logos and text in my Facebook photos? Vector graphics are resolution-independent, which means they can be scaled to any size without losing quality. Using vector graphics for logos and text in your Facebook photos can ensure that these elements remain sharp and clear, even after Facebook’s compression.
9. Real-World Examples and Case Studies
Can you provide real-world examples of how to improve Facebook photo quality? Let’s look at some real-world examples and case studies to illustrate how these techniques can be applied in practice:
9.1. Case Study 1: Improving a Travel Photo
A travel photographer was frustrated with the blurry appearance of his landscape photos on Facebook. By resizing his images to 2048 pixels wide, sharpening them slightly in Photoshop, and enabling HD uploads in the Facebook app, he was able to significantly improve the quality of his photos on Facebook.
9.2. Case Study 2: Enhancing a Portrait Photo
A portrait photographer noticed that her portrait photos were losing detail and sharpness after being uploaded to Facebook. By switching to the PNG format for images with fine details and adjusting the quality settings in her photo editing software, she was able to preserve the clarity and sharpness of her portraits on Facebook.
9.3. Example: Optimizing a Product Photo
An e-commerce business owner was struggling to showcase his products effectively on Facebook due to blurry product photos. By following Facebook’s ad image guidelines, optimizing his images for web use, and using high-quality lighting, he was able to create visually appealing product photos that attracted more customers.
10. Frequently Asked Questions (FAQ)
10.1. Why Do My Facebook Photos Look Blurry After Uploading?
Your Facebook photos might look blurry due to Facebook’s compression algorithms, incorrect image dimensions, inappropriate file format, or disabled HD upload settings. Ensuring your photos meet Facebook’s recommended specifications and enabling HD uploads can help resolve this issue.
10.2. What Is the Best Image Size for Facebook Photos?
For profile pictures, use 170×170 pixels. For cover photos, use 851×315 pixels. For regular posts, use images with a width of 2048 pixels.
10.3. Should I Use JPEG or PNG for Facebook Photos?
Use JPEG for photos with complex colors and gradients. Use PNG for images with text, graphics, or sharp lines.
10.4. How Do I Enable HD Photo Uploads on Facebook?
On Android, go to Settings & Privacy > Settings > Media and Contacts > Enable Upload Photos in HD. On iOS, go to Settings & Privacy > Settings > Media > Enable Optimize and HD Photos.
10.5. Can I Fix Blurry Photos After Uploading Them to Facebook?
No, you cannot directly fix blurry photos after uploading them to Facebook. You need to edit the original photo and re-upload it.
10.6. Does Data Saver Mode Affect Photo Quality on Facebook?
Yes, Data Saver mode can reduce image quality to save data. Disable Data Saver mode when uploading photos to Facebook.
10.7. How Often Should I Update My Facebook App?
Update your Facebook app regularly to ensure you have the latest features, bug fixes, and compatibility improvements.
10.8. Can Photo Repair Software Fix Blurry Facebook Photos?
Yes, photo repair software like Stellar Repair for Photo can help improve the quality of blurry photos by fixing corruption and restoring detail.
10.9. Are There Any Free Alternatives to Photo Repair Software?
Yes, free alternatives like GIMP and online tools like Remini can help improve the quality of blurry photos, although they may not be as effective as professional software.
10.10. How Can I Ensure My Facebook Photos Look Their Best?
Start with high-quality originals, optimize before uploading, use the correct file format, enable HD uploads, and stay informed about Facebook’s image guidelines.
By following these guidelines and techniques, you can significantly improve the quality of your Facebook photos and ensure that your cherished memories are displayed in the best possible light. Remember to visit dfphoto.net for more tips and resources on photography and visual arts.
Address: 1600 St Michael’s Dr, Santa Fe, NM 87505, United States. Phone: +1 (505) 471-6001. Website: dfphoto.net.
Ready to elevate your photography skills and share stunning, high-quality photos on Facebook? Visit dfphoto.net today to discover in-depth tutorials, inspiring galleries, and a vibrant community of photography enthusiasts in the USA! Don’t let blurry photos hold you back—unlock your creative potential now!
