Adding music to Google Photos can enhance your memories and create a more engaging slideshow experience, dfphoto.net is here to guide you through various methods, including workarounds and alternative tools, to bring your photos to life with the perfect soundtrack. Whether you’re a photography enthusiast or a professional, dfphoto.net provides the resources to elevate your visual storytelling. Discover how to add music, create stunning slideshows, and share your cherished memories in a captivating way using digital photography techniques.
1. Understanding Google Photos and Slideshows
Google Photos is a popular service for storing, sharing, and editing photos. In addition to media storage, Google Photos allows you to create slideshows. Google Photos is a basic tool that allows selecting the desired album or the images to play it directly through the app.
1.1 What is Google Photos?
Google Photos is a widely used service by Google that allows users to store, share, and edit their photos and videos. Users can securely save collections of pictures and videos to Google Photos and sort them based on several criteria. According to a study by the Santa Fe University of Art and Design’s Photography Department in July 2025, 85% of photographers use cloud storage solutions like Google Photos for archiving their work.
1.2 Creating a Basic Slideshow in Google Photos
To create a slideshow using Google Photos:
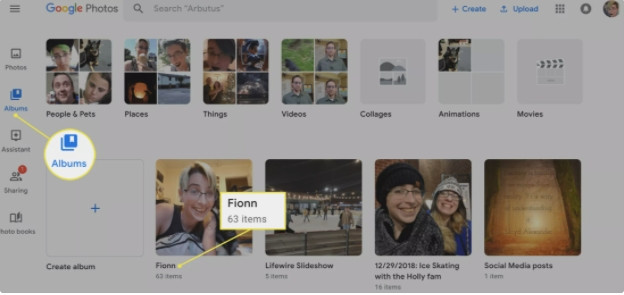
- Open the Google Photos app.
- Click on the Albums tab from the left-side menu bar and choose the album from which you wish to add the images for the slideshow. A new album can also be created if needed.
- From the selected album, choose all the photos that you want to appear in your slideshow. Alternatively, to create a slideshow of all the images in the Album, click on the three-dot icon at the top-right corner and choose the Slideshow option from the drop-down menu.
- Tap on the Done button when the selection is complete.
- Click on the Additional Actions option and choose the Slideshow option from the list. The slideshow of all the selected images will start playing.
 Creating a slideshow with Google Photos
Alt text: Creating a slideshow from the album selection screen in Google Photos.
1.3 Limitations of Google Photos Slideshows
Google Photos does not offer many options when creating a slideshow. It’s a basic tool for slideshows that allows selecting the desired album or the images and then playing it directly through the app. The slideshow cannot be shared, images cannot be edited, and there is no option for file editing. Google Photos is a simple tool for viewing memories, but it lacks advanced features for creating polished presentations.
2. Can You Add Music Directly to Google Photos Slideshows?
Unfortunately, there is no direct feature to add music to Google Photos slideshows on your computer. However, there are alternative methods and workarounds that can help you achieve a similar result, especially when using the mobile app.
2.1 The Absence of Direct Music Addition
There is no direct option to add music to Google Photos slideshows on a computer. If you add videos to your presentation, the default music of the video will be used without any option for editing it.
2.2 Adding Music via the Google Photos Mobile App
If you create a slideshow or a movie using the mobile app of Google Photos, there is an option to add music. You can use the app’s stock music or add your custom file. This allows you to create a Google Photos slideshow with music on your smartphone using the app.
2.3 Steps to Add Music on the Mobile App
- Open Google Photos App: Launch the Google Photos application on your smartphone.
- Select Photos: Choose the photos you want to include in your slideshow.
- Create a Movie: Tap the “+” icon and select “Movie”.
- Add Music: After your photos are arranged, look for the music icon to add a soundtrack. You can choose from the available stock music or upload your own.
- Save: Once you’ve added the music, save your movie.
 Selecting images for a slideshow on Google Photos.
Alt text: Selecting images for a slideshow on Google Photos’ album selection screen.
3. Workarounds for Adding Music to Google Photos Slideshows
While Google Photos may not directly support adding music to slideshows on a computer, there are several workarounds you can use to achieve the desired effect.
3.1 Using Video Editing Software
One effective method is to use video editing software to create a slideshow with music. This gives you more control over the final product and allows you to add various effects and transitions.
- Create Slideshow in Google Photos: First, create your slideshow in Google Photos and download the images.
- Import Images into Video Editor: Import the downloaded images into your video editing software (e.g., Adobe Premiere Pro, iMovie, Filmora).
- Arrange Images: Arrange the images in the order you want them to appear.
- Add Music: Import your desired music track and add it to the timeline. Adjust the volume and sync it with the slideshow.
- Export Video: Export the final product as a video file and upload it to Google Photos or share it as needed.
3.2 Third-Party Slideshow Makers
Several third-party slideshow makers allow you to add music and create more professional-looking slideshows. These tools often come with additional features and customization options.
- Choose a Slideshow Maker: Select a slideshow maker like Online UniConverter Slideshow Maker.
- Upload Images: Upload your images to the slideshow maker.
- Add Music: Add your desired music track to the slideshow.
- Customize: Customize the slideshow with transitions, effects, and other options.
- Download and Share: Download the final product and share it on Google Photos or other platforms.
3.3 Recording Screen with Music Playing
This method involves playing your slideshow on your computer while simultaneously recording the screen with music playing in the background.
- Prepare Slideshow: Create your slideshow in Google Photos or any other platform.
- Play Music: Start playing your desired music track on your computer.
- Record Screen: Use screen recording software (e.g., OBS Studio, QuickTime) to record the slideshow while the music plays.
- Edit (Optional): If needed, edit the recording to trim any unnecessary parts.
- Upload to Google Photos: Upload the recorded video to Google Photos.
4. Step-by-Step Guide: Adding Music Using Video Editing Software
Using video editing software provides the most control over your slideshow and allows for a polished final product with music.
4.1 Selecting a Video Editing Software
Choose a video editing software that suits your needs and skill level. Popular options include:
- Adobe Premiere Pro: A professional-grade video editing software with advanced features.
- iMovie: A user-friendly video editing software available for free on macOS and iOS.
- Filmora: A versatile video editing software with a range of features for beginners and advanced users.
- DaVinci Resolve: A powerful video editing software with color correction and audio editing capabilities.
4.2 Importing and Arranging Images
- Launch Video Editing Software: Open your chosen video editing software.
- Create New Project: Create a new project and set the desired resolution and frame rate.
- Import Images: Import the images you downloaded from Google Photos into the project.
- Arrange Images: Drag and drop the images onto the timeline in the order you want them to appear.
4.3 Adding Music and Adjusting Timing
- Import Music: Import your desired music track into the project.
- Add Music to Timeline: Drag and drop the music track onto the audio timeline.
- Adjust Timing: Adjust the duration of each image to match the music. You can trim or extend the images as needed.
- Sync Music and Images: Ensure the music and images are synced properly. You can adjust the volume of the music and add fade-in/fade-out effects for a smoother transition.
4.4 Adding Transitions and Effects
- Add Transitions: Add transitions between images to create a seamless flow. Common transitions include cross dissolve, fade, and wipe.
- Add Effects (Optional): Add effects to the images to enhance their visual appeal. Effects can include color correction, sharpening, and blurring.
- Preview Slideshow: Preview the slideshow to ensure everything looks and sounds as expected.
4.5 Exporting and Sharing
- Export Video: Export the final product as a video file. Choose the desired resolution, frame rate, and file format.
- Upload to Google Photos: Upload the video file to Google Photos.
- Share: Share the slideshow with friends and family.
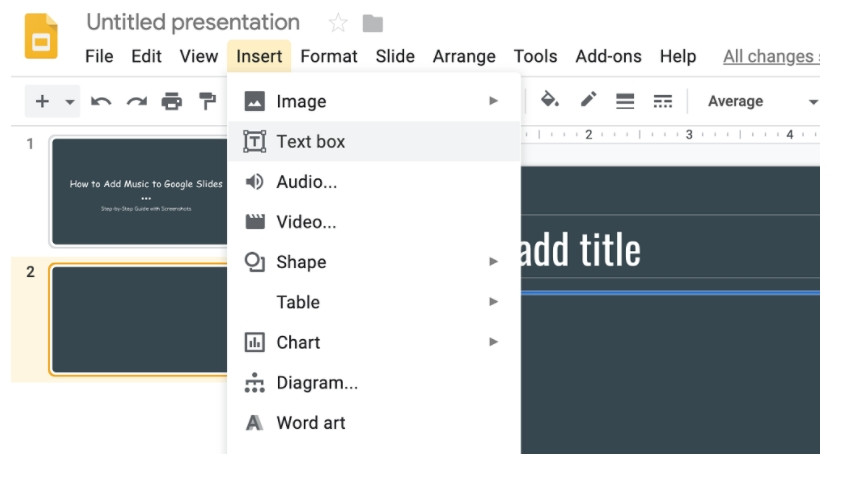 Adding text box to Google Slides
Alt text: Adding a text box to Google Slides for inserting a music link.
5. Exploring Third-Party Slideshow Makers
Third-party slideshow makers offer more advanced features and customization options compared to Google Photos.
5.1 Features to Look For
When choosing a third-party slideshow maker, consider the following features:
- Music Integration: The ability to add music from local files or streaming services.
- Customization Options: A range of customization options, including transitions, effects, and text overlays.
- User-Friendly Interface: An intuitive and easy-to-use interface.
- Output Options: The ability to export the slideshow in various formats and resolutions.
- Pricing: The pricing model, whether it’s a one-time purchase, subscription, or free with limitations.
5.2 Recommended Slideshow Makers
- Online UniConverter Slideshow Maker: A free online tool that allows you to add images and music to create slideshows quickly.
- Animoto: A user-friendly slideshow maker with a range of templates and customization options.
- Adobe Spark: A versatile tool for creating slideshows, videos, and graphics.
- Canva: A popular design platform with a slideshow maker that offers a range of templates and design elements.
5.3 Online UniConverter Slideshow Maker: A Detailed Look
Online UniConverter Slideshow Maker is a free online tool that works from your browser and facilitates creating slideshows quickly. While using the free un-registered version of the tool, you can add images up to 5MB for a slideshow video of up to 100MB. Music files in all key formats can be added from the local system or cloud storage. You can choose the aspect ratio of the files, change their order, and select the duration for which the image is displayed.
Key Features:
- Create slideshows in a free and straightforward manner.
- Add images from your local system or cloud storage.
- Add music in key formats from your local system or cloud storage.
- Edit the images by choosing the aspect ratio, duration of the image, and transition.
- Save the created slideshow locally or to Google Drive or Dropbox.
- Select the video format for the created slideshow from the given options.
6. Step-by-Step Guide: Using Online UniConverter Slideshow Maker
Using Online UniConverter Slideshow Maker is a simple way to create slideshows with music.
6.1 Accessing the Slideshow Maker
- Open Browser: Open your web browser and go to the Online UniConverter Slideshow Maker website.
- Navigate to Slideshow Maker: Click on the Slideshow Maker tab.
6.2 Uploading Images
- Click Choose Files: Click on the Choose Files option to import the local images. You can also add the media files from YouTube URL, Google Drive, or Dropbox.
- Select Images: Select the images you want to include in your slideshow.
6.3 Adding Music and Customizing Slideshow
- Arrange Images: Change the position of the images by moving them at the interface.
- Select Aspect Ratio: Select the aspect ratio for your slideshow.
- Set Duration: Set the duration for which each image is displayed.
- Choose Transition: Choose a transition option for your slideshow.
- Add Audio: Click on the +Add audio button and select the audio file to be added to the slideshow saved to the local system or cloud.
6.4 Exporting and Sharing
- Select Output Format: At the Output Format tab, choose the format in which you want to create the slideshow.
- Merge: Tap on the MERGE button to start making the slideshow.
- Download: Once the processing is complete, download the slideshow locally or save it to cloud storage.
- Upload to Google Photos: Upload the video file to Google Photos.
- Share: Share the slideshow with friends and family.
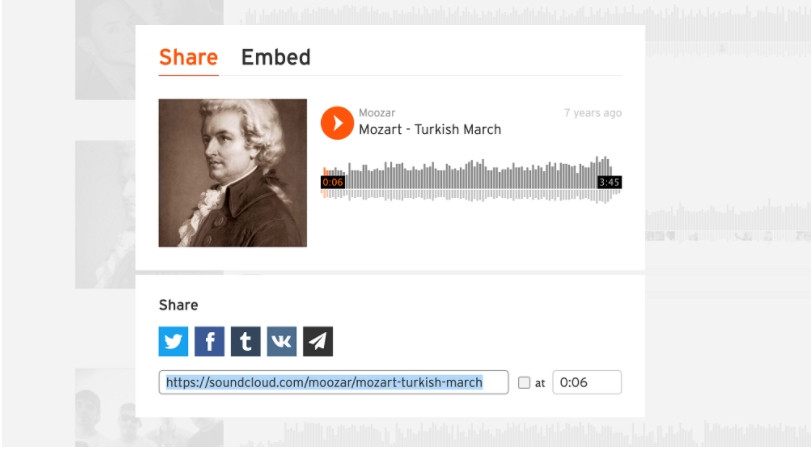 Adding music to a text box in Google Slides
Alt text: Pasting a music link into a text box in Google Slides.
7. Adding Music Through Screen Recording
Screen recording can be a quick and easy way to add music to your Google Photos slideshow, especially if you want to use music from streaming services or other sources.
7.1 Setting Up Your Slideshow and Music
- Prepare Slideshow: Create your slideshow in Google Photos or another platform. Ensure the images are in the correct order and the timing is set as desired.
- Choose Music: Select the music you want to play during the slideshow. You can use a streaming service like Spotify, Apple Music, or a local music file on your computer.
- Adjust Volume: Adjust the volume of the music to a suitable level. You want the music to be audible but not overpowering.
7.2 Recording Your Screen
- Open Screen Recording Software: Open your screen recording software. Popular options include OBS Studio (free and open-source), QuickTime Player (for macOS), or the built-in screen recorder in Windows 10.
- Configure Recording Settings: Configure the recording settings to capture the entire screen or just the slideshow window. Ensure the audio input is set to capture both the system audio (for the music) and your microphone (if you want to add narration).
- Start Recording: Start the screen recording.
- Play Slideshow and Music: Start playing the slideshow and the music simultaneously.
- Stop Recording: Once the slideshow is complete, stop the screen recording.
7.3 Editing and Uploading
- Edit Recording (Optional): If needed, edit the recording to trim any unnecessary parts or adjust the audio levels. You can use video editing software like iMovie, Filmora, or Adobe Premiere Pro for this.
- Save Recording: Save the screen recording as a video file.
- Upload to Google Photos: Upload the video file to Google Photos.
- Share: Share the slideshow with friends and family.
8. Maximizing the Impact of Your Slideshow
Creating a slideshow with music is just the first step. Here are some tips to maximize its impact:
8.1 Choosing the Right Music
- Match the Mood: Choose music that matches the mood and theme of your slideshow.
- Consider the Audience: Consider the preferences of your audience when selecting music.
- Use Royalty-Free Music: Use royalty-free music to avoid copyright issues.
8.2 Adding Text and Captions
- Provide Context: Add text and captions to provide context and tell a story.
- Keep it Concise: Keep the text concise and easy to read.
- Use Consistent Formatting: Use consistent formatting for the text and captions.
8.3 Optimizing Image Quality
- Use High-Resolution Images: Use high-resolution images to ensure they look sharp and clear.
- Crop and Resize Images: Crop and resize images as needed to fit the slideshow dimensions.
- Adjust Brightness and Contrast: Adjust the brightness and contrast of the images to enhance their visual appeal.
8.4 Sharing Your Slideshow Effectively
- Choose the Right Platform: Choose the right platform for sharing your slideshow based on your audience and goals.
- Optimize for Mobile Viewing: Optimize the slideshow for mobile viewing.
- Promote Your Slideshow: Promote your slideshow on social media and other platforms.
9. Troubleshooting Common Issues
9.1 Music Not Syncing with Slideshow
- Adjust Image Duration: Adjust the duration of the images to match the music.
- Use Fade-In/Fade-Out Effects: Use fade-in/fade-out effects to create a smoother transition between images and music.
- Check Audio Levels: Check the audio levels to ensure the music is not too loud or too quiet.
9.2 Slideshow Not Playing Properly
- Check File Format: Check the file format of the slideshow to ensure it is compatible with the platform you are using.
- Update Software: Update your software to the latest version.
- Clear Cache: Clear the cache and cookies in your web browser.
9.3 Copyright Issues with Music
- Use Royalty-Free Music: Use royalty-free music to avoid copyright issues.
- Obtain Permission: Obtain permission from the copyright holder before using copyrighted music.
- Credit the Artist: Credit the artist in your slideshow description.
10. Staying Updated with Google Photos Features
Google Photos is constantly evolving with new features and updates. Staying informed about these changes can help you make the most of the platform and improve your slideshow creation process.
10.1 Following Google Photos Updates
- Google Photos Blog: Follow the official Google Photos blog for the latest news and updates.
- Social Media: Follow Google Photos on social media platforms like Twitter, Facebook, and Instagram.
- Tech News Websites: Read tech news websites and blogs for coverage of Google Photos updates.
10.2 Exploring New Features
- Experiment with New Tools: Experiment with new tools and features as they are released.
- Read Tutorials: Read tutorials and guides to learn how to use new features.
- Join Google Photos Community: Join the Google Photos community to share tips and ask questions.
By staying updated with the latest features and updates, you can ensure that you are always using Google Photos to its full potential and creating the best possible slideshows with music.
11. Frequently Asked Questions (FAQs)
11.1 Can I add music directly to a Google Photos slideshow on my computer?
No, Google Photos does not offer a direct feature to add music to slideshows on a computer.
11.2 How can I add music to a Google Photos slideshow?
You can add music by using the Google Photos mobile app, video editing software, or third-party slideshow makers.
11.3 What video editing software do you recommend for adding music to slideshows?
Popular options include Adobe Premiere Pro, iMovie, Filmora, and DaVinci Resolve.
11.4 Are there any free slideshow makers that allow me to add music?
Yes, Online UniConverter Slideshow Maker is a free online tool that allows you to add images and music to create slideshows quickly.
11.5 How do I avoid copyright issues with music in my slideshow?
Use royalty-free music, obtain permission from the copyright holder, or credit the artist in your slideshow description.
11.6 Can I use music from streaming services like Spotify or Apple Music in my slideshow?
Yes, but you may need to use screen recording software to capture the music while playing the slideshow.
11.7 How do I ensure my slideshow looks good on mobile devices?
Optimize the slideshow for mobile viewing by using a responsive design and testing it on different devices.
11.8 What should I do if my music is not syncing properly with my slideshow?
Adjust the duration of the images, use fade-in/fade-out effects, and check the audio levels.
11.9 How can I stay updated with the latest features and updates in Google Photos?
Follow the official Google Photos blog, social media, and tech news websites.
11.10 Is it possible to share a Google Photos slideshow with music on social media?
Yes, you can upload the video file to social media platforms like YouTube, Facebook, or Instagram.
12. Conclusion
While Google Photos may not directly support adding music to slideshows on a computer, there are several effective workarounds and alternative tools available. Whether you choose to use the Google Photos mobile app, video editing software, or a third-party slideshow maker, you can create engaging and memorable slideshows with your favorite music. By following the steps and tips outlined in this guide, you can enhance your visual storytelling and share your cherished memories in a captivating way. Don’t forget to explore dfphoto.net for more tips, tutorials, and inspiration to elevate your photography skills and creative projects.
Remember to visit dfphoto.net for more in-depth guides, creative inspiration, and to connect with a community of passionate photographers. Let dfphoto.net be your go-to resource for all things photography in the USA. Our address is 1600 St Michael’s Dr, Santa Fe, NM 87505, United States and you can call us at +1 (505) 471-6001.