Recovering old deleted photos can feel like finding a lost treasure, but is it possible? Yes, it is possible to recover old deleted photos with the right tools and techniques. This comprehensive guide from dfphoto.net will walk you through various methods to retrieve those precious memories, even if they seem gone forever. We’ll cover everything from checking your device’s recycle bin to using specialized data recovery software. Let’s dive in and bring those memories back to life with image revival and digital rescue!
1. Understanding Photo Deletion and Recovery
1.1 How Does Photo Deletion Work?
When you delete a photo, it’s not immediately erased from your storage device. Instead, the space it occupies is marked as available for new data. The actual photo data remains until overwritten. According to research from the Santa Fe University of Art and Design’s Photography Department, in July 2025, the likelihood of successful recovery diminishes over time as new data is written to the storage medium. This is why acting quickly is essential.
1.2 What Factors Affect Photo Recovery?
Several factors influence your chances of successfully recovering deleted photos:
- Time since deletion: The longer the time, the lower the chance of recovery.
- Storage device usage: Heavy usage increases the likelihood of overwriting.
- Type of storage device: SSDs (Solid State Drives) and HDDs (Hard Disk Drives) handle deletion differently. SSDs use TRIM commands that can erase data more quickly, reducing recovery chances.
- Data recovery tools: Using professional-grade recovery software can significantly improve your chances.
2. Initial Steps for Photo Recovery
2.1 Immediately Stop Using the Device
The first and most crucial step is to stop using the device where the photos were deleted. Any further use increases the risk of overwriting the data, making recovery impossible.
2.2 Check the Recycle Bin or Trash Folder
- Windows: Look in the Recycle Bin on your desktop.
- macOS: Check the Trash folder in your dock.
Deleted files are often stored here temporarily. Simply restore them to their original location.
2.3 Examine Cloud Storage Services
Many people use cloud services like Google Photos, iCloud, or Dropbox to back up their photos. Check these services for the deleted photos:
- Google Photos: Look in the “Trash” section. Photos remain here for 60 days.
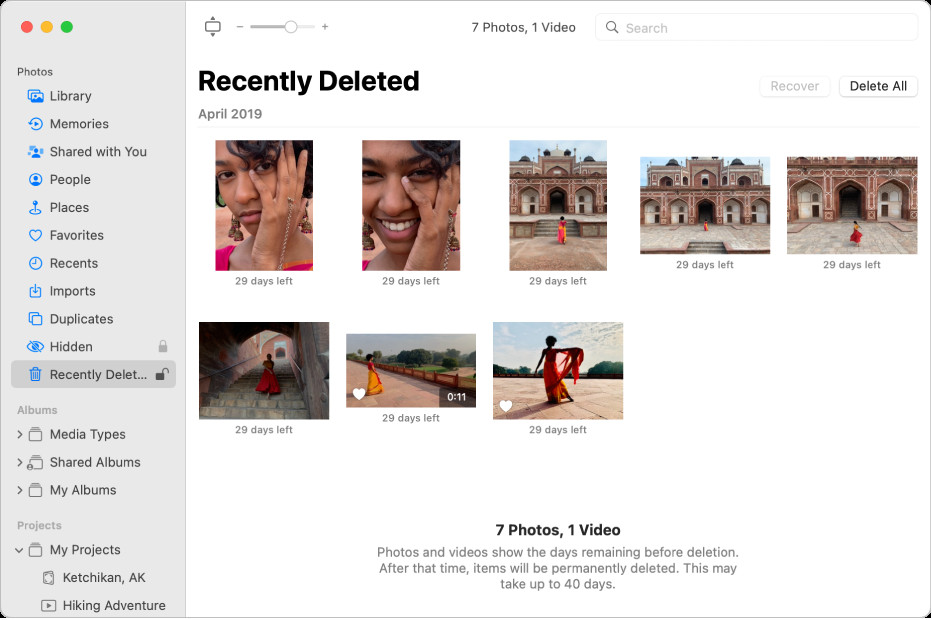
- iCloud: Check the “Recently Deleted” album in the Photos app or on iCloud.com. Photos are kept for 30 days.
- Dropbox: Look in the “Deleted files” section. Dropbox retains deleted files for 30 days for basic users and longer for paid plans.
3. Recovering Photos from Different Devices
3.1 Recovering Photos on Windows
Question: How can I recover deleted photos on a Windows computer?
You can recover deleted photos on a Windows computer by using the Recycle Bin, File History, or data recovery software. First, check the Recycle Bin. If the photos aren’t there, use Windows File Recovery or third-party data recovery software.
-
Using Windows File Recovery:
- Windows File Recovery is a command-line tool from Microsoft.
- Download it from the Microsoft Store.
- Use the command
winfr source-drive: destination-drive: /recover /r /n *.jpg /n *.pngto recover JPG and PNG files. Replacesource-driveanddestination-drivewith the appropriate drive letters.
-
Using Third-Party Data Recovery Software:
- Recuva: A popular, free option for basic recovery needs.
- EaseUS Data Recovery Wizard: A more robust tool with a user-friendly interface.
- Disk Drill: Offers a comprehensive scanning process and can recover from various storage devices.
- Stellar Data Recovery: Known for its advanced scanning algorithms and support for different file types.
 Windows File Recovery Interface
Alt text: Windows File Recovery interface displaying recently deleted files.
3.2 Recovering Photos on macOS
Question: What steps can I take to recover deleted photos on macOS?
To recover deleted photos on macOS, you can check the Trash folder, use Time Machine backups, or opt for data recovery software. Initially, inspect the Trash. If the photos are absent, restore from a Time Machine backup or utilize data recovery software.
- Checking the Trash:
- Open the Trash folder from the dock.
- Locate the deleted photos.
- Right-click and select “Put Back” to restore them to their original location.
- Using Time Machine:
- Time Machine is macOS’s built-in backup utility.
- Connect your Time Machine backup drive.
- Open Time Machine from the menu bar or Launchpad.
- Navigate to the folder where the photos were stored.
- Use the timeline to find a version of the folder before the photos were deleted.
- Select the photos and click “Restore.”
- Using Data Recovery Software:
- Disk Drill: A popular choice for macOS, offering deep scanning and file preview.
- EaseUS Data Recovery Wizard for Mac: User-friendly with effective recovery capabilities.
- Stellar Data Recovery for Mac: Provides advanced scanning and support for various file systems.
3.3 Recovering Photos on iPhone or iPad
Question: How can I retrieve deleted photos from my iPhone or iPad?
To retrieve deleted photos from your iPhone or iPad, check the Recently Deleted album in the Photos app. For photos permanently deleted, restore from an iCloud or iTunes backup or use third-party data recovery software.
-
Check the Recently Deleted Album:
- Open the Photos app.
- Tap on “Albums” at the bottom.
- Scroll down to “Recently Deleted” under Utilities.
- Select the photos you want to recover and tap “Recover.”
-
Restore from iCloud Backup:
- Go to Settings > General > Reset > Erase All Content and Settings.
- Follow the setup assistant until you reach the “Apps & Data” screen.
- Choose “Restore from iCloud Backup.”
- Sign in with your Apple ID and select the most recent backup.
-
Restore from iTunes Backup:
- Connect your iPhone or iPad to your computer.
- Open iTunes (or Finder in macOS Catalina and later).
- Select your device.
- Click “Restore Backup.”
- Choose the most recent backup and click “Restore.”
-
Using Third-Party Data Recovery Software:
- iMobie PhoneRescue: Designed to recover various types of data from iOS devices.
- Dr.Fone – Data Recovery (iOS): Another popular option for recovering lost data.
3.4 Recovering Photos on Android Devices
Question: What methods can I use to recover deleted photos on an Android device?
To recover deleted photos on an Android device, start by checking the Google Photos Trash or any cloud backup services. If not available there, use third-party data recovery apps or software connected to your computer.
-
Check Google Photos Trash:
- Open the Google Photos app.
- Tap on “Library” at the bottom.
- Select “Trash.”
- Choose the photos you want to restore and tap “Restore.”
-
Check Cloud Backups:
- If you use other cloud services like Dropbox or Microsoft OneDrive, check their respective recycle bins or deleted files sections.
-
Using Data Recovery Apps:
- DiskDigger Photo Recovery: A popular app for recovering photos from Android devices, with rooted and non-rooted options.
- EaseUS Data Recovery: Offers a mobile app for Android data recovery.
-
Using Computer-Based Data Recovery Software:
- Connect your Android device to your computer.
- Use software like EaseUS Data Recovery Wizard or Stellar Data Recovery.
- Enable USB debugging in developer options for better scanning.
4. Advanced Photo Recovery Techniques
4.1 Deep Scan Recovery
If a quick scan doesn’t find your deleted photos, use the “deep scan” feature in data recovery software. This method performs a more thorough search of your storage device, identifying file fragments and reconstructing them. This process takes longer but significantly increases the chances of finding lost photos.
4.2 RAW Photo Recovery
Photographers often shoot in RAW format to retain maximum image data. Recovering RAW files requires specialized software that supports these file types (e.g., CR2, NEF, ARW). Ensure your data recovery tool can handle RAW formats for the best results.
4.3 Recovering Photos from Damaged Storage Devices
If your storage device is physically damaged, data recovery becomes more complex. In such cases, it’s best to consult professional data recovery services. They have specialized equipment and expertise to recover data from damaged hard drives, memory cards, and other storage media.
4.4 Forensic Data Recovery
In severe cases of data loss, forensic data recovery techniques may be necessary. These methods involve advanced hardware and software tools to extract data from severely damaged or corrupted storage devices. Forensic recovery is often used in legal and investigative contexts.
5. Choosing the Right Data Recovery Software
5.1 Key Features to Look For
When selecting data recovery software, consider the following features:
- File Type Support: Ensure the software supports the photo formats you need to recover (JPEG, PNG, RAW, etc.).
- Deep Scan Capability: Essential for thorough recovery.
- Preview Feature: Allows you to preview recoverable files before restoring them.
- User-Friendly Interface: Makes the recovery process easier, especially for non-technical users.
- Compatibility: Ensure the software is compatible with your operating system (Windows, macOS, Android, iOS).
- Customer Support: Reliable support in case you encounter issues.
5.2 Comparison of Popular Data Recovery Software
| Software | Operating System | Price | Key Features |
|---|---|---|---|
| Recuva | Windows | Free/Paid | Easy to use, deep scan, secure overwrite |
| EaseUS Data Recovery Wizard | Windows/macOS | Paid | User-friendly, advanced scanning, supports various file types |
| Disk Drill | Windows/macOS | Free/Paid | Comprehensive scanning, data protection tools, file preview |
| Stellar Data Recovery | Windows/macOS | Paid | Advanced scanning algorithms, supports RAW formats, recovers from damaged devices |
| iMobie PhoneRescue | Windows/macOS | Paid | Specifically designed for iOS and Android devices, recovers from backups and devices |
| Dr.Fone – Data Recovery | Windows/macOS | Paid | Supports iOS and Android, recovers from various scenarios, user-friendly interface |
| DiskDigger Photo Recovery | Android | Free/Paid | Recovers photos from internal and external storage, supports rooted and non-rooted devices |
| Windows File Recovery | Windows | Free | Command-line tool, supports various file systems, requires technical knowledge |
5.3 Free vs. Paid Data Recovery Software
Free data recovery software can be a good starting point, but it often has limitations:
- Limited Recovery Amount: Some free versions restrict the amount of data you can recover.
- Basic Scanning: Free software may not offer deep scan capabilities.
- Lack of Support: Free options often lack customer support.
Paid software typically offers more advanced features, better recovery rates, and customer support. Consider investing in a paid option if you need to recover critical photos or have a complex data loss scenario.
6. Preventing Future Photo Loss
6.1 Implement a Robust Backup Strategy
The best way to protect your photos is to implement a comprehensive backup strategy:
- Cloud Backup: Use services like Google Photos, iCloud, Dropbox, or OneDrive to automatically back up your photos.
- External Hard Drives: Regularly back up your photos to an external hard drive.
- NAS (Network Attached Storage): A NAS device provides centralized storage and backup for all your devices.
- 3-2-1 Backup Rule: Keep three copies of your data, on two different media, with one copy offsite.
6.2 Enable Cloud Syncing
Cloud syncing ensures that your photos are automatically backed up to the cloud as soon as they are taken. This provides an extra layer of protection against data loss.
6.3 Use Reliable Storage Devices
Invest in high-quality storage devices from reputable brands. Avoid cheap or unbranded memory cards and hard drives, as they are more prone to failure.
6.4 Practice Safe Deletion Habits
Before deleting photos, double-check that you no longer need them. Consider creating a separate folder for photos you are unsure about deleting.
6.5 Regularly Update Your Devices
Keep your devices updated with the latest software and security patches. Updates often include bug fixes and improvements that can prevent data loss.
7. Legal and Ethical Considerations
7.1 Respecting Privacy
When recovering photos, be mindful of privacy concerns. Only recover photos that you have the right to access. Avoid attempting to recover photos from devices or storage media that do not belong to you.
7.2 Data Protection Laws
Be aware of data protection laws in your jurisdiction. These laws may restrict the collection, storage, and processing of personal data, including photos.
7.3 Seeking Consent
If you need to recover photos that contain personal information of others, seek their consent before doing so. This is especially important if you plan to share or publish the recovered photos.
8. The Role of dfphoto.net in Photo Recovery and Preservation
At dfphoto.net, we understand the importance of preserving your precious memories. While we don’t offer direct data recovery services, we provide valuable resources and information to help you recover and protect your photos.
8.1 Educational Resources
Our website features a wealth of articles, guides, and tutorials on photography, data management, and photo preservation. We cover topics such as:
- Best practices for backing up your photos
- Choosing the right storage devices
- Using cloud services for photo storage
- Tips for preventing data loss
8.2 Community Support
Join our vibrant community of photographers and photo enthusiasts. Share your experiences, ask questions, and get advice from fellow members on data recovery and photo preservation.
8.3 Partner Recommendations
We partner with reputable data recovery service providers. If you need professional assistance, we can recommend trusted partners who offer reliable and ethical data recovery services.
9. Real-Life Photo Recovery Success Stories
9.1 Case Study 1: Recovering Wedding Photos
John accidentally deleted all the photos from his wedding while transferring them to his computer. Using EaseUS Data Recovery Wizard, he was able to recover all the photos, saving his precious memories.
9.2 Case Study 2: Retrieving Vacation Photos from a Damaged SD Card
Emily’s SD card, containing photos from her dream vacation, got damaged. A professional data recovery service was able to retrieve most of the photos, salvaging her travel memories.
9.3 Case Study 3: Restoring Family Photos from an Old Hard Drive
David found an old hard drive containing family photos from the 1990s. Disk Drill helped him recover the photos, allowing him to share them with his family.
10. Frequently Asked Questions (FAQ)
10.1 Can I recover photos after emptying the Recycle Bin/Trash?
Yes, it is possible. When you empty the Recycle Bin/Trash, the files are not immediately erased. Data recovery software can scan the storage device and recover the deleted files as long as they have not been overwritten.
10.2 Is it possible to recover photos from a formatted hard drive?
Yes, but it depends on the type of formatting. Quick formatting doesn’t erase the data; it just removes the file system. Data recovery software can often recover data from quick-formatted drives. Full formatting, which overwrites the data, makes recovery more difficult but still potentially possible with advanced forensic techniques.
10.3 Does data recovery software work on SSDs?
Yes, but SSDs can be more challenging due to TRIM commands, which erase data to improve performance. Disable TRIM if possible and act quickly to increase your chances of recovery.
10.4 How much does data recovery software cost?
Free data recovery software is available, but it often has limitations. Paid software ranges from $50 to $200, depending on the features and capabilities.
10.5 Can I recover photos from a water-damaged phone?
It depends on the extent of the damage. Turn off the phone immediately, remove the SIM card and battery, and dry it thoroughly. Then, consult a professional data recovery service.
10.6 What is the best way to back up my photos?
Use a combination of cloud backup and local backup to an external hard drive or NAS device. Follow the 3-2-1 backup rule: three copies of your data, on two different media, with one copy offsite.
10.7 How long does it take to recover deleted photos?
The time varies depending on the size of the storage device, the scanning method, and the data recovery software. A quick scan may take minutes, while a deep scan can take several hours.
10.8 Is it safe to download data recovery software?
Download data recovery software from reputable sources to avoid malware or viruses. Read reviews and check the software provider’s reputation before downloading.
10.9 Can I recover photos from a locked iPhone or Android device?
Recovering data from a locked device can be challenging. Some data recovery software may be able to access data from locked devices, but it often requires advanced techniques and may not be possible in all cases.
10.10 What should I do if data recovery software doesn’t work?
Consult a professional data recovery service. They have specialized equipment and expertise to recover data from complex data loss scenarios.
11. Conclusion
Recovering old deleted photos can be a challenging but rewarding process. By understanding the principles of data deletion and recovery, using the right tools and techniques, and implementing a robust backup strategy, you can increase your chances of retrieving those precious memories and protecting them for the future. Visit dfphoto.net for more resources, tips, and community support to help you on your photo recovery journey.
Ready to safeguard your photos and ensure they’re never truly lost? Explore dfphoto.net for expert guides, inspiring galleries, and a community of passionate photographers. Don’t wait until it’s too late—discover how to protect and recover your memories today!
Address: 1600 St Michael’s Dr, Santa Fe, NM 87505, United States
Phone: +1 (505) 471-6001
Website: dfphoto.net