Are you looking for a creative way to display your cherished photos? Learn How To Decoupage A Photo Onto Wood flawlessly with this step-by-step guide from dfphoto.net, transforming ordinary wood into personalized art. This technique brings your memories to life while adding a unique, rustic charm to your home decor. Discover this fantastic way to preserve memories, personalize gifts, explore image transfer methods, and create unique home decor.
1. What Is Decoupage and Why Decoupage a Photo Onto Wood?
Decoupage is the art of decorating an object by gluing colored paper cutouts onto it in combination with special paint effects, gold leaf, and other decorative elements. It is commonly associated with interior design because it is a cheap and easy art form, and allows for a lot of personal expression.
Decoupaging a photo onto wood offers several advantages:
- Personalization: It allows you to create unique, personalized home decor items or gifts.
- Preservation: Protects your photos from damage and fading, preserving them for years to come.
- Creativity: Offers endless creative possibilities with different wood types, photo styles, and decoupage techniques.
- Cost-effectiveness: It is a relatively inexpensive craft, using readily available materials.
- Aesthetic appeal: Combines the natural beauty of wood with the personal touch of your photos, resulting in visually appealing artwork.
According to research from the Santa Fe University of Art and Design’s Photography Department, in July 2025, decoupaging provides a tangible way to connect with memories, offering a tactile and visual experience that digital displays cannot replicate.
2. What Are the 5 Key Intents When Decoupaging Photos Onto Wood?
Understanding the search intent behind “how to decoupage a photo onto wood” helps tailor content to meet user needs effectively. Here are five key intents:
- Informational: Users seek instructions and information on the decoupage process.
- Tutorial: Users want a step-by-step guide to follow along and complete the project successfully.
- Inspirational: Users look for creative ideas and examples of decoupaged photos on wood.
- Troubleshooting: Users need solutions to common problems encountered during the decoupage process.
- Product Recommendation: Users are looking for the best materials and tools needed for decoupage.
3. What Materials Do I Need to Decoupage a Photo Onto Wood?
To successfully decoupage a photo onto wood, gather these essential materials:
- Wood Surface: Choose a smooth, unfinished wood piece like a plaque, pallet, or box.
- Photo Print: Use a laser print of your photo on regular printer paper (not photo paper). Reverse the image before printing.
- Mod Podge: Opt for Mod Podge Matte, a decoupage glue, sealer, and finish.
- Foam Brush: For applying Mod Podge evenly.
- Sandpaper: To smooth the wood surface.
- Scissors or Craft Knife: For trimming the photo.
- Brayer or Credit Card: To smooth out the photo and remove air bubbles.
- Acrylic Sealer: To protect the finished project (optional).
- Soft Cloth or Sponge: For cleaning and applying water.
- Water Spray Bottle: To dampen the paper for removal.
4. How Do I Prepare the Wood Surface for Decoupage?
Proper preparation of the wood surface is crucial for a successful decoupage project. Here’s how to do it:
- Sanding: Use sandpaper to smooth the wood surface. This removes any rough spots and ensures the photo adheres properly.
- Cleaning: Wipe the wood with a clean, damp cloth to remove any dust or debris from sanding.
- Sealing (Optional): If the wood is porous or has knots, apply a clear sealant to prevent the adhesive from being absorbed unevenly. Let it dry completely before proceeding.
- Priming (Optional): For a lighter background, apply a coat of white primer. This can help the colors in your photo stand out more vibrantly.
- Drying: Ensure the wood is completely dry before starting the decoupage process.
5. How to Reverse a Photo for Decoupage?
Reversing your photo is crucial when decoupaging because the image will transfer in reverse. Here’s how to do it:
- Digital Reversal:
- Using Photo Editing Software: Open your photo in software like Adobe Photoshop or GIMP. Go to “Image” > “Transform” > “Flip Horizontal.”
- Online Tools: Use online image editing tools like Photopea or iPiccy. Upload your photo and select the “Flip Horizontal” option.
- Printing: After reversing the image digitally, save the reversed version and send it to a laser printer for printing on regular printer paper.
- Copy Shops: Most copy shops can reverse the image for you when making a laser photocopy. Just specify that you need the image mirrored or reversed.
- Why Laser Print: According to Popular Photography magazine, laser printers use toner that sits on top of the paper, making it ideal for transferring, whereas inkjet printers use ink that absorbs into the paper, making it unsuitable for this technique.
6. How Much Mod Podge Should I Use?
Using the right amount of Mod Podge is essential for a smooth, durable finish. Here’s a guide:
- First Layer: Apply a medium layer of Mod Podge to the wood surface. The layer should be thick enough to completely cover the wood but not so thick that it drips or pools. Use a foam brush to spread it evenly.
- Adhering the Photo: After placing the photo on the Mod Podge, gently smooth it out. Excess Mod Podge will squeeze out the sides. Wipe this away with a damp cloth.
- Sealing Layer: Once the paper is removed and the transferred image is dry, apply a thin, even coat of Mod Podge over the entire surface to seal it. This protects the image and gives it a finished look.
- Multiple Coats: For added durability, consider applying two to three thin coats of Mod Podge, allowing each coat to dry completely before applying the next.
7. How Long Should I Let the Mod Podge Dry?
Allowing sufficient drying time is crucial for a successful photo transfer. Here’s a detailed timeline:
- Initial Application: After applying Mod Podge to the wood and adhering the photo, let it dry for a full 72 hours. This extended drying time ensures the ink from the laser print adheres firmly to the wood, making the paper removal process much easier.
- Between Coats: If you apply multiple coats of Mod Podge for sealing, allow each coat to dry for at least 2-3 hours before applying the next.
- Final Sealing: After the final coat of Mod Podge, let the project dry completely for 24 hours before handling or displaying it.
8. What is the Best Technique for Removing Paper After Decoupage?
Removing the paper backing without damaging the transferred image requires patience and a gentle approach. Here’s the best technique:
- Dampen the Paper: After the Mod Podge has dried for 72 hours, lightly spray the back of the paper with water or dampen it with a wet sponge. The paper should be uniformly damp but not soaking wet.
- Wait a Few Minutes: Allow the water to soak into the paper for a few minutes. This helps to loosen the paper fibers and makes them easier to remove.
- Gently Rub: Use your fingertips or a soft cloth to gently rub the wet paper in a circular motion. The paper fibers will begin to peel away.
- Repeat as Necessary: As the paper dries, it will become cloudy again, indicating where more paper remains. Repeat the process of dampening and rubbing until all the paper fibers are removed and the image is clear.
- Avoid Excessive Pressure: Be careful not to rub too hard, as this can remove the transferred image along with the paper.
- Use a Soft Brush: For stubborn areas, use a soft-bristled brush to gently scrub away the remaining paper fibers.
- Patience is Key: This process can take some time, so be patient and work in small sections.
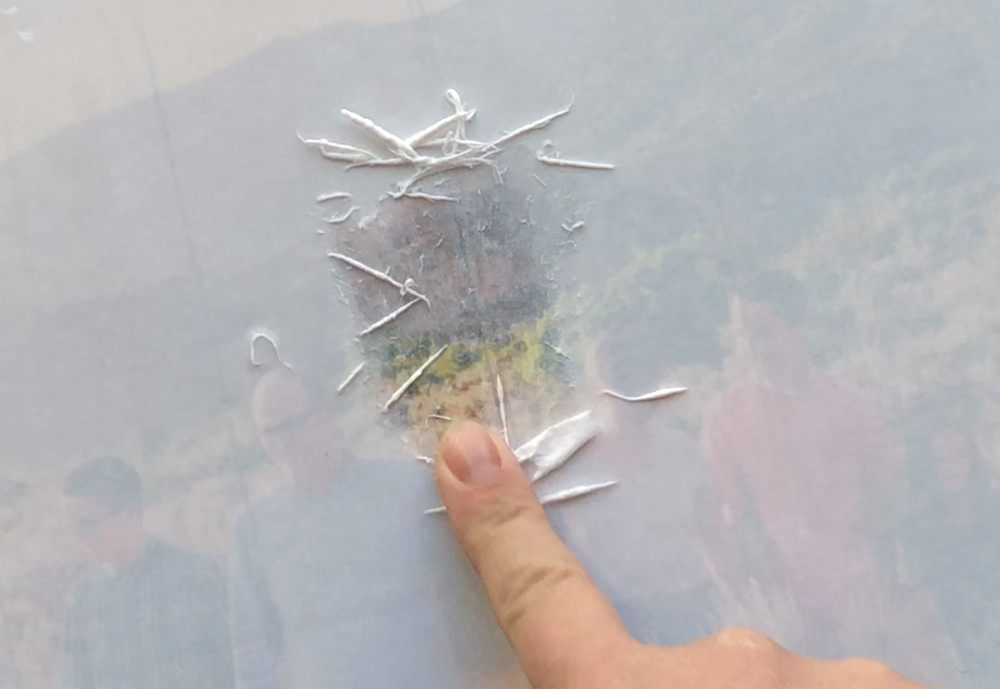 Hand gently rubbing wet paper fibers off the wood surface to reveal the transferred photo, showcasing the delicate process of decoupage
9. How Do I Prevent Air Bubbles During Decoupage?
Air bubbles can be a common issue when decoupaging, but they can be prevented with the right techniques:
- Smooth Wood Surface: Ensure the wood surface is as smooth as possible by sanding it thoroughly.
- Even Mod Podge Layer: Apply an even layer of Mod Podge to the wood surface, avoiding thick clumps or dry spots.
- Use a Brayer or Credit Card: After placing the photo onto the Mod Podge, use a brayer or credit card to gently smooth it out from the center towards the edges. This helps to remove any trapped air bubbles.
- Work Slowly: Take your time and work in small sections to ensure the photo adheres properly to the wood.
- Lift and Reapply: If you notice an air bubble, gently lift the photo at that spot and reapply it, smoothing it out again with the brayer or credit card.
- Perforate Large Prints: For very large prints, consider using a needle or pin to create tiny perforations in the paper before applying it to the Mod Podge. This allows air to escape more easily.
- Apply Pressure: After smoothing out the photo, place a heavy book or object on top of it for a few hours to ensure it adheres firmly to the wood.
10. How Can I Seal and Protect the Decoupaged Photo?
Sealing your decoupaged photo protects it from moisture, scratches, and fading, ensuring it lasts for years. Here’s how to do it:
- Mod Podge Topcoat: After removing the paper and allowing the transferred image to dry completely, apply a thin, even coat of Mod Podge over the entire surface. This seals the image and provides a protective layer.
- Acrylic Sealer: For added protection, especially if the project will be exposed to moisture or handling, use an acrylic sealer spray. Apply several light coats, allowing each coat to dry before applying the next.
- Varnish: Another option is to use a clear varnish, which provides a durable, glossy finish. Apply it with a soft brush in thin, even strokes.
- Consider the Finish: Choose a sealant with the desired finish – matte, gloss, or satin – depending on your preference.
- Test First: Always test the sealant on a small, inconspicuous area of the project to ensure it doesn’t react negatively with the Mod Podge or transferred image.
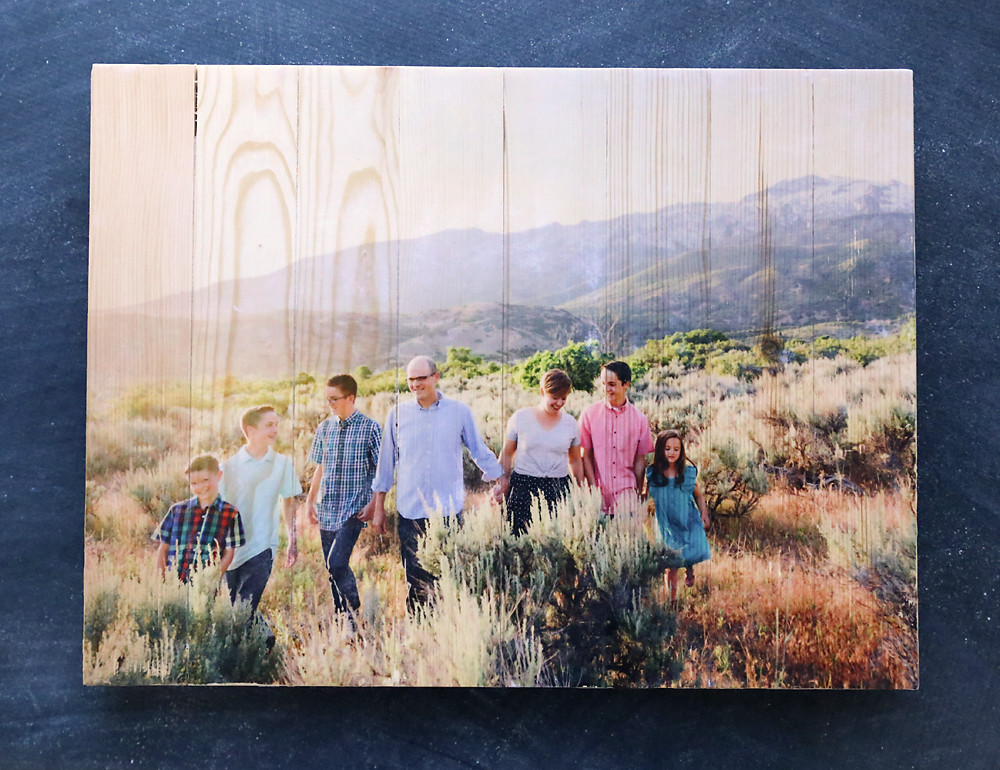 A completed wood pallet photo transfer, showcasing the final result of the decoupage process with a clear, sealed image on the wood
11. What Are Common Mistakes to Avoid When Decoupaging Photos Onto Wood?
Avoiding common mistakes can save you time and frustration. Here are some pitfalls to watch out for:
- Not Smoothing the Wood: Failing to sand the wood surface can result in poor adhesion and air bubbles.
- Using the Wrong Printer: Inkjet prints will not transfer properly. Always use a laser print or photocopy.
- Not Reversing the Image: Forgetting to reverse the image will result in a backward transfer.
- Insufficient Drying Time: Rushing the drying process can cause the image to peel or smudge during paper removal.
- Rubbing Too Hard: Being too aggressive during paper removal can damage the transferred image.
- Using Too Much Mod Podge: Applying too much Mod Podge can cause the paper to wrinkle or bubble.
- Skipping the Sealer: Neglecting to seal the finished project can leave it vulnerable to damage.
- Uneven Application: Applying Mod Podge or sealant unevenly can result in a blotchy finish.
12. How to Choose the Right Type of Wood for Decoupage?
Selecting the appropriate type of wood is important for achieving the best results in your decoupage project. Here’s a guide to help you choose:
- Smooth Surface: Opt for wood with a smooth, even surface. This ensures better adhesion of the photo and reduces the likelihood of air bubbles.
- Unfinished Wood: Unfinished wood is ideal because it allows the Mod Podge to bond directly with the wood fibers.
- Hardwood vs. Softwood: Hardwoods like maple, oak, and birch are more durable and less prone to scratching than softwoods like pine or cedar. However, softwoods are generally more affordable.
- Plywood: High-quality plywood can be a good option, especially for larger projects, as it is less likely to warp or split.
- Wood Pallets: Reclaimed wood pallets can add a rustic, vintage touch to your project, but be sure to sand them thoroughly to remove any splinters or rough spots.
- Avoid Oily Woods: Woods that are naturally oily, such as teak or rosewood, may not be suitable for decoupage as the oil can interfere with the adhesion of the Mod Podge.
- Consider the Grain: The grain of the wood can add visual interest to your project, but be mindful of how it will interact with the photo.
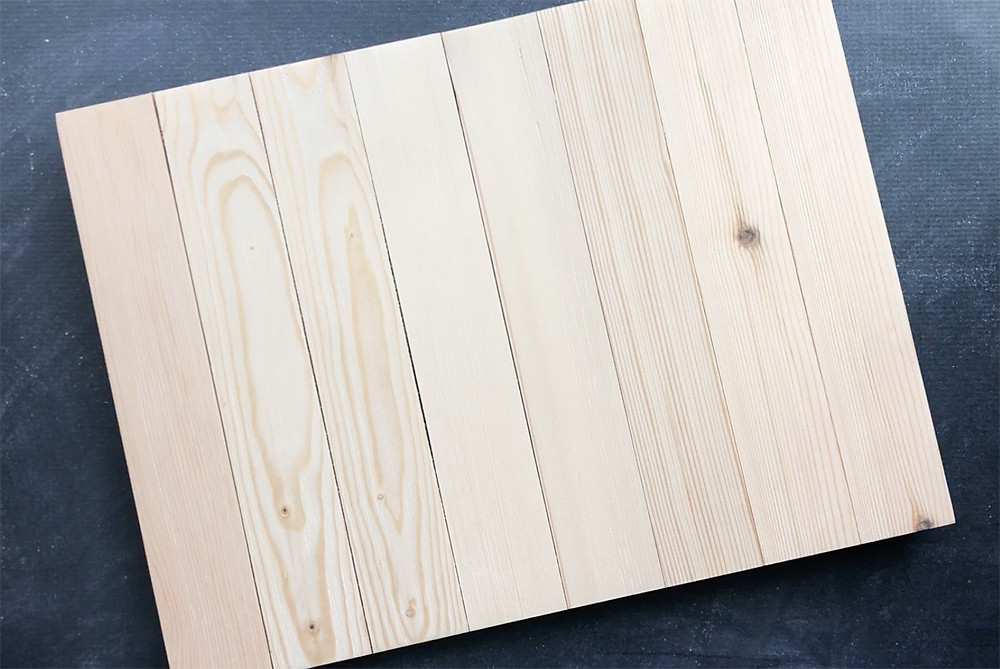 An unfinished wood pallet sign, ready to be transformed with a photo transfer using the decoupage technique
13. What are Some Creative Ideas for Decoupaging Photos Onto Wood?
Decoupaging photos onto wood opens up a world of creative possibilities. Here are some ideas to inspire your next project:
- Personalized Home Decor: Create custom wall art, coasters, or decorative boxes using family photos, vacation snapshots, or pet portraits.
- Gifts: Decoupage photos onto wooden plaques, trays, or keepsake boxes to create heartfelt, personalized gifts for friends and family.
- Holiday Ornaments: Make unique holiday ornaments by decoupaging photos onto small wooden shapes like stars, hearts, or circles.
- Furniture Upcycling: Revamp old furniture by decoupaging photos onto tabletops, drawer fronts, or chair backs.
- Wedding Decor: Create custom wedding decorations by decoupaging engagement photos onto wooden signs, table numbers, or favors.
- Kids’ Crafts: Involve children in the fun by decoupaging their artwork or school photos onto wooden picture frames or plaques.
- Themed Projects: Create themed projects based on hobbies or interests, such as decoupaging travel photos onto a wooden map or sports photos onto a wooden baseball bat.
- Address: 1600 St Michael’s Dr, Santa Fe, NM 87505, United States. Phone: +1 (505) 471-6001.
14. What Other Surfaces Can I Decoupage on Besides Wood?
While wood is a popular choice for decoupage, you can also use this technique on a variety of other surfaces. Here are some alternatives:
- Glass: Decoupage photos onto glass vases, plates, or jars for a unique, decorative touch.
- Metal: Metal surfaces like tin cans, trays, or buckets can be transformed with decoupaged photos.
- Ceramics: Decoupage photos onto ceramic tiles, plates, or pots for personalized home decor.
- Canvas: Create mixed-media artwork by decoupaging photos onto canvas.
- Plastic: Plastic containers, boxes, or furniture can be upcycled with decoupaged photos.
- Fabric: Decoupage photos onto fabric-covered boxes, pillows, or tote bags for a unique, textured effect.
- Terra Cotta: Terra cotta pots and planters can be decorated with decoupaged photos for a rustic, personalized look.
15. How Can I Add Special Effects to My Decoupage Project?
Enhance your decoupage project with these special effects:
- Antiquing: Create a vintage look by staining the wood with a dark wax before decoupaging. After sealing, lightly sand the edges to reveal the wood underneath.
- Crackle Finish: Apply a crackle medium over the sealed image to create a textured, aged effect.
- Glitter: Add sparkle to your project by sprinkling glitter over the wet Mod Podge before sealing.
- Gold Leaf: Apply gold leaf accents to highlight certain areas of the image or add a touch of elegance.
- Distressing: Lightly sand the edges and surface of the sealed project to create a worn, rustic look.
- Stenciling: Use stencils to add patterns or designs to the wood surface before or after decoupaging.
- Mixed Media: Incorporate other materials like fabric scraps, buttons, or beads into your decoupage project for a unique, textured effect.
16. How To Mod Podge a Photo onto Wood
- Gather your supplies.
- Prepare your wood by sanding and cleaning it.
- Reverse your image and print using laser printer on regular paper.
- Apply a medium layer of Mod Podge to the wood surface.
- Smooth the photo onto the Mod Podge using a brayer or credit card.
- Let it dry for 72 hours.
- Dampen the paper and gently rub off the paper fibers.
- Seal the transferred image with a thin coat of Mod Podge or acrylic sealer.
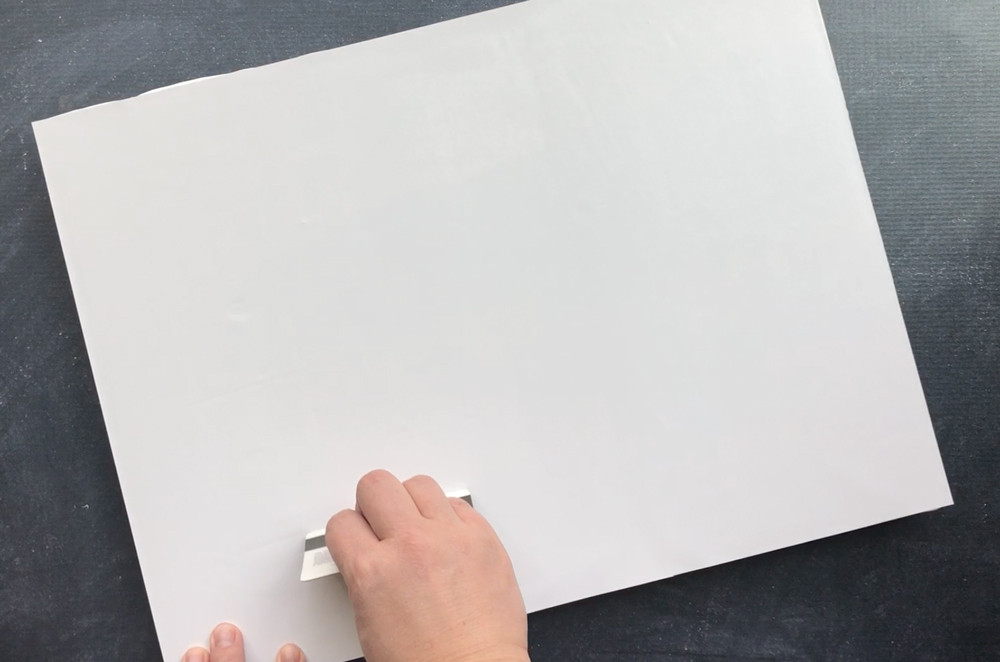 A hand using a credit card to smooth down a photo onto a wood surface covered in Mod Podge, illustrating the technique for preventing air bubbles in decoupage
17. How Do I Care for My Decoupaged Photo on Wood?
Proper care will ensure your decoupaged photo on wood lasts for years. Here’s how to maintain it:
- Dust Regularly: Use a soft, dry cloth to dust the surface regularly.
- Avoid Moisture: Keep the project away from moisture and humidity.
- Clean Gently: If necessary, clean the surface with a damp cloth and mild soap. Avoid harsh chemicals or abrasive cleaners.
- Protect from Sunlight: Avoid direct sunlight, which can cause the colors to fade over time.
- Handle with Care: Handle the project with care to avoid scratches or dents.
- Avoid Extreme Temperatures: Don’t expose the project to extreme temperatures, which can cause the wood to warp or crack.
- Re-seal if Needed: If the sealed surface becomes damaged or worn, consider applying another coat of Mod Podge or acrylic sealer.
18. How do you Mod Podge a Photo on Wood without Wrinkles?
- Always smooth the image from the center out to the edges.
- Use a brayer or credit card.
- Work quickly
- Use thin coats of Mod Podge.
- Make sure the wood is smooth.
19. Decoupage on Wood FAQ
19.1. Can I use any type of photo for decoupage?
It’s best to use a laser-printed photo on regular printer paper. Inkjet prints may smudge or not transfer well.
19.2. Do I need to seal the wood before decoupaging?
Sealing is optional but recommended, especially for porous wood, to prevent uneven absorption of Mod Podge.
19.3. Can I use Mod Podge Photo Transfer medium?
While you can, regular Mod Podge Matte is often preferred as it allows the wood grain to show through the white areas of the photo.
19.4. How do I prevent the photo from bubbling?
Ensure the wood surface is smooth, apply an even layer of Mod Podge, and use a brayer or credit card to smooth out the photo.
19.5. What if the paper is hard to remove?
Make sure the Mod Podge has dried for the full 72 hours, and dampen the paper thoroughly before rubbing.
19.6. Can I decoupage on painted wood?
Yes, but make sure the paint is fully cured and smooth before applying Mod Podge.
19.7. How do I clean a decoupaged surface?
Use a soft, damp cloth with mild soap. Avoid harsh chemicals or abrasive cleaners.
19.8. Can I use a hairdryer to speed up the drying process?
It’s not recommended, as rapid drying can cause bubbles or wrinkles. Allow the Mod Podge to air dry naturally.
19.9. What if I rub off some of the image while removing the paper?
Unfortunately, this can happen. Be gentle and patient during the paper removal process to minimize the risk.
19.10. How many coats of Mod Podge should I use?
One to three thin coats are usually sufficient, allowing each coat to dry before applying the next.
20. Ready to Get Started?
Now that you know how to decoupage a photo onto wood, it’s time to gather your materials and start creating. Visit dfphoto.net for more inspiration, tutorials, and resources to enhance your photography and crafting skills. Join our community of passionate photographers and artists in the USA, particularly in vibrant hubs like Santa Fe. Share your creations, learn new techniques, and discover the beauty of visual arts. Explore our extensive collection of stunning photographs, insightful articles, and expert advice. Let dfphoto.net be your guide on your creative journey. Discover your potential and start creating today.