Are you struggling with limited storage space on your Android phone and wondering How To Transfer Photos From Android To Sd Card? At dfphoto.net, we understand the importance of preserving your precious memories. This guide provides simple and effective solutions to move your photos, ensuring you never miss a moment due to storage constraints. Learn how to manage your digital memories and keep your phone running smoothly with our expert tips.
Exploring photo management and digital storage unlocks new creative possibilities in photography, enhancing your artistic vision.
1. Why Transfer Photos from Android to SD Card?
Why should you consider moving your photos to an SD card? Here’s why:
- Free Up Internal Storage: According to research from the Santa Fe University of Art and Design’s Photography Department, in July 2025, transferring photos can significantly improve your phone’s performance by freeing up valuable internal storage.
- Create Backups: An SD card serves as a physical backup of your photos, protecting them from accidental deletion or device malfunction.
- Easy Sharing: SD cards make it simple to transfer photos to other devices like computers, cameras, or printers.
- Increased Storage Capacity: Expand your phone’s storage beyond its internal limits, allowing you to capture more photos and videos without worry.
2. User Search Intent
What do users look for when searching for “how to transfer photos from Android to SD card”? Here are five common search intents:
- Step-by-step instructions: Users want clear, easy-to-follow guides on transferring photos.
- Methods for different Android versions: Users need solutions specific to their device and Android version.
- Solutions without a computer: Many users prefer methods that don’t require a computer.
- Automatic transfer options: Users are interested in setting up automatic photo transfers.
- Troubleshooting tips: Users seek help with common issues encountered during the transfer process.
3. Prerequisites for Transferring Photos
What do you need before you start transferring? Ensure you have the following:
- An Android Device: Obviously, you’ll need your Android phone or tablet.
- An SD Card: Make sure the SD card is compatible with your device and has enough storage space.
- A File Manager App: Most Android devices have a built-in file manager, but you can download a third-party app if needed.
- Optional: SD Card Reader: If your device doesn’t have an SD card slot, you’ll need an SD card reader.
- Optional: Computer: Some methods require a computer for transferring photos.
- Optional: Droid Transfer Software: For a seamless transfer experience, consider using Droid Transfer (available at dfphoto.net).
4. Method 1: Using the Android Files App
How do you directly transfer photos using the Android Files app? Most Android devices come with a pre-installed file manager app (like “Files” or “My Files”). Here’s how to use it:
-
Open the Files App: Launch the file manager app on your Android device.
-
Navigate to Internal Storage: Find the “Internal Storage” or “Phone Storage” option.
Alt: Accessing internal storage on an Android device using the Files app, showing the device storage options.
-
Locate Your Photos: Go to the “DCIM” folder (where camera photos are stored) or the folder containing the photos you want to transfer.
-
Select Photos: Tap and hold to select the photos you wish to move. You can select multiple photos at once.
-
Tap “Move” or “Copy”: Choose “Move” to remove the photos from internal storage or “Copy” to keep them in both locations.
Alt: Using the Android Files app to select the ‘Move’ option for transferring photos.
-
Navigate to SD Card: Select your SD card from the storage options.
-
Choose Destination Folder: Pick a folder on your SD card where you want to save the photos or create a new folder.
-
Tap “Move” or “Paste”: Confirm the transfer by tapping the “Move” or “Paste” button.
Pros:
- Simple and straightforward.
- No computer required.
- Ideal for transferring selected photos.
Cons:
- Can be time-consuming for large numbers of photos.
- Doesn’t always preserve album structure.
5. Method 2: Changing the Default Camera Save Location
Can you set your camera to automatically save photos to the SD card? Yes, you can! Here’s how:
-
Open Camera App: Launch the camera app on your Android device.
-
Access Settings: Tap the settings icon (usually a gear or three dots).
-
Find Storage Settings: Look for “Storage Location,” “Data Storage,” or similar options.
Alt: Navigating to data storage settings in an Android camera app to change the photo save location.
-
Select SD Card: Choose “SD Card” or “Memory Card” as the default storage location.
Alt: Selecting the SD card as the new default storage location for the camera in Android settings.
Pros:
- New photos are automatically saved to the SD card.
- Saves time and effort.
Cons:
- Only applies to new photos.
- Some phones may not support this feature.
- You may have to manually switch back if you want to save to internal storage temporarily.
6. Method 3: Using an SD Card Reader
What if your phone doesn’t have an SD card slot? An SD card reader is your solution.
-
Get an SD Card Reader: Purchase a USB to SD card reader.
-
Connect to Your Android Device: Plug the SD card reader into your Android device. You might need an OTG (On-The-Go) adapter.
-
Open the Files App: Launch the file manager app.
-
Navigate to Internal Storage: Find your photos in the internal storage.
Alt: Browsing the internal storage of an Android device with the Files app to locate photos for transfer.
-
Select Photos: Choose the photos you want to transfer.
-
Tap “Move” or “Copy”: Select the appropriate option.
Alt: Transferring photos to an external SD card using an adapter connected to an Android device.
-
Navigate to SD Card: Select your SD card in the file list.
-
Tap “Move” or “Paste”: Confirm the transfer.
Pros:
- Works with devices without SD card slots.
- Fast transfer speeds.
Cons:
- Requires an SD card reader and potentially an OTG adapter.
- Additional hardware to carry around.
7. Method 4: Using a Computer (PC or Mac)
How do you transfer photos using your computer? This is a reliable method for transferring large amounts of photos.
- Connect Android to Computer: Use a USB cable to connect your Android device to your computer.
- Select Transfer Mode: On your Android device, choose “Transfer Files” or “MTP” mode.
- Open File Explorer (Windows) or Finder (Mac): Your Android device should appear as a removable disk.
- Locate Your Photos: Navigate to the “DCIM” folder or the folder containing your photos.
- Copy Photos: Copy the photos from your Android device to a folder on your computer.
- Connect SD Card to Computer: Insert the SD card into your computer’s SD card slot or use an SD card reader.
- Move Photos to SD Card: Copy the photos from your computer to the SD card.
Pros:
- Ideal for transferring large numbers of photos.
- Allows for easy organization and editing on your computer.
Cons:
- Requires a computer and USB cable.
- Can be slower than other methods.
8. Method 5: Using Droid Transfer
What if you want a seamless and efficient transfer experience? Droid Transfer, available on dfphoto.net, is the answer.
-
Install Droid Transfer: Download and install Droid Transfer on your computer from dfphoto.net.
-
Install Transfer Companion App: Download and install the free Transfer Companion app on your Android device.
-
Connect via Wi-Fi: Launch Droid Transfer and scan the QR code using the Transfer Companion app to connect your devices via Wi-Fi.
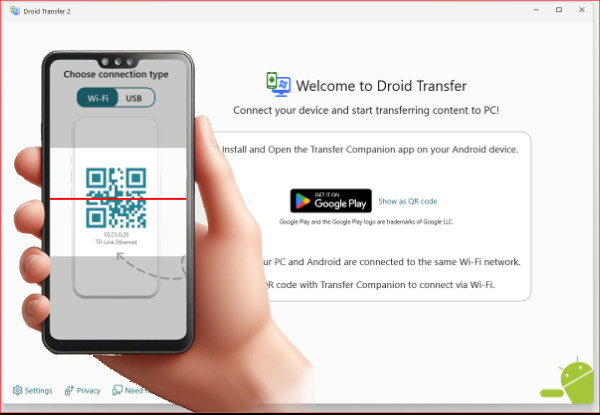 Connect Android to PC via Wifi
 -
Select “Photos”: In Droid Transfer, click on the “Photos” tab.
Alt: Selecting the ‘Photos’ feature within Droid Transfer software to manage photo transfers.
-
Select Photos: Choose the photos you want to transfer.
Alt: Choosing specific photos within Droid Transfer to copy them to a computer or SD card.
-
Click “Save to PC”: Click the “Save to PC” button and select your SD card as the destination.
Pros:
- Wireless transfer.
- Preserves album structure.
- Can transfer other file types (messages, music, etc.).
- Easy to use interface.
Cons:
- Requires Droid Transfer software.
- Requires a Wi-Fi connection.
9. Optimizing Your SD Card for Photography
How do you ensure your SD card performs optimally for photography? Consider these tips:
- Choose the Right SD Card: Select an SD card with a fast read/write speed (Class 10 or UHS-I/UHS-II) for optimal performance.
- Format Your SD Card: Format your SD card regularly to maintain its efficiency. You can do this through your camera or computer.
- Store SD Cards Properly: Protect your SD cards from extreme temperatures, moisture, and physical damage.
- Backup Your SD Card: Regularly back up the contents of your SD card to another storage device or cloud service.
10. Troubleshooting Common Issues
What should you do if you encounter problems? Here are some common issues and their solutions:
- SD Card Not Recognized:
- Ensure the SD card is properly inserted.
- Try a different SD card reader or device.
- Format the SD card (backup data first).
- Slow Transfer Speeds:
- Use a faster SD card reader or SD card.
- Close unnecessary apps during the transfer.
- Transfer photos in smaller batches.
- Photos Not Showing Up:
- Check the correct folder on the SD card.
- Restart your device.
- Ensure hidden files are visible in your file manager.
- Insufficient Storage Space:
- Delete unnecessary files from the SD card.
- Use a larger SD card.
11. Understanding SD Card Types and Speed Classes
What are the different types of SD cards and speed classes? Here’s a breakdown:
| SD Card Type | Capacity | Speed Class | Ideal For |
|---|---|---|---|
| SD | Up to 2GB | Class 2, 4, 6 | Basic photography, standard definition video recording |
| SDHC | 4GB to 32GB | Class 4, 6, 10 | High-resolution photos, Full HD video recording |
| SDXC | 64GB to 2TB | Class 10, UHS-I, UHS-II, Video Speed Classes | 4K video recording, professional photography, large file storage |
| SDUC | 2TB to 128TB | UHS-I, UHS-II, Video Speed Classes | 8K video recording, advanced professional use, massive storage needs |
12. Security Considerations When Using SD Cards
How do you keep your photos safe on an SD card? Consider these security measures:
- Physical Security: Store your SD cards in a safe place to prevent theft or loss.
- Encryption: Encrypt your SD card to protect your photos from unauthorized access.
- Regular Backups: Regularly back up the contents of your SD card to a secure location.
- Avoid Public Computers: Be cautious when using public computers to transfer photos from your SD card.
- Wipe Data Securely: When disposing of an SD card, ensure you wipe the data securely to prevent data recovery.
13. How to Choose the Right SD Card for Your Needs
What factors should you consider when buying an SD card? Here are some key considerations:
- Capacity: Choose a capacity that meets your storage needs. Consider how many photos and videos you plan to store.
- Speed Class: Select a speed class that supports your camera’s capabilities, especially for video recording.
- Brand Reputation: Opt for reputable brands known for their reliability and performance.
- Price: Compare prices from different retailers to find the best deal.
- Compatibility: Ensure the SD card is compatible with your Android device or camera.
14. Alternative Storage Solutions
What other options are available for storing your photos? Consider these alternatives:
- Cloud Storage: Services like Google Photos, Dropbox, and Amazon Photos offer cloud-based storage for your photos.
- External Hard Drives: External hard drives provide a large storage capacity for backing up your photos.
- NAS (Network Attached Storage): NAS devices allow you to store and access your photos over your home network.
- USB Flash Drives: USB flash drives are a portable option for transferring and storing smaller amounts of photos.
15. The Future of Mobile Photography Storage
What does the future hold for mobile photography storage? Expect these trends:
- Increased Internal Storage: Smartphones will continue to offer larger internal storage capacities.
- Cloud Integration: Cloud storage will become even more tightly integrated with mobile devices.
- Advanced Compression Technologies: New compression algorithms will reduce file sizes without sacrificing image quality.
- Wireless Transfer Technologies: Faster and more reliable wireless transfer technologies will simplify photo sharing and backup.
16. Call to Action
Ready to take control of your photo storage? Visit dfphoto.net for more tips, tutorials, and software solutions to enhance your photography experience! Explore our comprehensive guides, discover stunning photography, and connect with a vibrant community of photographers in the USA. Don’t let storage limitations hold you back – start capturing and preserving your memories today!
FAQ: Transferring Photos from Android to SD Card
Here are some frequently asked questions:
- Can I automatically transfer photos from my Android to an SD card? Yes, by changing the default camera save location to the SD card in your camera app’s settings.
- What if my Android phone doesn’t have an SD card slot? Use an SD card reader with a USB or USB-C connection to transfer photos.
- How do I format an SD card on my Android phone? Go to Settings > Device Care > Storage, then find the SD card option and select “Format.”
- Will transferring photos to an SD card delete them from my phone? Not if you choose “Copy.” If you choose “Move,” the photos will be deleted from your phone after the transfer.
- What is the best SD card size for my Android phone? It depends on your needs. A 64GB or 128GB SD card is a good starting point for most users.
- How do I encrypt my SD card on Android? Go to Settings > Security > Encryption and choose the option to encrypt your SD card.
- Can I transfer photos from my SD card back to my Android phone? Yes, using the same methods described above in reverse.
- Why are my photos not showing up on my SD card after transferring? Ensure the photos are in a visible folder and that your file manager is set to show all files.
- What is the difference between SDHC and SDXC cards? SDHC cards have a capacity of up to 32GB, while SDXC cards range from 64GB to 2TB.
- Is it safe to remove the SD card while transferring photos? No, always safely eject the SD card to avoid data corruption.
By following these methods and tips, you can efficiently manage your photos and ensure they are safely stored on your SD card. Remember to visit dfphoto.net for more photography resources and inspiration!