Putting two photos side by side is a fundamental skill in photo editing, whether you’re aiming to create a compelling social media post, design a before-and-after comparison, or simply get creative with your images. While seemingly straightforward, many users still search for the easiest and most effective ways to achieve this. This guide will walk you through six simple methods to place two photos side by side, perfect for beginners and experienced users alike.
6 Easy Ways to Display Two Photos Side by Side
Creating side-by-side images doesn’t require complex software or advanced skills. Here are six different approaches you can take, using tools you likely already have access to or can easily download.
Method 1: Using Dedicated Collage Maker Apps
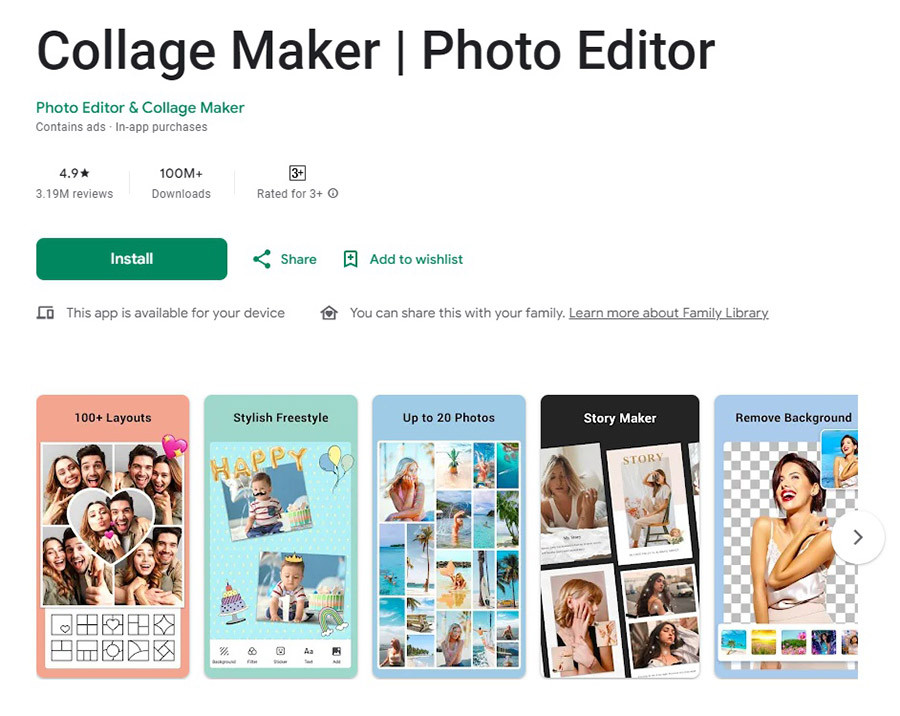 Collage Maker App Interface
When you need to quickly combine multiple images, especially on your mobile device, collage maker applications are incredibly useful. These apps, available on both Android and iOS, are specifically designed for creating photo grids and collages with ease. Here’s a general approach on how to put two photos side by side using a collage maker:
- Launch a Collage App: Start by opening your chosen collage maker app. Look for options like “Collage,” “Grid,” or “Layout” on the main screen.
- Select Your Photos: Choose the two images you want to place side by side. Most apps will have a clear selection process, often involving tapping on the photos in your gallery and then pressing “Next” or “Import.”
- Choose a Side-by-Side Template: Browse through the available templates and select one that arranges two photos horizontally side by side. You can usually customize aspects like aspect ratio and border thickness at this stage. Some apps also allow you to change the background color or pattern between the photos.
- Edit and Adjust: Once your template is set, you can fine-tune each photo within the collage. Adjust zoom, reposition the images within their frames, or apply individual filters and text to enhance each picture separately.
- Save and Share: Once you’re satisfied with your side-by-side image, finalize the collage. The app will merge the photos into a single image, ready for saving to your device or sharing online.
Method 2: Leveraging Google Photos for Quick Collages
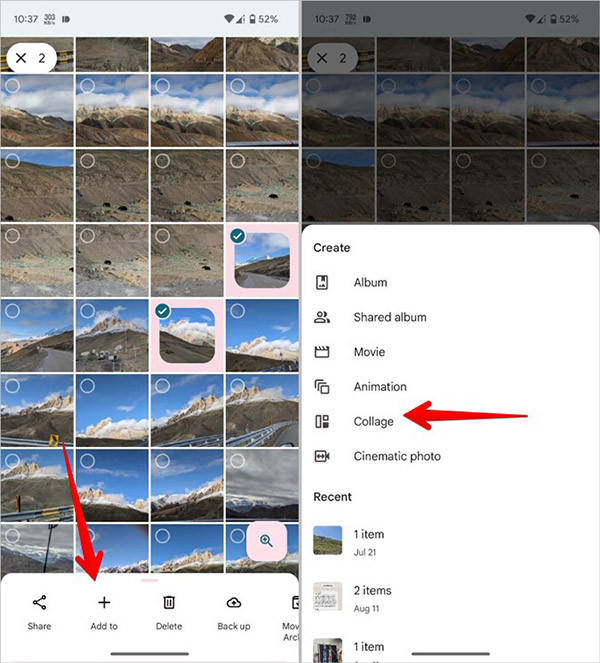 Google Photos Collage Feature
Google Photos is more than just a photo storage service; it also offers basic editing features, including the ability to create simple collages. This method is ideal for Android users and those who already use Google Photos for photo management. Here’s how to put two photos side by side in Google Photos:
- Open Google Photos: Launch the Google Photos app on your phone or tablet.
- Select Photos for Collage: Long-press the first photo you want to use. Then, tap the second photo to select it as well. Selected photos will usually be indicated with a checkmark or circle.
- Create a Collage: Tap the “+” icon, typically located at the top right corner of the screen, and choose “Collage” from the menu options.
- Automatic Collage Creation: Google Photos will automatically create a side-by-side collage of your selected images. While it’s quick and easy, customization options for borders and layouts are limited compared to dedicated collage apps.
Method 3: Utilizing Samsung’s Built-in Photo Editor
For Samsung Galaxy users, creating side-by-side photos is even more convenient thanks to the integrated photo editor. This method avoids the need for any extra app downloads and allows for quick edits directly within your gallery. Here’s how to combine photos side by side using the Samsung editor:
- Access Your Gallery: Open the Samsung Gallery app and select the two photos you wish to combine.
- Initiate Collage Creation: Tap the three-dot “More” icon (usually located at the bottom right or top right corner) and select “Create” followed by “Collage.”
- Customize Your Layout: Samsung’s photo editor will offer layout options. Choose a side-by-side layout and customize it further. You might be able to adjust borders and spacing depending on the editor version.
This streamlined process makes it incredibly easy for Samsung users to quickly put two pictures together without any additional software.
Method 4: Using Instagram Layout in Stories
Instagram, primarily known for social sharing, also provides a handy way to create side-by-side images through its Stories feature. This is a quick workaround for creating simple collages that you can then save to your device. Here’s how to use Instagram Layouts to put two photos side by side:
- Open Instagram and Start a Story: Tap the “+” icon at the top right, then select “Story” at the bottom.
- Access Layout Feature: In the Story creation interface, look for the “Layout” icon (it often looks like a grid). Tap this icon to activate the layout mode.
- Capture or Upload Photos: With the layout grid active, you can either take new photos directly within the Instagram Story interface, or upload existing photos from your phone’s gallery. For a side-by-side effect with two photos, choose a two-cell layout and fill each cell with a photo.
- Save the Layout: Once you have your photos positioned in the layout, instead of posting it as a Story, tap the download icon (usually a downward arrow) at the top of the screen to save the layout as a single image to your phone.
This method is a clever way to use Instagram’s features for basic photo editing even if you don’t intend to share the collage on the platform itself.
Method 5: iPhone Shortcuts for Native Photo Combining
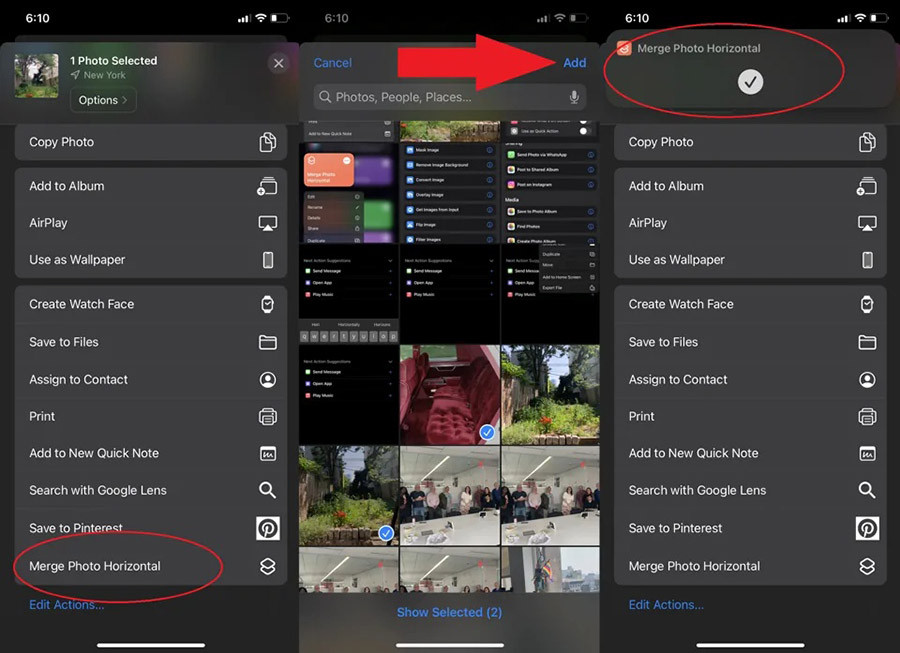 iPhone Shortcuts App Interface
iPhone users can leverage the powerful Shortcuts app to create custom workflows, including one for combining images side by side. This method uses a built-in app, avoiding the need to download anything new. Here’s a step-by-step guide to setting up an iPhone Shortcut for combining photos:
- Open the Shortcuts App: Launch the Shortcuts app on your iPhone. If you don’t see it, you can download it free from the App Store. Tap the “+” icon to create a new shortcut.
- Add “Select Photos” Action: In the shortcut editor, use the search bar at the bottom and type “Select Photos.” Tap the “Select Photos” action that appears. Tap the arrow on the “Select Photos” action and enable “Select Multiple.”
- Add “Combine Images” Action: Search again for “Combine Images” and select this action. Choose “Horizontally” to arrange your images side by side. You can also adjust the spacing between photos if desired within this action’s settings.
- Add “Save to Photo Album” Action: Search for “Save to Photo Album” and add this as the final action in your shortcut.
- Customize and Save Shortcut: Rename your shortcut (e.g., “Combine Photos Side by Side”) and customize its icon if you wish by tapping the three-dot menu at the top. Then, tap “Add to Home Screen” to place the shortcut icon on your home screen for easy access.
- Use Your New Shortcut: To combine photos, tap the shortcut icon on your home screen. It will prompt you to select two photos from your library. After selecting, it will automatically combine them and save the side-by-side image to your Photos app.
This method is a bit more involved in the setup but provides a convenient and native way for iPhone users to repeatedly create side-by-side images.
Method 6: Online Photo Editors like TinyWow
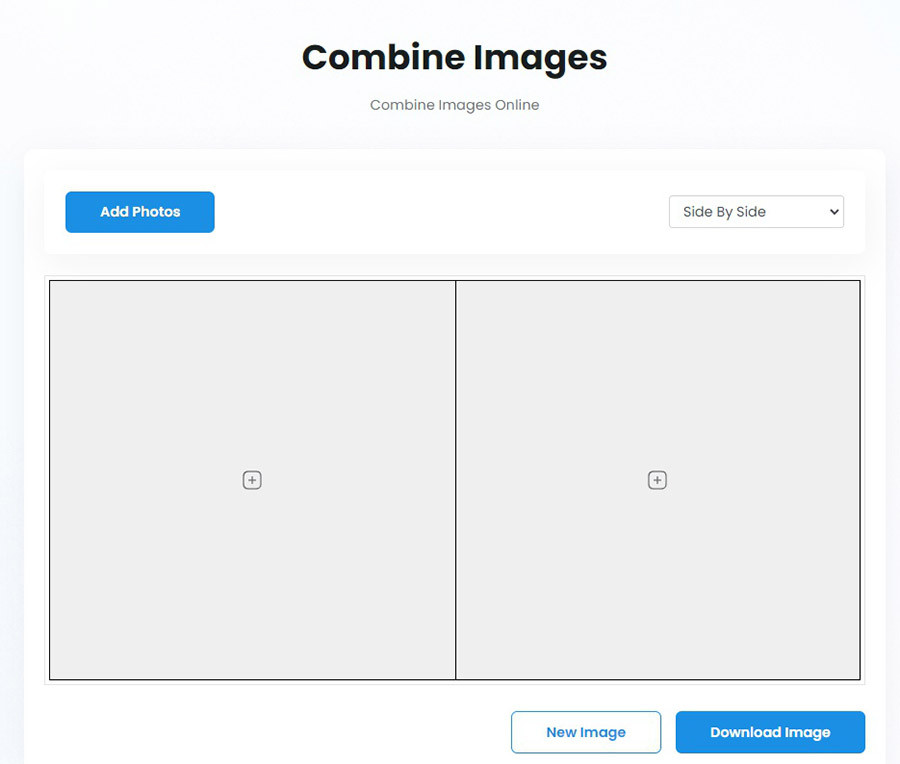 TinyWow Online Image Combiner
If you prefer not to install apps or are working on a computer, online photo editing tools offer a versatile solution. Websites like TinyWow provide free and easy-to-use image combiners directly in your web browser. Here’s how to put two photos side by side using TinyWow:
- Visit TinyWow Website: Go to the TinyWow website in your browser and navigate to their “Combine Images” tool.
- Upload Your Photos: Click the “Add photos” button on the TinyWow page. Select the two images from your computer that you want to combine. You can usually select multiple files at once by holding down “Ctrl” (or “Cmd” on Mac) while clicking.
- Upload and Combine: Click “Open” to upload the photos to TinyWow. The website will process them and display your side-by-side image.
- Download Your Combined Image: Once processed, click the “Download Image” button. You might need to complete a CAPTCHA verification before the download starts.
Keep in mind that free online tools like TinyWow might have temporary storage policies for uploaded files, so it’s best to download your combined image promptly after creation.
Frequently Asked Questions
How Can I Create a Photo Collage with More Than Two Photos?
Collage maker apps and online tools are designed for more than just side-by-side combinations. Most offer templates and options to combine three, four, or even more images into a single collage. Explore the different layouts available in your chosen app or online tool to find one that suits your needs.
Can I Edit Live Photos and Then Combine Them?
Yes, Live Photos can be edited just like regular photos. You can trim them, mute the sound, or even convert them to still images before combining them side by side using any of the methods described above.
Is it Possible to Put Two Pictures Together Without Downloading Any Apps?
Absolutely! As demonstrated, you can use Google Photos (on Android), Samsung’s built-in editor, iPhone Shortcuts, and online tools like TinyWow to combine photos without needing to download third-party apps. These methods offer varying degrees of customization, so choose the one that best fits your needs and device.
Further Reading: Learn how to convert RAW To JPEG to prepare your images for editing.
Conclusion
You now have six straightforward methods to answer the question “How Do I Put Two Photos Side By Side?”. From dedicated apps to built-in phone features and online tools, combining photos has never been easier. The best way to master these techniques is to try them out yourself. Pick your preferred method, grab a couple of photos, and start creating your own side-by-side masterpieces today! If you encounter any further questions, don’t hesitate to reach out for more guidance.
