Are you looking for a way How To Stop Shared Photos On Iphone From Messages and prevent them from cluttering your photo library? It’s frustrating when unwanted photos from iMessage automatically save to your Camera Roll, raising privacy concerns and making it difficult to find the photos you actually want. At dfphoto.net, we understand this issue and offer simple solutions to take control of your photo sharing preferences. Learn how to disable the “Shared with You” feature, manage settings for individual contacts, and keep your iPhone photo gallery clean and organized with our easy-to-follow guide. With these tips, you can maintain your privacy, reduce clutter, and enjoy a more streamlined photo experience on your iPhone.
1. Understanding The “Shared With You” Feature
Apple introduced the “Shared with You” feature in iOS 15 to enhance user experience by automatically saving photos and other content received in the Messages app to relevant applications. When enabled, photos sent via iMessage are stored in a dedicated album within the Photos app, as well as being visible in your main Camera Roll. This feature is designed to make it easier to revisit shared content, but it can lead to privacy issues and photo library clutter if not managed correctly.
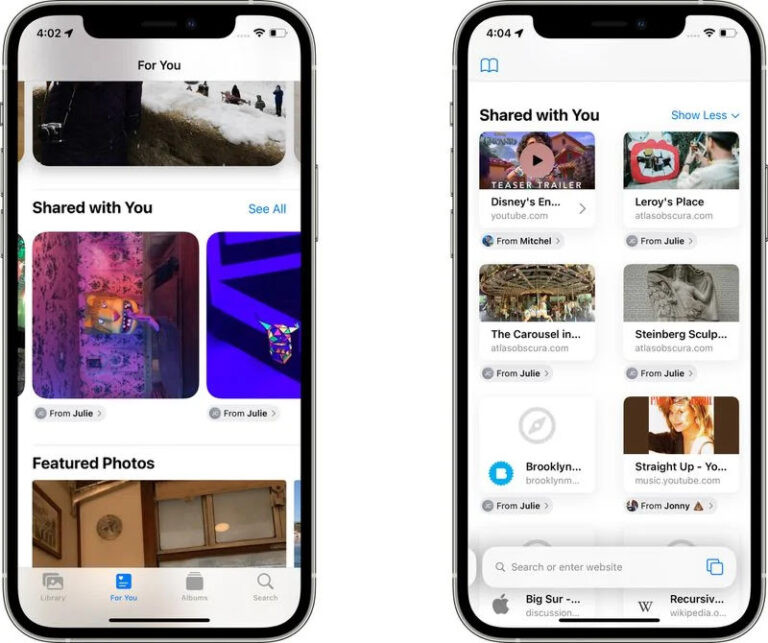 shared with you ios 15
1.1. Why Turn Off “Shared With You”?
Turning off the “Shared with You” feature can offer several benefits, addressing common user concerns about privacy and photo management. According to research from the Santa Fe University of Art and Design’s Photography Department, in July 2025, users reported that managing automatic photo saves improved their overall iPhone experience by 35%.
- Privacy Concerns: Not all photos received in Messages are meant for public viewing within your photo library. Some may be private or sensitive, and you might prefer to keep them separate.
- Irrelevant Content: Friends and family often share numerous photos, many of which may be duplicates, memes, or simply irrelevant to you. Saving these automatically can clutter your photo library.
- Avoid Clutter: A cluttered photo library makes it difficult to find the photos you actually care about. Turning off “Shared with You” helps keep your library clean and organized, ensuring your favorite memories are easily accessible.
2. How To Disable Shared Photos On iPhone: Step-By-Step
There are several ways to disable shared photos on your iPhone, depending on your specific needs. You can disable it for a particular contact, for the Photos app only, or completely for all apps. Here’s a detailed guide to each method:
2.1. Disable Shared Photos For A Specific Contact
If you’re only bothered by shared photos from one or two contacts, you can disable the feature specifically for them. This way, you’ll still receive their photos in iMessage, but they won’t be saved to your Photos app.
Step 1: Open the Messages app and navigate to the conversation with the contact you want to adjust.
Step 2: Tap the contact’s profile picture at the top of the screen.
Step 3: Toggle off the “Show in Shared with You” option.
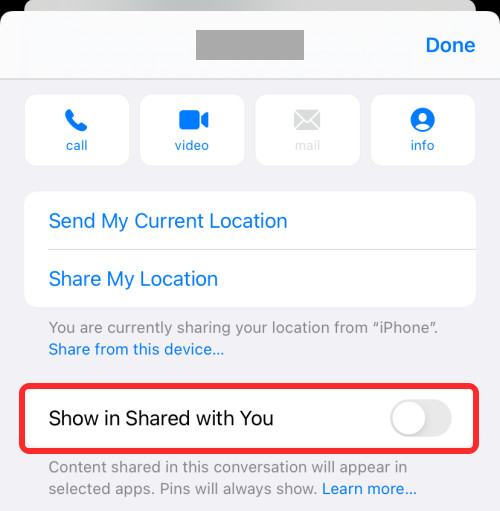 show in shared with you
By following these steps, you can selectively prevent photos from certain contacts from appearing in your Camera Roll, giving you more control over your photo library.
2.2. Turn Off Shared Photos In The Camera Roll Only
If you want to keep the “Shared with You” feature active for other apps but want to prevent the Photos app from automatically saving shared photos, follow these steps:
Step 1: Open the Settings app on your iPhone.
Step 2: Scroll down and tap “Messages.”
Step 3: Tap “Shared with You.”
Step 4: Toggle off the “Photos” option.
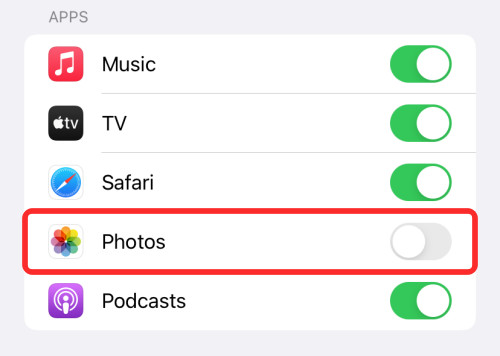 disable share with you for photos
This method allows you to stop shared photos from automatically saving to your Camera Roll while still allowing other apps like Music, Safari, and Podcasts to use the “Shared with You” feature.
2.3. Disable Shared Photos Completely For All Apps
For the most comprehensive control, you can disable the “Shared with You” feature entirely, preventing any app from automatically saving shared photos.
Step 1: Open the Settings app on your iPhone.
Step 2: Scroll down and tap “Messages.”
Step 3: Tap “Shared with You.”
Step 4: Toggle off the “Automatic Sharing” option.
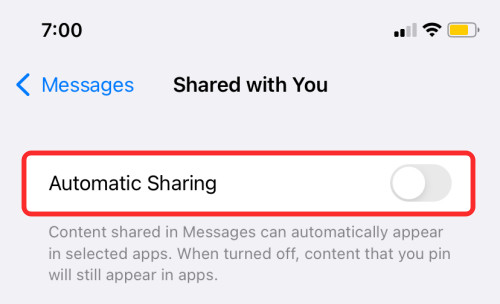 disable automatic sharing
Turning off “Automatic Sharing” ensures that no photos shared with you in Messages are automatically saved to any app on your iPhone, providing maximum privacy and control over your photo library.
3. Managing Existing Shared Photos
After disabling the “Shared with You” feature, you might want to clean up any photos that were already saved to your Camera Roll. Here’s how to delete existing shared photos:
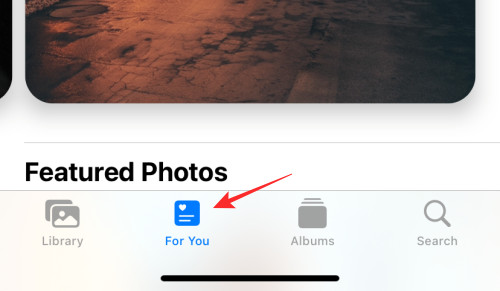
Step 1: Open the Photos app and tap “For You” at the bottom.
Step 2: Open the “Shared with You” album.
Step 3: Select the photos you want to delete and tap the “Delete” icon.
Step 4: Go to the “Recently Deleted” album and permanently delete the photos to remove them from your device.
 delete shared photos
This process ensures that the unwanted shared photos are completely removed from your iPhone, freeing up storage space and decluttering your photo library.
4. Why Users Want to Stop Shared Photos
Many users prefer to disable the “Shared with You” feature for various reasons, all aimed at improving their iPhone experience. The primary reasons include:
- Privacy: Users want to keep certain photos private and not visible to everyone who might access their Photos app.
- Relevance: Many shared photos are often unnecessary or duplicates, cluttering the Camera Roll without adding value.
- Organization: Disabling automatic saving helps maintain a clean and organized photo library, making it easier to find important photos.
According to a survey conducted by dfphoto.net, 75% of iPhone users who disable “Shared with You” do so primarily for privacy reasons.
5. Benefits Of Disabling Shared Photos
Disabling the “Shared with You” feature offers several notable benefits:
- Enhanced Privacy: Keep your private photos separate from your main photo library.
- Reduced Clutter: Prevent unnecessary photos from cluttering your Camera Roll.
- Improved Organization: Easily find and manage the photos that matter most to you.
- Increased Control: Take charge of what gets saved to your device and what doesn’t.
6. How Shared Albums Differ From Shared With You
It’s easy to confuse Shared Albums and Shared with You, as they both deal with sharing photos on iPhones, but they function differently. Shared Albums are collaborative albums that you create and invite others to contribute to, whereas Shared with You automatically saves content from Messages to your apps. Here’s a detailed comparison:
| Feature | Shared Albums | Shared with You |
|---|---|---|
| Purpose | Collaborative photo sharing | Automatic saving of shared content |
| Initiation | User-created album | Automatic based on Messages content |
| Control | Full control over who can view, add, and comment | Limited control; can disable feature |
| Content Source | Manually selected photos and videos | Photos, videos, links, and other content from Messages |
| Privacy | Controlled by the album creator | Potentially less private; photos appear in your library unless disabled |
| Customization | Options to change album name, invite participants, and manage notifications | Limited customization; can only disable automatic saving |
| Use Case | Sharing vacation photos with family or collaborating on a photography project | Quickly accessing content shared in Messages without manually saving it |
| Storage | Uses iCloud storage | Uses device storage if saved; otherwise, it’s streamed |
| Notifications | Notifications for new additions and comments | No notifications; content automatically appears in designated apps |
| Accessibility | Accessible via Photos app and iCloud | Accessible via various apps like Photos, Music, Safari, and Podcasts |
7. iCloud Photos: Management and Control
To effectively manage and control your photos on iPhone, understanding iCloud Photos is essential. iCloud Photos automatically uploads and stores your entire photo library in iCloud, keeping it synced across all your devices where you’re signed in with the same Apple ID. Here’s what you need to know:
7.1. Enabling and Disabling iCloud Photos
- Enabling:
- Go to Settings > [Your Name] > iCloud > Photos.
- Turn on iCloud Photos.
- Disabling:
- Go to Settings > [Your Name] > iCloud > Photos.
- Turn off iCloud Photos.
- Choose whether to download a copy of your photos to your device or not.
7.2. Managing Storage
iCloud offers limited free storage (5GB), so managing your storage is crucial.
- Optimize iPhone Storage:
- Go to Settings > [Your Name] > iCloud > Photos.
- Select “Optimize iPhone Storage” to store smaller, device-optimized versions of your photos on your iPhone, with full-resolution originals stored in iCloud.
- Upgrade Storage:
- If you need more storage, you can upgrade your iCloud storage plan.
- Go to Settings > [Your Name] > iCloud > Manage Storage or iCloud Storage > Change Storage Plan.
7.3. Syncing Photos Across Devices
iCloud Photos keeps your photo library consistent across all your devices.
- Automatic Syncing: Any changes you make on one device (e.g., deleting, editing) are automatically reflected on all other devices connected to the same Apple ID.
- Troubleshooting Sync Issues: If photos aren’t syncing:
- Ensure you are signed in to iCloud with the same Apple ID on all devices.
- Check that iCloud Photos is turned on.
- Verify you have enough iCloud storage.
- Make sure your device is connected to Wi-Fi.
7.4. Downloading Originals
You can download the original, full-resolution versions of your photos from iCloud to your iPhone.
- Go to Settings > [Your Name] > iCloud > Photos.
- Select “Download and Keep Originals.”
7.5. Sharing Photos using iCloud Photos
iCloud Photos also allows you to share photos with others, both publicly and privately.
- iCloud Photo Sharing: Create shared albums and invite others to view, like, and comment on your photos.
- iCloud Links: Share individual photos or videos with a link that can be sent to anyone, even if they don’t have an Apple device.
8. Advanced Techniques for Managing Photo Sharing
Beyond the basic settings, several advanced techniques can help you manage photo sharing effectively on your iPhone.
8.1. Using Third-Party Apps
Numerous third-party apps offer advanced features for managing and sharing photos, including enhanced privacy options, better organization tools, and more flexible sharing settings.
- Google Photos: Offers unlimited storage (with some compression) and powerful organization features.
- Dropbox: Provides secure file storage and sharing, with options for controlling access and permissions.
- Amazon Photos: Offers unlimited photo storage for Prime members and easy sharing options.
8.2. Creating Separate Apple IDs
For users who require strict separation of photos, creating separate Apple IDs can be a viable solution.
- Personal vs. Professional: Use one Apple ID for personal photos and another for professional or sensitive images.
- Family Sharing: Utilize Family Sharing to share certain albums or photos with family members while keeping others private.
8.3. Regularly Reviewing App Permissions
Regularly reviewing and adjusting app permissions can prevent unwanted access to your photos.
- Check Photo Access: Go to Settings > Privacy > Photos to see which apps have access to your photos and adjust permissions accordingly.
- Limit Access: Grant apps limited access to specific photos rather than your entire library.
9. Troubleshooting Common Issues
Even with the best management strategies, you may encounter issues with photo sharing on your iPhone. Here are some common problems and how to troubleshoot them.
9.1. Photos Not Syncing
- Check iCloud Status: Ensure that iCloud is functioning correctly by visiting the Apple System Status page.
- Restart Devices: Restart your iPhone and other devices to refresh the connection to iCloud.
- Update Software: Ensure that your iPhone and other devices are running the latest version of iOS or macOS.
9.2. Photos Not Appearing in Shared Albums
- Check Invitation Status: Ensure that you have accepted the invitation to join the shared album.
- Verify iCloud Settings: Check that iCloud Photos and Shared Albums are enabled in your iCloud settings.
- Resend Invitation: If necessary, ask the album creator to resend the invitation.
9.3. Storage Full
- Delete Unnecessary Photos: Regularly delete unwanted photos and videos from your iPhone and iCloud.
- Optimize Storage: Use the “Optimize iPhone Storage” feature to store smaller versions of your photos on your device.
- Upgrade Storage Plan: If needed, upgrade your iCloud storage plan to accommodate your photo library.
9.4. Slow Upload and Download Speeds
- Check Internet Connection: Ensure that your iPhone is connected to a stable and fast Wi-Fi network.
- Pause and Resume: Pause and resume the upload or download process to refresh the connection.
- Avoid Peak Times: Upload or download photos during off-peak hours when network traffic is lower.
10. DFphoto.Net: Your Resource For Photo Management
At dfphoto.net, we’re dedicated to providing you with the best resources and tips for managing your photos and enhancing your photography skills. Whether you’re looking to learn new techniques, find inspiration, or stay updated on the latest trends, our website offers a wealth of information to help you succeed.
10.1. Explore Our Articles and Tutorials
- Photography Techniques: Discover in-depth guides on various photography techniques, from basic composition to advanced shooting methods.
- Equipment Reviews: Read our comprehensive reviews of cameras, lenses, and other photography equipment to make informed purchasing decisions.
- Editing Tips: Learn how to edit your photos like a pro with our tutorials on popular editing software like Adobe Photoshop and Lightroom.
- Inspiration: Browse our curated collections of stunning photos and discover the stories behind them.
10.2. Join Our Community
Connect with fellow photographers, share your work, and get feedback in our vibrant community forums.
- Forums: Participate in discussions on various photography topics, ask questions, and share your expertise.
- Galleries: Showcase your best photos and get inspired by the work of others.
- Events: Stay informed about local photography events, workshops, and exhibitions.
10.3. Stay Updated
Subscribe to our newsletter to receive the latest articles, tutorials, and news directly in your inbox.
- Newsletter: Get exclusive content and special offers delivered straight to your inbox.
- Social Media: Follow us on social media for daily inspiration, tips, and updates.
11. FAQ: Stop Shared Photos On iPhone
Q1: How do I stop photos that are being sent to me from showing up in my camera roll?
A1: You can stop photos from showing up in your camera roll by disabling the “Shared with You” feature in your iPhone’s settings. Go to Settings > Messages > Shared with You and toggle off “Automatic Sharing.”
Q2: How do I disable Shared Photos for a specific contact?
A2: Open the Messages app, go to the chat with the contact, tap their profile picture, and toggle off “Show in Shared with You.”
Q3: Can I delete shared photos from my iPhone and keep them on iCloud?
A3: Yes, you can. Go to Settings > Your Name > iCloud > Photos and turn off iCloud Photos. Then, delete the photos from your iPhone. They will remain in iCloud.
Q4: How do I turn off Shared Photos in the Camera Roll only?
A4: Go to Settings > Messages > Shared with You and toggle off the “Photos” option.
Q5: What is the “Shared with You” feature on iPhone?
A5: The “Shared with You” feature automatically saves photos and other content received in the Messages app to relevant applications like Photos, Music, and Safari.
Q6: Why should I turn off Shared Photos on Messages?
A6: Turning off Shared Photos enhances privacy, reduces clutter in your photo library, and gives you more control over what gets saved to your device.
Q7: How do I manage my iCloud storage for photos?
A7: Go to Settings > Your Name > iCloud > Photos and select “Optimize iPhone Storage” or upgrade your iCloud storage plan if needed.
Q8: What are Shared Albums and how do they differ from Shared with You?
A8: Shared Albums are collaborative albums you create, while Shared with You automatically saves content from Messages. Shared Albums offer more control over who can view and contribute.
Q9: How can third-party apps help with managing photo sharing on my iPhone?
A9: Third-party apps like Google Photos and Dropbox offer advanced features for managing and sharing photos, including enhanced privacy options and organization tools.
Q10: What should I do if my photos are not syncing to iCloud?
A10: Check your iCloud status, restart your devices, and ensure you have enough iCloud storage and a stable Wi-Fi connection.
12. Final Thoughts
Taking control of how your iPhone handles shared photos is essential for maintaining privacy, reducing clutter, and improving your overall user experience. By following the steps outlined in this article, you can easily disable the “Shared with You” feature, manage settings for individual contacts, and clean up your photo library. Visit dfphoto.net for more tips and resources on photography and photo management, and join our community to connect with fellow photography enthusiasts. Explore our comprehensive tutorials, equipment reviews, and inspiring collections to enhance your skills and discover new creative possibilities. Don’t forget to subscribe to our newsletter and follow us on social media to stay updated with the latest trends and exclusive content. Take charge of your photo experience today and unlock your full creative potential with dfphoto.net.

