Getting your passport photo right is crucial for a smooth application process. A surprising number of passport applications are delayed or even rejected due to photo issues. The U.S. State Department emphasizes the importance of adhering to specific guidelines to ensure your photo is accepted. This guide will walk you through everything you need to know to take a passport photo that not only meets all official requirements but also looks great.
Understanding Official Passport Photo Guidelines
The U.S. Department of State has detailed specifications for passport photos to ensure they are suitable for identification. These rules are in place to prevent delays and ensure your application proceeds without a hitch. The key is to understand these guidelines before you even think about snapping a picture. The official website travel.state.gov is your primary resource, offering instructions, specifications, helpful tips, and clear examples of acceptable and unacceptable photos. They even provide a handy photo tool where you can upload and check your photo instantly. Familiarizing yourself with these official resources is the first step to passport photo success.
What to Wear (and What Not to Wear) for Your Passport Photo
Choosing the right attire is more important than you might think. While the State Department suggests “clothing normally worn on a daily basis,” there are specific items to avoid and recommendations for what works best.
Acceptable attire: Think of everyday, comfortable clothing. A casual t-shirt, polo shirt, or a more dressed-up jacket and tie are all generally acceptable. The focus should be on you, not your clothing being distracting.
Items to avoid:
- Eyeglasses and Sunglasses: Absolutely no eyeglasses or shades are allowed. Even if you wear prescription glasses daily, they must be removed for the photo. Medical exceptions require a signed doctor’s note.
- Head coverings: Hats or head coverings are prohibited unless worn daily for religious or medical reasons, and even then, you’ll need a signed statement to verify this.
- Uniforms and Camouflage: These are not permitted as passport photos are intended for personal identification, and uniforms can obscure your everyday appearance.
- Tank tops: It’s advisable to avoid tank tops as they may not present a formal enough appearance and could be too revealing for official documentation.
- Masks, Earbuds, and Headphones: Anything that obstructs your facial features is a no-go. Your face must be fully visible.
Jewelry and Facial Tattoos: The good news is that permanent facial tattoos and jewelry, including facial piercings, are allowed as long as they don’t obscure your face. The key is visibility of your facial features.
An example of a compliant passport photo showcasing appropriate attire and background.
Color Considerations: Solid, darker colors are generally recommended as they contrast well against the required white or off-white background. While light colors and patterns aren’t strictly forbidden, they can be problematic. Wearing white clothing might cause you to blend into the background, potentially leading to a request to retake the photo. It’s best to play it safe with darker, solid colors.
Posing and Framing for Passport Photo Perfection
Posing for a passport photo is straightforward, but attention to detail is crucial. The goal is a clear, front-facing image that accurately represents your features.
Background: The background must be plain white or off-white, free of shadows, textures, or lines. A simple wall or a white sheet hung smoothly will work perfectly.
Posture and Position: Sit or stand straight with your shoulders squared to the camera. Your head should be centered within the frame. Face the camera directly, ensuring your full face is visible and not turned to the side or at an angle.
Facial Expression: Maintain a neutral expression. While a slight smile is acceptable, it’s best to keep your mouth closed and your eyes open and looking directly at the camera. Avoid exaggerated expressions, frowning, or squinting. The aim is a natural, easily recognizable image.
Common Passport Photo Mistakes to Steer Clear Of
Even seemingly minor errors can lead to passport photo rejection. Being aware of common pitfalls is essential for getting it right the first time. Based on insights from U.S. Passport Service Guide, here are frequent mistakes to avoid:
- Incorrect Head Position: Ensure your face is centered and not tilted or turned.
- Inappropriate Facial Expression: Neutral is key. Avoid smiling too broadly, frowning, or any exaggerated expressions.
- Shadows on Face or Background: Proper lighting is crucial to eliminate shadows.
- Wearing Eyeglasses: Unless medically documented, glasses are not allowed.
- Prohibited Clothing or Attire: Adhere to the dress guidelines mentioned earlier.
- Poor Color Balance: Photos should have natural skin tones and proper exposure.
- Unacceptable Background: White or off-white, plain, and shadow-free is mandatory.
- Edited or Retouched Photos: Photos must be unedited. No filters, enhancements, or red-eye removal.
- Wrong Photo Size: Ensure your photo is the correct 2×2 inches (51×51 mm) dimension.
Makeup, Tattoos, Piercings, and Facial Hair: What’s Allowed?
You can wear makeup, keep tattoos, and retain piercings in your passport photo as long as they don’t obscure your facial features or create shadows. However, heavy makeup that drastically alters your appearance is not recommended. Passport-Photo.Online advises avoiding lip liner, lip gloss, and very bright or dark lipsticks that can distort your natural skin tone.
Beards and mustaches are perfectly acceptable, even if you didn’t have them in previous passport photos. Just remember that your passport photo is valid for ten years, so ensure it accurately represents your current appearance.
Digital Passport Photo Specifications and Size
For online passport renewals, digital photo specifications are crucial. According to the State Department, your digital photo must meet these technical requirements:
- File Format: JPEG (.JPEG)
- Resolution: At least 600 x 600 pixels
- File Size: At least 54 kilobytes, but no larger than 10MB.
- Head Size: In the 2×2 inch printed photo, the head should measure between 1 inch and 1.4 inches (25 to 35 mm) from the bottom of the chin to the top of the head. For digital submissions, ensure ample space around your head for automatic cropping.
Printed photos for in-person or mail applications must be 2×2 inches (51×51 mm). Photos can be printed on either glossy or matte paper. Avoid submitting scanned photos of printed photos or damaged photos.
Taking Your Passport Photo: DIY vs. Professional Services
You have options when it comes to getting your passport photo. You can take it yourself or use professional services.
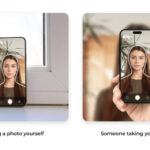
DIY Passport Photos: Using a smartphone or digital camera is acceptable if you can meet all the specifications. Ensure good lighting, a plain white background, and no filters or retouching. However, selfies are not allowed.
Professional Passport Photo Services: Numerous locations offer passport photo services, including:
- Post Offices: Many USPS locations provide passport photo services.
- Shipping Stores: FedEx and UPS stores often offer passport photo services.
- Pharmacies and Retailers: Stores like Target, Walmart, CVS, and Walgreens also provide passport photo services.
- Passport Acceptance Facilities: The State Department’s database lists acceptance facilities, some of which may also offer photo services.
Choosing a professional service can add convenience and ensure compliance, especially if you’re unsure about meeting all the technical requirements yourself.
Taking a Passport Photo of a Baby
Photographing a baby for a passport requires extra care. Here are specific tips for infant passport photos:
- One Child Only: Only one child can be in the photo.
- No Parent in Shot: You cannot be in the photo holding the baby.
- Background: Lay the baby on their back on a white or off-white blanket or use a car seat with a plain white or off-white blanket behind them.
- Pacifiers and Objects: Remove pacifiers, toys, or any other objects.
- Eyes Open: While it’s noted that infant’s eyes do not need to be fully open, for older children and adults, eyes must be open.
An example of an acceptable baby passport photo, correctly posed and with a plain background.
Final Check: Utilize the State Department’s Photo Tool
Before submitting your passport photo, the best advice is to use the U.S. State Department’s photo tool. This online tool allows you to upload your photo and instantly check if it meets all the criteria. It highlights any issues with lighting, attire, background, pose, and more, helping you avoid common mistakes and ensure your passport application proceeds smoothly. Taking the time to utilize this tool is a smart step toward passport photo success.