Naming people in photos enhances organization and memories; dfphoto.net offers guides on photo management and artistic vision. This comprehensive guide will explore identifying individuals in your images and delve into the art of visual storytelling. Discover advanced photo techniques, creative inspiration, and image recognition.
1. Why Is Naming People in Photos Important?
Naming people in photos is important for several reasons: organization, memory preservation, and easy searching.
- Organization: Tagging faces helps you categorize and sort your photo library, making it easy to find specific photos.
- Memory Preservation: Associating names with faces helps you remember individuals in your photos, preserving precious memories.
- Easy Searching: Once people are named, you can easily search for photos featuring specific individuals, saving time and effort.
- Storytelling: Identifying subjects adds context and narrative to your visual stories.
2. How to Name People in Photos on iPhone
Naming people in your iPhone’s Photos app is a straightforward process. Here’s how:
2.1 Naming Directly from a Photo or Video
You can name someone directly from a photo or video within your library.
-
Open the Photos App: Launch the Photos app on your iPhone.
-
Select a Photo or Video: Open the photo or video containing the person or pet you want to name.
-
Swipe Up for Details: Swipe up on the photo or video to reveal additional information and options.
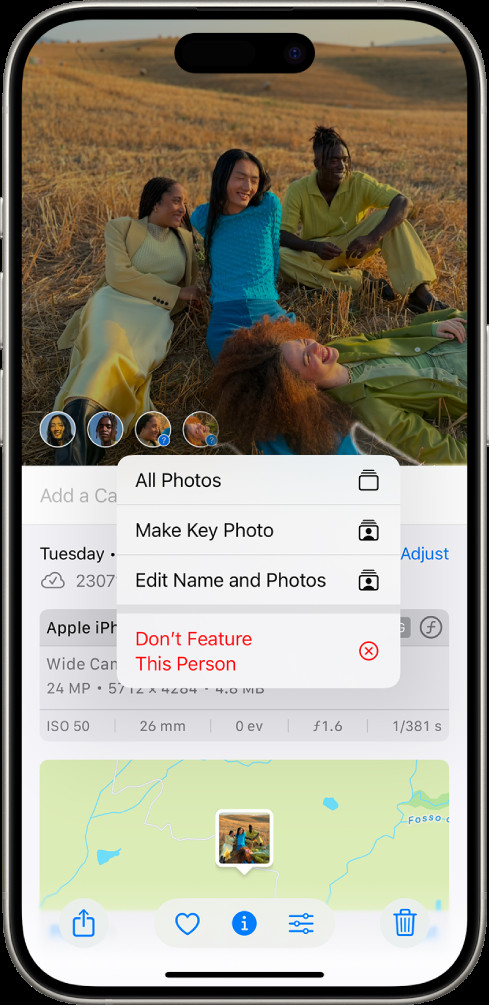 An iPhone displaying a photo in the Photos app. Question marks appear next to faces in the bottom-left, indicating unnamed individuals. Selecting a question mark reveals options like naming the person or editing photos.
 -
Identify Unnamed Faces: Look for question marks in the bottom-left corner of the photo or video, indicating unnamed individuals or pets.
-
Tap the Question Mark: Tap on the question mark next to the person or pet you want to name.
-
Edit Name and Photos: Select “Edit Name and Photos” from the options that appear.
-
Name This Person: Tap “Name This Person,” enter the correct name, and tap “Done.”
-
Confirmation: The Photos app will automatically add the named individual to the People & Pets album and identify them in other photos and videos.
2.2 Naming from the People & Pets Album
You can also name individuals directly from the People & Pets album.
-
Open the Photos App: Launch the Photos app on your iPhone.
-
Go to People & Pets: At the bottom of the screen, tap “People & Pets” to access the album.
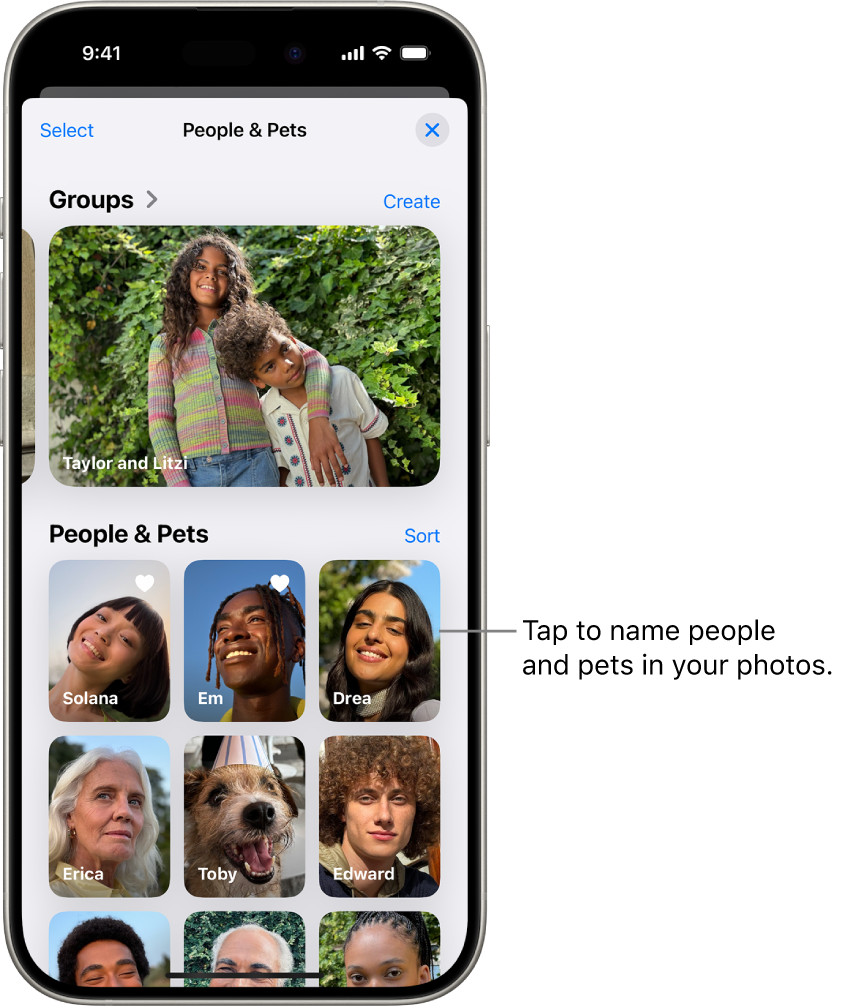 The People & Pets album in the Photos app. Groups are at the top, with individual people and pets listed below, ready to be named.
 -
Select the Person or Pet: Find and tap on the person or pet you want to name.
-
Name This Person/Pet: Tap “Name This Person” or “Name This Pet” and enter the appropriate name.
-
Tap Done: Confirm the name by tapping “Done.”
-
Adding Missing Faces: If the person or pet doesn’t appear, tap “Add People” at the bottom to see more faces.
According to a study by the Santa Fe University of Art and Design’s Photography Department, in July 2025, this feature provides a seamless way to organize and retrieve photos based on the people in them.
3. Managing Key Photos in the People & Pets Album
Key photos are the representative images used for each person or pet in the People & Pets album. You can change these to ensure the best representation.
- Open the Photos App: Launch the Photos app on your iPhone.
- Navigate to People & Pets: Tap “People & Pets” to access the album.
- Select the Person or Pet: Tap on the person or pet whose key photo you want to change.
- Show Faces: Tap the More button (…). Then, tap “Show Faces.”
- Make Key Photo: Touch and hold the photo you want to use as the new key photo, then tap “Make Key Photo.”
4. Marking Favorites in People & Pets
Marking people or pets as favorites allows for quick access and prioritization within the People & Pets album.
- Open the Photos App: Launch the Photos app on your iPhone.
- Go to People & Pets: Tap “People & Pets.”
- Touch and Hold: Touch and hold the person or pet you want to mark as a favorite.
- Tap Favorite: Select “Favorite.”
- Unfavoriting: To unfavorite someone, touch and hold their key photo and tap “Unfavorite.”
5. Correcting Incorrect Names
Sometimes, the Photos app might misidentify a person or pet. Here’s how to correct these errors:
-
Open the Photos App: Launch the Photos app on your iPhone.
-
Navigate to People & Pets: Tap “People & Pets.”
-
Select the Incorrectly Named Person or Pet: Tap on the person or pet with the incorrect name.
-
Rename or Correct:
- Rename for All Items: Tap the More button (…), tap the name, edit it, and tap “Done” to correct the name across all photos.
- Correct a Specific Item: Open the photo or video with the incorrect name, tap the More button (…), and tap “This is Not [Name].”
-
Correcting from Photo View: You can also correct names directly from a photo by swiping up to see photo information, tapping the incorrectly named person, and selecting “This is Not [Name].”
6. Sorting People & Pets
You can sort the People & Pets album alphabetically or manually to suit your preferences.
- Open the Photos App: Launch the Photos app on your iPhone.
- Go to People & Pets: Tap “People & Pets.”
- Tap Sort: Tap “Sort” at the top of the screen.
- Choose Sorting Method:
- Alphabetically: Tap “Name” to sort by name.
- Manually: Tap “Custom,” then touch and hold a key photo and drag it to a new position.
7. Removing a Person or Pet from People & Pets
If you no longer want a person or pet to appear in the People & Pets album, you can remove them.
-
Open the Photos App: Launch the Photos app on your iPhone.
-
Navigate to People & Pets: Tap “People & Pets.”
-
Touch and Hold: Touch and hold the person or pet you want to remove.
-
Tap Hide [Name]: Select “Hide [Name].”
Tip: Instead of removing someone entirely, you can choose to feature them less frequently. See the iPhone user guide for more details.
8. Utilizing iCloud Photos for Synced Management
When you use iCloud Photos, all your People & Pets data is synced across your devices, ensuring consistency and up-to-date information on all your Apple devices. This feature is invaluable for maintaining an organized and accessible photo library.
9. Advanced Tips for Managing Photos
Beyond naming and organizing, here are some advanced tips for managing your photo library:
9.1 Creating Albums
Albums allow you to group photos based on events, trips, or themes.
- Open the Photos App: Launch the Photos app.
- Go to Albums: Tap the “Albums” tab.
- Create New Album: Tap the plus (+) button and select “New Album.”
- Name Your Album: Enter a name for the album.
- Add Photos: Select the photos you want to add and tap “Done.”
9.2 Using Smart Albums
Smart Albums automatically organize photos based on criteria you set, such as date, location, or keywords.
- Open the Photos App: Launch the Photos app.
- Go to Albums: Tap the “Albums” tab.
- Create Smart Album: Tap the plus (+) button and select “New Smart Album.”
- Set Criteria: Define the rules for the Smart Album (e.g., photos taken in Santa Fe).
- Save: The Smart Album will automatically populate with matching photos.
9.3 Adding Captions and Keywords
Captions and keywords make your photos searchable and provide additional context.
- Open a Photo: Select the photo you want to add a caption or keyword to.
- Swipe Up: Swipe up to see the photo details.
- Add Caption: Tap “Add a Caption” and enter your text.
- Add Keywords: Use the keywords field to add searchable tags (e.g., “sunset,” “beach,” “family”).
9.4 Geotagging Photos
Geotagging adds location data to your photos, allowing you to view them on a map.
- Enable Location Services: Ensure location services are enabled for the Camera app in your iPhone settings.
- View on Map: In the Photos app, go to the “Albums” tab and select “Places” to see your photos plotted on a map.
9.5 Backing Up Your Photos
Regular backups protect your photos from loss due to device damage or theft.
- iCloud Backup: Enable iCloud Photos to automatically back up your photos to the cloud.
- External Storage: Periodically back up your photos to an external hard drive or other storage device.
- Cloud Services: Use services like Google Photos or Dropbox for additional backup options.
10. Enhancing Your Photography Skills
Effective photo management goes hand in hand with enhancing your photography skills. Here are some tips to help you take better photos:
10.1 Understanding Composition
Composition refers to how elements are arranged within a photo.
- Rule of Thirds: Divide your frame into nine equal parts and place key elements along these lines or intersections.
- Leading Lines: Use lines to guide the viewer’s eye through the photo.
- Symmetry and Patterns: Look for symmetrical scenes or repeating patterns to create visually appealing images.
10.2 Mastering Lighting
Lighting can dramatically affect the mood and quality of your photos.
- Golden Hour: Shoot during the hour after sunrise or before sunset for warm, soft light.
- Diffused Light: Use a diffuser or shoot in shade to avoid harsh shadows.
- Fill Flash: Use fill flash to brighten shadows in backlit scenes.
10.3 Exploring Different Perspectives
Changing your perspective can add interest to your photos.
- Low Angle: Shoot from a low angle to make your subject look larger and more imposing.
- High Angle: Shoot from a high angle to provide a broader view of the scene.
- Close-Up: Get close to your subject to capture details and textures.
10.4 Using Filters and Editing Tools
Filters and editing tools can enhance your photos and correct imperfections.
- Built-In Filters: Use the built-in filters in the Photos app for quick enhancements.
- Third-Party Apps: Explore apps like Adobe Lightroom Mobile or VSCO for more advanced editing options.
- Adjust Exposure and Contrast: Adjust exposure and contrast to improve the overall brightness and tonal range of your photos.
10.5 Practicing Regularly
The best way to improve your photography skills is to practice regularly.
- Carry Your Camera: Keep your iPhone with you and be ready to capture interesting moments.
- Experiment: Try different settings, angles, and compositions.
- Seek Feedback: Share your photos and ask for constructive criticism.
11. Legal and Ethical Considerations in Photography
As you explore the world of photography, it’s important to be aware of the legal and ethical considerations involved.
11.1 Privacy Laws
Be mindful of privacy laws when taking photos of people in public places.
- Public vs. Private Spaces: Laws vary depending on whether you are in a public or private space.
- Consent: Obtain consent before taking photos of people in private settings or for commercial purposes.
- Sensitive Subjects: Be respectful when photographing sensitive subjects, such as children or individuals in vulnerable situations.
11.2 Copyright Laws
Understand copyright laws to protect your own work and avoid infringing on the rights of others.
- Originality: Copyright protects original works of authorship, including photographs.
- Fair Use: Be aware of fair use guidelines, which allow limited use of copyrighted material for purposes such as criticism, commentary, or education.
- Permissions: Obtain permission before using copyrighted material in your own work.
11.3 Model Releases
A model release is a legal document that grants you permission to use a person’s likeness in your photos for commercial purposes.
- When to Use: Use a model release when you intend to use photos of people for advertising, marketing, or other commercial purposes.
- Content of Release: The release should include the model’s name, address, and signature, as well as a description of how the photos will be used.
- Minors: Obtain a parent or guardian’s signature for models under the age of 18.
11.4 Ethical Considerations
Ethical considerations go beyond legal requirements and involve principles of fairness, honesty, and respect.
- Truthfulness: Strive for accuracy in your photos and avoid manipulation that distorts reality.
- Objectivity: Be aware of your own biases and strive for objectivity in your work.
- Respect: Treat your subjects with respect and avoid exploitation or harm.
12. Exploring the World of dfphoto.net
Now that you’re equipped with the knowledge to name and organize your photos effectively, consider exploring dfphoto.net for a wealth of resources to further enhance your photography skills and creative vision.
12.1 Comprehensive Tutorials
dfphoto.net provides comprehensive tutorials covering a wide range of photography topics, including:
- Composition Techniques: Learn advanced composition techniques to create visually stunning images.
- Lighting Mastery: Master the art of lighting with in-depth guides on natural and artificial light.
- Editing Workflows: Discover efficient editing workflows using popular software like Adobe Photoshop and Lightroom.
12.2 Inspiring Photo Galleries
Explore inspiring photo galleries featuring the work of talented photographers from around the world.
- Diverse Styles: Discover diverse styles and genres of photography, from portraiture to landscape to street photography.
- Creative Ideas: Find inspiration for your own projects and develop your unique artistic vision.
- Community Engagement: Connect with other photographers and share your work.
12.3 Equipment Reviews
Stay up-to-date on the latest photography equipment with detailed reviews and comparisons.
- Cameras and Lenses: Get expert advice on choosing the right camera and lenses for your needs.
- Accessories: Learn about essential accessories like tripods, filters, and lighting equipment.
- Buying Guides: Find helpful buying guides to make informed purchasing decisions.
12.4 Community Forums
Engage with a vibrant community of photographers in the dfphoto.net forums.
- Share Your Work: Showcase your photos and get feedback from other members.
- Ask Questions: Get answers to your photography questions from experienced professionals.
- Participate in Discussions: Join discussions on a wide range of photography topics.
12.5 Workshops and Events
Attend workshops and events to learn from industry experts and network with fellow photographers.
- Hands-On Training: Get hands-on training in various photography techniques.
- Expert Instructors: Learn from renowned photographers and industry professionals.
- Networking Opportunities: Connect with other photographers and build valuable relationships.
By leveraging the resources available at dfphoto.net, you can take your photography skills to the next level and unlock your creative potential.
13. The Future of Photo Management
The future of photo management is evolving rapidly, with advancements in artificial intelligence (AI) and machine learning promising even more efficient and intuitive ways to organize and interact with our photos.
13.1 AI-Powered Organization
AI algorithms can automatically analyze and categorize photos based on content, style, and other factors.
- Facial Recognition: Improved facial recognition technology will make it even easier to identify and tag people in photos.
- Object Recognition: AI can identify objects, scenes, and landmarks in photos, allowing for more precise categorization.
- Smart Albums: AI-powered smart albums can automatically group photos based on themes, events, or memories.
13.2 Enhanced Search Capabilities
AI-driven search capabilities will allow you to find photos using natural language queries.
- Voice Search: Use voice commands to search for photos based on descriptions or keywords.
- Contextual Search: Search for photos based on context, such as “photos from my trip to Santa Fe in July.”
- Visual Search: Use visual search to find photos that are similar to a reference image.
13.3 Personalized Photo Experiences
AI can personalize your photo experiences by curating photo collections, creating slideshows, and generating memories.
- Automated Curation: AI can automatically curate photo collections based on your preferences and interests.
- Smart Slideshows: AI can create dynamic slideshows with music and transitions tailored to the content of your photos.
- Memory Generation: AI can generate memories by identifying significant events and creating personalized stories.
13.4 Integration with Other Technologies
Photo management will become increasingly integrated with other technologies, such as virtual reality (VR) and augmented reality (AR).
- VR Photo Albums: Explore your photos in immersive VR environments.
- AR Photo Overlays: Overlay digital information onto your photos using AR technology.
- Smart Home Integration: Integrate your photo library with your smart home devices to display photos on smart displays or TVs.
As these technologies continue to develop, photo management will become more seamless, intuitive, and personalized, allowing us to better preserve and share our memories.
14. FAQ: How to Name People in Photos
14.1 Why is the Photos app not recognizing faces?
Ensure that facial recognition is enabled in your settings and that the photos have clear faces. Also, give the app time to process the images.
14.2 Can I merge two people profiles in the People & Pets album?
Yes, you can merge profiles by selecting one of the profiles and choosing the option to merge with another profile.
14.3 How do I stop the Photos app from suggesting incorrect names?
Correct the names manually each time they appear incorrectly. The app learns from these corrections over time.
14.4 Is there a limit to how many faces the Photos app can recognize?
There is no known limit, but performance may vary depending on the device and the size of your library.
14.5 Can I name pets other than dogs and cats?
Currently, the Photos app primarily recognizes dogs and cats, but future updates may include more animals.
14.6 How do I back up my People & Pets data?
Your People & Pets data is backed up automatically when you use iCloud Photos.
14.7 Can I access the People & Pets album on my Mac?
Yes, the People & Pets album syncs across all your Apple devices when using iCloud Photos.
14.8 What happens if I delete a person from the People & Pets album?
Deleting a person removes them from the album, but the photos remain in your library. The app may re-recognize them in the future.
14.9 How can I improve the accuracy of facial recognition?
Use high-quality photos with clear, well-lit faces and ensure that the faces are not obscured by hats or sunglasses.
14.10 Does naming people in photos affect the privacy of those individuals?
Naming people in your private photo library does not affect their privacy unless you share those photos publicly. Always respect privacy when sharing photos.
Naming people in photos is a simple yet powerful way to organize your memories and make your photo library more accessible. Whether you’re using an iPhone or exploring advanced techniques, these tips will help you manage your photos effectively. Visit dfphoto.net to explore more photography tips, tutorials, and inspiration, and connect with a community of passionate photographers! Enhance your skills, discover new perspectives, and preserve your visual stories with dfphoto.net. Address: 1600 St Michael’s Dr, Santa Fe, NM 87505, United States. Phone: +1 (505) 471-6001. Website: dfphoto.net.