Making a photo frame out of wood is a fulfilling project that lets you showcase your woodworking skills and display cherished memories. At dfphoto.net, we believe in combining the art of photography with the craft of woodworking, offering you a unique way to personalize your living space. From selecting the right wood to mastering the finishing touches, this guide will walk you through each step, ensuring a beautiful and durable frame that complements your photos. Embrace the blend of carpentry and visual artistry to create something truly special. Discover the elegance in handcrafted artistry, frame construction techniques, and DIY home decor, enhancing both your photographs and living spaces.
1. Why Should You Make a Photo Frame Out of Wood?
A photo frame made out of wood offers unique benefits compared to mass-produced frames. There are a multitude of reasons to consider crafting a wooden photo frame that extends beyond mere functionality and dives into personal expression and sustainable practices.
- Personalization: A wooden frame allows for complete customization, enabling you to select the type of wood, finish, and style that aligns perfectly with your decor and personal taste.
- Durability: High-quality wood frames are exceptionally durable, protecting your photos for years to come, unlike cheaper materials that may degrade over time.
- Aesthetic Appeal: The natural warmth and beauty of wood can enhance any photograph, adding a touch of elegance and sophistication to your display.
- Craftsmanship: Making your own frame is a rewarding project that allows you to develop and showcase your woodworking skills, providing a sense of accomplishment.
- Sustainability: Using reclaimed or sustainably sourced wood supports environmentally responsible practices, making your frame an eco-friendly choice.
2. What Tools and Materials Do You Need To Make A Wooden Photo Frame?
You’ll require several essential tools and materials to successfully create a wooden photo frame, ensuring the process is both smooth and enjoyable.
| Tool/Material | Description |
|---|---|
| Wood | Choose hardwoods like oak, maple, or cherry for durability and aesthetic appeal. |
| Saw | A miter saw is ideal for accurate angle cuts, while a table saw can be used for ripping boards to width. |
| Measuring Tools | A ruler, measuring tape, and combination square are essential for precise measurements. |
| Wood Glue | High-quality wood glue ensures strong joints. |
| Clamps | Miter clamps or bar clamps help hold the frame together while the glue dries. |
| Sandpaper | Various grits (120, 220, 320) are needed for smoothing the wood surface. |
| Finishing Supplies | Wood stain, varnish, or paint to enhance the wood’s appearance and protect it. |
| Safety Equipment | Safety glasses, a dust mask, and ear protection are crucial for safe operation of power tools. |
| Glass or Acrylic | To protect the photo; consider UV-protective options to prevent fading. |
| Backing Material | Cardboard or foam board to support the photo within the frame. |
| Fasteners | Brad nails or flexible tabs to hold the photo and backing in place. |
| Router (Optional) | For creating decorative edges or grooves for the glass and backing. |
| Wood Filler | To fix imperfections in the wood. |
| Picture Hanging Kit | D-rings and picture wire for hanging the frame. |
| Pencil | For marking cut lines and measurements. |
| Paintbrushes | For applying stain or varnish. |
3. What Types of Wood Are Best for Photo Frames?
Selecting the right type of wood is crucial for creating a durable and aesthetically pleasing photo frame. Here’s a detailed look at some of the best options:
- Oak: Known for its strength and prominent grain pattern, oak is an excellent choice for robust frames. White oak is particularly resistant to moisture, making it ideal for frames that may be exposed to varying humidity levels.
- Maple: Maple offers a fine, uniform texture and a naturally light color that can be stained or painted easily. Its hardness makes it suitable for frames that require intricate detailing.
- Cherry: Cherry wood is prized for its rich, reddish-brown color and smooth grain. It darkens with age, adding character to the frame over time.
- Walnut: Walnut is a premium hardwood with a deep, chocolate-brown color and a distinctive grain pattern. It provides a luxurious look and is ideal for high-end frames.
- Pine: A softwood that is easy to work with and relatively inexpensive. It’s a good option for rustic or painted frames.
- Reclaimed Wood: Using reclaimed wood not only adds character and a unique story to your frame but also promotes environmental sustainability.
4. How Do You Prepare the Wood for Making a Photo Frame?
Proper preparation is essential for achieving a professional finish on your wooden photo frame. The process ensures that the wood is smooth, clean, and ready for cutting and assembly.
- Select and Inspect: Choose your wood and carefully inspect it for any defects such as knots, cracks, or warping. Select pieces that are straight and free from significant imperfections.
- Mill the Wood: Use a jointer to create a flat, square edge on one side of the board. Then, use a planer to flatten the opposite side parallel to the first. This ensures consistent thickness.
- Rip to Width: Use a table saw to cut the boards to the desired width for your frame. Ensure all pieces are uniform for a cohesive look.
- Crosscut to Length: Cut the boards to the required length for each side of the frame, adding extra length for the miter cuts.
- Sanding: Begin with 120-grit sandpaper to remove any mill marks or imperfections. Progress to 220-grit and then 320-grit for a smooth surface. Sand with the grain to avoid scratches.
- Clean the Wood: Use a tack cloth or compressed air to remove all sanding dust. This ensures a clean surface for applying finishes.
- Acclimatize: Allow the wood to acclimatize to the environment in which the frame will be displayed. This can help prevent warping or cracking after assembly.
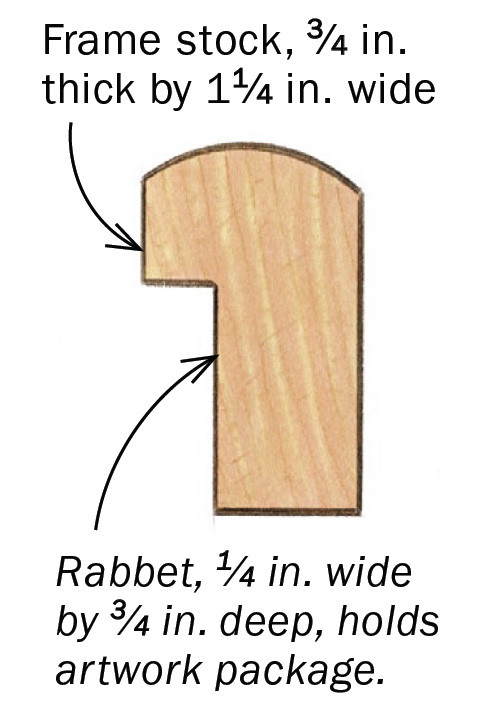
5. What Are the Key Measurements for a Photo Frame?
Accurate measurements are critical for creating a photo frame that perfectly fits your picture. Precision in this step will ensure your frame looks professional and holds the photo securely.
- Photo Size: Begin by measuring the exact dimensions of your photo. This will be the inner dimension of your frame. For example, a standard 4×6 inch photo requires an inner frame size of 4×6 inches.
- Molding Width: Decide on the width of the frame molding. A wider molding can make a statement, while a narrower one offers a more subtle look. Common widths range from 1 to 3 inches.
- Outer Dimensions: Calculate the outer dimensions of the frame by adding twice the molding width to both the length and width of the photo size. For instance, if your photo is 4×6 inches and the molding width is 1.5 inches, the outer dimensions would be 7×9 inches (4 + 1.5 + 1.5 = 7, and 6 + 1.5 + 1.5 = 9).
- Rabbet Depth and Width: The rabbet is the groove on the inside edge of the frame that holds the photo, glass, and backing. A typical rabbet depth is around 3/8 to 1/2 inch, and the width should be sufficient to accommodate the thickness of the photo, glass, and backing material (usually about 1/4 to 3/8 inch).
- Miter Angle: Ensure that your miter saw is set to a precise 45-degree angle. Accurate miter cuts are essential for creating tight, seamless corners.
6. How Do You Cut the Wood for a Photo Frame?
Cutting the wood accurately is a critical step in creating a well-fitted photo frame. Here’s how to ensure precise cuts using a miter saw:
- Miter Saw Setup: Ensure your miter saw is calibrated correctly and set to a 45-degree angle. Use a reliable square to check the accuracy of the angle.
- Measure and Mark: Measure and mark the wood pieces according to your calculated dimensions, accounting for the inner dimensions of the frame. Remember that the miter cuts will shorten the overall length of each piece.
- Cutting Technique: Place the wood firmly against the fence of the miter saw. Make the cut slowly and steadily, allowing the saw blade to do the work. Avoid forcing the blade through the wood, as this can cause splintering or inaccurate cuts.
- Cutting Order: Cut one end of each piece with a 45-degree angle. Then, flip the piece and measure from the inside point of the miter to the desired length, marking the cut line. This ensures the inner dimensions are accurate.
- Test Fit: Before applying glue, dry-fit the pieces together to ensure they align correctly and form a perfect rectangle or square. Make any necessary adjustments to the cuts.
- Consistent Cuts: For frames with identical sides, use a stop block to ensure all pieces are cut to the exact same length. This is particularly important for achieving a uniform look.
- Safety: Always wear safety glasses and ear protection when using a miter saw. Keep your hands clear of the blade and ensure the wood is securely held in place.
 Miter saw cutting a wooden frame piece
7. How To Make A Miter Joint?
Creating a strong and seamless miter joint is crucial for the structural integrity and aesthetic appeal of your photo frame. There are a few ways to create a miter joint.
- Apply Glue: Apply a thin, even layer of high-quality wood glue to both mitered surfaces. Ensure the entire surface is covered for a strong bond.
- Assemble the Frame: Carefully align the mitered corners and press them together. Use clamps to hold the corners tightly in place. Miter clamps are specifically designed for this purpose, but bar clamps can also be used with corner blocks to protect the wood.
- Check for Squareness: Ensure the frame is square by measuring the diagonals. If the measurements are equal, the frame is square. If not, adjust the clamps until the frame is square.
- Reinforcement (Optional): For added strength, consider reinforcing the miter joints with splines or dowels. Cut slots for splines using a slot cutter on a router table or drill holes for dowels. Glue the splines or dowels into place and sand flush once dry.
- Clean Up Excess Glue: Use a damp cloth to wipe away any excess glue that squeezes out of the joints. Dried glue can be difficult to remove and can interfere with the finishing process.
- Curing Time: Allow the glue to dry completely, typically 24 hours, before removing the clamps. This ensures a strong, durable joint.
- Inspect the Joints: After removing the clamps, inspect the miter joints for any gaps or imperfections. Fill any small gaps with wood filler and sand smooth once dry.
8. What Are Some Methods for Reinforcing Miter Joints?
Reinforcing miter joints is essential for ensuring the longevity and stability of your wooden photo frame. Miter joints are inherently weak due to the end grain-to-end grain glue surface.
- Splines: Cutting slots into the mitered corners and inserting splines provides a significant increase in strength. Splines can be made from contrasting wood for a decorative effect.
- Dowels: Drilling holes into the mitered corners and inserting dowels adds mechanical strength to the joint. Dowels are particularly useful for thicker frame moldings.
- Metal Fasteners: Using metal fasteners such as corrugated fasteners or V-nails can provide additional reinforcement. These are typically used in conjunction with glue for a strong, lasting joint.
- Corner Keys: Insetting decorative corner keys into the frame provides both reinforcement and visual appeal. Corner keys can be made from contrasting wood or metal.
- Bridle Joints: For a more advanced technique, consider using bridle joints to reinforce the corners. This involves creating a tenon and mortise joint at each corner, providing exceptional strength and stability.
9. How Do You Sand and Finish a Wooden Photo Frame?
Sanding and finishing are critical steps in achieving a professional look and protecting your wooden photo frame. Proper sanding ensures a smooth surface, while the finish enhances the wood’s natural beauty and provides a protective layer.
- Initial Sanding: Start with 120-grit sandpaper to remove any imperfections, such as glue residue or minor scratches. Sand with the grain to avoid creating cross-grain scratches.
- Progressive Sanding: Move to 220-grit sandpaper to further refine the surface. Continue sanding with the grain, ensuring a smooth, even texture.
- Final Sanding: Finish with 320-grit sandpaper for an ultra-smooth surface. This step is crucial for achieving a professional-looking finish.
- Dust Removal: Use a tack cloth or compressed air to remove all sanding dust. Ensure the surface is completely clean before applying any finishes.
- Staining (Optional): If desired, apply a wood stain to enhance the wood’s color. Choose a stain that complements the wood type and your desired aesthetic. Apply the stain evenly with a brush or cloth, and wipe off any excess.
- Sealing: Apply a wood sealer to prepare the surface for the final finish. A sealer helps to prevent the finish from being absorbed unevenly into the wood.
- Finishing: Apply the final finish, such as varnish, lacquer, or polyurethane. These finishes provide a protective layer that enhances the wood’s durability and appearance. Apply the finish in thin, even coats, allowing each coat to dry completely before applying the next.
- Final Sanding (Optional): After the final coat has dried, lightly sand with 400-grit sandpaper to remove any imperfections or brush marks.
- Polishing: Use a soft cloth to polish the finished surface, enhancing its sheen and smoothness.
10. What Are Some Finishing Options for a Wooden Photo Frame?
Choosing the right finish can significantly enhance the look and durability of your wooden photo frame. There are several options available, each offering unique benefits and aesthetic qualities.
- Varnish: Varnish provides a durable, protective finish that is resistant to scratches and moisture. It is available in various sheens, from matte to high gloss.
- Lacquer: Lacquer dries quickly and provides a smooth, hard finish. It is ideal for frames that require a high level of durability and resistance to wear.
- Polyurethane: Polyurethane is a synthetic finish that offers excellent protection against water, chemicals, and abrasion. It is available in both water-based and oil-based formulations.
- Oil Finish: Oil finishes, such as linseed oil or tung oil, penetrate the wood and enhance its natural beauty. They provide a soft, matte finish that is easy to repair and maintain.
- Wax Finish: Wax finishes provide a low-luster, protective coating that enhances the wood’s texture. They are best suited for frames that will not be exposed to high levels of moisture or wear.
- Paint: Painting your frame allows you to add color and personality to your project. Choose a high-quality paint that is suitable for wood and apply it in thin, even coats.
- Stain: Staining can be combined with one of the topcoat options, like a varnish. It adds richness and color to the frame.
11. How Do You Install the Glass, Photo, and Backing?
Installing the glass, photo, and backing correctly ensures your picture is protected and securely displayed within the frame. This process involves careful handling of materials to avoid damage and proper alignment for a professional finish.
- Clean the Glass or Acrylic: Use a glass cleaner and a lint-free cloth to thoroughly clean the glass or acrylic. Ensure there are no streaks, fingerprints, or dust particles.
- Insert the Glass: Carefully slide the cleaned glass or acrylic into the rabbet of the frame. Ensure it sits flush against the frame and is properly aligned.
- Position the Photo: Place your photo on top of the glass or acrylic, ensuring it is centered and properly oriented.
- Add the Backing Material: Cut a piece of cardboard or foam board to fit snugly into the rabbet behind the photo. This backing provides support and helps to hold the photo in place.
- Secure the Contents: Use brad nails, flexible tabs, or turn buttons to secure the glass, photo, and backing in the frame. Brad nails can be carefully hammered into the back of the frame, while flexible tabs can be bent to hold the contents in place. Turn buttons provide a secure and easily adjustable option.
- Check Alignment: Before fully securing the contents, double-check that the photo is properly aligned and centered within the frame.
- Final Adjustments: Make any necessary adjustments to ensure everything is properly aligned and securely held in place.
12. What Are Some Creative Design Ideas for Wooden Photo Frames?
Wooden photo frames offer endless possibilities for creative design. By incorporating unique elements and personalized touches, you can create frames that are not only functional but also works of art.
- Reclaimed Wood Frames: Use reclaimed wood to create frames with a rustic, vintage aesthetic. The natural imperfections and weathered texture of reclaimed wood add character and a unique story to your frame.
- Live Edge Frames: Incorporate live edge wood into your frames for a natural, organic look. The irregular edge of the wood adds visual interest and highlights the natural beauty of the material.
- Inlaid Frames: Add decorative inlays using contrasting wood species, metal, or stone. Inlays can be used to create intricate patterns or highlight specific areas of the frame.
- Carved Frames: Carve decorative details into the wood using hand tools or a CNC router. Carvings can range from simple geometric patterns to elaborate floral designs.
- Painted Frames: Paint your frames with vibrant colors or intricate designs. Use stencils, masking tape, or freehand techniques to create unique patterns and textures.
- Mixed Media Frames: Combine wood with other materials such as metal, glass, or fabric. For example, you could add metal accents to the corners of the frame or incorporate fabric panels into the design.
- Distressed Frames: Create a distressed look by sanding away some of the finish and adding dings and scratches. This technique gives the frame a worn, vintage appearance.
13. How Can You Personalize a Wooden Photo Frame?
Personalizing a wooden photo frame turns it into a cherished keepsake that reflects your unique style and memories. There are countless ways to add personal touches, making each frame a one-of-a-kind piece.
- Engraving: Engrave names, dates, or special messages onto the frame using a wood burning tool or laser engraver. Engraving adds a personal touch that will be treasured for years to come.
- Decoupage: Use decoupage techniques to apply decorative paper, fabric, or photos onto the frame. This allows you to create a collage of images and patterns that reflect your personal interests.
- Paint and Stencils: Use paint and stencils to add custom designs, patterns, or quotes to the frame. Stencils make it easy to create professional-looking designs, while freehand painting allows for more creative expression.
- Adding Embellishments: Attach decorative embellishments such as beads, buttons, shells, or small trinkets to the frame. These embellishments add texture and visual interest, creating a unique and personalized look.
- Photo Transfers: Transfer images directly onto the wood using photo transfer techniques. This allows you to create a frame that features a collage of your favorite photos.
- Calligraphy: Write personalized messages or quotes onto the frame using calligraphy pens. Calligraphy adds an elegant and artistic touch to your frame.
- Themed Frames: Create themed frames that reflect specific events, hobbies, or interests. For example, you could create a beach-themed frame using seashells and sand, or a travel-themed frame using maps and postcards.
14. What Are Some Common Mistakes To Avoid When Making a Wooden Photo Frame?
While making a wooden photo frame is a rewarding project, it’s easy to make mistakes that can compromise the final result. Being aware of these common pitfalls can help you avoid them and ensure a successful outcome.
- Inaccurate Measurements: One of the most common mistakes is inaccurate measurements. Always double-check your measurements before cutting the wood to ensure the frame fits the photo properly.
- Poor Miter Cuts: Sloppy miter cuts can result in gaps and misaligned corners. Use a properly calibrated miter saw and take your time to make precise cuts.
- Weak Miter Joints: Insufficient glue or clamping pressure can result in weak miter joints. Use high-quality wood glue and ensure the corners are tightly clamped while the glue dries. Consider reinforcing the joints with splines or dowels.
- Uneven Sanding: Inconsistent sanding can result in a rough or uneven finish. Sand the wood progressively, starting with a coarser grit and moving to finer grits. Always sand with the grain to avoid scratches.
- Dusty Surface: Applying a finish to a dusty surface can result in a cloudy or textured appearance. Use a tack cloth or compressed air to remove all sanding dust before applying any finishes.
- Thick Finish Coats: Applying finish coats too thickly can result in drips, runs, or an uneven sheen. Apply thin, even coats, allowing each coat to dry completely before applying the next.
- Rushing the Process: Rushing through the project can lead to mistakes and a subpar final product. Take your time, follow each step carefully, and allow sufficient drying time for glue and finishes.
- Neglecting Safety: Failing to use safety glasses, a dust mask, or ear protection can result in injuries. Always wear appropriate safety gear when working with power tools and finishes.
15. How Do You Hang a Wooden Photo Frame Securely?
Hanging a wooden photo frame securely ensures it stays safely on the wall and presents your photo in the best possible way. Proper hanging techniques prevent accidents and maintain the aesthetic appeal of your display.
- Choose the Right Hardware: Select the appropriate hanging hardware based on the size and weight of the frame. For lighter frames, small nails or adhesive hooks may suffice. For heavier frames, use D-rings, picture wire, and heavy-duty hooks or screws.
- Install D-Rings: Attach D-rings to the back of the frame, typically about one-third of the way down from the top. Use screws that are the correct length for the thickness of the frame to ensure they hold securely without protruding through the front.
- Attach Picture Wire: Thread picture wire through the D-rings, leaving enough slack to create a gentle curve when the frame is hung. Twist the wire securely around itself several times to prevent it from slipping.
- Mark the Wall: Use a pencil to mark the spot on the wall where you want to hang the frame. Use a level to ensure the mark is straight.
- Install the Hook or Screw: Install a hook or screw at the marked location. For drywall, use anchors to ensure the hook or screw can support the weight of the frame.
- Hang the Frame: Carefully hang the frame on the hook or screw. Ensure the wire is securely seated and the frame is level.
- Check Stability: Gently nudge the frame to ensure it is stable and securely hung. Make any necessary adjustments to the wire or hook.
- Alternative Hanging Methods:
- Adhesive Strips: For lightweight frames, use adhesive hanging strips. These strips are easy to apply and remove without damaging the wall.
- French Cleats: For heavier frames, consider using a French cleat system. This involves attaching a beveled strip of wood to the back of the frame and a matching strip to the wall. The frame then slides onto the cleat, providing a secure and level hanging solution.
16. Can You Make a Photo Frame Without Power Tools?
Making a photo frame without power tools is entirely possible and can be a rewarding experience, relying on traditional woodworking techniques and hand tools. This approach is not only quieter and less intimidating for beginners but also allows for a more intimate connection with the materials.
- Gather Your Hand Tools: You’ll need a hand saw (such as a backsaw or dovetail saw), a miter box, a hand plane, chisels, a marking gauge, a ruler, a square, sandpaper, glue, and clamps.
- Prepare the Wood: Use a hand plane to flatten and smooth the wood. A marking gauge can help you ensure consistent thickness for all pieces.
- Cut the Wood: Place the wood in a miter box to make accurate 45-degree cuts for the corners. A sharp hand saw is crucial for clean cuts.
- Assemble the Frame: Apply glue to the mitered corners and clamp them together. Ensure the frame is square by measuring the diagonals.
- Reinforce the Joints: Use hand tools to create slots for splines or drill holes for dowels to reinforce the miter joints. Glue the splines or dowels into place.
- Sand and Finish: Sand the frame by hand, starting with coarser grit sandpaper and moving to finer grits. Apply your chosen finish using a brush or cloth.
- Install the Photo and Backing: Use chisels to create a rabbet for the glass, photo, and backing. Secure the contents with small nails or flexible tabs.
- Benefits of Using Hand Tools:
- Quieter and Cleaner: Hand tools produce less noise and dust compared to power tools, making them ideal for small workshops or shared living spaces.
- Greater Control: Hand tools allow for greater control and precision, especially for intricate details and fine adjustments.
- Enhanced Skills: Working with hand tools enhances your woodworking skills and provides a deeper understanding of the materials.
- Sustainable Approach: Using hand tools reduces reliance on electricity and promotes a more sustainable approach to woodworking.
17. What Safety Precautions Should You Take When Making a Wooden Photo Frame?
Safety should always be a top priority when undertaking any woodworking project, including making a wooden photo frame. Following safety precautions can help prevent accidents and injuries, ensuring a safe and enjoyable experience.
- Wear Safety Glasses: Always wear safety glasses to protect your eyes from flying debris, such as wood chips and sanding dust.
- Use a Dust Mask or Respirator: Woodworking can generate a significant amount of dust, which can be harmful to your lungs. Use a dust mask or respirator to prevent inhalation of dust particles.
- Wear Ear Protection: Power tools can be very loud and prolonged exposure to high noise levels can damage your hearing. Wear earplugs or earmuffs to protect your ears.
- Work in a Well-Ventilated Area: Finishes and adhesives can release harmful fumes. Work in a well-ventilated area to prevent inhalation of these fumes.
- Secure the Workpiece: Use clamps or vises to secure the workpiece while cutting, sanding, or drilling. This prevents the wood from moving and reduces the risk of accidents.
- Keep Hands Clear of Blades: Always keep your hands clear of saw blades, router bits, and other cutting tools. Use push sticks or push blocks to guide the wood through the tool.
- Unplug Tools Before Maintenance: Always unplug power tools before changing blades, adjusting settings, or performing maintenance.
- Use Proper Lifting Techniques: When lifting heavy pieces of wood, use proper lifting techniques to avoid back strain. Bend your knees and keep your back straight.
- Store Tools Properly: Store tools in a safe and organized manner to prevent accidents. Keep sharp tools covered and out of reach of children.
- First Aid Kit: Keep a well-stocked first aid kit in your workshop for treating minor cuts, burns, and abrasions.
18. How Much Does It Cost to Make a Photo Frame Out of Wood?
The cost of making a photo frame out of wood can vary widely depending on several factors, including the type of wood, the size of the frame, the complexity of the design, and the cost of finishing materials. However, creating your own frame can often be more economical than purchasing a comparable frame from a store, especially if you already have some of the necessary tools and materials.
- Wood: The cost of wood can range from a few dollars for inexpensive softwoods like pine to several dollars for premium hardwoods like walnut or cherry. Reclaimed wood can be a cost-effective and eco-friendly option.
- Glass or Acrylic: The cost of glass or acrylic depends on the size and thickness. UV-protective options may be more expensive but offer added protection for your photos.
- Finishing Materials: The cost of stains, varnishes, paints, and sealers can vary depending on the brand and quality. A small can of stain or varnish is usually sufficient for multiple frames.
- Hardware: The cost of D-rings, picture wire, brad nails, and flexible tabs is relatively low. A picture hanging kit typically includes all the necessary hardware.
- Tools: If you already have the necessary tools, such as a miter saw, sander, and clamps, the cost will be lower. If you need to purchase tools, consider investing in high-quality tools that will last for many years.
- Additional Supplies: The cost of wood glue, sandpaper, wood filler, and other miscellaneous supplies is typically minimal.
- Labor: If you are making the frame yourself, the cost of labor is free. However, consider the value of your time and effort.
- Cost Comparison:
- DIY Frame: The total cost for materials and supplies can range from $10 to $30, depending on the factors mentioned above.
- Store-Bought Frame: A comparable frame from a store can range from $20 to $100 or more, depending on the size, materials, and design.
19. What Are the Best Woodworking Techniques for Making Photo Frames?
Mastering specific woodworking techniques is essential for creating high-quality, durable, and aesthetically pleasing photo frames. These techniques ensure precision, strength, and a professional finish.
- Accurate Measuring and Marking: Precise measurements are crucial for creating a frame that fits the photo properly. Use a ruler, measuring tape, and combination square to ensure accurate measurements and markings.
- Miter Cutting: Accurate miter cuts are essential for creating seamless corners. Use a properly calibrated miter saw and take your time to make precise cuts. Consider using a stop block to ensure all pieces are cut to the exact same length.
- Joinery: Strong joinery is essential for the structural integrity of the frame. Use high-quality wood glue and clamps to create tight, secure joints. Consider reinforcing the miter joints with splines, dowels, or metal fasteners.
- Sanding: Proper sanding is crucial for achieving a smooth, even surface. Sand the wood progressively, starting with a coarser grit and moving to finer grits. Always sand with the grain to avoid scratches.
- Finishing: Applying a finish enhances the wood’s natural beauty and provides a protective layer. Use thin, even coats and allow each coat to dry completely before applying the next. Consider using a sealer to prepare the surface for the final finish.
- Routing: A router can be used to create decorative edges or grooves for the glass and backing. Use a router table for greater control and precision.
- Wood Bending: For curved frames, use wood bending techniques such as steam bending or lamination. These techniques allow you to create unique and visually stunning designs.
- Wood Carving: Use hand tools or a CNC router to carve decorative details into the wood. Carvings can range from simple geometric patterns to elaborate floral designs.
- Inlaying: Add decorative inlays using contrasting wood species, metal, or stone. Inlays can be used to create intricate patterns or highlight specific areas of the frame.
20. Where Can You Find Inspiration and Resources for Making Wooden Photo Frames?
Finding inspiration and resources is crucial for expanding your creativity and enhancing your skills in making wooden photo frames. Numerous sources can provide ideas, tutorials, and expert advice to help you create stunning and unique frames.
- dfphoto.net: Our website offers a wealth of articles, tutorials, and project ideas related to woodworking and photography. You can find inspiration for combining these two passions to create beautiful and personalized photo frames.
- Woodworking Magazines: Magazines like Fine Woodworking, Popular Woodworking, and Woodsmith feature articles, project plans, and tips from experienced woodworkers. These magazines often include projects for making photo frames and other decorative items.
- Online Forums: Online forums like Woodworking Talk, LumberJocks, and Reddit’s r/woodworking are great places to connect with other woodworkers, ask questions, and share your projects.
- YouTube: YouTube is a treasure trove of woodworking tutorials. Channels like The Wood Whisperer, Stumpy Nubs, and Steve Ramsey offer step-by-step instructions for making photo frames and other woodworking projects.
- Pinterest: Pinterest is a visual platform where you can find endless inspiration for wooden photo frame designs. Create a board to save your favorite ideas and projects.
- Instagram: Instagram is another great platform for finding inspiration. Follow woodworkers, artists, and designers to see their latest creations and get ideas for your own projects.
- Books: Books on woodworking techniques, joinery, and finishing can provide valuable knowledge and skills for making photo frames. Look for books that focus on beginner-friendly projects and techniques.
- Local Workshops: Attend woodworking workshops or classes at local community centers, art schools, or woodworking supply stores. These workshops offer hands-on instruction and can help you develop your skills.
- Museums and Galleries: Visit museums and art galleries to see examples of woodworking and framing techniques. Pay attention to the details, such as the joinery, finishing, and design elements.
- Online Marketplaces: Browse online marketplaces like Etsy, eBay, and Amazon to see examples of wooden photo frames created by independent artists and woodworkers. This can provide inspiration for your own projects and give you ideas for unique designs.
FAQ About Making Photo Frames Out of Wood
1. What is the best type of wood for a photo frame?
The best wood types include oak, maple, cherry, and walnut for their durability and aesthetic appeal.
2. How do I ensure accurate miter cuts for the corners?
Calibrate your miter saw to 45 degrees and use a stop block to ensure consistent lengths and angles.
3. What’s the best way to reinforce miter joints?
Use splines, dowels, or metal fasteners along with high-quality wood glue for added strength.
4. How do I prevent the finish from being uneven?
Sand the wood progressively to a smooth surface, remove all dust, and apply thin, even coats of finish.
5. What’s the easiest way to hang a heavy wooden frame?
Use D-rings, picture wire, and heavy-duty hooks or screws anchored securely into the wall.
6. Can I make a photo frame without power tools?
Yes, you can use hand tools like a hand saw, miter box, hand plane, and chisels for a traditional woodworking experience.
7. How do I personalize a wooden photo frame?
Consider engraving, decoupage, painting, adding embellishments, or using photo transfer techniques.
8. What safety precautions should I take while woodworking?
Always wear safety glasses, a dust mask, and ear protection, and work in a well-ventilated area.
9. How much does it cost to make a wooden photo frame?
The cost can range from $10 to $30 depending on the wood type, size, and finishing materials used.
10. Where can I find inspiration for wooden photo frame designs?
Explore websites like dfphoto.net, woodworking magazines, online forums, YouTube, Pinterest, and Instagram.
Making a wooden photo frame is a satisfying way to blend craftsmanship with personal memories, resulting in a unique piece that enhances any photograph. By following this comprehensive guide, you’ll be well-equipped to create beautiful and durable frames that reflect your style and skills. For more inspiration, detailed tutorials, and a supportive community, visit dfphoto.net. We offer a wealth of resources to help you elevate your woodworking and photography projects, so you can create
