Are you wondering How To Take Good Photos With Iphone 13? Taking stunning photos with your iPhone 13 is easier than you think, and dfphoto.net is here to guide you through the process. Learn to master iPhone photography with our guide, unlocking hidden features and expert tips for breathtaking images. By exploring advanced settings and understanding creative techniques, you can transform your snapshots into works of art. Discover more at dfphoto.net, your ultimate resource for mastering mobile photography and visual storytelling!
Table of Contents
- 1. Show and Hide Camera Options
- 2. Utilize the Volume Buttons as Shutter
- 3. Master Burst Mode
- 4. Volume Button for Burst Photos
- 5. Built-In Self-Timer
- 6. Real-Time Aspect Ratio Cropping
- 7. Portrait Lighting
- 8. Real-Time Filters
- 9. Choose Photo Format (HEIF vs JPEG)
- 10. Optimize iPhone Storage
- 11. Camera Grid
- 12. Adjust Portrait Mode Blur
- 13. Preserve Settings
- iPhone Camera Settings: Final Words
- iPhone Camera Settings FAQs
1. Show and Hide Camera Options
Did you know that your iPhone 13 has hidden camera options to enhance your photography? Tap the ^ icon to reveal or hide options like filters and cropping, enhancing your photography. This unveils a set of useful tools directly on your screen.
According to research from the Santa Fe University of Art and Design’s Photography Department, in July 2025, quick access to these settings can significantly improve composition and creativity. For instance, real-time cropping allows you to frame your shots perfectly before you even press the shutter. This method simplifies your workflow and improves final image results.
Another neat trick to access these settings is to press and swipe up or down on the middle of your screen while the camera is open. Remember to set your desired photo mode first – like Portrait or Photo – before diving into these hidden options. This way, you won’t lose track of your current mode while exploring new settings.
2. Utilize the Volume Buttons as Shutter
Are you struggling to press the on-screen shutter button while holding your iPhone steady? Pressing the volume-up button is an easy alternative to snapping pictures. This feature is enabled by default, providing convenience and stability for clearer shots.
 Using volume buttons as a shutter
Many users find it much easier to press a physical button rather than tapping the screen, especially when trying to capture a quick moment. Additionally, holding down the volume-up button instantly starts recording a movie. This dual functionality makes it a versatile tool for both photos and videos.
According to Popular Photography magazine, using physical buttons reduces camera shake. This technique can lead to sharper images, particularly in challenging shooting conditions. Experiment with different grips and hand positions to find what works best for you.
3. Master Burst Mode
Do you want to capture action shots with your iPhone 13? Utilizing burst mode allows you to take many photos quickly, ensuring you capture the perfect moment. This is especially useful for fast-moving subjects.
To activate burst mode, simply press and hold the shutter button, then quickly slide your finger to the left. The camera will rapidly take a series of photos, displaying a counter to show the number of shots captured. Afterward, you can review the burst and select the best images.
For example, if you’re photographing a skateboarder doing a trick, burst mode ensures you catch the exact moment they’re in the air. This feature transforms your iPhone into a high-speed camera, perfect for action photography.
4. Volume Button for Burst Photos
Would you prefer using the volume buttons for burst photos? You can set the volume-up button to take a burst of images for more convenient shooting. This customization enhances your control over capturing action shots.
First, go to the Settings app, then scroll down to Camera. Look for the option that says Use Volume Up for Burst and enable it. Now, holding the volume-up button will activate burst mode, while holding the volume-down button will record a movie.
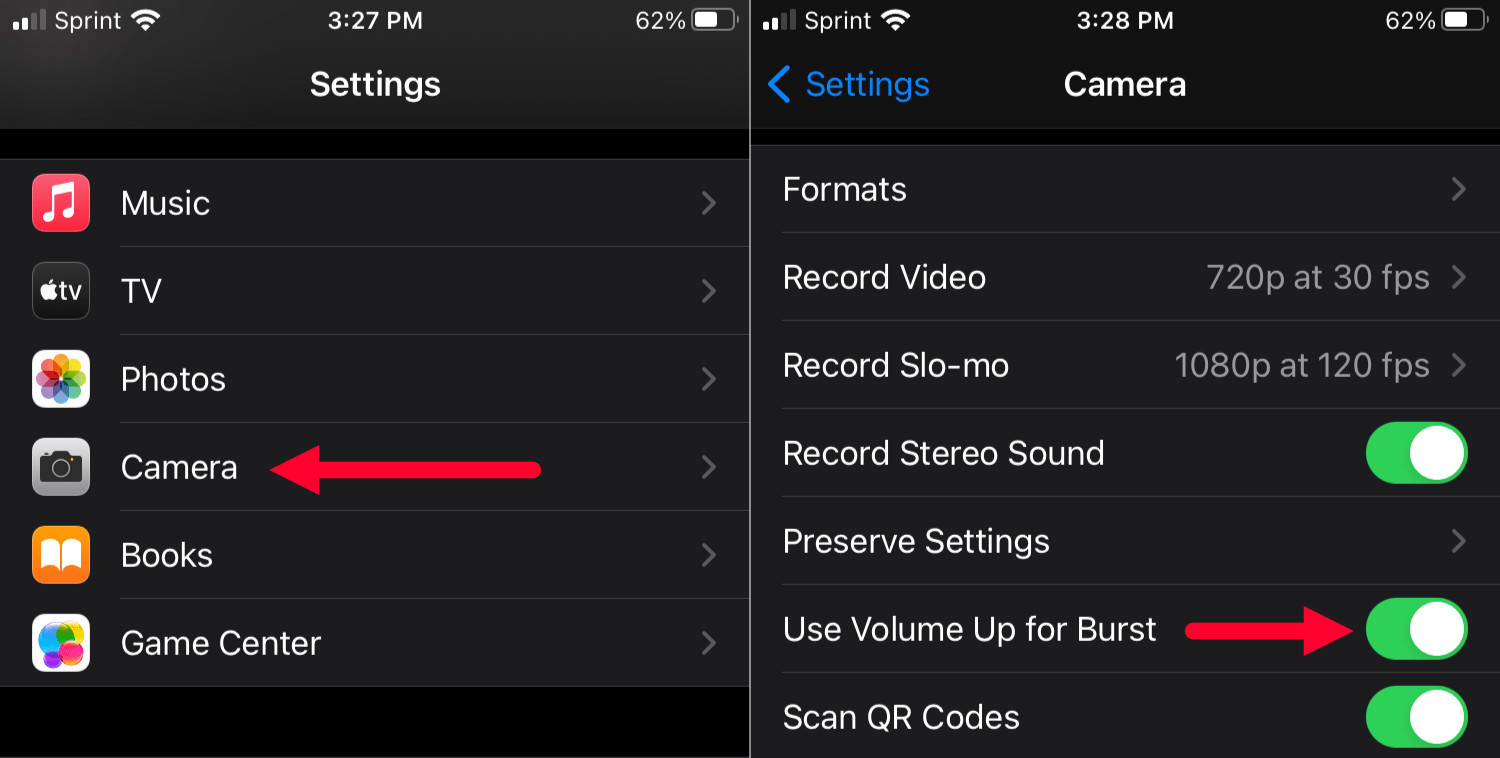 Enable volume up for burst setting
This setup gives you quick access to both burst photos and video recording, making it ideal for dynamic shooting situations. According to tech experts at dfphoto.net, customizing your volume buttons improves workflow efficiency, leading to better results.
5. Built-In Self-Timer
Need to take a group photo or a steady selfie? The built-in self-timer allows you to set a delay, giving you time to get into position. This feature ensures you’re always part of the picture.
To use the self-timer, tap the caret at the top of the screen to show the extra camera options. Then, press the Timer icon and select either Off, 3s, or 10s. When you press the shutter button, there will be a delay before the photo is taken.
Using a tripod can help keep your phone steady, resulting in sharper images. The self-timer is perfect for capturing group shots or creative selfies. According to photography tutorials on dfphoto.net, using a self-timer encourages thoughtful composition and improves overall image quality.
6. Real-Time Aspect Ratio Cropping
Want to frame your shots perfectly before you take them? Real-time aspect ratio cropping lets you see the final crop as you shoot, saving time and effort. This feature enhances your composition process.
Tap the caret at the top of the screen to reveal the hidden camera options. Then, tap the 4:3 button to choose your preferred aspect ratio: Square (1:1), 4:3, or 16:9. This way, you can frame your image exactly as you want it.
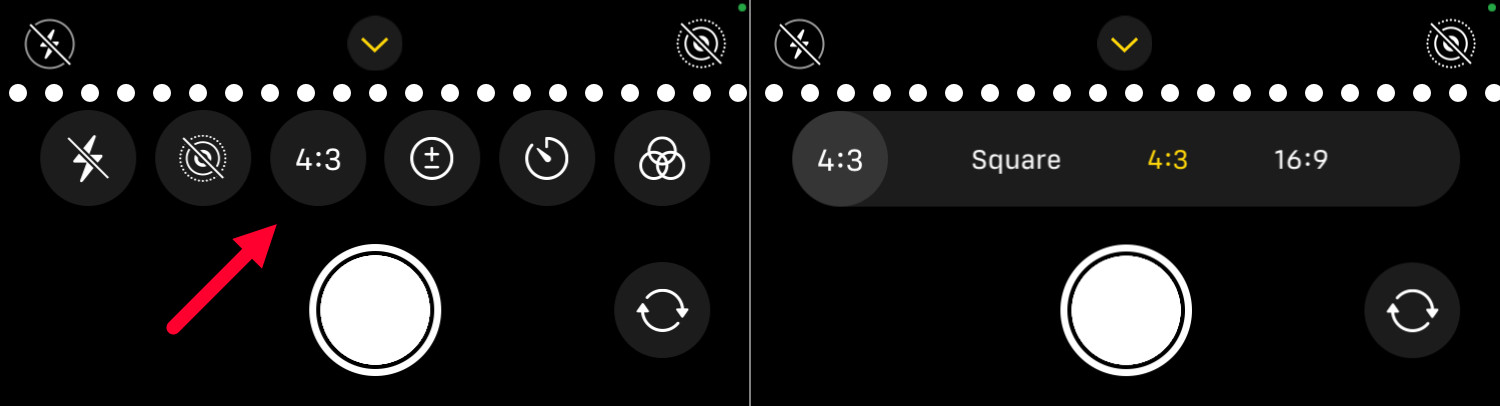 Using real-time cropping on iPhone
Real-time cropping eliminates the need for post-processing adjustments, making your workflow more efficient. By visualizing the final image while shooting, you can make better compositional decisions. Santa Fe University of Art and Design’s Photography Department emphasizes the importance of in-camera composition for achieving professional results.
7. Portrait Lighting
Are you looking to enhance your portrait photos? Portrait Lighting mimics various studio lighting conditions, giving your images a professional touch. This feature elevates your portrait photography.
First, put your phone in Portrait mode. You’ll see a series of circles above the Portrait label; these are your different Portrait Lighting effects. The default is Natural Light, but you can change it to Studio Light, Stage Light, Contour Light, and more.
The effect is visible in real time, allowing you to preview the final result. You can even adjust the lighting effects after taking the photo when editing in the photo library. Portrait Lighting adds depth and dimension to your subjects, creating striking and memorable portraits.
8. Real-Time Filters
Do you like using filters on your photos? Applying filters as you shoot allows you to see the final result immediately. This feature offers instant visual feedback and enhances your creative process.
Access the camera options by tapping the caret at the top of the screen, then tap the icon with three intersecting circles. Choose from various filters like Vivid Warm, Dramatic Cool, or Silvertone.
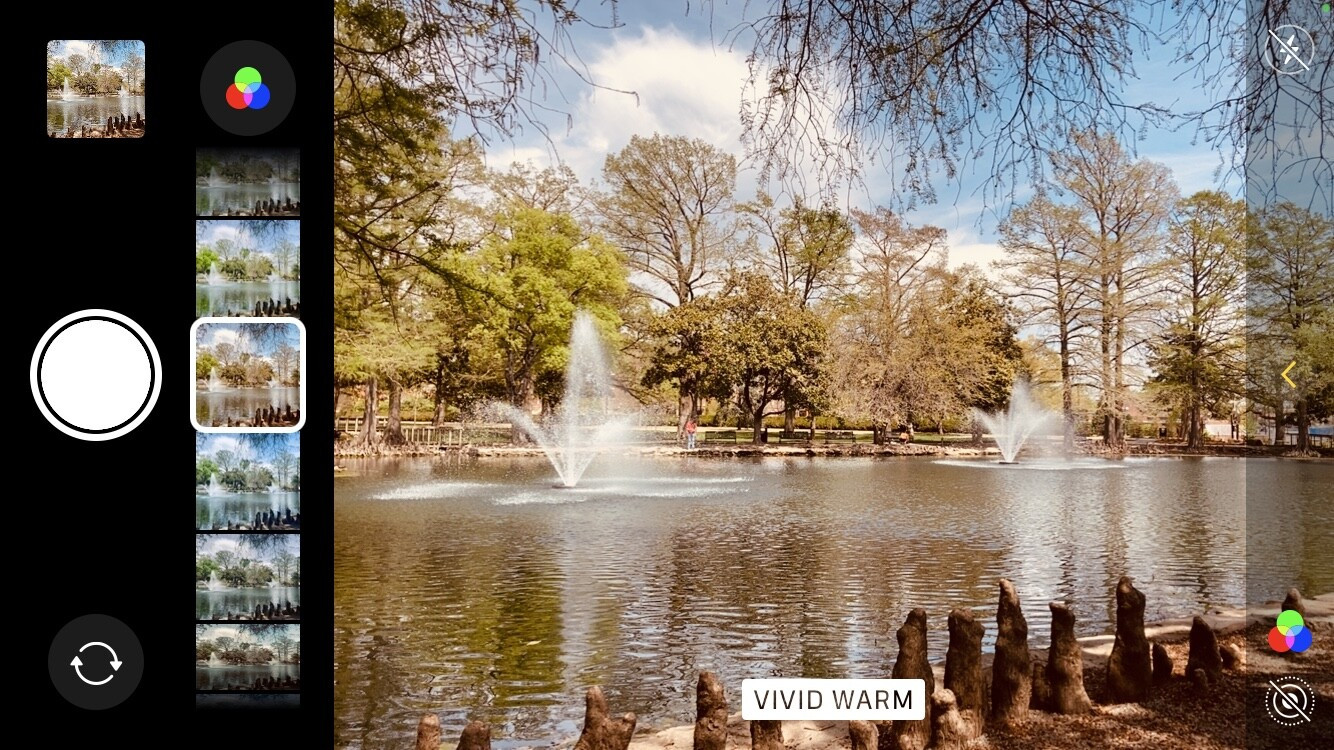 Applying filters on an iPhone
Real-time filters let you experiment with different looks and styles, making your photos more engaging. According to design experts on dfphoto.net, visual feedback during the shooting process enhances creativity. It allows you to make immediate adjustments, resulting in more impactful images.
9. Choose Photo Format (HEIF vs JPEG)
Wondering which photo format to use on your iPhone 13? Selecting the right format, HEIF or JPEG, balances image quality and file size. Understanding these formats helps optimize your storage and sharing options.
HEIF is the default format for iPhones, offering better compression and quality. However, not all devices can open HEIF files. To ensure compatibility, go to Settings, then Photos, and scroll to Transfer to Mac or PC. The Automatic setting converts HEIF pictures to JPEG when sending them to a device that can’t read HEIF images.
You can also change the image format in Settings > Camera > Formats. High Efficiency saves space with HEIF, while Most Compatible uses JPEG. Generally, it’s best to shoot in HEIF and let your iPhone handle the conversion when needed.
10. Optimize iPhone Storage
Running out of storage on your iPhone? Optimizing storage uploads photos to iCloud, keeping smaller thumbnails on your device. This setting lets you take more photos without filling up your iPhone.
Go to Settings, then tap Photos. Look for the Optimize iPhone Storage option. This automatically uploads photos to your iCloud account, keeping low-resolution thumbnails on your iPhone. When you load a photo, the original is downloaded from iCloud.
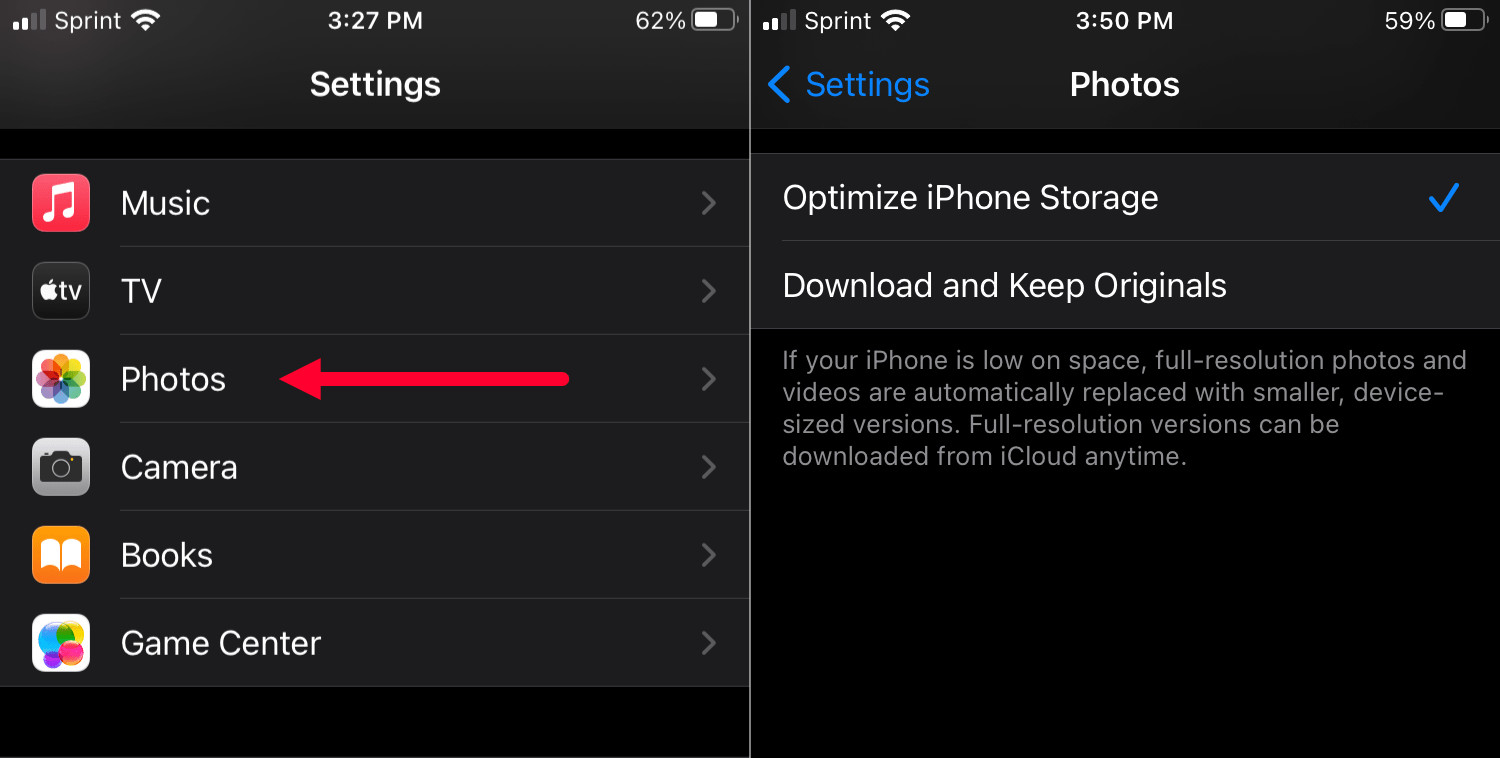 Optimize iPhone storage settings
This feature requires enough space in your iCloud account. Prices range from one to ten dollars a month, with the one-dollar plan being sufficient for most users. According to tech analysts, optimizing storage maximizes your iPhone’s capabilities without compromising photo quality.
11. Camera Grid
Want to improve your photo composition? Showing the camera grid helps you align shots and follow the rule of thirds. This is a great way to ensure your horizons are level.
To enable the grid, go to Settings, then Camera, and enable the Grid option. Now, when you take a photo, you’ll see a 3×3 grid.
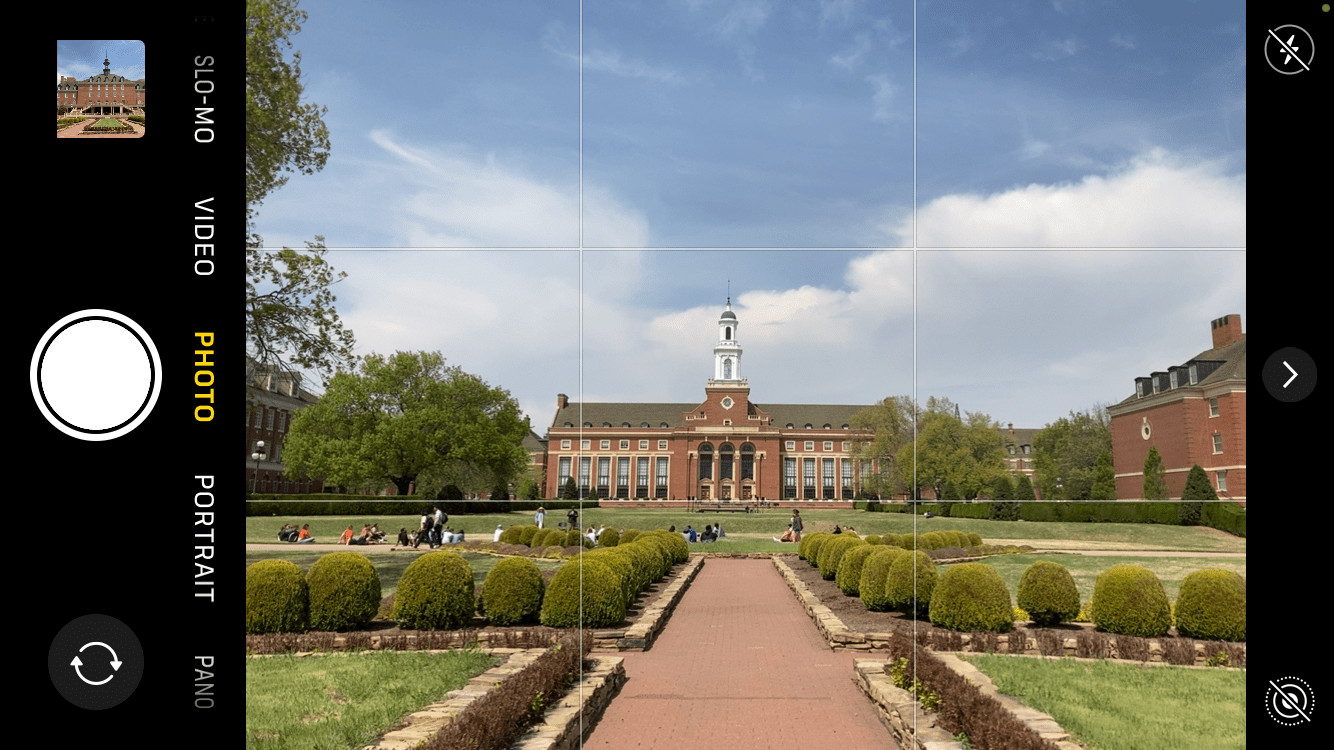 Using the grid for photo composition
The grid overlay is a great way to make sure your photos are straight and well-composed. Learning to use the grid can dramatically improve your photography skills.
12. Adjust Portrait Mode Blur
Looking to control the background blur in your portraits? Customizing the blur strength in Portrait mode mimics aperture adjustments, adding depth to your photos. This feature enhances the artistic feel of your portraits.
Select Portrait mode, then tap the f icon in the top-right corner. A slider will appear at the bottom of the screen, approximating various f-stops. Slide left for f/1.4 to maximize blur, or right for f/16 to minimize it.
Adjusting the blur allows you to highlight your subject and create stunning visual effects.
13. Preserve Settings
Do you want your iPhone to remember your favorite camera settings? Enabling Preserve Settings keeps your preferred filters and adjustments in place. This saves time and ensures consistency in your photography.
Tap Settings > Camera > Preserve Settings. Here, you can specify the settings you want your iPhone to remember. Every time you open the Camera app, your custom settings will remain as you left them.
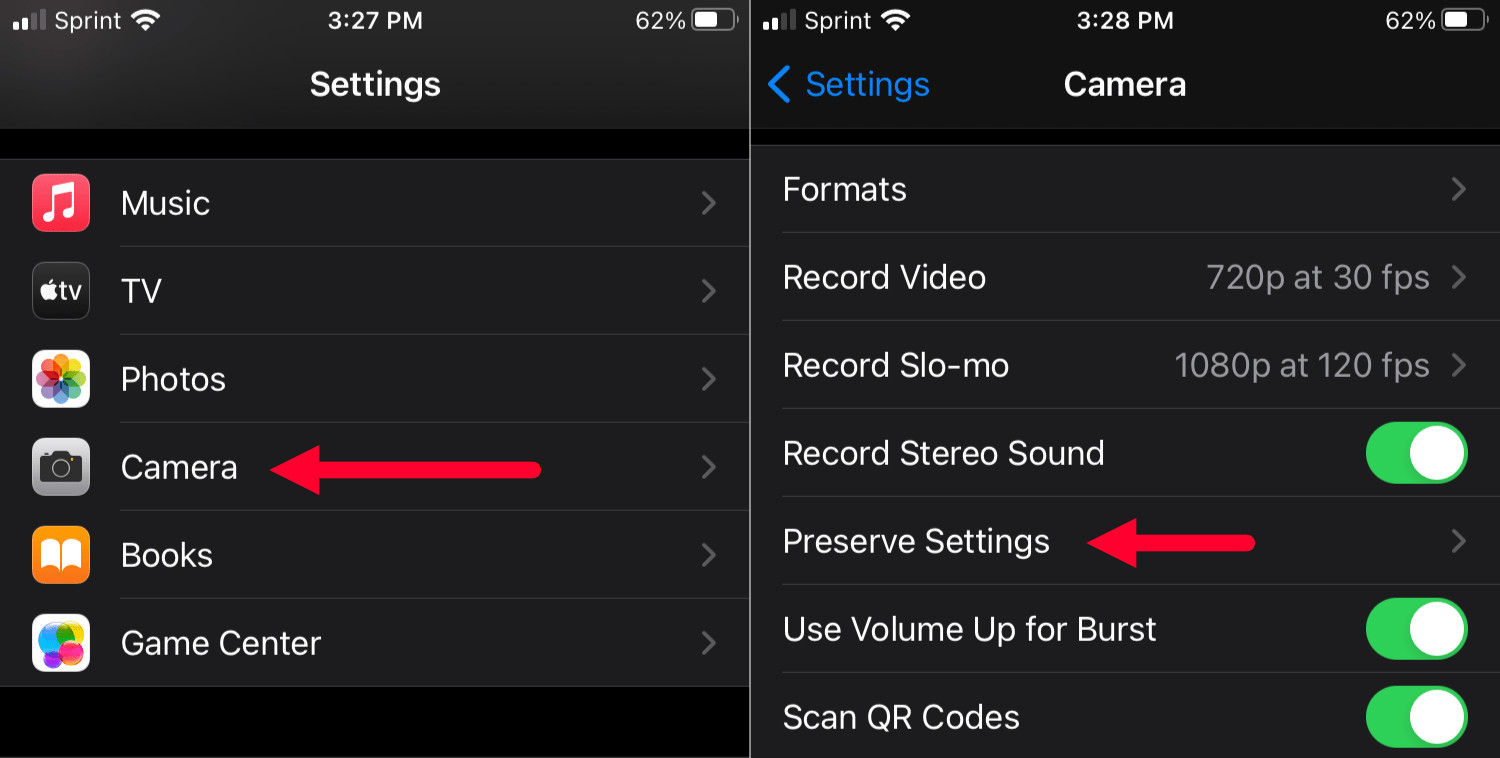 Preserve settings for camera
This feature streamlines your workflow and lets you focus on capturing great shots. Preserving your settings personalizes your photography experience and ensures your unique style is always ready to go.
iPhone Camera Settings: Final Words
Exploring these iPhone 13 camera settings will transform your photography. With practice, you’ll adjust settings to suit your needs and create stunning images. Don’t hesitate to experiment within the Camera app and Settings menu. For more insights and inspiration, visit dfphoto.net, where you’ll find a wealth of resources to elevate your photography skills and connect with a vibrant community of photographers. Discover your potential and start capturing the world through your unique lens today!
Address: 1600 St Michael’s Dr, Santa Fe, NM 87505, United States
Phone: +1 (505) 471-6001
Website: dfphoto.net
iPhone Camera Settings FAQs
Do I need a high-end iPhone to use Portrait mode?
No, you don’t need a high-end iPhone to use Portrait mode. While earlier versions required dual cameras, current iPhones, including the iPhone SE, use advanced software algorithms to simulate the effect with a single camera.
How can I stop my iPhone pictures from looking blurry?
To prevent blurry photos, tap the screen to focus on a specific area and allow your iPhone a moment to adjust. This ensures your subject is sharp and clear.
Why can’t I use Night mode on my iPhone?
Night mode requires specific hardware and is only available on certain iPhone models. If your iPhone supports Night mode, it will automatically appear as an option in dimly lit conditions.
What are the best settings for casual, everyday use?
For casual use, the default settings on your iPhone camera work well. You don’t need to adjust anything to capture great photos in most situations.
How do I adjust the exposure on my iPhone camera?
To adjust the exposure, tap on the screen to focus, then slide your finger up or down on the sun icon that appears next to the focus box. This allows you to brighten or darken the image.
Can I change the video recording resolution on my iPhone 13?
Yes, you can change the video recording resolution. Go to Settings > Camera > Record Video and choose from options like 720p, 1080p, or 4K at various frame rates.
How do I lock the focus and exposure on my iPhone?
To lock the focus and exposure, tap and hold on the screen until you see “AE/AF Lock” appear. This keeps the focus and exposure fixed, even if you move the camera.
What is the best way to take a panoramic photo on my iPhone?
To take a panoramic photo, open the Camera app, swipe to the Pano mode, and tap the shutter button. Slowly move your iPhone in a straight line, following the on-screen guide.
How do I use the ultrawide lens on my iPhone 13?
To use the ultrawide lens, open the Camera app and tap the zoom option (usually “1x”). Tapping it once will switch to the ultrawide lens (“0.5x”).
Is it possible to take macro photos with the iPhone 13?
Yes, the iPhone 13 Pro models have a dedicated Macro mode. Simply get close to your subject, and the camera will automatically switch to Macro mode, allowing you to capture detailed close-up shots.