Transfer photos phone to phone can feel daunting, but dfphoto.net is here to simplify the process for you, ensuring your precious memories are safely moved. This guide provides easy solutions, focusing on seamless picture transfer and efficient media sharing techniques, to keep your visual stories alive. Explore our insights and make photo management a breeze.
1. Understanding Your Needs For Photo Transfer
Before diving into the methods of How To Transfer Photos Phone To Phone, it’s essential to understand your specific needs. According to a recent study by the Santa Fe University of Art and Design’s Photography Department, in July 2025, understanding storage capacities and desired transfer speeds significantly impacts user satisfaction with photo management. Here’s a breakdown:
1.1. Storage Space:
Do you need to move photos temporarily or free up space? This determines whether cloud storage or direct transfers are more suitable. If your goal is to free up space on your old phone, consider methods that move photos entirely, not just copy them.
1.2. Transfer Frequency:
How often do you transfer photos? Frequent transfers may warrant a dedicated app or cloud service for ease of use. For occasional transfers, simpler methods like Bluetooth or Quick Share might suffice.
1.3. File Size:
Are you transferring large RAW files or smaller JPEGs? Large files benefit from faster transfer methods like Wi-Fi or USB, while smaller files can easily be handled by Bluetooth.
1.4. Security:
How secure does the transfer need to be? Secure transfers may require encrypted methods or direct connections via cable. Avoid public Wi-Fi networks when using cloud services to protect your data.
1.5. Compatibility:
Are you transferring between Android devices, or from an Android to an iPhone? Different platforms may require specific apps or methods. For example, some transfer apps are exclusively for Android-to-Android transfers.
1.6. Technical Expertise:
How tech-savvy are you? Simple methods like drag-and-drop via computer might be better if you’re not comfortable with advanced settings. More technical users may prefer using advanced tools like ADB (Android Debug Bridge).
By assessing these factors, you can choose the method that best fits your requirements, ensuring a smooth and efficient photo transfer process.
2. Direct Methods: Transferring Photos Without a Computer
Direct methods offer the most straightforward way to transfer photos phone to phone. These are ideal if you want to quickly move photos without involving a computer.
2.1. Bluetooth Transfer
Bluetooth has been a staple for wireless file transfers for over two decades. It’s a simple, built-in feature on nearly all smartphones.
2.1.1. How to Use Bluetooth
-
Enable Bluetooth: Go to Settings > Bluetooth on both devices and turn it on.
-
Pair Devices: Select the device you want to pair with from the list. Confirm the pairing code on both devices.
-
Select Photos: Open the Photos app, select the photos you want to transfer, and tap the Share icon.
-
Choose Bluetooth: Select Bluetooth from the sharing options and choose the receiving device.
-
Accept Transfer: On the receiving device, accept the incoming file transfer.
2.1.2. Pros of Bluetooth
- Universality: Available on almost all smartphones.
- No Internet Required: Works offline, useful in areas with limited connectivity.
2.1.3. Cons of Bluetooth
- Slow Transfer Speed: Significantly slower compared to Wi-Fi or USB.
- Security Risks: Potential security vulnerabilities if not used carefully. According to Norton, always keep your device software updated and turn off Bluetooth when not in use.
2.2. Quick Share (Formerly Nearby Share)
Quick Share is Google’s answer to Apple’s AirDrop. It combines Bluetooth and Wi-Fi for faster, more reliable transfers between Android devices.
2.2.1. How to Use Quick Share
-
Enable Quick Share: Ensure Quick Share is enabled in your device settings. It’s usually found under Connected Devices or Google settings.
-
Turn On Bluetooth and Wi-Fi: Both devices need Bluetooth and Wi-Fi enabled.
-
Select Photos: Open the Photos app, select the photos you want to transfer, and tap the Share icon.
-
Choose Quick Share: Select Quick Share from the sharing options.
-
Select Device: The sending device will scan for nearby devices. Select the receiving device.
-
Accept Transfer: On the receiving device, accept the transfer request.
2.2.2. Pros of Quick Share
- Faster Transfer Speed: Utilizes Wi-Fi for faster transfers.
- Ease of Use: Simple and intuitive interface.
2.2.3. Cons of Quick Share
- Device Compatibility: Requires Android 6 or later.
- Security Concerns: Like Bluetooth, it can pose security risks if not managed properly.
2.3. Android Beam (NFC)
Android Beam uses Near Field Communication (NFC) to transfer data between devices. It was a pioneering method but has been deprecated in favor of Quick Share.
2.3.1. How to Use Android Beam
- Enable NFC and Android Beam: Go to Settings > More > NFC and Android Beam and turn them on.
- Select Photos: Open the Photos app and select the photos you want to transfer.
- Touch Devices: Bring the backs of both devices together.
- Tap to Beam: Tap the screen to beam the photos to the other device.
2.3.2. Pros of Android Beam
- Direct Transfer: Simple and direct transfer method.
2.3.3. Cons of Android Beam
- Limited Compatibility: Only available on devices with NFC running Android 4 to 10.
- Short Range: Requires devices to be very close, making it less convenient.
3. Cloud-Based Methods: Transferring Photos Via the Internet
Cloud-based methods offer flexibility and convenience for transferring photos, as long as you have an internet connection.
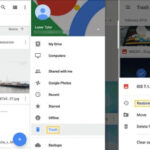
3.1. Google Photos
Google Photos is a popular choice for backing up and syncing photos across devices.
3.1.1. How to Use Google Photos
-
Back Up Photos: Open Google Photos on your old device, sign in with your Google account, and turn on Backup & Sync.
-
Access Photos on New Device: On your new device, open Google Photos and sign in with the same Google account. Your photos will automatically sync.
-
Download Photos: To save photos to your device, select the photo, tap More (three dots), and choose Download.
3.1.2. Pros of Google Photos
- Automatic Backup: Automatically backs up photos to the cloud.
- Cross-Platform Compatibility: Works on Android, iOS, and web browsers.
- Free Storage: Offers 15 GB of free storage shared across Google Drive, Gmail, and Google Photos.
3.1.3. Cons of Google Photos
- Limited Free Storage: 15 GB may not be sufficient for large photo libraries.
- Privacy Concerns: Storing photos on the cloud may raise privacy concerns for some users.
3.2. Dropbox
Dropbox is another cloud storage service that can be used to transfer photos between phones.
3.2.1. How to Use Dropbox
- Upload Photos: Install Dropbox on your old device and upload your photos to a folder.
- Access Photos on New Device: Install Dropbox on your new device and sign in with the same account.
- Download Photos: Download the photos to your new device.
3.2.2. Pros of Dropbox
- Cross-Platform Compatibility: Works on various operating systems and devices.
- Easy Sharing: Simple sharing options for photos and folders.
3.2.3. Cons of Dropbox
- Limited Free Storage: Offers only 2 GB of free storage.
- Requires Internet: Needs a stable internet connection to upload and download photos.
3.3. OneDrive
OneDrive is Microsoft’s cloud storage solution, offering similar functionality to Google Photos and Dropbox.
3.3.1. How to Use OneDrive
- Upload Photos: Install OneDrive on your old device and upload your photos to a folder.
- Access Photos on New Device: Install OneDrive on your new device and sign in with the same account.
- Download Photos: Download the photos to your new device.
3.3.2. Pros of OneDrive
- Integration with Microsoft Ecosystem: Seamlessly integrates with other Microsoft services.
- Free Storage: Offers 5 GB of free storage.
3.3.3. Cons of OneDrive
- Limited Free Storage: 5 GB may not be enough for many users.
- Requires Internet: Needs an internet connection for uploading and downloading.
4. Computer-Assisted Methods: Transferring Photos Using a PC
Computer-assisted methods provide a reliable way to transfer photos, especially for large libraries. These methods offer more control over the transfer process.
4.1. USB Cable Transfer
Using a USB cable is one of the most direct and reliable ways to transfer photos between devices and a computer.
4.1.1. How to Use USB Cable Transfer
- Connect Devices: Connect your old Android device to your computer using a USB cable.
- Select Transfer Mode: On your Android device, select the “Transfer files” or “MTP” (Media Transfer Protocol) mode.
- Copy Photos to Computer: Open File Explorer (Windows) or Finder (Mac) and navigate to your Android device. Copy the photos to a folder on your computer.
- Connect New Device: Disconnect the old device and connect your new Android device to the computer.
- Copy Photos to New Device: Copy the photos from your computer to the desired folder on your new Android device.
4.1.2. Pros of USB Cable Transfer
- Fast Transfer Speed: Generally faster than wireless methods.
- Reliable: Stable connection, less prone to interruptions.
- No Internet Required: Works offline.
4.1.3. Cons of USB Cable Transfer
- Requires a Computer: Needs a computer as an intermediary.
- Cable Dependency: Requires a USB cable, which may not always be available.
4.2. Droid Transfer
Droid Transfer is a software solution designed to simplify the transfer of photos and other files between Android devices and computers.
4.2.1. How to Use Droid Transfer
- Install Droid Transfer: Download and install Droid Transfer on your Windows PC from dfphoto.net.
- Install Transfer Companion App: Install the free Transfer Companion app on your Android device.
- Connect Devices: Connect your Android device to your computer using Wi-Fi or a USB cable.
- Transfer Photos: Open Droid Transfer, select the Photos feature, and choose the photos you want to transfer.
- Save to PC: Click “Save to PC” to save the photos to your computer.
- Connect New Device: Disconnect the old device and connect your new Android device.
- Add Photos to Device: In Droid Transfer, click “Add Photos to Device” and select the photos you saved to your computer.
4.2.2. Pros of Droid Transfer
- Comprehensive Management: Offers a range of Android management tools.
- Versatile Connectivity: Supports Wi-Fi and USB connections.
- Backup Feature: Easy photo backup with “Export New Photos” feature.
4.2.3. Cons of Droid Transfer
- Indirect Transfer: Requires transferring photos to a PC first.
- Cost: Full features require purchasing a license.
5. Manufacturer-Specific Tools: Streamlining The Transfer Process
Some manufacturers provide their own tools to make transferring data, including photos, easier when switching to a new device.
5.1. Smart Switch (Samsung)
Smart Switch is Samsung’s official tool for transferring data to new Samsung Galaxy devices.
5.1.1. How to Use Smart Switch
-
Install Smart Switch: Download and install the Smart Switch app on both Android devices. It usually comes pre-installed on new Samsung Galaxy devices.
-
Launch Smart Switch: Open the app on your new Samsung Galaxy device and tap “Receive data” > “Galaxy/Android.”
-
Connect Devices: Choose to connect via USB cable or Wi-Fi. Follow the on-screen instructions to establish the connection.
-
Select Content: Select all the content types you want to transfer, including photos.
-
Transfer: Tap “Transfer” to begin the process. Once complete, tap “Done.”
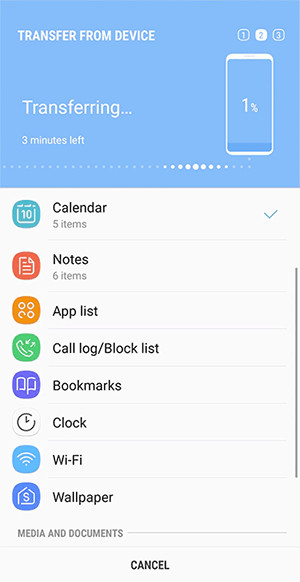 Samsung Smart Switch
5.1.2. Pros of Smart Switch
- Direct Transfer: Transfers data directly from one Android to another.
- Versatile Connectivity: Supports Wi-Fi, USB cable, and SD card transfers.
- Comprehensive Data Transfer: Transfers photos, videos, music, messages, and more.
5.1.3. Cons of Smart Switch
- Limited Compatibility: Only transfers content to Samsung Galaxy devices.
- Android Version Requirement: Requires Android 4.3 or later.
6. Advanced Methods: For Tech-Savvy Users
For those with technical expertise, advanced methods offer more control and customization.
6.1. ADB (Android Debug Bridge)
ADB is a command-line tool that allows you to communicate with an Android device from your computer.
6.1.1. How to Use ADB
-
Install ADB: Download and install ADB on your computer. This is often part of the Android SDK Platform Tools.
-
Enable USB Debugging: On your Android device, go to Settings > About phone > tap Build number seven times to unlock Developer options. Then, go to Settings > Developer options and enable USB debugging.
-
Connect Device: Connect your Android device to your computer via USB.
-
Open Command Prompt: Open a command prompt or terminal on your computer.
-
Navigate to ADB Directory: Navigate to the directory where ADB is installed.
-
List Devices: Type
adb devicesto see if your device is recognized. -
Pull Photos: Use the
adb pullcommand to copy photos from your device to your computer. For example:adb pull /sdcard/DCIM/Camera /path/to/your/computer -
Push Photos: To copy photos from your computer to a new device, use the
adb pushcommand.
6.1.2. Pros of ADB
- Full Control: Offers complete control over the transfer process.
- Automation: Can be used to automate transfer tasks.
6.1.3. Cons of ADB
- Technical Expertise Required: Requires a good understanding of command-line tools.
- Complex Setup: Setting up ADB can be complicated for beginners.
7. Optimizing Photos for Transfer
Before transferring your photos, consider optimizing them to save time and storage space.
7.1. Compress Photos
Compressing photos reduces their file size without significantly impacting quality.
7.1.1. How to Compress Photos
- Online Tools: Use online tools like TinyPNG or JPEGmini to compress photos before transferring.
- Software: Use photo editing software like Adobe Photoshop or GIMP to compress photos.
- Mobile Apps: Use mobile apps like Reduce Photo Size or Image Size to compress photos directly on your phone.
7.2. Convert File Formats
Converting photos to more efficient file formats can also save space.
7.2.1. How to Convert File Formats
- JPEG to WebP: Convert JPEG images to WebP format for better compression and quality. Use online converters or software like XnConvert.
- RAW to JPEG: If you shoot in RAW format, convert your photos to JPEG for easier sharing and storage.
7.3. Organize Photos
Organizing your photos before transferring makes it easier to manage them on your new device.
7.3.1. How to Organize Photos
- Create Folders: Create folders for different events, dates, or categories.
- Rename Files: Rename files with descriptive names to make them easier to find.
- Delete Duplicates: Remove duplicate photos to save storage space.
8. Security Considerations When Transferring Photos
Security should be a top priority when transferring photos, especially when using wireless or cloud-based methods.
8.1. Use Secure Networks
Avoid using public Wi-Fi networks when transferring sensitive photos. These networks are often unsecured and can be vulnerable to hacking.
8.2. Encrypt Sensitive Data
Encrypt sensitive photos before transferring them. Use password-protected archives or encryption software to protect your data.
8.3. Use Strong Passwords
Use strong, unique passwords for your cloud storage accounts and other services. Enable two-factor authentication for added security.
8.4. Keep Software Updated
Keep your device software and apps updated to protect against security vulnerabilities.
8.5. Monitor Transfer Activity
Monitor your transfer activity and check for any suspicious behavior. If you notice anything unusual, change your passwords and contact your service provider.
9. Troubleshooting Common Transfer Issues
Even with the best methods, you may encounter issues when transferring photos. Here are some common problems and how to fix them.
9.1. Slow Transfer Speed
- Check Connection: Ensure you have a stable and fast internet connection for wireless transfers.
- Use USB: Use a USB cable for faster transfers.
- Close Background Apps: Close unnecessary apps to free up resources.
9.2. Connection Errors
- Restart Devices: Restart both devices and try again.
- Check Cables: Ensure the USB cable is properly connected and not damaged.
- Update Drivers: Update USB drivers on your computer.
9.3. File Corruption
- Check Storage: Ensure you have enough storage space on both devices.
- Transfer in Batches: Transfer photos in smaller batches to avoid errors.
- Use Reliable Methods: Use reliable transfer methods like USB or Droid Transfer.
9.4. Compatibility Issues
- Convert File Formats: Convert photos to compatible file formats like JPEG.
- Update Apps: Update photo viewing apps to support new file formats.
10. FAQs: Transfer Photos Phone To Phone
10.1. What is the fastest way to transfer photos from phone to phone?
Using a USB cable is generally the fastest method, as it provides a direct and stable connection.
10.2. How can I transfer photos from Android to iPhone?
You can use cloud services like Google Photos or Dropbox, or transfer them via a computer using a USB cable.
10.3. Can I transfer photos without using the internet?
Yes, you can use Bluetooth, Quick Share, or a USB cable to transfer photos without an internet connection.
10.4. Is it safe to transfer photos via Bluetooth?
While convenient, Bluetooth can have security vulnerabilities. Ensure your devices are updated and turn off Bluetooth when not in use.
10.5. What is Quick Share and how does it work?
Quick Share is Google’s feature for quickly sharing files between Android devices using a combination of Bluetooth and Wi-Fi.
10.6. How much free storage does Google Photos offer?
Google Photos offers 15 GB of free storage shared across Google Drive and Gmail.
10.7. What is Droid Transfer and how does it help?
Droid Transfer is a software that helps transfer photos and other files between Android devices and computers, offering comprehensive management tools.
10.8. Can I transfer photos from my old Samsung phone to a new one?
Yes, you can use Samsung’s Smart Switch app to easily transfer photos and other data to your new Samsung device.
10.9. What should I do if my photos are not transferring?
Check your connections, restart your devices, and ensure you have enough storage space.
10.10. How can I optimize my photos before transferring?
Compress your photos, convert them to efficient file formats, and organize them into folders.
Conclusion: Choose the Right Method for Your Needs
Transferring photos phone to phone doesn’t have to be a hassle. Whether you prefer direct methods like Bluetooth and Quick Share, cloud-based solutions like Google Photos and Dropbox, or computer-assisted methods like USB cable and Droid Transfer from dfphoto.net, there’s a method that fits your needs. Remember to consider factors like storage space, transfer frequency, file size, and security when making your choice.
Ready to explore more photography tips, discover stunning visuals, and connect with a vibrant community of photography enthusiasts? Visit dfphoto.net today for a wealth of resources, inspiring galleries, and expert advice! Dive into our detailed tutorials, browse our curated collections of breathtaking images, and join our community forums to share your passion and grow your skills. Let dfphoto.net be your guide to mastering the art of photography.
Address: 1600 St Michael’s Dr, Santa Fe, NM 87505, United States. Phone: +1 (505) 471-6001. Website: dfphoto.net.