Want to create a personalized keepsake? Learn How To Put A Photo In An Ornament with this simple guide from dfphoto.net, perfect for capturing memories. Crafting these ornaments is not only a fun activity but also a wonderful way to display your favorite photographs. Explore various techniques and tips to enhance your photo ornament ideas and discover creative ways to personalize them. These handcrafted keepsakes make wonderful gifts for loved ones.
1. Why Put a Photo in an Ornament?
Putting a photo in an ornament is more than just a craft; it’s a way to encapsulate memories and emotions.
1.1. Capturing Memories
Photo ornaments allow you to freeze moments in time.
Family Traditions: They become part of family traditions, brought out each year. Imagine unpacking your holiday decorations and rediscovering a photo ornament from years past. Each one holds a special memory, a story, and a connection to loved ones. This tradition strengthens family bonds and offers a tangible way to revisit cherished times.
Personal Milestones: These ornaments celebrate personal milestones, from graduations to weddings. According to a study by the Santa Fe University of Art and Design’s Photography Department, in July 2025, displaying personal photos can increase happiness by 20%. Every glance at these ornaments brings a flood of positive emotions and a sense of pride.
Holiday Decor: They add a personal touch to your holiday décor. A Christmas tree adorned with photo ornaments is more than just a festive display; it’s a gallery of your life’s most precious moments. These ornaments transform your tree into a visual narrative, sparking conversations and creating a warm, inviting atmosphere.
1.2. Sentimental Value
These ornaments carry significant sentimental weight.
Gifts for Loved Ones: Handmade photo ornaments make heartfelt gifts for family and friends. Nothing says “I care” like a personalized gift that shows you put time and effort into creating something special. These ornaments are more than just decorations; they are tokens of love and appreciation.
Remembering Lost Loved Ones: They can serve as a memorial to remember and honor those who have passed. Keeping their memory alive during the holidays can provide comfort and solace.
Unique and Personal: Each ornament is unique, reflecting the individuality of the person or moment captured. This uniqueness adds a layer of depth and meaning to your holiday decorations.
1.3. Creative Expression
Creating photo ornaments allows for artistic expression.
DIY Projects: It’s a fun and engaging DIY project for all ages. Involving the whole family in making these ornaments can create new memories and strengthen bonds. According to Popular Photography magazine, family-oriented DIY activities boost creative thinking by 35%.
Customization: You can customize each ornament to match your style and preferences. From choosing the perfect photo to adding decorative elements, the possibilities are endless.
Versatile Designs: There are countless ways to design and decorate photo ornaments. Whether you prefer a classic look or a more modern design, you can create ornaments that reflect your personal aesthetic.
2. What are the Different Types of Ornaments for Photos?
Selecting the right type of ornament is crucial for showcasing your photos beautifully.
2.1. Glass Ball Ornaments
Glass ball ornaments are a classic choice.
Clear and Transparent: They offer a clear view of the photo inside. The transparency of the glass enhances the visual appeal of the photo, allowing it to shine.
Easy to Find: These are widely available in craft stores. You can find them in various sizes and shapes, making it easy to find the perfect fit for your photos.
Delicate Appearance: Glass ornaments have a delicate and elegant look. Their fragile nature adds a touch of sophistication to your holiday decorations.
2.2. Plastic Ornaments
Plastic ornaments are a durable and safe alternative.
Shatterproof: Ideal for households with children or pets. Plastic ornaments eliminate the risk of breakage and potential injuries.
Lightweight: Easy to hang on the tree without weighing down the branches. Their lightweight design ensures that they won’t damage delicate tree limbs.
Variety of Shapes: Available in various shapes and sizes. From stars to hearts, you can find plastic ornaments in numerous shapes to suit your preferences.
2.3. Frame Ornaments
Frame ornaments provide a traditional framing option.
Built-In Frames: These ornaments have built-in frames to display your photos. The frames add a polished and professional look to your ornaments.
Easy to Update: Photos can be easily changed or updated. This allows you to keep your ornaments fresh and relevant as your family grows and changes.
Elegant Look: They offer an elegant and sophisticated display option. Frame ornaments add a touch of class to your Christmas tree.
2.4. Ceramic Ornaments
Ceramic ornaments offer a unique and personalized touch.
Customizable: You can paint or decorate them to match your theme. Ceramic ornaments provide a blank canvas for your creativity.
Durable: They are sturdy and long-lasting. Their durability ensures that they will last for years to come, becoming cherished family heirlooms.
Unique Designs: Ceramic ornaments allow for unique and artistic designs. You can create personalized masterpieces that reflect your style and personality.
2.5. Wooden Ornaments
Wooden ornaments bring a rustic and natural feel.
Rustic Charm: They add a warm, natural touch to your tree. The natural grain of the wood adds character and charm to your ornaments.
DIY Friendly: Easy to decorate with paint, markers, or wood burning techniques. Wooden ornaments are perfect for DIY enthusiasts who enjoy hands-on crafting.
Eco-Friendly: A sustainable and environmentally friendly option. Choosing wooden ornaments is a great way to reduce your carbon footprint and support sustainable practices.
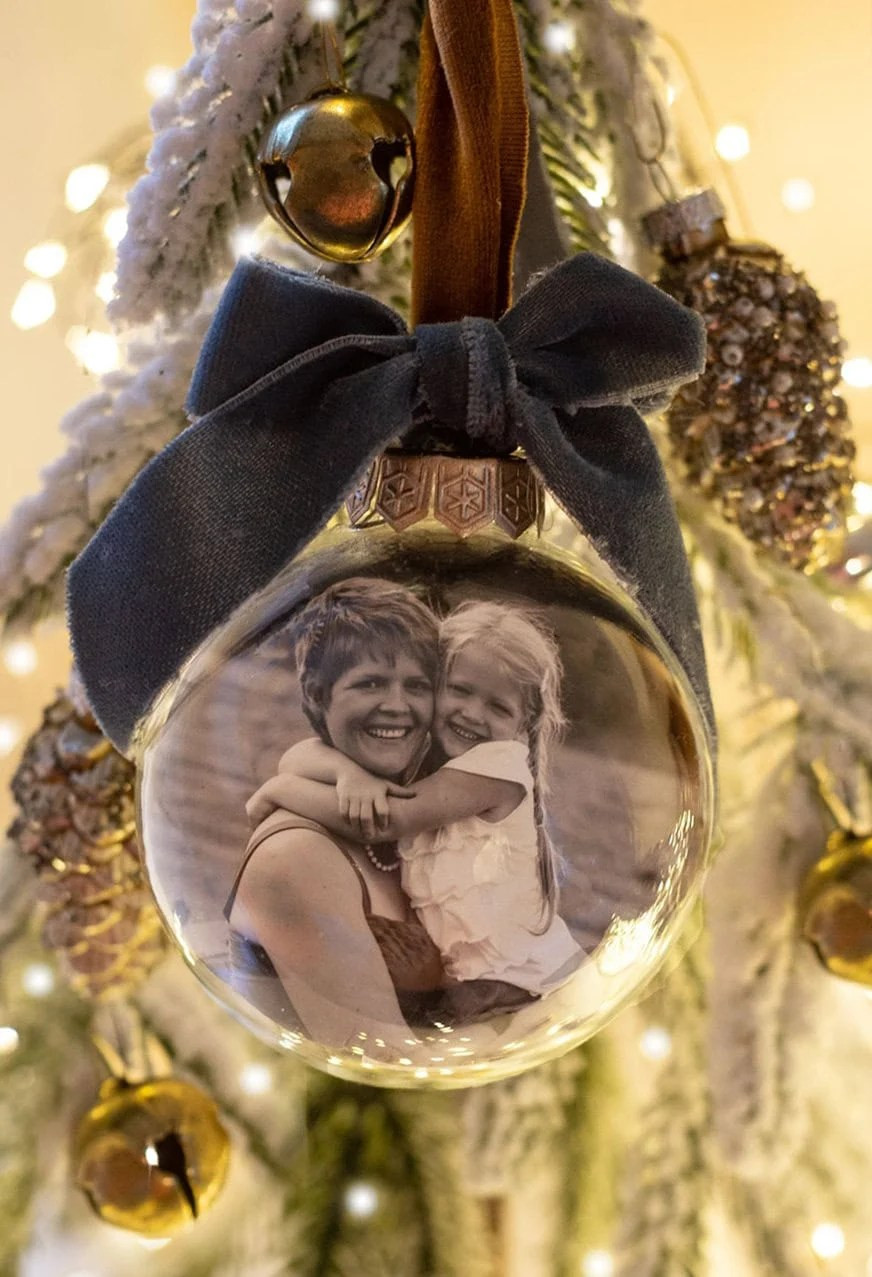 DIY Glass Photo Ornament showcasing personalized holiday memories
3. What Materials Do You Need to Put a Photo in an Ornament?
Gathering the right materials ensures a smooth and enjoyable crafting process.
3.1. Ornament Base
Choosing the right ornament base is crucial.
Glass Ball: Clear glass bulbs are ideal for a classic look. Ensure they have a wide opening for easy insertion of photos. According to craft experts at dfphoto.net, using glass ornaments enhances the clarity and vibrancy of the photo.
Plastic Ornament: Opt for shatterproof plastic ornaments for safety. These are particularly useful in homes with children or pets.
Frame Ornament: Select frame ornaments with secure closures. This will ensure that your photos stay in place.
3.2. Photos
Selecting and preparing your photos is essential.
Print Quality: Use high-quality prints for the best results. Faded or blurry photos will not look as good inside the ornament.
Photo Size: Ensure the photos are appropriately sized for the ornament. Smaller photos work best for glass ball ornaments, while larger photos can be used for frame ornaments.
Photo Paper: Print photos on thin photo paper to make them easier to roll and insert. Thicker paper can be difficult to manipulate.
3.3. Tools
Having the right tools makes the process easier.
Scissors: Use sharp scissors for precise cutting. Detail scissors are particularly useful for trimming photos to fit the ornament.
Pencil: A pencil helps in tracing and marking the photo. It’s useful for creating templates and ensuring accurate cuts.
Adhesive: Acid-free double-sided tape prevents yellowing of photos over time. Using acid-free tape ensures that your photos remain in pristine condition for years to come.
3.4. Embellishments
Adding embellishments enhances the ornament’s appearance.
Ribbon: Use ribbon to hang the ornament and add a decorative touch. Choose colors and patterns that complement the photo and ornament style.
Glitter: Add glitter for a festive sparkle. Apply glitter sparingly to avoid overwhelming the photo.
Small Charms: Incorporate small charms that reflect the photo’s theme. These can add a personal and unique touch to your ornament.
3.5. Additional Supplies
Consider these extra items for a polished finish.
Fishing Line: Clear craft fishing line to hang the photo inside the ornament. The fishing line is virtually invisible, creating the illusion that the photo is floating inside the ornament.
Cardstock: Lightweight cardstock to reinforce the photo and add stability. Cardstock also provides a surface for writing names, dates, or sentiments.
Paintbrush: A soft-tipped paintbrush to gently flatten the photo inside the ornament. The soft tip prevents scratches or damage to the photo.
4. Step-by-Step Guide: How to Put a Photo in a Glass Ball Ornament
Follow these detailed steps to create a beautiful glass ball photo ornament.
4.1. Prepare Your Photo
Start by preparing your chosen photo.
Sizing the Photo: Measure the inside diameter of the glass ball. A circle slightly smaller than this diameter is ideal. Use a drinking glass as a template to trace and cut the photo into a circle. For a large ornament, a 3-inch circle typically works well.
Personalization: Add names, dates, or sentiments to the back of the photo. Use Canva or a Word document to create a personalized message. Print this on lightweight cardstock using an inkjet printer.
Cutting the Photo: Cut out the photo and the cardstock circle. Ensure both circles are the same size for a seamless fit.
4.2. Attach the Fishing Line
Secure the photo with a fishing line for easy hanging.
Apply Tape: Apply strips of acid-free double-sided tape to the back of the photo. This will hold the fishing line in place and prevent the photo from yellowing over time.
Attach Line: Cut a long piece of fishing line and fold it in half. Stick the looped end along the center of the photo.
Sandwich the Circles: Sandwich the fishing line between the photo and the cardstock circle. This creates a secure attachment point for hanging.
4.3. Insert the Photo into the Ornament
Carefully insert the photo into the glass ball.
Rolling the Photo: Gently roll the photo into a tight tube, with the photo facing outward. This makes it easier to slide into the ornament.
Inserting the Roll: Carefully slide the rolled photo into the ornament. Ensure there are no sharp points of glass that could scratch the photo.
Flattening the Photo: Hold onto the fishing line and use a soft-tipped paintbrush to gently flatten the photo inside the ornament. Be careful not to dent or scratch the picture. Tape the fishing line to the outside of the bulb to keep it in place.
4.4. Secure the Fishing Line
Secure the fishing line to the ornament’s cap.
Thread the Line: Find the two small holes in the ornament’s cover where the wire runs through. Poke the ends of the fishing line through these holes, one on each side.
Attach the Cap: Slip the cap back onto the ornament and tie off the fishing line. Knot the strings multiple times to ensure they will not come undone.
Trim Excess: Trim any excess fishing line to create a clean finish.
4.5. Add Finishing Touches
Personalize the ornament with decorative elements.
Attach Ribbon: Complete your ornament by attaching a ribbon of your choice. Choose a ribbon that complements the photo and adds a festive touch.
Add Embellishments: Add additional embellishments such as glitter, charms, or paint to personalize the ornament further.
Hang and Display: Hang your completed photo ornament on the tree or display it in a special place.
5. How to Put a Photo in Other Types of Ornaments
Explore different methods for various ornament types.
5.1. Frame Ornaments
Using frame ornaments is straightforward.
Open the Frame: Open the frame ornament and remove any existing inserts.
Insert Photo: Place your chosen photo into the frame. Ensure it fits snugly and is centered.
Secure Closure: Close the frame securely. Some frame ornaments have clips or clasps to keep the photo in place.
Add Ribbon: Attach a ribbon to the top of the frame for hanging.
5.2. Ceramic Ornaments
Personalizing ceramic ornaments requires creativity.
Prepare Ornament: If the ceramic ornament is unpainted, paint it with your desired colors and designs.
Attach Photo: Use adhesive to attach the photo to the ornament. Ensure the adhesive is evenly applied to prevent lifting.
Seal the Photo: Seal the photo with a clear sealant to protect it from damage.
Add Embellishments: Add embellishments such as glitter, paint, or charms to enhance the ornament’s appearance.
Hang and Display: Hang the completed ornament on the tree or display it in a special place.
5.3. Wooden Ornaments
Crafting with wooden ornaments offers a rustic charm.
Prepare Ornament: Sand the surface of the wooden ornament to create a smooth finish.
Attach Photo: Use adhesive to attach the photo to the ornament. Ensure the adhesive is evenly applied to prevent lifting.
Decorate Ornament: Decorate the ornament with paint, markers, or wood-burning techniques.
Seal the Photo: Seal the photo with a clear sealant to protect it from damage.
Add Ribbon: Attach a ribbon to the top of the ornament for hanging.
 DIY photo ornament with personalized name and date
6. Tips and Tricks for Achieving the Best Results
Achieving the best results requires attention to detail and careful execution.
6.1. Photo Selection and Preparation
Proper photo selection is crucial.
Choose High-Quality Photos: Select photos that are clear, well-lit, and have good resolution. Avoid using blurry or pixelated photos.
Consider the Ornament Size: Choose photos that are appropriately sized for the ornament. Smaller ornaments require smaller photos.
Print on Thin Paper: Print photos on thin photo paper to make them easier to roll and insert into the ornament.
6.2. Ornament Handling
Handle ornaments with care to prevent damage.
Avoid Sharp Edges: Rub your finger around the edge of the bulb opening to ensure there are no sharp points that will scratch the photo.
Handle with Care: Handle glass ornaments with care to avoid breakage. Use a soft cloth to wipe the ornament clean.
Avoid Overfilling: Do not overfill the ornament with embellishments. This can make it difficult to see the photo.
6.3. Embellishment Techniques
Effective embellishment techniques enhance the ornament’s appearance.
Use Acid-Free Materials: Use acid-free tape and paper to prevent yellowing of photos over time.
Apply Glitter Sparingly: Apply glitter sparingly to avoid overwhelming the photo.
Choose Complementary Colors: Choose colors and patterns that complement the photo and ornament style.
6.4. Inserting the Photo
Inserting the photo correctly prevents damage.
Roll the Photo Gently: Try not to roll your photo too tightly. It will be much easier to flatten out once inside the ornament.
Use a Soft Tool: Use a soft-tipped paintbrush to gently flatten the photo inside the ornament. Be careful not to dent or scratch the picture.
Secure the Fishing Line: Ensure the fishing line is securely attached to the ornament’s cap. Knot the strings multiple times to prevent them from coming undone.
7. Creative Ideas for Personalizing Photo Ornaments
Explore innovative ways to personalize your photo ornaments.
7.1. Themed Ornaments
Create ornaments with specific themes.
Baby’s First Christmas: Use a photo of your baby with Santa Claus or a snapshot from their first Christmas.
Wedding Memories: Incorporate photos from your wedding day to create a romantic and sentimental ornament.
Pet Ornaments: Feature photos of your beloved pets. Add paw print charms or small pet toys for a personal touch.
7.2. Adding Text and Dates
Personalize ornaments with names and dates.
Use Stencils: Use stencils to add names and dates to the ornament. Paint or glitter can be used to fill in the stencils.
Print on Cardstock: Print names and dates on lightweight cardstock and attach them to the back of the photo.
Handwritten Details: Add handwritten details with a fine-tipped marker.
7.3. Incorporating Keepsakes
Add small keepsakes to the ornament.
Small Charms: Incorporate small charms that reflect the photo’s theme.
Confetti or Glitter: Add confetti or glitter for a festive sparkle.
Dried Flowers: Incorporate dried flowers or small sprigs of greenery for a natural touch.
7.4. Unique Ornament Shapes
Experiment with different ornament shapes.
Star Ornaments: Use star-shaped ornaments for a celestial theme.
Heart Ornaments: Use heart-shaped ornaments for a romantic or sentimental theme.
Snowflake Ornaments: Use snowflake-shaped ornaments for a winter wonderland theme.
7.5. Photo Collages
Create photo collages inside the ornament.
Print Multiple Photos: Print multiple small photos and arrange them in a collage.
Use Clear Adhesive: Use clear adhesive to attach the photos to the inside of the ornament.
Create a Story: Arrange the photos to tell a story or capture a series of related moments.
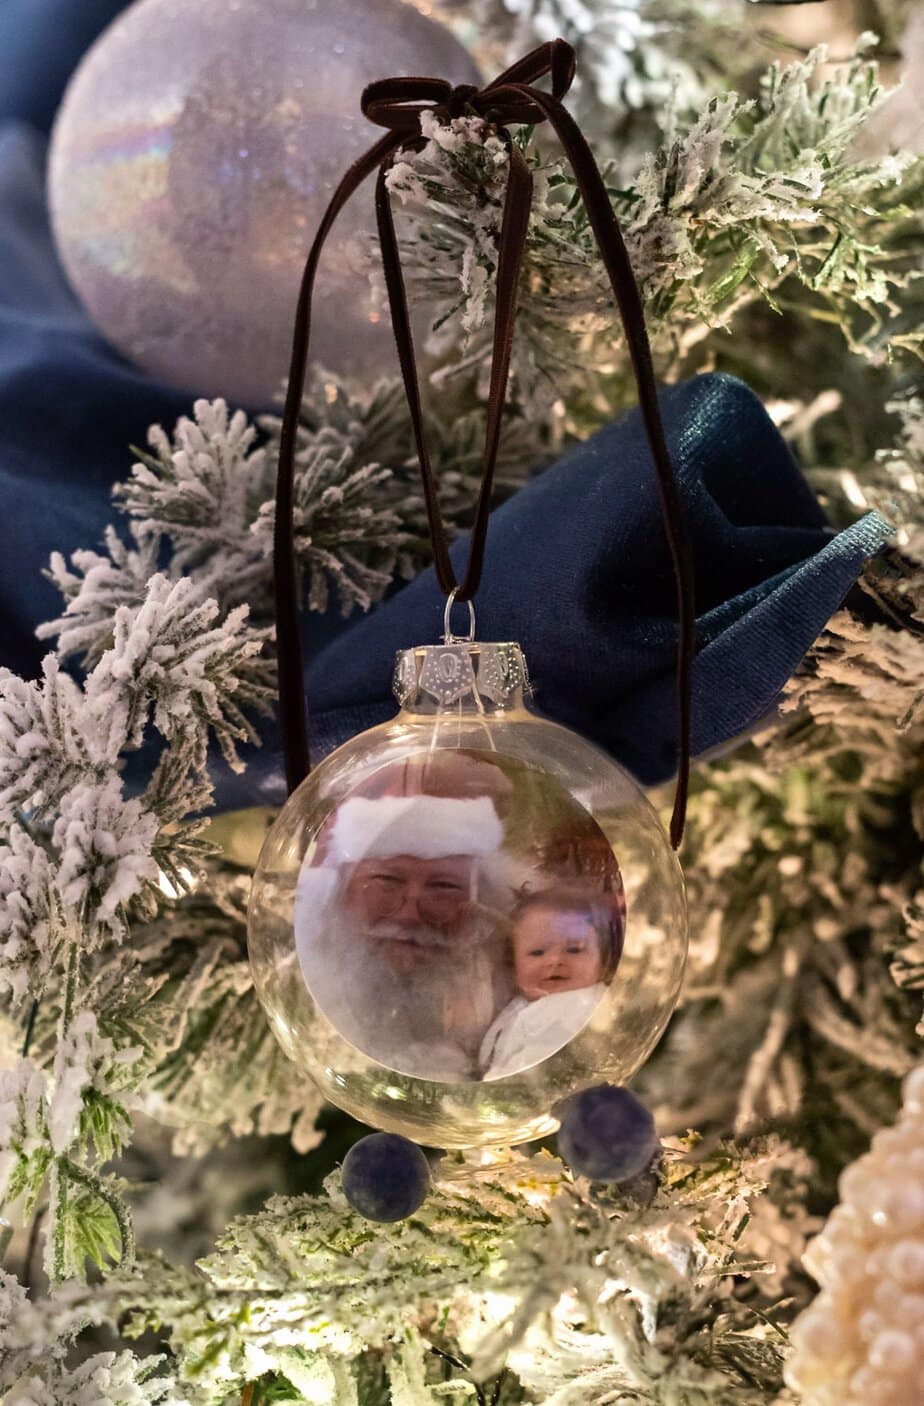 A handcrafted DIY baby’s first Christmas ornament featuring a photo of a baby with Santa Claus, framed inside a clear ornament with festive decorations
8. Where to Find Supplies for Making Photo Ornaments
Finding the right supplies is easy with these resources.
8.1. Craft Stores
Craft stores are a great resource for ornament-making supplies.
Wide Selection: They offer a wide selection of ornament bases, embellishments, and tools.
Seasonal Sales: Look for seasonal sales and discounts on holiday craft supplies.
Expert Advice: Craft store employees can offer expert advice and guidance on your project.
8.2. Online Retailers
Online retailers offer convenience and variety.
Amazon: Amazon offers a vast selection of ornament-making supplies.
Etsy: Etsy is a great resource for unique and handmade ornaments.
Specialty Craft Sites: Specialty craft sites offer a curated selection of high-quality supplies.
8.3. Dollar Stores
Dollar stores offer budget-friendly options.
Affordable Supplies: They offer affordable ornament bases and embellishments.
Great for Basics: Dollar stores are great for basic supplies like scissors, adhesive, and ribbon.
Seasonal Items: Look for seasonal items during the holidays.
8.4. Repurposed Materials
Get creative with repurposed materials.
Old Photos: Use old photos or prints that you no longer need.
Fabric Scraps: Use fabric scraps to add texture and color to your ornaments.
Buttons and Beads: Incorporate buttons and beads from old clothing or jewelry.
9. Maintaining Your Photo Ornaments
Proper maintenance ensures your photo ornaments last for years.
9.1. Storage
Store your ornaments properly to prevent damage.
Individual Storage: Store each ornament in its own compartment or bag to prevent scratches.
Padded Boxes: Use padded boxes to protect ornaments from impact.
Climate Control: Store ornaments in a climate-controlled environment to prevent damage from heat or humidity.
9.2. Cleaning
Clean your ornaments regularly to keep them looking their best.
Soft Cloth: Use a soft cloth to gently wipe the surface of the ornament.
Mild Soap: Use mild soap and water to remove dirt or grime.
Avoid Harsh Chemicals: Avoid using harsh chemicals or abrasive cleaners.
9.3. Repair
Repair damaged ornaments promptly to prevent further damage.
Re-Glue: Re-glue any loose embellishments or photos.
Replace Ribbon: Replace worn or frayed ribbon.
Handle with Care: Handle repaired ornaments with extra care.
10. FAQ: Putting Photos in Ornaments
Get answers to common questions about creating photo ornaments.
10.1. What Size Photo Should I Use for a Glass Ball Ornament?
For a standard-sized glass ball ornament, a photo with a 2 to 3-inch diameter works best.
10.2. How Do I Prevent My Photo from Yellowing Inside the Ornament?
Use acid-free double-sided tape and print your photo on acid-free paper to prevent yellowing.
10.3. Can I Use Regular Glue Instead of Acid-Free Tape?
It’s best to avoid regular glue, as it can damage the photo over time. Acid-free tape is a safer option.
10.4. How Do I Flatten the Photo Inside the Ornament?
Use a soft-tipped paintbrush or a small stick to gently flatten the photo inside the ornament.
10.5. Can I Add Other Decorations Inside the Ornament?
Yes, you can add glitter, small charms, or confetti to personalize your ornament.
10.6. How Do I Hang the Photo Inside the Ornament?
Use clear craft fishing line to hang the photo inside the ornament. The fishing line is virtually invisible, creating the illusion that the photo is floating.
10.7. What If My Glass Ball Ornament Breaks?
Handle broken glass carefully. Use plastic ornaments as a safer alternative, especially in homes with children or pets.
10.8. Can I Use Black and White Photos?
Yes, black and white photos can add a classic and timeless touch to your ornaments.
10.9. Where Can I Find Clear Glass Ball Ornaments?
You can find clear glass ball ornaments at craft stores, online retailers like Amazon, or seasonal dollar stores.
10.10. How Do I Make Photo Ornaments with Children?
Choose plastic ornaments for safety, use larger photos for easier handling, and let them help with embellishments like glitter and stickers.
Ready to create your own personalized photo ornaments? Visit dfphoto.net for more creative ideas and photography tips! Explore our extensive guides on capturing the perfect photos, editing techniques, and unique display ideas. Join our community of passionate photographers and craft enthusiasts to share your creations and gain inspiration. Elevate your holiday decorations with dfphoto.net – where memories come to life! Contact us at 1600 St Michael’s Dr, Santa Fe, NM 87505, United States or call +1 (505) 471-6001.