Are you looking to enhance your iPhone photography skills by learning how to layer two photos? At dfphoto.net, we provide a detailed guide on using the iOS Shortcuts app to create stunning superimposed images directly on your iPhone. Discover the creative possibilities and easy steps to master this technique. This guide will cover everything from setting up shortcuts to using photo editing tools.
1. Why Layer Photos on Your iPhone?
1.1. Unleashing Creativity with Photo Layering
Photo layering on your iPhone opens a world of creative possibilities. You can blend different textures, create surreal effects, and add depth to your images. This technique allows you to combine elements from multiple photos into a single, cohesive piece of art. It’s a fantastic way to express your unique artistic vision directly from your mobile device.
According to research from the Santa Fe University of Art and Design’s Photography Department, layering photos enhances visual storytelling by allowing photographers to create composite images that convey complex narratives and emotions.
1.2. Enhancing Your Social Media Presence
Layering photos is a great way to make your social media posts stand out. By creating unique and eye-catching images, you can capture the attention of your followers and increase engagement. Whether it’s a whimsical meme or a sophisticated artistic piece, layered photos add a professional touch to your personal brand.
1.3. Quick Edits on the Go
With the iOS Shortcuts app, you can perform quick photo edits directly on your iPhone without needing to transfer images to a computer or use complex photo editing software. This convenience is perfect for photographers who want to make immediate edits while on the move.
1.4. Creating Memorable Visuals
Layering photos enables you to create visuals that capture and preserve memories in a unique and artistic way. Whether it’s combining landscapes with portraits or adding creative overlays to everyday scenes, this technique adds a personal and memorable touch to your photographs.
2. What Tools Do You Need?
2.1. Essential Requirements
To start layering photos on your iPhone, you need a few essential tools and requirements:
- iPhone with iOS 13 or Above: Ensure your iPhone is updated to iOS 13 or a later version to support the Shortcuts app.
- Shortcuts App: This app should come preinstalled on your iPhone. If not, you can download it from the App Store.
- Photos App: This app is essential for selecting and editing your photos.
2.2. Optional but Helpful
Consider these optional tools for a smoother experience:
- Photo Editing Apps: Apps like Adobe Photoshop Express or Snapseed can help you enhance your photos before layering.
- Cloud Storage: iCloud or Google Photos can help you manage and access your photos easily.
3. How to Set Up the Shortcuts App for Photo Layering
3.1. Open the Shortcuts App and Create a New Shortcut
- Locate the Shortcuts App: Find the Shortcuts app on your iPhone. If you can’t find it, search for it in the App Store and reinstall it.
- Create a New Shortcut: Once the app is open, tap the + symbol in the top right corner to create a new shortcut.
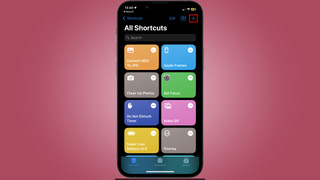 Open Shortcuts and add new shortcut, tapping the '+' icon to begin creating a new automation
3.2. Enable Share Sheet Setting
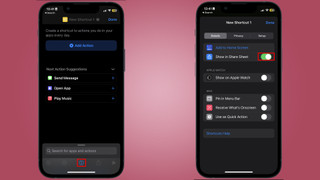
- Access Settings: Tap the i symbol in the toolbar. This will open the settings page for the shortcut.
- Show in Share Sheet: Toggle the option to Show in Share Sheet. This allows you to access the shortcut directly from your Photos app.
- Complete: After enabling the Share Sheet, tap Done.
 Enable Share Sheet in Shortcuts, toggle the option to access the shortcut from the Photos app
3.3. Select File Formats
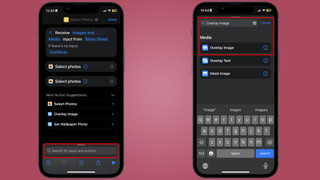
- Return to Shortcut Page: Go back to the new shortcut page. You’ll see an action has been added to receive media from the Share Sheet.
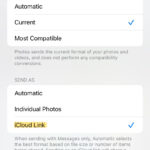
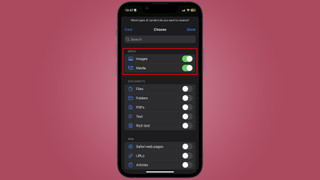
- Select Image Format: Tap where it says Any/Images and more, and turn off every media format except for Images and Media. This ensures the shortcut only processes image files.
- Finalize: Tap Done to save your selection.
 Configure file formats in Shortcuts, selecting 'Images and Media' to ensure only image files are processed
3.4. Add Select Photos Actions
- Add Action: From the new shortcut page, tap Add Action or use the search bar at the bottom.
- Search for Select Photos: Type Select Photos and select the action.
- Add Another Action: Repeat the above steps to add a second Select Photos action. This allows you to choose two photos to layer.
 Add 'Select Photos' action in Shortcuts, searching and selecting the action to enable photo selection
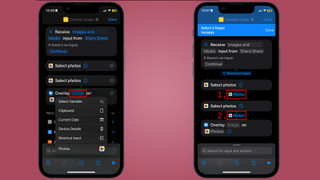
3.5. Add the Overlay Image Action
- Add Action: Once again, tap Add Action or use the search bar.
- Search for Overlay Image: Type Overlay Image into the search bar.
- Select the Action: Choose the corresponding action. This action will blend the two selected photos.
 Add 'Overlay Image' action in Shortcuts, searching and selecting the action to blend two photos
3.6. Select Image Variables for the Overlay
- Tap the First Images Variable: Tap the first Images variable in your overlay action.
- Select Variable: From the menu, choose Select Variable.
- Choose First Photo Label: A blue bar will appear at the top. Tap on the first Photos label after your first Select Photos action.
- Repeat for Second Variable: Repeat these steps for the second Images variable, this time tapping on the second Photos label after your second Select Photos action.
 Select variables for overlay in Shortcuts, tapping the 'Images' variable and choosing the corresponding photo label
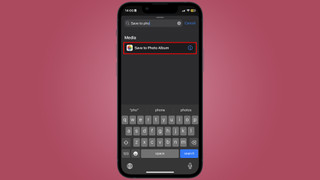
3.7. Add the Save to Photo Album Action
- Add Action: Tap the search bar one final time.
- Search for Save to Photo Album: Type Save to Photo Album and select the action. This saves the layered image to your camera roll.
 Add 'Save to Photo Album' action in Shortcuts, searching and selecting the action to save the layered image
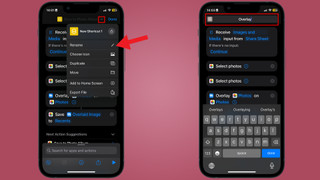
3.8. Rename Your Shortcut
- Tap the Name: Tap the name of your shortcut at the top.
- Rename: Rename it to something like Overlay or Superimpose. This name will appear in your Share Sheet for easy access.
 Rename shortcut in Shortcuts, tapping the name and entering a descriptive name like 'Overlay'
4. How to Use the Shortcut to Layer Photos
4.1. Accessing the Shortcut from Photos
- Open Photos App: Open your Photos app and find the two photos you want to layer.
- Tap Share Sheet Button: Tap the Share Sheet button (the box with an arrow pointing up).
- Select First Photo: You will be prompted to select your first photo. This will be the image that goes on top.
- Select Second Photo: Next, select your second photo. This will be the image at the bottom.
 Run shortcut in photo reel, tapping the Share Sheet button and selecting the first photo
4.2. Adjusting the Overlay
- Image Editor: You’ll be taken to an image editor where you can resize and reposition your overlay.
- Reposition and Resize: Adjust the top image to fit your desired aesthetic.
- Save: Tap Done to save the layered image to your Camera Roll.
 Resize and reframe images, adjusting the overlay to fit the desired aesthetic in the image editor
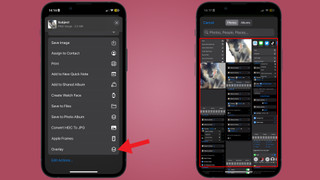
4.3. Using Lift Subject from Background Feature
- Select Subject: If you want to overlay a selection of a photo, use the Lift Subject from Background feature.
- Press and Hold: Press and hold over the subject you want to extract.
- Share: Tap Share and save this as a separate image.
5. Alternative Methods for Layering Photos on iPhone
5.1. Using Photo Editing Apps
If the Shortcuts app seems too complex, several photo editing apps offer similar functionality. Here are a few options:
- Adobe Photoshop Express: This app provides advanced editing tools, including layering capabilities.
- Snapseed: A free app by Google that offers a variety of tools for blending and layering photos.
- PicsArt: A popular app known for its user-friendly interface and extensive editing options.
5.2. Built-in Photo Editor
The iPhone’s built-in photo editor also has basic editing features that can be used creatively:
- Adjust Opacity: Use the editing tools to adjust the opacity of one image to create a layered effect.
- Use Filters: Experiment with filters to blend the two images seamlessly.
6. Tips and Tricks for Better Photo Layering
6.1. Choosing the Right Photos
Selecting the right photos is crucial for creating a visually appealing layered image. Consider the following:
- Contrast: Choose photos with contrasting colors and textures to make the layered image more dynamic.
- Theme: Ensure the photos share a common theme or mood to create a cohesive look.
- Resolution: Use high-resolution images to maintain clarity and detail in the final product.
6.2. Mastering Composition
Composition plays a significant role in the final outcome. Pay attention to the following:
- Rule of Thirds: Use the rule of thirds to position key elements in your layered image for a balanced composition.
- Leading Lines: Incorporate leading lines to guide the viewer’s eye through the image.
- Negative Space: Use negative space to create a sense of balance and highlight the main subjects.
6.3. Experimenting with Blending Modes
Blending modes can significantly alter the look of your layered image. Experiment with different blending modes to achieve various effects:
- Multiply: Darkens the image by multiplying the colors of the layers.
- Screen: Lightens the image by screening the colors of the layers.
- Overlay: Combines the effects of Multiply and Screen, adding contrast and vibrancy.
6.4. Using Masks
Masks allow you to selectively reveal or hide parts of an image, giving you greater control over the layering process:
- Gradient Masks: Create smooth transitions between layers.
- Brush Masks: Use a brush to paint in or out specific areas of the image.
- Luminosity Masks: Target specific tonal ranges in the image.
7. Inspiring Ideas for Photo Layering
7.1. Double Exposure Effects
Create stunning double exposure effects by layering portraits with landscapes or textures. This technique adds depth and intrigue to your images.
7.2. Surreal Compositions
Combine unexpected elements to create surreal and dreamlike compositions. This is a great way to express your creativity and imagination.
7.3. Adding Textures and Overlays
Enhance your photos by adding textures like grunge, bokeh, or light leaks. Overlays can add a vintage or artistic touch to your images.
7.4. Creating Photo Montages
Tell a story by creating photo montages that combine multiple images into a single, cohesive narrative. This technique is perfect for documenting events or capturing a series of related moments.
8. Common Issues and Troubleshooting
8.1. Shortcut Not Working
If your shortcut isn’t working, try the following:
- Check iOS Version: Ensure your iPhone is running iOS 13 or above.
- Reinstall Shortcuts App: Delete and reinstall the Shortcuts app from the App Store.
- Review Shortcut Steps: Double-check each step in the shortcut to ensure it’s configured correctly.
8.2. Image Quality Issues
If the layered image has poor quality:
- Use High-Resolution Images: Ensure you’re using high-resolution images for both layers.
- Adjust Compression Settings: Check the compression settings in your photo editing app or the Shortcuts app.
8.3. Blending Issues
If the blending doesn’t look right:
- Experiment with Blending Modes: Try different blending modes to see which one works best for your images.
- Adjust Opacity: Adjust the opacity of the top layer to fine-tune the blending effect.
9. The Future of iPhone Photography
9.1. Advancements in Mobile Technology
Mobile technology continues to advance, bringing more powerful and sophisticated features to iPhone photography. Expect to see improvements in:
- Camera Hardware: Higher resolution sensors, better low-light performance, and advanced zoom capabilities.
- Software Algorithms: Improved image processing, AI-powered editing tools, and enhanced computational photography.
9.2. Trends in Photo Editing
Photo editing trends are constantly evolving. Keep an eye on:
- AI-Powered Editing: Tools that use artificial intelligence to automate complex editing tasks.
- Augmented Reality (AR): Apps that allow you to add AR elements to your photos.
- Collaborative Editing: Platforms that enable multiple users to edit photos together in real-time.
9.3. dfphoto.net: Your Resource for Photography Excellence
At dfphoto.net, we are dedicated to providing you with the latest tips, tricks, and techniques for mastering iPhone photography. Explore our website for:
- Detailed Tutorials: Step-by-step guides on various photography techniques.
- Inspiring Galleries: Showcases of stunning photography from around the world.
- Community Forums: A place to connect with fellow photographers, share your work, and get feedback.
10. FAQ: Layering Photos on iPhone
10.1. Can I Layer More Than Two Photos?
Yes, you can layer more than two photos by repeating the “Overlay Image” action in the Shortcuts app or using photo editing apps that support multiple layers.
10.2. Is the Shortcuts App Free to Use?
Yes, the Shortcuts app is a free app developed by Apple and comes preinstalled on most iPhones.
10.3. Can I Use Videos Instead of Photos?
The “Overlay Image” action in the Shortcuts app is designed for photos. To layer videos, you’ll need to use video editing apps like iMovie or Adobe Premiere Rush.
10.4. How Do I Remove a Layer?
In the Shortcuts app, you can’t directly remove a layer once it’s been added. You would need to start the shortcut over. In photo editing apps, you can delete or hide individual layers.
10.5. Can I Adjust the Opacity of Each Layer?
Yes, photo editing apps typically allow you to adjust the opacity of each layer, giving you more control over the blending effect.
10.6. How Do I Save the Layered Photo in High Resolution?
Ensure you are using high-resolution images and check the export settings in your photo editing app or the Shortcuts app to save the layered photo in the highest quality possible.
10.7. What Are Some Good Apps for Layering Photos?
Some popular apps for layering photos include Adobe Photoshop Express, Snapseed, PicsArt, and Pixelmator.
10.8. Can I Use This Technique for Social Media Content?
Yes, layering photos is a great way to create unique and engaging content for social media platforms like Instagram, Facebook, and TikTok.
10.9. How Do I Share the Layered Photo?
Once you’ve saved the layered photo to your camera roll, you can share it directly to any social media platform or messaging app.
10.10. What If the Shortcut Keeps Crashing?
Try restarting your iPhone, reinstalling the Shortcuts app, and ensuring you have enough storage space on your device. Also, check for any updates to the Shortcuts app in the App Store.
Mastering the art of layering photos on your iPhone can transform your photography and unlock your creative potential. While the Shortcuts app provides a quick and convenient way to superimpose images, exploring alternative methods and experimenting with different techniques can yield stunning results.
Visit dfphoto.net today to discover more tutorials, inspiration, and a vibrant community of photographers passionate about pushing the boundaries of mobile photography.
For more information, visit our website at dfphoto.net or contact us at Address: 1600 St Michael’s Dr, Santa Fe, NM 87505, United States. Phone: +1 (505) 471-6001.