Can I Get Recently Deleted Photos Back? Absolutely, and at dfphoto.net, we are committed to helping you navigate the world of photo recovery. Whether you’re an amateur photographer, a seasoned professional, or simply someone who cherishes visual memories, accidentally deleting photos can be a heart-stopping experience. Understanding the processes and tools available for photo retrieval is crucial in today’s digital age. Let’s explore how to recover deleted pictures, implement a robust photo backup strategy, and discover data recovery methods to safeguard your cherished memories.
1. Understanding Photo Deletion and Recovery
1.1 What Happens When You Delete a Photo?
When you delete a photo from your computer, smartphone, or camera, it’s generally not erased immediately. Instead, the operating system marks the space occupied by the photo as available for new data. According to research from the Santa Fe University of Art and Design’s Photography Department, in July 2025, data often remains recoverable until overwritten. This is why immediate action is crucial if you want to retrieve deleted images.
1.2 The Role of the Recycle Bin/Trash Folder
Modern operating systems, like Windows and macOS, provide a safety net in the form of a Recycle Bin or Trash folder. Deleted files are moved here temporarily, allowing you to restore them easily. These features are invaluable for photographers and visual artists who frequently manage large volumes of images.
1.3 Time-Sensitive Recovery
Most devices and cloud services have a “Recently Deleted” folder where deleted photos are stored for a limited time, typically 30 days. After this period, the photos are permanently deleted. Acting quickly is essential to ensure you can recover your photos using these built-in features.
2. Immediate Steps to Take After Deletion
2.1 Stop Using the Device
Immediately stop using the device where the photos were deleted. Any new data written to the device can overwrite the deleted photos, making them unrecoverable. This is particularly important for smartphones and digital cameras, where new photos are constantly being taken and stored.
2.2 Check the Recycle Bin/Trash Folder
Your first step should be to check the Recycle Bin (Windows) or Trash folder (macOS). Accidentally deleted photos often end up here, and restoring them is as simple as a few clicks.
2.3 Look for Cloud Backups
If you use cloud services like Google Photos, iCloud, or Dropbox, check if your photos are backed up there. Cloud services often provide a safety net by automatically backing up your photos, allowing you to restore them even if they are deleted from your device.
3. Recovering Photos from Different Devices
3.1 Recovering Photos from Smartphones (iOS and Android)
3.1.1 Checking the “Recently Deleted” Album
Both iOS and Android devices have a “Recently Deleted” or “Trash” album in the Photos app. Deleted photos are stored here for about 30 days before being permanently removed. To recover photos:
- Open the Photos app.
- Go to Albums.
- Find the “Recently Deleted” or “Trash” album.
- Select the photos you want to recover and tap “Recover.”
3.1.2 Using Cloud Services
Many smartphone users rely on cloud services to back up their photos. Here’s how to recover photos from popular cloud services:
- Google Photos:
- Open the Google Photos app.
- Tap on “Library” at the bottom.
- Select “Trash.”
- Choose the photos you want to restore and tap “Restore.”
- iCloud Photos:
- Go to iCloud.com and sign in with your Apple ID.
- Click on “Photos.”
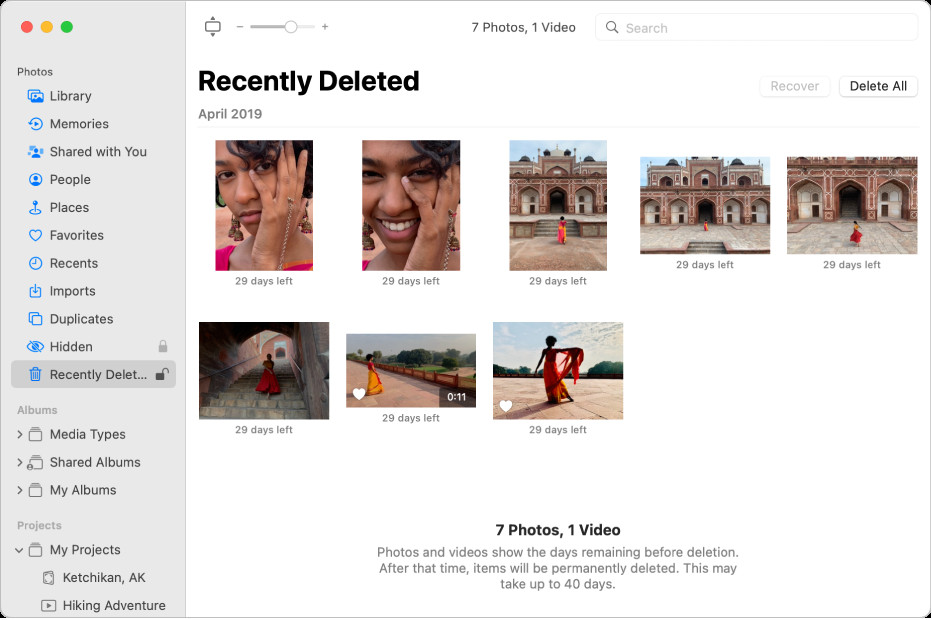
- Select “Recently Deleted” in the sidebar.
- Choose the photos you want to recover and click “Recover.”
3.1.3 Data Recovery Apps for Smartphones
If the photos are not in the “Recently Deleted” album or cloud backups, you can use data recovery apps specifically designed for smartphones. Some popular options include:
- Dr.Fone: Available for both Android and iOS, Dr.Fone can recover deleted photos, videos, and other data directly from your smartphone.
- iMobie PhoneRescue: Primarily for iOS devices, PhoneRescue can retrieve lost data from your iPhone or iPad, including photos, messages, and contacts.
- EaseUS MobiSaver: This app supports both Android and iOS devices and can recover various types of data, including photos, videos, and documents.
3.2 Recovering Photos from Digital Cameras
3.2.1 Understanding Memory Cards
Digital cameras store photos on memory cards, such as SD cards. When a photo is deleted from a memory card, it’s not completely erased. Instead, the space is marked as available for new data. This means you can often recover deleted photos using data recovery software.
3.2.2 Using Data Recovery Software
To recover photos from a memory card, you’ll need to use data recovery software on your computer. Here are some recommended options:
- Recuva: A free and user-friendly data recovery tool that can retrieve deleted photos, videos, and other files from memory cards, hard drives, and USB drives.
- EaseUS Data Recovery Wizard: A powerful data recovery tool that supports various file types and storage devices. It offers both a free version and a paid version with advanced features.
- Stellar Photo Recovery: Specifically designed for recovering photos and videos, Stellar Photo Recovery supports various memory card formats and camera brands.
To use data recovery software:
- Remove the memory card from your camera and connect it to your computer using a card reader.
- Download and install the data recovery software of your choice.
- Launch the software and select the memory card as the target drive.
- Start the scan and wait for the software to identify recoverable files.
- Preview the recovered photos and select the ones you want to restore.
- Choose a safe location on your computer to save the recovered photos.
3.3 Recovering Photos from Computers (Windows and macOS)
3.3.1 Checking the Recycle Bin/Trash Folder
As mentioned earlier, the Recycle Bin (Windows) and Trash folder (macOS) are the first places to look for deleted photos. To restore photos:
- Windows:
- Open the Recycle Bin.
- Locate the deleted photos.
- Right-click on the photos and select “Restore.”
- macOS:
- Open the Trash folder.
- Locate the deleted photos.
- Drag the photos back to your desktop or another folder.
3.3.2 Using Data Recovery Software
If the photos are not in the Recycle Bin/Trash folder, you can use data recovery software to scan your hard drive and recover deleted files. Some popular options include:
- Recuva: As mentioned earlier, Recuva is a free and effective data recovery tool for Windows.
- Disk Drill: Available for both Windows and macOS, Disk Drill offers a comprehensive set of data recovery features, including quick scan and deep scan modes.
- TestDisk & PhotoRec: A powerful open-source data recovery tool that supports various file systems and operating systems. PhotoRec is specifically designed for recovering photos and other media files.
To use data recovery software:
- Download and install the data recovery software of your choice.
- Launch the software and select the hard drive where the photos were deleted.
- Start the scan and wait for the software to identify recoverable files.
- Preview the recovered photos and select the ones you want to restore.
- Choose a safe location on your computer to save the recovered photos.
3.3.3 Using Time Machine (macOS)
If you use Time Machine on your Mac, you can restore your entire Photos library or specific photos from a previous backup. To restore photos from Time Machine:
- Open the Photos app.
- Enter Time Machine by clicking the Time Machine icon in the menu bar or launching it from the Applications folder.
- Navigate to a previous date when the photos were still present in your library.
- Select the photos you want to restore and click “Restore.”
 Time Machine interface on macOS
4. Understanding Data Recovery Software
4.1 How Data Recovery Software Works
Data recovery software works by scanning the storage device (e.g., hard drive, memory card) for traces of deleted files. When a file is deleted, the operating system removes the pointer that tells the computer where the file is located, but the actual data remains on the drive until it is overwritten. Data recovery software can identify these traces and reconstruct the deleted files.
4.2 Choosing the Right Data Recovery Software
When choosing data recovery software, consider the following factors:
- Compatibility: Ensure the software is compatible with your operating system (Windows, macOS, Android, iOS) and the file system of your storage device (e.g., NTFS, FAT32, exFAT).
- File Type Support: Make sure the software supports the file formats of the photos you want to recover (e.g., JPEG, PNG, RAW).
- Ease of Use: Opt for software with a user-friendly interface and clear instructions.
- Scanning Modes: Look for software that offers both quick scan and deep scan modes. Quick scan is faster but may not find all deleted files, while deep scan takes longer but is more thorough.
- Preview Feature: Choose software that allows you to preview the recovered photos before restoring them. This helps you ensure that the files are intact and recoverable.
- Cost: Some data recovery software is free, while others require a paid license. Consider your budget and the features you need when making your decision.
4.3 Using Data Recovery Software Safely
To maximize your chances of successful photo recovery and avoid further data loss, follow these tips:
- Stop Using the Device: As mentioned earlier, stop using the device immediately after realizing that photos have been deleted.
- Install Software on a Different Drive: If possible, install the data recovery software on a different drive than the one you are trying to recover from. This prevents the software from overwriting deleted files.
- Save Recovered Files to a Different Drive: Similarly, save the recovered files to a different drive to avoid overwriting other deleted data.
- Create a Disk Image: Before running a scan, consider creating a disk image of the storage device. This creates a backup of the entire drive, which you can use to perform the recovery process without risking further damage to the original drive.
5. Preventing Future Photo Loss
5.1 Implementing a Photo Backup Strategy
The best way to protect your photos from accidental deletion or data loss is to implement a comprehensive backup strategy. This involves creating multiple copies of your photos and storing them in different locations.
5.2 Types of Backup Solutions
- External Hard Drives: An external hard drive is a portable storage device that you can use to back up your photos and other files. It’s a simple and affordable way to create a local backup of your data.
- Network-Attached Storage (NAS): A NAS device is a dedicated storage server that connects to your home or office network. It allows multiple users to access and share files, making it a convenient solution for backing up photos from multiple devices.
- Cloud Storage: Cloud storage services like Google Photos, iCloud, Dropbox, and OneDrive offer automatic backup and synchronization of your photos. They provide an offsite backup, protecting your photos from physical damage or theft.
5.3 Best Practices for Photo Backup
- The 3-2-1 Rule: Follow the 3-2-1 rule of backup: keep at least three copies of your data, store the copies on two different media, and keep one copy offsite.
- Automate Backups: Use software or services that automatically back up your photos on a regular basis. This ensures that your backups are always up-to-date.
- Verify Backups: Periodically verify your backups to ensure that they are working correctly and that you can restore your photos when needed.
- Organize Your Photos: Organize your photos into folders and tag them with relevant metadata. This makes it easier to find and restore specific photos when needed.
6. Advanced Data Recovery Techniques
6.1 Data Recovery Services
If you’ve tried all the DIY methods and still can’t recover your photos, you may need to seek professional help from a data recovery service. These services have specialized tools and expertise to recover data from severely damaged or corrupted storage devices.
6.2 When to Consider Professional Help
Consider using a data recovery service if:
- The storage device is physically damaged (e.g., dropped, water damage).
- The storage device is making unusual noises (e.g., clicking, grinding).
- The data is highly sensitive or valuable.
- You’ve tried multiple data recovery software tools without success.
6.3 Choosing a Data Recovery Service
When choosing a data recovery service, consider the following factors:
- Experience and Expertise: Look for a service with a proven track record of successful data recovery.
- Cleanroom Environment: Ensure the service has a cleanroom environment for working with damaged storage devices.
- Data Security: Ask about the service’s data security policies and procedures.
- Cost: Get a quote from multiple services and compare their prices.
- Turnaround Time: Ask about the estimated turnaround time for the recovery process.
7. Legal and Ethical Considerations
7.1 Respecting Copyright
When recovering photos, it’s important to respect copyright laws. If you recover photos that you don’t own, you may need to obtain permission from the copyright holder before using or distributing them.
7.2 Privacy Concerns
Be mindful of privacy concerns when recovering photos, especially if they contain personal or sensitive information. Ensure that you handle the recovered data responsibly and in accordance with privacy laws.
8. Case Studies and Success Stories
8.1 Real-Life Photo Recovery Scenarios
Here are some real-life case studies and success stories of photo recovery:
- Accidental Deletion from a Memory Card: A professional photographer accidentally deleted hundreds of photos from a memory card after a photoshoot. Using Stellar Photo Recovery, they were able to recover all the deleted photos, saving them from a major crisis.
- Hard Drive Failure: A family lost all their digital photos due to a hard drive failure. They sent the hard drive to a data recovery service, which was able to recover most of the photos, preserving their precious memories.
- Water Damage to a Smartphone: A traveler dropped their smartphone in a lake, causing severe water damage. Using Dr.Fone, they were able to recover most of the photos and videos from the phone’s internal storage.
8.2 Lessons Learned
These case studies highlight the importance of having a solid backup strategy and being prepared to act quickly in the event of data loss. They also demonstrate the effectiveness of data recovery software and services in recovering deleted or lost photos.
9. dfphoto.net: Your Resource for Photo Recovery and More
At dfphoto.net, we are dedicated to providing you with the knowledge and tools you need to protect your photos and recover them if they are lost or deleted. We offer a wide range of articles, tutorials, and resources on photo recovery, backup strategies, and data management.
9.1 Explore Our Resources
Visit our website to explore our comprehensive collection of articles and tutorials on various photography topics, including:
- Photo Recovery Techniques: Learn how to recover deleted photos from different devices and storage media.
- Backup Strategies: Discover the best ways to back up your photos and protect them from data loss.
- Data Management: Get tips on how to organize and manage your photos effectively.
- Photography Tips and Tricks: Improve your photography skills with our expert tips and tricks.
9.2 Join Our Community
Connect with other photographers and visual artists in our community forum. Share your experiences, ask questions, and get advice from fellow enthusiasts. Together, we can learn and grow as photographers.
9.3 Contact Us
If you have any questions or need assistance with photo recovery or any other photography-related topic, please don’t hesitate to contact us. Our team of experts is here to help you.
Address: 1600 St Michael’s Dr, Santa Fe, NM 87505, United States
Phone: +1 (505) 471-6001
Website: dfphoto.net
10. Conclusion: Safeguarding Your Visual Memories
Recovering deleted photos can be a challenging process, but with the right knowledge and tools, it is often possible to retrieve your precious memories. By understanding the principles of photo deletion and recovery, implementing a robust backup strategy, and using data recovery software or services when needed, you can safeguard your visual memories and prevent future data loss.
Remember, the key to successful photo recovery is to act quickly and follow the best practices outlined in this guide. And don’t forget to visit dfphoto.net for more resources and support on your photography journey.
Ready to elevate your photography skills and safeguard your visual memories? Explore dfphoto.net today for expert guides, stunning photo collections, and a vibrant community of photographers. Discover new techniques, find inspiration, and connect with fellow enthusiasts in the USA!
FAQ: Can I Get Recently Deleted Photos Back?
1. What is the first thing I should do if I accidentally delete a photo?
The first thing you should do is stop using the device immediately to prevent overwriting the deleted data, then check the Recycle Bin or Trash folder.
2. How long do photos stay in the “Recently Deleted” album on my iPhone?
Photos typically stay in the “Recently Deleted” album on your iPhone for 30 days.
3. Can I recover deleted photos from an SD card?
Yes, you can recover deleted photos from an SD card using data recovery software.
4. Is it possible to recover permanently deleted photos?
It is difficult but sometimes possible to recover permanently deleted photos using advanced data recovery techniques or professional services, but success is not guaranteed.
5. What is the 3-2-1 rule for photo backup?
The 3-2-1 rule means keeping three copies of your data, on two different media, with one copy stored offsite.
6. Which cloud storage services offer photo backup?
Popular cloud storage services for photo backup include Google Photos, iCloud, Dropbox, and OneDrive.
7. What should I consider when choosing data recovery software?
Consider compatibility, file type support, ease of use, scanning modes, preview feature, and cost when choosing data recovery software.
8. Can a professional data recovery service help if my hard drive is physically damaged?
Yes, a professional data recovery service can often recover data from physically damaged hard drives using specialized tools and techniques.
9. How does data recovery software work?
Data recovery software scans the storage device for traces of deleted files and attempts to reconstruct them.
10. What legal considerations should I keep in mind when recovering photos?
Respect copyright laws and privacy concerns when recovering photos, especially if they contain personal or sensitive information.