Should I Smile In My Id Photo? Yes, generally, smiling is allowed, but the key is a natural, relaxed expression that enhances your features without being overly expressive, and at dfphoto.net, we’ll guide you through achieving that perfect balance. Whether you’re aiming for a confident driver’s license photo or a friendly passport picture, understanding the nuances of posing and presentation is essential, and with our insights, you’ll learn to capture a photograph that reflects your best self while adhering to official guidelines, plus discover tips for enhancing your appearance and ensuring compliance with regulatory standards. Let’s delve into the art of mastering your ID photo, exploring makeup tips, the best clothing colors, and the latest trends in photographic enhancement to elevate your visual identity.
1. Understanding ID Photo Regulations
Before diving into the specifics of smiling, it’s essential to understand the general regulations surrounding ID photos, and in the USA, these regulations are usually consistent across different types of identification, such as driver’s licenses and passports, however, knowing the rules can save you time and stress.
1.1. General Requirements
Most official ID photos share several common requirements:
- Neutral Expression: While smiling is sometimes allowed, the general requirement is a neutral facial expression, with eyes open and mouth closed, and this helps ensure accurate facial recognition.
- Proper Lighting: Photos must have adequate lighting to avoid shadows and ensure clarity, so even and diffused lighting is ideal.
- Plain Background: A plain, light-colored background is typically required to avoid distractions.
- Correct Size: The photo must be the correct size and dimensions, usually 2×2 inches for US passports, and adhering to these dimensions is critical.
- No Head Coverings: Unless for religious or medical reasons, head coverings are generally not allowed.
- No Glasses: Many agencies now require glasses to be removed to avoid glare and obstruction of the eyes, so check the specific guidelines.
1.2. State-Specific Rules
While federal guidelines exist for documents like passports, driver’s license photo rules can vary by state, and some states may be more lenient regarding smiles than others, so it’s important to check your state’s specific requirements on the DMV website.
Example:
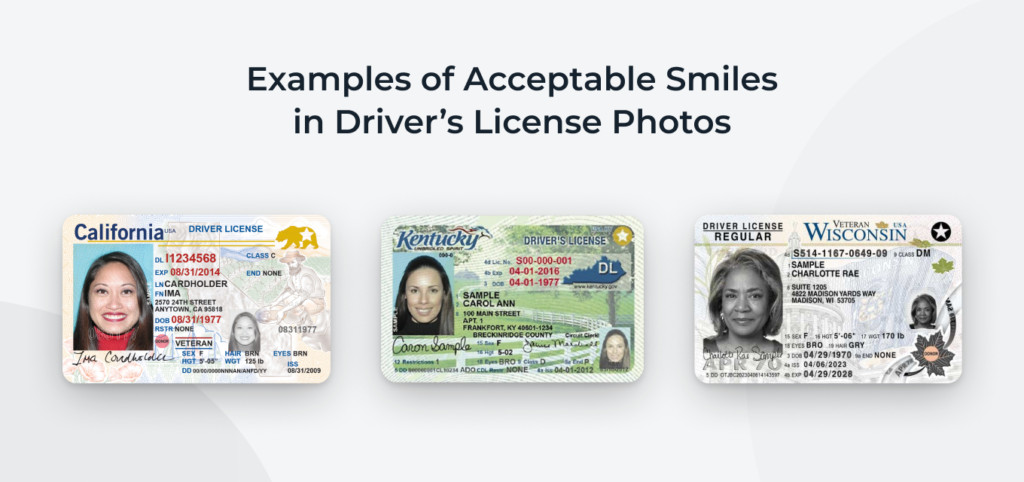
- Colorado: Known to be more accepting of toothy smiles.
- Other States: May require a closed-mouth smile or a completely neutral expression.
According to research from the Santa Fe University of Art and Design’s Photography Department, in July 2025, knowing these state-specific rules can help you prepare accordingly and avoid having your photo rejected.
2. The Great Smile Debate: To Smile or Not to Smile?
The question of whether to smile in an ID photo is a common one, and the answer isn’t always straightforward, so it largely depends on the specific regulations of the issuing authority.
2.1. Smiling vs. Neutral Expression
- Smiling: A slight, natural smile can make you appear more approachable and friendly, and some states and countries permit this, so it’s a good option if allowed.
- Neutral Expression: A neutral expression is often the safest bet, as it complies with the strictest requirements and ensures no ambiguity, and this typically means a relaxed face with your mouth closed.
2.2. Why Regulations Exist
The primary reason for these regulations is to ensure accurate facial recognition. According to a 2024 study published in the Journal of Electronic Imaging, neutral expressions are more easily processed by facial recognition software, and extreme expressions can distort facial features, making identification less reliable.
3. States That Allow Smiling
While many states require or prefer a neutral expression, some are more lenient and allow a natural smile, and it’s essential to know where you stand before taking your photo.
3.1. Examples of States
- Colorado: As mentioned earlier, Colorado is one of the more liberal states when it comes to smiling in ID photos.
- Other States: Some states don’t explicitly forbid smiling but may require the smile to be subtle and natural, so check the specific guidelines for your state on the DMV website.
3.2. How to Check Your State’s Policy
- Visit the DMV Website: The official website of your state’s Department of Motor Vehicles (DMV) is the best source for accurate information.
- Search for Photo Requirements: Look for a section on driver’s license photo requirements, and this will usually provide specific details on acceptable expressions.
- Contact the DMV Directly: If the website is unclear, call or email the DMV for clarification, and this ensures you have the most up-to-date information.
4. How to Smile Properly in an ID Photo
If your state or the issuing authority allows smiling, it’s essential to do it right, and a forced or unnatural smile can look worse than a neutral expression, so here’s how to achieve a pleasant, acceptable smile.
4.1. The Natural Smile
A natural smile is key to looking good in any photo, including an ID picture.
- Relax Your Face: Start by relaxing your facial muscles.
- Slight Upturn of the Lips: A gentle upturn of the corners of your mouth is usually sufficient.
- Think of Something Happy: This can help create a genuine, relaxed smile.
- Avoid Showing Too Many Teeth: A toothy grin might not be acceptable, so keep it subtle.
4.2. Practice Makes Perfect
- Practice in Front of a Mirror: Experiment with different smiles to see what looks best.
- Take Selfies: Take several selfies with various expressions to identify the most flattering one.
- Get Feedback: Ask a friend or family member for their opinion on your smile, and they can provide valuable feedback.
5. General Tips for a Great ID Photo
Regardless of whether you smile or not, several general tips can help you take a great ID photo, and these tips cover everything from clothing to grooming, ensuring you look your best.
5.1. Dress Code
- Choose the Right Colors: Avoid wearing white, as it can blend with the background, and opt for solid, darker colors like blue, green, or burgundy.
- Avoid Busy Patterns: Simple, solid-colored clothing is best, as busy patterns can be distracting.
- Comfortable Attire: Wear something you feel comfortable and confident in.
5.2. Makeup Tips
- Natural Look: Go for a natural, “no-makeup” look that enhances your features without being overdone, and this is typically the most flattering option.
- Matte Finish: Use matte or satin-finish products to avoid shine from the camera flash.
- Concealer: Use a good concealer to cover dark circles and blemishes.
- Blush: Apply a touch of blush to add color to your face.
- Avoid Heavy Contouring: Heavy contouring can look unnatural in photos, so keep it light.
5.3. Hair Styling
- Neat and Tidy: Ensure your hair is neat and tidy.
- Keep Hair Off Your Face: Make sure your hair doesn’t cover your eyes or face.
- Simple Styles: Simple hairstyles are best, and avoid anything too elaborate.
- Hair Accessories: Avoid headbands or other accessories unless for religious or medical reasons.
5.4. Glasses
- Check Regulations: If you wear glasses, check whether they are allowed in the photo, and many agencies now require them to be removed.
- Avoid Glare: If glasses are allowed, ensure there is no glare on the lenses, and you can try tilting your head slightly or adjusting the lighting.
6. Common Mistakes to Avoid
Knowing what not to do is just as important as knowing what to do, and avoiding these common mistakes can help ensure your photo is accepted and looks great.
6.1. Poor Lighting
- Too Dark: Make sure the photo is well-lit, and avoid shadows on your face.
- Harsh Lighting: Avoid harsh, direct lighting, which can create unflattering shadows, and instead, opt for soft, diffused lighting.
6.2. Incorrect Background
- Busy Background: Ensure the background is plain and light-colored, and avoid backgrounds with patterns or objects.
- Wrong Color: Check the specific color requirements for the background, and it’s usually white or light gray.
6.3. Unnatural Expression
- Forced Smile: Avoid a forced or unnatural smile, as it can look awkward.
- Serious Face: While a neutral expression is often required, avoid looking too stern or serious.
6.4. Improper Attire
- Wearing White: Avoid wearing white, as it can blend with the background.
- Distracting Patterns: Avoid clothing with busy patterns or logos.
6.5. Poor Grooming
- Messy Hair: Ensure your hair is neat and tidy, and avoid messy or unkempt hairstyles.
- Too Much Makeup: Avoid wearing too much makeup, as it can look unnatural in photos.
7. Home vs. Professional Photos
You may have the option of taking your ID photo at home or having it done professionally, and each has its advantages and disadvantages.
7.1. Home Photos
- Pros:
- Convenience: You can take the photo in the comfort of your own home.
- Cost-Effective: It can be cheaper than going to a professional photographer.
- Unlimited Retakes: You can take as many photos as you need until you get the perfect one.
- Cons:
- Technical Challenges: Ensuring proper lighting, background, and composition can be challenging.
- Risk of Rejection: If the photo doesn’t meet the requirements, it could be rejected.
7.2. Professional Photos
- Pros:
- Expertise: Professional photographers know the requirements and can ensure the photo meets them.
- Quality: Professional equipment and lighting can result in a higher-quality photo.
- Guaranteed Acceptance: Some photographers guarantee their photos will be accepted.
- Cons:
- Cost: Professional photos can be more expensive than taking them at home.
- Inconvenience: You need to travel to a studio and schedule an appointment.
7.3. Using Photo Editing Apps
If you opt to take your photo at home, consider using photo editing apps to ensure it meets all the requirements.
- PhotoAiD®: Available for both iOS and Android, PhotoAiD® helps you create compliant photos by automatically adjusting the size, background, and other parameters.
- Other Apps: Several other apps are available that offer similar features.
8. Real-Life Examples
Looking at real-life examples can provide additional guidance and inspiration, and here are a few scenarios and tips.
8.1. Driver’s License Photo
- State Regulations: Check your state’s DMV website for specific requirements.
- Neutral Smile: If allowed, opt for a slight, natural smile.
- Proper Attire: Wear a solid-colored shirt that contrasts with the background.
8.2. Passport Photo
- Strict Guidelines: Passport photos have very strict guidelines, so ensure you adhere to them.
- Neutral Expression: A neutral expression with your mouth closed is typically required.
- No Glasses: Glasses are generally not allowed in passport photos.
8.3. Student ID Photo
- School Policies: Check your school’s policies regarding ID photos.
- Natural Look: A natural, friendly look is usually acceptable.
- Comfortable Attire: Wear something you feel comfortable and confident in.
9. Staying Updated on Regulations
ID photo regulations can change, so it’s essential to stay updated, and here’s how.
9.1. Official Websites
- DMV Website: For driver’s licenses, regularly check your state’s DMV website.
- State Department Website: For passports, refer to the US Department of State website.
- School or Employer Websites: For student or employee IDs, check the respective institution’s website.
9.2. News and Updates
- Follow Official Accounts: Follow official social media accounts for updates.
- Check News Articles: Look for news articles or announcements regarding changes in regulations.
10. FAQ: Frequently Asked Questions
10.1. Can you take your own driver’s license photo?
Driver’s license photo rules differ depending on the state—some accept a license picture taken at home, while others require you to do it at a DMV office, and it’s best to check your local regulations before taking a photo. If you can take your driver’s license picture yourself, try a photo editor.
10.2. Can you wear earrings in driver’s license photos?
Earrings and other jewelry are allowed in license photos, however, they shouldn’t be too big or flashy, like over-sized hoops or sparkly sets.
10.3. Can you wear glasses in your driver’s license picture?
If you wear prescription glasses when driving, you must wear them for a driver’s license photo, and in other cases, the decision is yours, just be sure that your frames don’t cover your eyes or cast shadows, your lenses aren’t tinted, and there’s no glare on the lenses.
10.4. Can you show teeth in driver’s license photos?
Smiling is generally allowed in all driver’s license photos, but toothy smiles are accepted only in certain states, so check your local regulations.
10.5. What color to wear for a driver’s license photo?
The best color to wear for a driver’s license photo is one that complements your natural skin and eye color and doesn’t blend with the background, and avoid white and wear a solid, darker color.
10.6. Can I wear a headband in my driver’s license photo?
You can’t wear any head coverings, including headbands, for driver’s license pictures, and headgear is allowed only for medical or religious purposes.
10.7. What if my photo is rejected?
If your photo is rejected, find out the reason why, and common reasons include improper lighting, incorrect background, or non-compliance with expression guidelines, then, correct the issue and retake the photo, or consider going to a professional photographer.
10.8. How can I ensure my home photo meets the requirements?
Use photo editing apps like PhotoAiD® to adjust the size, background, and other parameters, and follow all the guidelines regarding lighting, expression, and attire.
10.9. Are there any specific apps for ID photos?
Yes, PhotoAiD® is a popular app for creating compliant ID photos, and it’s available for both iOS and Android, offering features like automatic background removal and size adjustment.
10.10. What are the most common reasons for ID photo rejection?
The most common reasons include improper lighting, incorrect background, non-compliant expression, wearing glasses when not allowed, and incorrect photo size.
 Smiling subtly in a passport photo, demonstrating an acceptable expression.
11. Conclusion: Putting It All Together
Taking a great ID photo involves understanding the regulations, preparing properly, and paying attention to detail, and whether you choose to smile or maintain a neutral expression, the key is to look natural, confident, and compliant with the guidelines. By following the tips outlined in this guide, you can increase your chances of getting an ID photo you’re happy with, and remember, dfphoto.net is here to provide you with more in-depth guides, inspiration, and resources to enhance your photographic journey.
Ready to elevate your photography skills and capture stunning images? Visit dfphoto.net today for a wealth of resources, including detailed tutorials, beautiful photo galleries, and a vibrant community of photographers. Discover new techniques, find inspiration, and connect with fellow photography enthusiasts to take your skills to the next level. Don’t wait—start your journey to photographic excellence with dfphoto.net now! Address: 1600 St Michael’s Dr, Santa Fe, NM 87505, United States. Phone: +1 (505) 471-6001. Website: dfphoto.net.