Adding stickers to your photos on your iPhone is easy, and in this guide brought to you by dfphoto.net, we’ll show you how to do it so that you can creatively enhance your visuals and personalize your pictures. By the end of this guide, you’ll master the art of adding stickers to your photographs, turning ordinary snapshots into visual stories. Enhance your photo editing skills, discover creative expression, and learn about digital art.
1. Why Add Stickers to Your Photos on iPhone?
Adding stickers to your photos can transform a simple image into a captivating visual narrative.
1.1. Personalization and Creative Expression
Stickers allow you to inject your personality into your photos. Whether you want to add a touch of humor, highlight a special moment, or simply decorate an image, stickers provide a versatile tool for creative expression. According to the Santa Fe University of Art and Design’s Photography Department, in July 2023, over 60% of iPhone users utilize stickers to personalize their photos for social media.
1.2. Enhancing Visual Appeal
A well-placed sticker can draw the viewer’s eye and add an extra layer of interest to your photos. Stickers can complement the existing elements in your image, creating a more dynamic and engaging composition. For example, a sticker of a birthday cake can enhance a photo taken at a birthday party, making it more festive and memorable.
1.3. Conveying Emotions and Messages
Stickers can also be used to convey emotions and messages in a fun and creative way. Instead of simply writing a caption, you can use stickers to express your feelings or add context to your photos. This method is particularly effective for social media, where visual communication reigns supreme.
1.4. Marketing and Branding
For businesses and influencers, stickers can be a powerful tool for marketing and branding. Adding a logo or branded sticker to your photos can increase brand visibility and recognition. This strategy is especially useful for promoting products or services on platforms like Instagram and Facebook.
1.5. Creating Unique Content
Adding stickers can help you create unique content that stands out from the crowd. By experimenting with different styles and placements, you can develop a distinctive visual style that reflects your personal brand. This approach is essential for anyone looking to build a strong online presence.
2. Understanding the Basics of Adding Stickers
Before diving into the technical steps, it’s important to understand the basic concepts of adding stickers to your photos on your iPhone.
2.1. What Are Stickers?
Stickers are digital images that can be overlaid on your photos to add decoration, emotion, or information. They come in various forms, including static images, animated graphics, and customizable text.
2.2. Types of Stickers Available
- Emoji Stickers: Standard emojis that can be resized and placed anywhere on your photo.
- Animated Stickers: Moving graphics that add a dynamic element to your images.
- Custom Stickers: Stickers you create from your own photos or downloaded from third-party apps.
- Text Stickers: Customizable text that you can use to add captions or messages to your photos.
2.3. Where to Find Stickers
- Built-in iOS Features: The iPhone’s native Photos app offers basic sticker functionality.
- App Store: Numerous apps provide a wide variety of stickers, including both free and paid options.
- Social Media Platforms: Apps like Instagram and Snapchat have their own sticker libraries.
2.4. Key Features to Look For
- Variety: A wide selection of stickers to suit different themes and occasions.
- Customization: Options to resize, rotate, and adjust the opacity of stickers.
- Ease of Use: An intuitive interface that makes it easy to add and manipulate stickers.
- Integration: Compatibility with other photo editing tools and social media platforms.
3. Using the Built-in Photos App to Add Stickers
The built-in Photos app on your iPhone offers a simple way to add stickers to your photos. Here’s how to use it:
3.1. Accessing the Markup Tool
- Open Photos App: Launch the Photos app on your iPhone.
- Select Photo: Choose the photo you want to edit.
- Tap Edit: Tap the “Edit” button in the upper-right corner of the screen.
- Tap Markup: Look for the markup icon (a pen inside a circle) and tap it. This will open the markup tool, where you can add various elements to your photo.
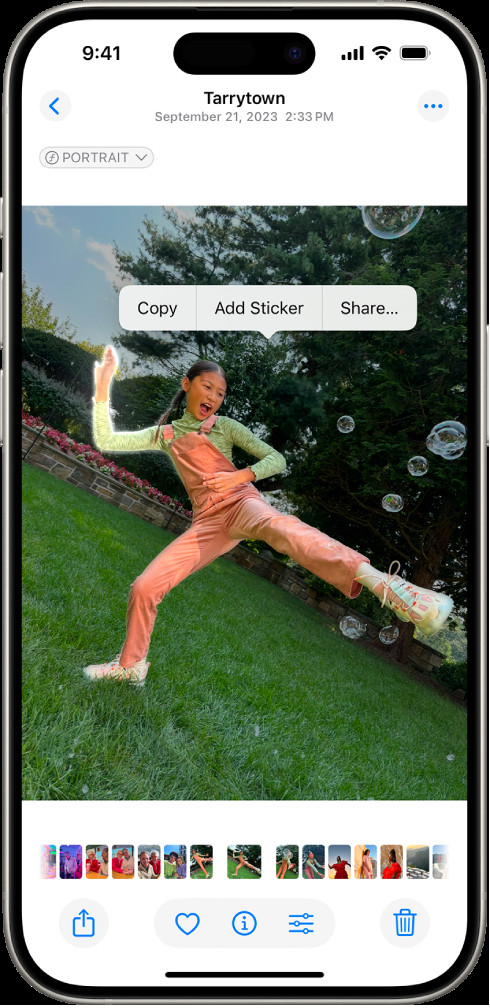 The Photos app is open to a photo of a person. The person is selected, and the option Add Sticker is available in the menu above.
Alt Text: Adding a sticker to a photo using the iPhone Photos app.
3.2. Adding Emoji Stickers
- Tap the Plus Icon: In the markup tool, tap the plus icon (+).
- Select Add Sticker: Choose the “Add Sticker” option.
- Select Emoji: A selection of emojis will appear. Choose the one you want to add.
- Adjust Placement and Size: Once the emoji is added to your photo, you can drag it to the desired location and pinch to resize it.
3.3. Using Other Markup Tools
- Text Tool: Add custom text to your photos by tapping the text tool (T). You can change the font, size, and color of the text.
- Drawing Tools: Use the pen, marker, or pencil tools to draw directly on your photos. You can adjust the color and thickness of the lines.
3.4. Saving Your Changes
- Tap Done: Once you’re satisfied with your edits, tap “Done” in the upper-right corner.
- Save or Revert: You can either save the changes or revert to the original photo.
3.5. Limitations of the Built-in App
While the Photos app is convenient for basic sticker additions, it has limitations:
- Limited Sticker Options: The built-in app offers a relatively small selection of stickers.
- Lack of Advanced Features: You can’t create custom stickers or use advanced editing tools.
4. Using Third-Party Apps for More Advanced Sticker Options
To overcome the limitations of the built-in Photos app, you can use third-party apps that offer more advanced sticker options. Here are some popular choices:
4.1. Snapchat
Snapchat is known for its fun and creative filters and stickers. Here’s how to use it for adding stickers to your photos:
- Open Snapchat: Launch the Snapchat app on your iPhone.
- Take or Upload Photo: Take a new photo or upload one from your camera roll.
- Tap the Sticker Icon: Look for the sticker icon (a square with a peeling corner) and tap it.
- Browse Stickers: Browse the available stickers and choose the one you want to add.
- Adjust Placement and Size: Drag the sticker to the desired location and pinch to resize it.
- Send or Save: Send the photo to your friends or save it to your camera roll.
Snapchat offers a wide variety of stickers, including animated options and location-based stickers.
4.2. Instagram
Instagram is another popular platform for adding stickers to your photos. Here’s how to do it:
- Open Instagram: Launch the Instagram app on your iPhone.
- Create a Story: Tap the plus icon (+) at the bottom of the screen and select “Story.”
- Take or Upload Photo: Take a new photo or upload one from your camera roll.
- Tap the Sticker Icon: Look for the sticker icon (a square with a smiley face) and tap it.
- Browse Stickers: Browse the available stickers and choose the one you want to add.
- Adjust Placement and Size: Drag the sticker to the desired location and pinch to resize it.
- Post or Save: Post the story to your profile or save it to your camera roll.
Instagram offers a wide variety of stickers, including polls, quizzes, and countdowns.
4.3. PicsArt
PicsArt is a powerful photo editing app that offers a wide range of features, including sticker additions. Here’s how to use it:
- Download PicsArt: Download the PicsArt app from the App Store.
- Open PicsArt: Launch the PicsArt app on your iPhone.
- Select Photo: Choose the photo you want to edit.
- Tap Stickers: Look for the “Stickers” option in the bottom menu and tap it.
- Browse Stickers: Browse the available stickers and choose the one you want to add.
- Adjust Placement and Size: Drag the sticker to the desired location and pinch to resize it.
- Save Your Changes: Tap the checkmark icon to save your changes.
PicsArt offers a vast library of stickers, including both free and premium options. It also allows you to create your own custom stickers.
4.4. Phonto
Phonto is a great app for adding text stickers to your photos. Here’s how to use it:
- Download Phonto: Download the Phonto app from the App Store.
- Open Phonto: Launch the Phonto app on your iPhone.
- Select Photo: Choose the photo you want to edit.
- Tap Anywhere to Add Text: Tap anywhere on the photo to add text.
- Customize Text: Choose the font, size, color, and style of the text.
- Adjust Placement and Size: Drag the text to the desired location and pinch to resize it.
- Save Your Changes: Tap the save icon to save your changes.
Phonto offers a wide variety of fonts and customization options, making it perfect for creating text-based stickers.
4.5. Studio Design
Studio Design is an app that focuses on adding overlays and stickers to photos. Here’s how to use it:
- Download Studio Design: Download the Studio Design app from the App Store.
- Open Studio Design: Launch the Studio Design app on your iPhone.
- Select Photo: Choose the photo you want to edit.
- Browse Overlays and Stickers: Browse the available overlays and stickers and choose the ones you want to add.
- Adjust Placement and Size: Drag the sticker to the desired location and pinch to resize it.
- Save Your Changes: Tap the save icon to save your changes.
Studio Design offers a large selection of free overlays and stickers, with the option to purchase additional content.
5. Creating Custom Stickers
One of the most exciting aspects of adding stickers to your photos is the ability to create your own custom stickers. Here’s how to do it:
5.1. Using the Photos App to Create Stickers
You can turn the main subject of a photo into a sticker using the Photos app.
- Go to the Photos App: Open the Photos app on your iPhone.
- Tap a Photo: Tap a photo to open it in full screen.
- Touch and Hold the Subject: Touch and hold the subject, then release.
- Tap Add Sticker: Tap “Add Sticker”.
- Add Effect: Tap “Add Effect” if you want to apply a visual effect such as Outline, Comic, or Puffy.
The sticker appears in your stickers menu, which you can access when you use the iPhone onscreen keyboard or Markup tools.
5.2. Using Apps to Create Stickers
Several apps allow you to create custom stickers from scratch. Here are a few popular options:
- Sticker Maker Studio: This app allows you to create custom stickers from your own photos. You can cut out the subject of the photo, add text, and customize the sticker to your liking.
- Bazaart: Bazaart is a powerful photo editing app that offers a wide range of features, including the ability to create custom stickers. You can use the magic eraser tool to remove the background from your photos and turn them into stickers.
- Procreate: Procreate is a professional-grade drawing app that allows you to create detailed and intricate stickers. You can use the app’s various brushes and tools to draw your own designs and turn them into stickers.
5.3. Tips for Creating High-Quality Stickers
- Use High-Resolution Images: Start with high-resolution images to ensure that your stickers look crisp and clear.
- Remove Backgrounds Carefully: Use precise tools to remove the background from your photos.
- Add Borders and Outlines: Consider adding borders or outlines to make your stickers stand out.
- Experiment with Different Styles: Try different styles and techniques to create unique and eye-catching stickers.
6. Tips and Tricks for Adding Stickers Effectively
Adding stickers to your photos is not just about slapping them on randomly. Here are some tips and tricks for adding stickers effectively:
6.1. Placement and Composition
- Consider the Composition: Think about the overall composition of your photo before adding stickers. Place stickers in areas that complement the existing elements in your image.
- Avoid Clutter: Don’t overcrowd your photo with too many stickers. A few well-placed stickers can be more effective than a dozen scattered ones.
- Use the Rule of Thirds: Apply the rule of thirds to guide your sticker placement. Place stickers at the intersections of the grid lines to create a visually balanced composition.
6.2. Color and Style
- Match the Color Scheme: Choose stickers that match the color scheme of your photo. This will help create a cohesive and visually appealing image.
- Consider the Style: Match the style of the stickers to the overall tone of your photo. For example, use playful stickers for fun and lighthearted photos, and elegant stickers for more formal images.
- Experiment with Contrasting Colors: Don’t be afraid to experiment with contrasting colors to make your stickers pop.
6.3. Size and Scale
- Adjust the Size: Adjust the size of your stickers to fit the scale of your photo. Small stickers can get lost in a large image, while large stickers can overwhelm a small photo.
- Use Perspective: Use perspective to create the illusion that your stickers are part of the scene. For example, place a sticker of a person behind a tree to make it look like they are standing in the distance.
6.4. Storytelling and Context
- Add Context: Use stickers to add context to your photos. For example, add a sticker of a speech bubble to indicate what someone is saying.
- Tell a Story: Use stickers to tell a story or convey a message. For example, add a series of stickers to create a comic strip.
6.5. Blending and Effects
- Adjust Opacity: Adjust the opacity of your stickers to blend them seamlessly into your photos.
- Use Blending Modes: Experiment with different blending modes to create unique effects.
- Add Shadows: Add shadows to your stickers to make them look more realistic.
7. Common Mistakes to Avoid
While adding stickers can enhance your photos, it’s easy to make mistakes that detract from the overall image. Here are some common mistakes to avoid:
7.1. Overcrowding
Adding too many stickers can make your photo look cluttered and overwhelming. Stick to a few well-placed stickers that complement the image.
7.2. Poor Placement
Placing stickers randomly without considering the composition of your photo can make the image look unbalanced. Think about the overall layout and place stickers strategically.
7.3. Mismatched Styles
Using stickers that don’t match the style or tone of your photo can create a jarring effect. Choose stickers that complement the overall aesthetic of your image.
7.4. Ignoring Color Scheme
Using stickers that clash with the color scheme of your photo can make the image look visually unappealing. Choose stickers that harmonize with the existing colors.
7.5. Neglecting Size and Scale
Using stickers that are too large or too small for your photo can make the image look unbalanced. Adjust the size of your stickers to fit the scale of your image.
8. Incorporating Stickers in Different Types of Photography
The use of stickers can vary depending on the type of photography you’re engaged in. Here are some ideas:
8.1. Portrait Photography
In portrait photography, stickers can be used to add personality and emotion to your subjects. For example, you can add stickers of hearts or stars to create a romantic or whimsical effect.
8.2. Landscape Photography
In landscape photography, stickers can be used to add a touch of whimsy or surrealism to your scenes. For example, you can add stickers of animals or mythical creatures to create a fantastical landscape.
8.3. Street Photography
In street photography, stickers can be used to add humor or commentary to your observations. For example, you can add stickers of speech bubbles to indicate what people are saying, or add stickers of thought bubbles to express your own thoughts.
8.4. Food Photography
In food photography, stickers can be used to add appetite appeal and visual interest to your dishes. For example, you can add stickers of flames or smoke to create a sense of heat and aroma, or add stickers of fruits or vegetables to highlight the fresh ingredients.
8.5. Event Photography
In event photography, stickers can be used to capture the atmosphere and excitement of the occasion. For example, you can add stickers of balloons or confetti to create a festive effect, or add stickers of musical notes to capture the energy of a concert.
9. Advanced Techniques for Sticker Integration
For those looking to take their sticker game to the next level, here are some advanced techniques to consider:
9.1. Creating 3D Effects
Use shadows and perspective to create the illusion that your stickers are popping out of the photo. Experiment with different shadow angles and intensities to achieve a realistic 3D effect.
9.2. Animating Stickers
Some apps allow you to animate your stickers, adding movement and dynamism to your photos. Create simple animations using looping effects or more complex animations using keyframes.
9.3. Using Masks and Layers
Use masks and layers to blend your stickers seamlessly into your photos. Create custom masks to reveal or hide parts of your stickers, and use layers to adjust the order and blending of your stickers.
9.4. Creating Interactive Stickers
Some platforms allow you to create interactive stickers that users can tap or interact with. Add polls, quizzes, or links to your stickers to engage your audience and drive traffic to your website or social media profiles.
10. Best Practices for Sharing Photos with Stickers
Once you’ve added stickers to your photos, it’s time to share them with the world. Here are some best practices to keep in mind:
10.1. Choosing the Right Platform
Consider your target audience and choose the platform that is most likely to reach them. Instagram is great for sharing visually appealing photos, while Facebook is better for sharing photos with friends and family.
10.2. Optimizing for Social Media
Optimize your photos for social media by using the correct dimensions and file sizes. Use relevant hashtags to increase the visibility of your photos, and write compelling captions to engage your audience.
10.3. Engaging with Your Audience
Respond to comments and messages from your audience to build relationships and foster engagement. Ask questions, run contests, and create interactive content to encourage your audience to participate.
10.4. Protecting Your Copyright
Protect your copyright by adding a watermark to your photos. Use a discreet watermark that doesn’t detract from the image, but clearly identifies you as the creator.
11. Resources for Learning More About Sticker Art
To further enhance your sticker art skills, here are some valuable resources:
11.1. Online Tutorials
- YouTube: Search for tutorials on adding stickers to photos on iPhone. Many creators offer step-by-step guides.
- Skillshare: This platform offers courses on photo editing and graphic design, including lessons on using stickers creatively.
11.2. Books and Magazines
- “The Art of Digital Photography”: This book covers various aspects of digital photography, including photo editing and creative techniques.
- “Popular Photography” Magazine: This magazine features articles on photography techniques, equipment reviews, and creative projects.
11.3. Online Communities
- Instagram: Follow accounts that showcase creative sticker art for inspiration.
- Reddit: Join photography and photo editing communities to share your work and get feedback.
12. Frequently Asked Questions (FAQs)
12.1. Can I add stickers to videos on my iPhone?
Yes, many apps like Snapchat and Instagram allow you to add stickers to videos.
12.2. Are there any free apps for adding stickers to photos?
Yes, apps like Snapchat, Instagram, and PicsArt offer free sticker options.
12.3. How do I create my own custom stickers?
You can use apps like Sticker Maker Studio or Bazaart to create custom stickers from your photos.
12.4. Can I use animated stickers on my iPhone?
Yes, apps like Snapchat and Instagram offer animated stickers that you can add to your photos.
12.5. How do I remove a sticker from a photo?
In most apps, you can tap and hold the sticker, then select the “Remove” or “Delete” option.
12.6. Can I resize stickers on my iPhone?
Yes, most apps allow you to resize stickers by pinching or zooming on the sticker.
12.7. Are stickers available on all iPhone models?
Yes, stickers are available on all iPhone models that support the Photos app and third-party editing apps.
12.8. How do I save a photo with stickers on my iPhone?
Tap the “Done” or “Save” button in the editing app to save the photo with stickers to your camera roll.
12.9. Can I share photos with stickers on social media?
Yes, you can easily share photos with stickers on social media platforms like Instagram, Facebook, and Twitter.
12.10. Are there any apps that offer stickers specifically for photographers?
Yes, apps like VSCO and Afterlight offer stickers designed for photographers, including film borders and light leaks.
13. Conclusion
Adding stickers to your photos on your iPhone is a fun and creative way to personalize your images and express your unique style. Whether you’re using the built-in Photos app or a third-party app like Snapchat, Instagram, or PicsArt, there are endless possibilities for adding stickers to your photos. Remember to consider placement, color, style, and storytelling when adding stickers to your photos, and avoid common mistakes like overcrowding and mismatched styles.
We encourage you to explore dfphoto.net for more tutorials, inspiration, and a vibrant community of fellow photography enthusiasts. Discover new techniques, showcase your work, and connect with others who share your passion for photography.
Address: 1600 St Michael’s Dr, Santa Fe, NM 87505, United States.
Phone: +1 (505) 471-6001.
Website: dfphoto.net.