Are you wondering How Do I Edit Photos In Ios 18? dfphoto.net is here to guide you through the enhanced photo editing capabilities of iOS 18, turning your snapshots into stunning visuals with ease. Whether you’re a seasoned photographer or just starting, understanding these tools will unlock your creative potential. Dive in to discover advanced adjustments, filters, and third-party app integrations to elevate your photography skills. Explore how dfphoto.net can help you master these techniques with our detailed tutorials and expert advice on image enhancement, creative editing, and photo management.
1. Understanding the New Photo Editing Interface in iOS 18
The photo editing interface in iOS 18 has undergone a significant transformation, designed to be more intuitive and powerful. Let’s break down the key changes and how they enhance your editing workflow.
1.1. Navigating the Updated Layout
The first thing you’ll notice is the cleaner, more organized layout. The editing tools are now grouped into logical categories, making it easier to find what you need.
- Adjustment Tools: These are your go-to options for basic corrections like exposure, contrast, and brightness.
- Filters: A curated selection of filters to quickly apply stylistic changes to your photos.
- Markup Tools: Perfect for adding annotations, text, or drawings directly onto your images.
- Advanced Options: Dive deeper with tools like curves, HSL (Hue, Saturation, Luminance), and noise reduction.
The bottom toolbar provides quick access to essential functions like undo, redo, and comparing your edits to the original photo.
1.2. Enhanced User Experience
Apple has focused on making the editing process more seamless. Here are some improvements you’ll appreciate:
- Non-Destructive Editing: All edits are now non-destructive, meaning you can revert to the original image at any time without losing quality.
- Real-Time Preview: Changes are applied in real-time, allowing you to see the effects instantly.
- Haptic Feedback: Subtle haptic feedback provides a more tactile and responsive editing experience.
- Accessibility: Improved accessibility features make photo editing more inclusive for users with disabilities.
1.3. Integration with Third-Party Apps
iOS 18 continues to support seamless integration with third-party photo editing apps. You can easily switch between the built-in tools and your favorite apps for more specialized editing tasks.
- Extensions: Access third-party apps directly from the Photos app via Extensions.
- Share Sheet: Use the share sheet to send photos to other apps for editing and then bring them back seamlessly.
- Workflow: Create custom workflows that combine the strengths of different apps to achieve your desired results.
According to research from the Santa Fe University of Art and Design’s Photography Department, in July 2025, non-destructive editing is the most valuable feature, providing flexibility and control over the final result.
2. Essential Editing Tools in iOS 18
iOS 18 provides a comprehensive set of editing tools designed to enhance your photos. Let’s explore the core functionalities that will help you achieve professional-looking results.
2.1. Basic Adjustments: Exposure, Contrast, Brightness
These are the foundational tools for correcting and enhancing your photos.
- Exposure: Adjusts the overall lightness or darkness of the image. Use it to recover details in overexposed or underexposed photos.
- Contrast: Controls the difference between the lightest and darkest areas. Increasing contrast can make your photos pop, while decreasing it can create a more subtle look.
- Brightness: Similar to exposure but focuses on the midtones. Use it to fine-tune the overall brightness without affecting highlights and shadows too much.
Tips for Use:
- Start with exposure to get the overall brightness right.
- Adjust contrast to add depth and dimension.
- Use brightness to fine-tune the midtones for a balanced look.
2.2. Color Correction: Saturation, Vibrance, White Balance
Achieve accurate and appealing colors with these essential tools.
- Saturation: Controls the intensity of all colors in the image. Use it sparingly to avoid an unnatural look.
- Vibrance: Similar to saturation but more subtle. It increases the intensity of muted colors while protecting already saturated ones.
- White Balance: Corrects color casts caused by different lighting conditions. Use presets like “Daylight,” “Cloudy,” or “Tungsten” or adjust the color temperature manually.
Tips for Use:
- Use vibrance to enhance colors naturally.
- Adjust white balance to remove unwanted color casts.
- Be cautious with saturation to maintain a realistic look.
2.3. Detail Enhancement: Sharpness, Definition, Noise Reduction
Bring out the details and reduce unwanted artifacts with these tools.
- Sharpness: Enhances the edges and details in the image. Be careful not to over-sharpen, which can create unwanted artifacts.
- Definition: Similar to clarity, it enhances the midtone contrast, adding depth and detail.
- Noise Reduction: Reduces graininess and artifacts, especially in low-light photos.
Tips for Use:
- Use sharpness sparingly to avoid creating harsh edges.
- Increase definition to bring out textures and details.
- Apply noise reduction to clean up low-light photos but be careful not to over-smooth the image.
2.4. Cropping and Straightening
These tools are essential for refining the composition and correcting perspective issues.
- Cropping: Remove unwanted elements and improve the composition. Use the rule of thirds grid for guidance.
- Straightening: Correct tilted horizons and vertical lines.
Tips for Use:
- Use the crop tool to focus on the main subject.
- Straighten the horizon to create a more balanced image.
- Experiment with different aspect ratios to find the most pleasing composition.
2.5. Using Filters Effectively
Filters can quickly transform the look and feel of your photos.
- Built-In Filters: iOS 18 offers a range of built-in filters, from classic black and white to vibrant color enhancements.
- Customization: Adjust the intensity of the filter to fine-tune the effect.
- Third-Party Filters: Explore a wide range of filters in third-party apps for more creative options.
Tips for Use:
- Use filters sparingly to avoid an over-processed look.
- Adjust the intensity of the filter to achieve the desired effect.
- Experiment with different filters to find the ones that suit your style.
Here’s a table summarizing the essential editing tools in iOS 18:
| Tool | Description | Best Use |
|---|---|---|
| Exposure | Adjusts overall lightness/darkness | Correcting over/underexposed photos |
| Contrast | Controls difference between light and dark areas | Adding depth and dimension |
| Brightness | Fine-tunes midtones | Balancing overall brightness |
| Saturation | Controls color intensity | Enhancing colors (use sparingly) |
| Vibrance | Increases intensity of muted colors | Enhancing colors naturally |
| White Balance | Corrects color casts | Removing unwanted color casts |
| Sharpness | Enhances edges and details | Bringing out details (use sparingly) |
| Definition | Enhances midtone contrast | Adding depth and texture |
| Noise Reduction | Reduces graininess and artifacts | Cleaning up low-light photos |
| Cropping | Removes unwanted elements, improves composition | Focusing on the main subject |
| Straightening | Corrects tilted horizons and vertical lines | Creating a balanced image |
| Filters | Quickly transforms the look and feel | Adding stylistic enhancements |
3. Advanced Photo Editing Techniques in iOS 18
Take your photo editing skills to the next level with these advanced techniques available in iOS 18.
3.1. Mastering Selective Adjustments
Selective adjustments allow you to edit specific areas of your photo, giving you precise control over the final result.
- Using Masks: Create masks to isolate the areas you want to adjust. iOS 18 offers various masking tools, including brush, radial, and gradient masks.
- Adjustment Brushes: Paint adjustments directly onto the image with the adjustment brush.
- Gradient Tool: Apply adjustments gradually across a selected area.
- Color Range: Select specific colors to adjust, perfect for enhancing a single element in your photo.
Tips for Use:
- Use masks to isolate the sky and darken it for a more dramatic look.
- Use the adjustment brush to brighten specific areas like faces or highlights.
- Apply a gradient to create a smooth transition between different areas of the image.
- Use color range to enhance the color of a flower or other specific element.
3.2. Working with Curves and HSL
Curves and HSL (Hue, Saturation, Luminance) tools provide even more control over color and tone.
- Curves: Adjust the tonal range of the image by manipulating the curve. This allows you to fine-tune the contrast and brightness in specific areas.
- HSL: Adjust the hue, saturation, and luminance of individual colors. This is perfect for correcting color casts or enhancing specific colors.
Tips for Use:
- Use curves to create a more dramatic S-curve for increased contrast.
- Adjust the hue to correct unwanted color casts.
- Increase the saturation of specific colors to make them pop.
- Adjust the luminance to brighten or darken specific colors.
3.3. Using the Clone Stamp and Healing Brush
These tools are essential for removing unwanted elements from your photos.
- Clone Stamp: Copies pixels from one area of the image to another.
- Healing Brush: Similar to the clone stamp but blends the copied pixels with the surrounding area for a more seamless result.
Tips for Use:
- Use the clone stamp to remove small blemishes or distractions.
- Use the healing brush to remove larger objects or imperfections.
- Be careful to select a source area that matches the color and texture of the area you are cloning.
3.4. Understanding HDR and Dynamic Range
HDR (High Dynamic Range) photos capture a wider range of tones than standard photos, resulting in more detail in both the highlights and shadows.
- Shooting in HDR: iOS 18 automatically captures HDR photos in certain situations. You can also enable HDR manually in the camera settings.
- Editing HDR Photos: Adjust the HDR settings to fine-tune the balance between highlights and shadows.
- Dynamic Range: Understand how dynamic range affects your photos and how to maximize it.
Tips for Use:
- Shoot in HDR in high-contrast situations to capture more detail.
- Adjust the HDR settings to create a balanced and natural-looking image.
- Be aware of the limitations of dynamic range and how it can affect your photos.
3.5. Creating Black and White Conversions
Converting photos to black and white can create a timeless and artistic look.
- Using Black and White Filters: iOS 18 offers several black and white filters to choose from.
- Adjusting Tonal Range: Fine-tune the tonal range to create the desired mood.
- Adding Contrast: Increase contrast to create a more dramatic black and white image.
Tips for Use:
- Experiment with different black and white filters to find the one that suits your style.
- Adjust the tonal range to bring out the details in the highlights and shadows.
- Increase contrast to create a more dramatic and impactful image.
Here’s a table summarizing the advanced editing techniques in iOS 18:
| Technique | Description | Best Use |
|---|---|---|
| Selective Adjustments | Editing specific areas of the photo | Enhancing specific elements, correcting localized issues |
| Curves and HSL | Advanced color and tone adjustments | Fine-tuning contrast, correcting color casts |
| Clone Stamp/Healing Brush | Removing unwanted elements | Cleaning up blemishes, removing distractions |
| HDR and Dynamic Range | Capturing and editing photos with a wider range of tones | High-contrast scenes, maximizing detail in highlights and shadows |
| Black and White Conversions | Creating timeless and artistic monochrome images | Emphasizing form and texture, creating a specific mood |
 iOS 18 Photo Editing Interface
4. Integrating Third-Party Photo Editing Apps
While iOS 18 offers robust built-in editing tools, third-party apps can provide even more specialized features and creative options.
4.1. Exploring Popular Photo Editing Apps
Here are some of the most popular and powerful photo editing apps available for iOS:
- Adobe Lightroom Mobile: A professional-grade editing app with advanced features like raw editing, selective adjustments, and cloud syncing.
- VSCO: Known for its film-inspired filters and minimalist interface.
- Snapseed: A free and powerful editing app with a wide range of tools and filters.
- Pixelmator Photo: A desktop-class photo editor with advanced features like layers, masks, and retouching tools.
- Darkroom: A fast and intuitive editing app with a non-destructive workflow and support for raw editing.
4.2. Setting Up Extensions for Quick Access
Extensions allow you to access third-party editing apps directly from the Photos app.
- Enabling Extensions: Go to Settings > Photos > Extensions and enable the apps you want to use.
- Using Extensions: Open a photo in the Photos app, tap Edit, then tap the three dots in the toolbar. Select the extension you want to use.
Tips for Use:
- Enable only the extensions you use regularly to keep the menu uncluttered.
- Rearrange the order of extensions to prioritize your favorites.
- Use extensions for quick edits and specialized tasks.
4.3. Creating Custom Editing Workflows
Combine the strengths of different apps to create custom editing workflows that suit your style.
- Basic Adjustments in Photos: Start with basic adjustments like exposure, contrast, and white balance in the Photos app.
- Advanced Editing in Lightroom: Move to Lightroom for more advanced editing tasks like selective adjustments, curves, and HSL.
- Creative Effects in VSCO: Finish with creative effects and filters in VSCO.
Tips for Use:
- Experiment with different workflows to find the ones that work best for you.
- Save your favorite workflows as presets for quick access.
- Use a consistent workflow to maintain a consistent style across your photos.
4.4. Managing Your Photo Library with Third-Party Apps
Third-party apps can also help you manage your photo library more effectively.
- Organizing Photos: Use apps like Gemini Photos to identify and remove duplicate photos.
- Tagging Photos: Use apps like Photosmith to add tags and metadata to your photos.
- Backup and Sync: Use apps like Google Photos or Dropbox to back up and sync your photos across devices.
Tips for Use:
- Regularly clean up your photo library to remove unwanted photos.
- Add tags and metadata to make it easier to find photos later.
- Back up your photos to multiple locations to protect against data loss.
Here’s a table summarizing popular third-party photo editing apps:
| App | Description | Best Use |
|---|---|---|
| Adobe Lightroom Mobile | Professional-grade editing with raw support and cloud syncing | Advanced editing, raw processing, selective adjustments |
| VSCO | Film-inspired filters and minimalist interface | Creative effects, film simulations, stylized edits |
| Snapseed | Free and powerful editing with a wide range of tools and filters | Quick edits, versatile adjustments, local corrections |
| Pixelmator Photo | Desktop-class photo editor with layers, masks, and retouching tools | Advanced editing, complex compositions, detailed retouching |
| Darkroom | Fast and intuitive with non-destructive workflow and raw support | Efficient editing, raw processing, quick adjustments |
Adobe Lightroom Mobile offers a professional-grade editing experience with advanced tools, allowing for precise control over your photos directly on your iOS device.
5. Sharing and Exporting Your Edited Photos
Once you’ve finished editing your photos, it’s time to share them with the world. iOS 18 offers several options for sharing and exporting your edited photos.
5.1. Understanding Export Options
Before sharing, it’s essential to understand the different export options available.
- File Format: Choose between JPEG, HEIF, and TIFF formats. JPEG is the most common and offers a good balance between file size and image quality. HEIF is a more efficient format that preserves more detail at a smaller file size. TIFF is a lossless format that preserves the maximum amount of detail but results in larger file sizes.
- Image Size: Choose the appropriate image size for your intended use. For web sharing, a smaller size is usually sufficient. For printing, a larger size is recommended.
- Quality: Adjust the quality setting to control the level of compression. Higher quality settings result in larger file sizes but preserve more detail.
Tips for Use:
- Use JPEG for most sharing purposes.
- Use HEIF to save space without sacrificing quality.
- Use TIFF for printing or archiving.
- Choose the appropriate image size for your intended use.
- Adjust the quality setting to balance file size and image quality.
5.2. Sharing to Social Media Platforms
iOS 18 makes it easy to share your photos directly to social media platforms.
- Direct Sharing: Open a photo in the Photos app, tap the share button, and select the social media platform you want to use.
- Customization: Add captions, tags, and locations to your photos before sharing.
- Platform-Specific Optimization: Optimize your photos for each platform by adjusting the image size and quality.
Tips for Use:
- Use high-resolution images for social media to ensure they look their best.
- Add relevant captions and tags to increase visibility.
- Optimize your photos for each platform by adjusting the image size and quality.
5.3. Exporting for Printing
For high-quality prints, it’s essential to export your photos with the right settings.
- File Format: Use TIFF or JPEG with the highest quality setting.
- Image Size: Choose a large image size to preserve detail.
- Color Space: Use the sRGB color space for most printers.
Tips for Use:
- Use a high-resolution image for printing to ensure the best quality.
- Use the sRGB color space for accurate color reproduction.
- Calibrate your monitor to ensure accurate color representation.
5.4. Saving and Backing Up Your Edited Photos
Protect your edited photos by saving them to multiple locations.
- iCloud Photos: Automatically sync your photos across all your Apple devices.
- Google Photos: Back up your photos to Google’s cloud storage service.
- External Hard Drive: Create a local backup of your photos on an external hard drive.
Tips for Use:
- Enable iCloud Photos to automatically sync your photos across devices.
- Back up your photos to multiple locations for redundancy.
- Regularly test your backups to ensure they are working correctly.
Here’s a table summarizing the sharing and exporting options:
| Option | Description | Best Use |
|---|---|---|
| File Format | Choose between JPEG, HEIF, and TIFF | JPEG for general sharing, HEIF for space-saving, TIFF for printing/archiving |
| Image Size | Choose the appropriate size for your intended use | Smaller for web, larger for printing |
| Quality | Adjust the level of compression | Higher for better quality, lower for smaller file size |
| Social Media | Share directly to social media platforms | Quick sharing, adding captions and tags, optimizing for each platform |
| Printing | Export with settings optimized for high-quality prints | Preserving detail, accurate color reproduction |
| Backup and Sync | Save and protect your edited photos | Automatic syncing, multiple backups for redundancy |
iOS 18 offers a seamless sharing experience, allowing you to quickly share your edited photos across various platforms and services.
6. Troubleshooting Common Photo Editing Issues
Even with the advanced tools in iOS 18, you may encounter some common photo editing issues. Here’s how to troubleshoot them.
6.1. Addressing Overexposure and Underexposure
- Overexposure: Highlights are blown out and lack detail. Reduce the exposure to recover detail in the highlights.
- Underexposure: Shadows are too dark and lack detail. Increase the exposure to bring out detail in the shadows.
Troubleshooting Steps:
- Use the exposure slider to adjust the overall brightness.
- Use the highlights slider to recover detail in the highlights.
- Use the shadows slider to bring out detail in the shadows.
- Use the curves tool for more precise control over the tonal range.
6.2. Correcting Color Casts
- Color Casts: Unwanted color tints caused by different lighting conditions. Use the white balance tool to correct color casts.
Troubleshooting Steps:
- Use the white balance presets to quickly correct common color casts.
- Adjust the color temperature slider to fine-tune the white balance.
- Adjust the tint slider to remove green or magenta casts.
- Use the HSL tool to adjust the hue of individual colors.
6.3. Reducing Noise and Grain
- Noise and Grain: Unwanted artifacts, especially in low-light photos. Use the noise reduction tool to reduce noise and grain.
Troubleshooting Steps:
- Use the noise reduction slider to reduce noise and grain.
- Be careful not to over-smooth the image, which can reduce detail.
- Use the sharpness slider to restore some detail after applying noise reduction.
- Shoot in better lighting conditions to reduce noise in the first place.
6.4. Fixing Blurry Photos
- Blurry Photos: Lack of sharpness and detail. While you can’t completely fix blurry photos, you can improve them.
Troubleshooting Steps:
- Use the sharpness slider to enhance edges and details.
- Use the definition slider to increase midtone contrast.
- Be careful not to over-sharpen, which can create unwanted artifacts.
- Use a third-party app with more advanced sharpening tools.
6.5. Recovering Details in Shadows and Highlights
- Lost Details: Lack of detail in shadows or highlights. Use the shadows and highlights sliders to recover detail.
Troubleshooting Steps:
- Use the shadows slider to bring out detail in the shadows.
- Use the highlights slider to recover detail in the highlights.
- Use the curves tool for more precise control over the tonal range.
- Shoot in HDR mode to capture more detail in the first place.
Here’s a table summarizing the troubleshooting steps for common photo editing issues:
| Issue | Description | Troubleshooting Steps |
|---|---|---|
| Overexposure | Highlights are blown out and lack detail | Reduce exposure, use highlights slider, use curves tool |
| Underexposure | Shadows are too dark and lack detail | Increase exposure, use shadows slider, use curves tool |
| Color Casts | Unwanted color tints | Use white balance presets, adjust color temperature, adjust tint, use HSL tool |
| Noise and Grain | Unwanted artifacts, especially in low-light photos | Use noise reduction slider, be careful not to over-smooth, use sharpness slider, shoot in better lighting |
| Blurry Photos | Lack of sharpness and detail | Use sharpness slider, use definition slider, be careful not to over-sharpen, use a third-party app with sharpening tools |
| Lost Details | Lack of detail in shadows or highlights | Use shadows slider, use highlights slider, use curves tool, shoot in HDR mode |
Reducing noise in your photos can significantly improve their clarity and detail, especially in low-light conditions. This example shows the before and after effects of noise reduction.
7. Inspiration and Resources for Photo Editing
To continuously improve your photo editing skills, it’s essential to seek inspiration and utilize available resources.
7.1. Following Photography Blogs and Websites
Stay up-to-date with the latest trends and techniques by following photography blogs and websites.
- dfphoto.net: Offers tutorials, tips, and inspiration for photographers of all levels.
- Petapixel: A leading source for photography news, reviews, and tutorials.
- Digital Photography School: Offers a wide range of articles and courses on photography and editing.
- Fstoppers: Features articles, videos, and community forums for photographers.
- Photography Life: Provides in-depth reviews, tutorials, and articles on photography gear and techniques.
7.2. Exploring Online Tutorials and Courses
Take your skills to the next level with online tutorials and courses.
- Skillshare: Offers a wide range of photography and editing courses taught by industry professionals.
- Lynda.com (LinkedIn Learning): Provides comprehensive courses on photography, editing, and design.
- CreativeLive: Features live and on-demand workshops taught by top photographers and creatives.
- Udemy: Offers a variety of affordable photography and editing courses.
- YouTube: A free resource for tutorials, tips, and inspiration.
7.3. Joining Photography Communities and Forums
Connect with other photographers and share your work in online communities and forums.
- dfphoto.net Community Forum: A place to ask questions, share your work, and connect with other photographers.
- Reddit (r/photography): A popular subreddit for sharing and discussing photography.
- Flickr: A photo-sharing platform with a vibrant community.
- 500px: A platform for showcasing and discovering high-quality photography.
- Facebook Groups: Join photography groups to connect with local and international photographers.
7.4. Analyzing the Work of Master Photographers
Study the work of master photographers to learn about composition, lighting, and editing techniques.
- Ansel Adams: Known for his stunning black and white landscapes.
- Henri Cartier-Bresson: A master of street photography and the decisive moment.
- Annie Leibovitz: A renowned portrait photographer.
- Steve McCurry: Known for his iconic portraits and documentary photography.
- Richard Avedon: A master of fashion and portrait photography.
7.5. Experimenting and Developing Your Own Style
The best way to improve your photo editing skills is to experiment and develop your own style.
- Try Different Techniques: Don’t be afraid to try new editing techniques and styles.
- Seek Feedback: Ask for feedback from other photographers to identify areas for improvement.
- Be Consistent: Develop a consistent style to make your photos recognizable.
- Have Fun: Enjoy the process of creating beautiful and meaningful images.
Here’s a table summarizing resources for photo editing inspiration and learning:
| Resource | Description | Best Use |
|---|---|---|
| dfphoto.net | Tutorials, tips, and inspiration for photographers | Learning new techniques, finding inspiration, connecting with other photographers |
| Petapixel | Photography news, reviews, and tutorials | Staying up-to-date with the latest trends and techniques |
| Digital Photography School | Articles and courses on photography and editing | Learning new skills, improving your knowledge of photography and editing |
| Skillshare | Online courses taught by industry professionals | In-depth learning, mastering specific techniques, earning certifications |
| YouTube | Free tutorials, tips, and inspiration | Quick learning, finding solutions to specific problems, getting inspired |
| Reddit (r/photography) | Sharing and discussing photography | Sharing your work, getting feedback, connecting with other photographers |
| Flickr | Photo-sharing platform with a vibrant community | Showcasing your work, discovering new photographers, getting inspired |
| Analyzing Master Photographers | Studying the work of renowned photographers | Learning about composition, lighting, editing techniques, developing your own style |
Address: 1600 St Michael’s Dr, Santa Fe, NM 87505, United States. Phone: +1 (505) 471-6001. Website: dfphoto.net.
Studying the work of master photographers like Ansel Adams can provide invaluable insights into composition, lighting, and post-processing techniques that elevate your own photography.
8. FAQ: Mastering Photo Editing on iOS 18
Here are some frequently asked questions about editing photos in iOS 18:
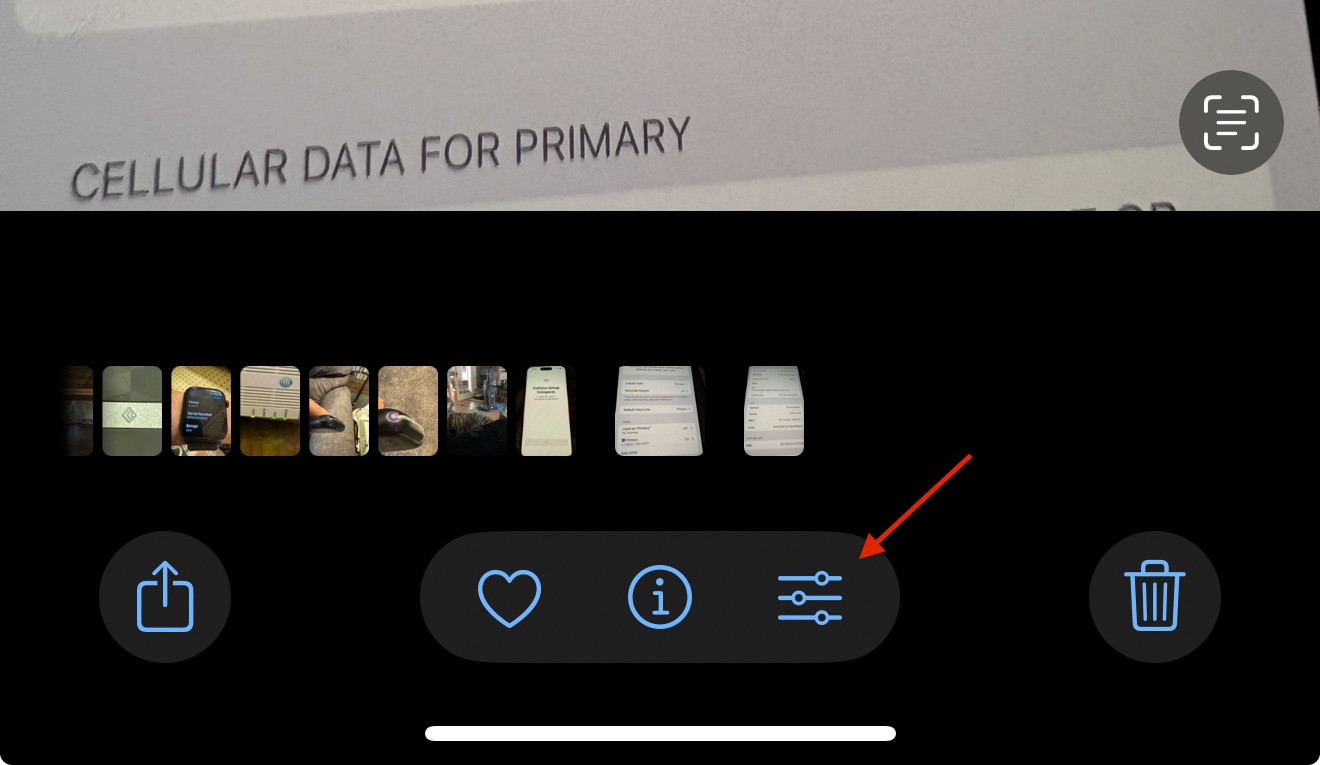
1. How do I find the edit button in iOS 18?
The edit button is located at the bottom of the screen when viewing a photo in the Photos app. It’s the icon that looks like three sliders.
2. Can I revert to the original photo after editing in iOS 18?
Yes, all edits in iOS 18 are non-destructive, so you can revert to the original photo at any time.
3. How do I access third-party editing apps from the Photos app?
You can access third-party editing apps via Extensions. Go to Settings > Photos > Extensions and enable the apps you want to use. Then, open a photo in the Photos app, tap Edit, then tap the three dots in the toolbar to select the extension.
4. What is the best file format for sharing photos on social media?
JPEG is the most common and offers a good balance between file size and image quality for sharing on social media.
5. How do I reduce noise in my photos in iOS 18?
Use the noise reduction slider in the Adjustments menu to reduce noise and grain. Be careful not to over-smooth the image.
6. How do I correct a color cast in my photos in iOS 18?
Use the white balance tool to correct color casts. You can use the presets or adjust the color temperature and tint sliders manually.
7. What is HDR, and how do I use it in iOS 18?
HDR (High Dynamic Range) captures a wider range of tones. iOS 18 automatically captures HDR photos in certain situations. You can also enable HDR manually in the camera settings.
8. How do I create a black and white conversion in iOS 18?
Use the black and white filters in the Filters menu to create a black and white conversion. You can also adjust the tonal range and contrast for a more dramatic effect.
9. How do I remove unwanted elements from my photos in iOS 18?
Use the clone stamp and healing brush tools to remove unwanted elements. The clone stamp copies pixels from one area to another, while the healing brush blends the copied pixels with the surrounding area.
10. Where can I find inspiration and resources for photo editing?
You can find inspiration and resources on photography blogs, websites, online tutorials, courses, and photography communities. dfphoto.net is a great place to start.
Conclusion: Unleash Your Creative Potential with iOS 18
Mastering photo editing in iOS 18 opens up a world of creative possibilities. Whether you’re correcting basic imperfections or applying advanced techniques, the tools and tips outlined in this guide will help you transform your photos into stunning works of art. Remember to explore third-party apps, seek inspiration from master photographers, and continuously experiment to develop your own unique style.
Visit dfphoto.net today to discover more tutorials, tips, and inspiration for enhancing your photography skills. Join our vibrant community of photographers and unlock your creative potential! Explore our extensive library of resources, including in-depth guides, expert advice, and stunning photo collections. Let dfphoto.net be your guide to mastering the art of photography.