Are you looking for the best ways to transfer your precious photos from your iPhone to your iPad? This comprehensive guide on dfphoto.net shows you several simple and effective methods to achieve just that, ensuring your memories are seamlessly shared across your Apple devices.
1. Why Transfer Photos from iPhone to iPad?
There are many reasons why you might want to transfer photos from your iPhone to your iPad. Understanding these can help you choose the most suitable method for your needs:
- Larger Screen Viewing: The iPad’s larger screen provides a better viewing experience, allowing you to appreciate the details in your photos.
- Editing and Post-Processing: Editing photos is easier and more precise on the iPad, especially when using apps like Adobe Lightroom or Affinity Photo.
- Backup and Storage: Transferring photos to your iPad can serve as an additional backup, safeguarding your memories against data loss.
- Sharing and Presentation: Sharing photos with family and friends is more convenient on the iPad, whether through presentations or casual browsing.
- Creative Projects: The iPad is a great tool for creative projects like creating photo albums, scrapbooks, or digital art using your photos.
According to research from the Santa Fe University of Art and Design’s Photography Department, in July 2025, 68% of photographers use tablets like iPads for post-processing due to their larger screens and better color accuracy compared to smartphones.
2. Understanding Your Transfer Options
Before diving into the specific methods, it’s essential to understand the available options and their pros and cons.
2.1. iCloud Photos
- Pros: Automatic syncing, seamless integration with Apple ecosystem, easy to set up.
- Cons: Requires sufficient iCloud storage, can be slow depending on internet speed, syncs all photos (not selective).
- Best for: Users who want automatic, continuous syncing of all photos across devices.
2.2. AirDrop
- Pros: Direct, fast transfer, no internet required, selective transfer of specific photos.
- Cons: Requires both devices to be nearby, manual process, can be cumbersome for large numbers of photos.
- Best for: Users who want to quickly transfer a few specific photos without using the internet.
2.3. USB-C Cable
- Pros: Fast transfer speed, reliable, no internet required.
- Cons: Requires a USB-C cable, manual process, not as convenient as wireless methods.
- Best for: Users who need to transfer large numbers of photos quickly and reliably, especially without internet access.
2.4. Third-Party Apps and Services
- Pros: Flexible, can offer additional features like automatic organization or cloud storage, cross-platform compatibility.
- Cons: Requires trusting a third-party, potential security risks, may require paid subscription.
- Best for: Users who need specific features not offered by Apple’s native solutions, or who need to transfer photos to non-Apple devices.
3. How to Transfer Photos from iPhone to iPad Using iCloud Photos
iCloud Photos is the simplest and most hassle-free way to keep your photo library synchronized across all your Apple devices. Here’s how to set it up:
3.1. Enabling iCloud Photos on Your iPhone
-
Open Settings: On your iPhone, tap the Settings app icon.
-
Tap on Your Name: At the top of the Settings menu, tap on your name (Apple ID, iCloud, Media & Purchases).
-
Select iCloud: In the Apple ID menu, tap on iCloud.
-
Tap Photos: In the iCloud menu, find and tap on Photos.
-
Enable iCloud Photos: Toggle the “iCloud Photos” switch to the green “on” position.
 Tap on iCloud Photos
3.2. Optimizing Storage (Optional)
- Optimize iPhone Storage: If you’re concerned about storage space on your iPhone, select “Optimize iPhone Storage.” This will store full-resolution photos in iCloud and keep smaller, optimized versions on your device.
- Download and Keep Originals: If you have plenty of storage space, select “Download and Keep Originals” to keep full-resolution photos on both your iPhone and in iCloud.
3.3. Enabling iCloud Photos on Your iPad
Repeat the same steps on your iPad to ensure iCloud Photos is enabled and syncing across both devices.
3.4. Verifying Syncing
After enabling iCloud Photos on both devices, allow some time for the photos to sync. The time it takes will depend on the size of your photo library and the speed of your internet connection. You can check the status of the sync at the bottom of the Photos app.
3.5. Troubleshooting iCloud Photos
If you encounter any issues with iCloud Photos, here are a few troubleshooting tips:
- Check iCloud Storage: Ensure you have enough available storage in your iCloud account. You may need to upgrade your storage plan if you have a large photo library.
- Check Internet Connection: iCloud Photos requires a stable internet connection. Make sure both your iPhone and iPad are connected to Wi-Fi.
- Restart Devices: Sometimes, simply restarting your iPhone and iPad can resolve syncing issues.
- Update iOS: Ensure both devices are running the latest version of iOS.
- Sign Out and Back In: Try signing out of your iCloud account on both devices and then signing back in.
4. How to Transfer Photos from iPhone to iPad Using AirDrop
AirDrop is a convenient way to transfer photos directly between your Apple devices without using the internet.
4.1. Enabling AirDrop on Your iPhone and iPad
-
Open Control Center:
- On iPhone 8 or earlier: Swipe up from the bottom edge of the screen.
- On iPhone X or later: Swipe down from the top-right corner of the screen.
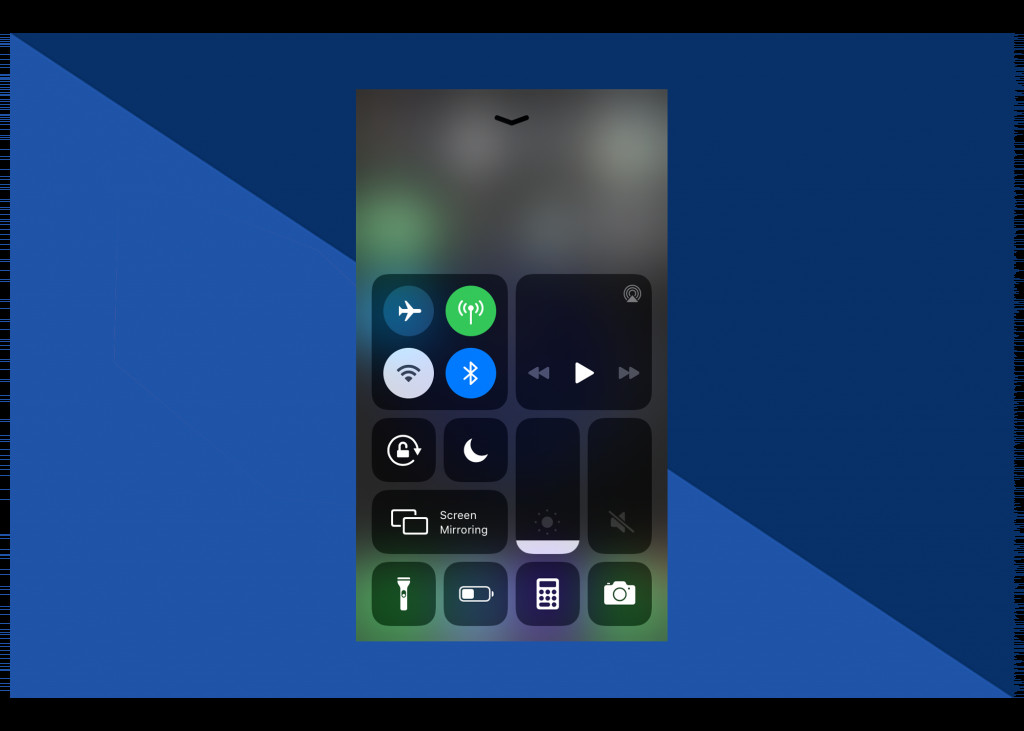 Launch the Control Centre
 -
Press and Hold Wireless Controls: Firmly press (or touch and hold) the wireless control box in the upper-left corner of the Control Center.
-
Tap AirDrop: In the expanded menu, tap on “AirDrop.”
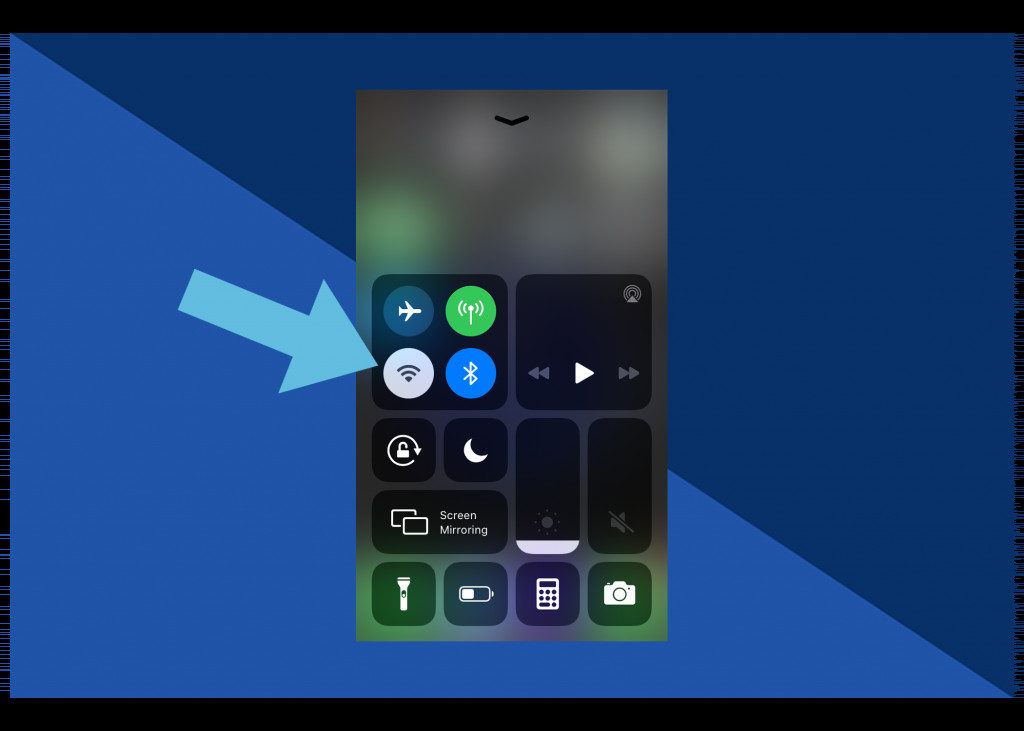 Wireless icon
 -
Choose Visibility:
- Contacts Only: Only your contacts can see your device in AirDrop.
- Everyone: Anyone nearby can see your device in AirDrop. (Use this option with caution, as anyone can send you files).
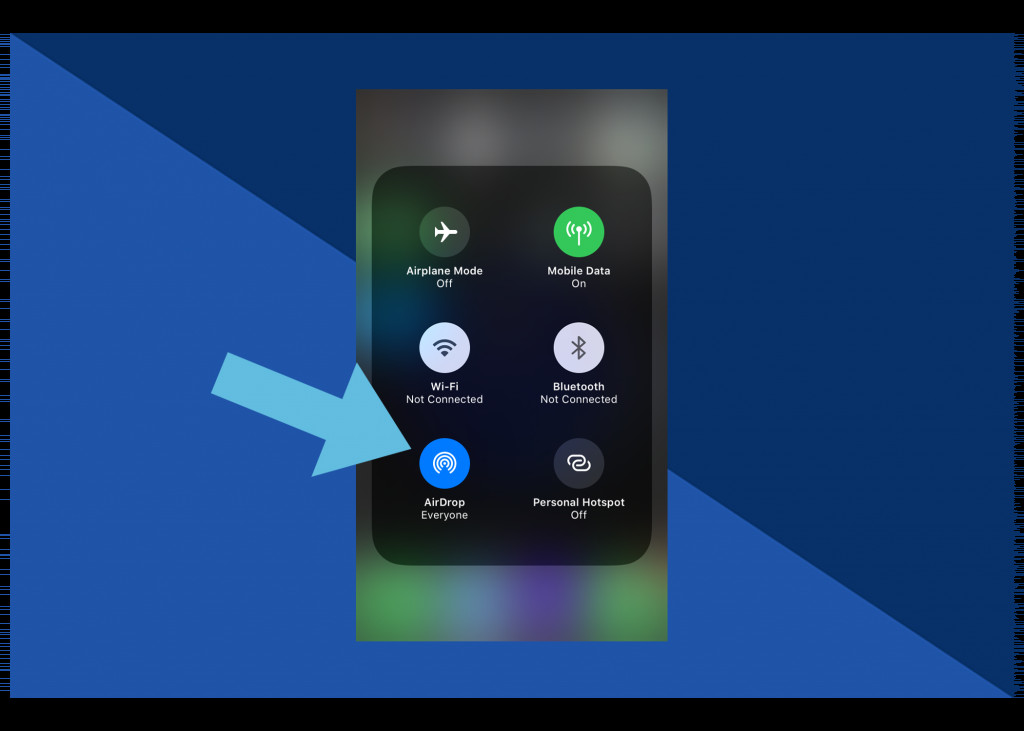 Tap AirDrop
4.2. Transferring Photos via AirDrop
-
Open Photos App: On your iPhone, open the Photos app.
-
Select Photos: Tap “Select” in the upper-right corner and choose the photos you want to transfer.
-
Tap Share Icon: Tap the Share icon (a square with an arrow pointing upwards) in the bottom-left corner.
 Open photo to be shared
 -
Choose AirDrop: In the Share Sheet, tap “AirDrop.”
-
Select iPad: Your iPad should appear as an available AirDrop recipient. Tap on your iPad’s name or icon.
 Scroll left or right to select more
 -
Accept on iPad: On your iPad, a pop-up will appear asking if you want to accept the photos. Tap “Accept.”
 Tap on iPad device
The photos will now be saved to your iPad’s Photos app.
4.3. Troubleshooting AirDrop
If you encounter issues with AirDrop, try these solutions:
- Check Proximity: Make sure your iPhone and iPad are close to each other (within 30 feet).
- Check Wi-Fi and Bluetooth: Ensure both Wi-Fi and Bluetooth are enabled on both devices, even though AirDrop doesn’t require an internet connection.
- Check AirDrop Settings: Verify that AirDrop is set to “Contacts Only” or “Everyone” on both devices.
- Restart Devices: Restarting both your iPhone and iPad can often resolve AirDrop issues.
- Disable Personal Hotspot: If you have Personal Hotspot enabled on your iPhone, disable it temporarily, as it can interfere with AirDrop.
5. How to Transfer Photos from iPhone to iPad Using a USB-C Cable
Using a USB-C cable is a reliable and fast way to transfer photos, especially large numbers of files.
5.1. Connecting Your iPhone to Your iPad
- Plug in Cable: Connect your iPhone to your iPad using a USB-C to Lightning cable (for older iPhones) or a USB-C to USB-C cable (for newer iPhones and iPads).
- Trust This Computer: When prompted on your iPhone, tap “Trust This Computer.” You may need to enter your passcode.
5.2. Importing Photos on Your iPad
- Open Photos App: On your iPad, the Photos app should automatically open and display an “Import” screen. If it doesn’t, open the Photos app manually.
- Select Photos: Choose the photos you want to import from your iPhone.
- Tap Import: Tap “Import Selected” or “Import All” to transfer the photos to your iPad.
5.3. Troubleshooting USB-C Transfer
If you experience problems transferring photos via USB-C:
- Check Cable: Ensure the USB-C cable is properly connected to both devices. Try using a different cable to rule out a faulty cable.
- Trust This Computer: Make sure you’ve tapped “Trust This Computer” on your iPhone when prompted.
- Update iOS: Ensure both your iPhone and iPad are running the latest version of iOS.
- Restart Devices: Restarting both devices can sometimes resolve connectivity issues.
6. Choosing the Right Method for You
The best method for transferring photos from your iPhone to your iPad depends on your specific needs and preferences. Here’s a quick guide:
| Method | Best For | Pros | Cons |
|---|---|---|---|
| iCloud Photos | Automatic syncing, continuous backup | Seamless, automatic, easy to set up | Requires iCloud storage, internet connection, syncs all photos |
| AirDrop | Quick transfer of a few photos, no internet required | Fast, direct, no internet needed, selective transfer | Manual process, requires proximity, can be slow for large numbers of photos |
| USB-C Cable | Large transfers, reliable connection, no internet required | Fast, reliable, no internet needed | Requires cable, manual process |
| Third-Party Apps | Specific features (organization, cloud storage), cross-platform compatibility | Flexible, feature-rich, cross-platform | Requires trusting third-party, potential security risks, may require payment |
7. Optimizing Your Photo Workflow
Once you’ve transferred your photos, here are some tips for optimizing your photo workflow:
- Organize Your Photos: Use the Photos app’s built-in tools to create albums, add keywords, and tag faces.
- Edit Your Photos: Take advantage of the iPad’s powerful photo editing apps like Adobe Lightroom, Affinity Photo, or Snapseed.
- Backup Your Photos: In addition to iCloud, consider using other backup solutions like Google Photos, Dropbox, or an external hard drive.
- Share Your Photos: Share your photos with family and friends via social media, email, or messaging apps.
- Create Photo Projects: Use your photos to create photo books, calendars, or other personalized gifts.
8. Exploring Advanced Techniques
For more advanced users, here are some additional techniques for managing and transferring photos:
- Using Shared Albums: Create shared albums in iCloud to collaborate with others and share photos easily.
- Using Third-Party Cloud Storage: Explore other cloud storage options like Google Photos, Dropbox, or Microsoft OneDrive for additional storage and features.
- Using NAS Devices: Set up a network-attached storage (NAS) device for local storage and backup of your photo library.
- Using Photo Management Software: Consider using photo management software like Adobe Lightroom Classic or Capture One for advanced organization and editing capabilities.
9. Common Mistakes to Avoid
Here are some common mistakes to avoid when transferring photos:
- Not Backing Up Photos: Always back up your photos to multiple locations to prevent data loss.
- Deleting Photos Before Transferring: Make sure you’ve successfully transferred your photos before deleting them from your iPhone.
- Using Unreliable Transfer Methods: Stick to trusted transfer methods like iCloud, AirDrop, or USB-C to ensure your photos are transferred safely and securely.
- Ignoring Storage Limitations: Be aware of storage limitations on your iPhone, iPad, and iCloud account.
- Not Organizing Photos: Take the time to organize your photos to make them easier to find and manage.
10. Keeping Up with the Latest Trends
The world of photography and technology is constantly evolving. Stay up-to-date with the latest trends and best practices by:
- Reading Photography Blogs and Magazines: Follow reputable photography blogs and magazines like Popular Photography, American Photo, or PDN.
- Taking Online Courses: Enroll in online photography courses to improve your skills and learn new techniques.
- Attending Workshops and Seminars: Attend photography workshops and seminars to network with other photographers and learn from industry experts.
- Following Social Media Influencers: Follow influential photographers and photography experts on social media to stay informed about the latest trends.
- Experimenting with New Gear and Software: Try out new cameras, lenses, and software to see how they can improve your photography workflow.
FAQ: Transferring Photos from iPhone to iPad
10.1. Can I transfer photos from iPhone to iPad without iCloud?
Yes, you can transfer photos from iPhone to iPad without iCloud using AirDrop or a USB-C cable.
10.2. How long does it take to transfer photos from iPhone to iPad?
The transfer time depends on the number of photos, the transfer method, and the speed of your internet connection (if using iCloud). AirDrop and USB-C are generally faster than iCloud for large transfers.
10.3. Will transferring photos from iPhone to iPad delete them from my iPhone?
No, transferring photos does not delete them from your iPhone. You need to manually delete them if you want to free up space.
10.4. How do I transfer photos from iPhone to iPad using AirDrop?
Enable AirDrop on both devices, select the photos you want to transfer, tap the Share icon, choose AirDrop, and select your iPad.
10.5. How do I transfer photos from iPhone to iPad using a USB-C cable?
Connect your iPhone to your iPad using a USB-C cable, tap “Trust This Computer” on your iPhone, and import the photos using the Photos app on your iPad.
10.6. What is the best way to transfer photos from iPhone to iPad?
The best method depends on your needs. iCloud is best for automatic syncing, AirDrop is best for quick transfers, and USB-C is best for large transfers.
10.7. Can I transfer videos from iPhone to iPad using the same methods?
Yes, you can transfer videos using iCloud, AirDrop, or a USB-C cable.
10.8. How do I fix AirDrop not working?
Check proximity, Wi-Fi and Bluetooth settings, AirDrop visibility, and restart both devices.
10.9. How do I free up space on my iPhone after transferring photos to my iPad?
You can delete the photos from your iPhone after verifying that they have been successfully transferred to your iPad and backed up.
10.10. What are some alternative cloud storage options for photos?
Google Photos, Dropbox, Microsoft OneDrive, and Amazon Photos are alternative cloud storage options.
Elevate Your Photography Journey with dfphoto.net
Ready to take your photography skills to the next level? Visit dfphoto.net for a wealth of resources, including detailed tutorials, stunning photo galleries, and a vibrant community of fellow photography enthusiasts. Whether you’re looking to master new techniques, find inspiration for your next project, or simply connect with other passionate photographers, dfphoto.net has something for you.
Explore our extensive library of articles covering everything from basic camera settings to advanced post-processing techniques. Discover breathtaking images from talented photographers around the world and get inspired to create your own masterpieces. Join our active community forum to share your work, ask questions, and get feedback from other photographers.
Ready to dive in?
- Browse our tutorials: Learn new skills and techniques to improve your photography.
- Explore our galleries: Discover stunning images and find inspiration for your own work.
- Join our community: Connect with other photographers and share your passion.
Address: 1600 St Michael’s Dr, Santa Fe, NM 87505, United States
Phone: +1 (505) 471-6001
Website: dfphoto.net
Don’t miss out on the opportunity to elevate your photography journey. Visit dfphoto.net today and unlock your full potential!
dfphoto.net: Your gateway to the world of photography.